Master Spark With R

Must Watch!


MustWatch


Chapter 1 Introduction

With information growing at exponential rates, it’s no surprise that historians are referring to this period of history as the Information Age. The increasing speed at which data is being collected has created new opportunities and is certainly poised to create even more. This chapter presents the tools that have been used to solve large-scale data challenges. First, it introduces Apache Spark as a leading tool that is democratizing our ability to process large datasets. With this as a backdrop, we introduce the R computing language, which was specifically designed to simplify data analysis. Finally, this leads us to introduce sparklyr, a project merging R and Spark into a powerful tool that is easily accessible to all. Chapter 2 presents the prerequisites, tools, and steps you need to perform to get Spark and R working on your personal computer. You will learn how to install and initialize Spark, get introduced to common operations, and get your very first data processing and modeling task done. It is the goal of that chapter to help anyone grasp the concepts and tools required to start tackling large-scale data challenges which, until recently, were accessible to just a few organizations. You then move into learning how to analyze large-scale data, followed by building models capable of predicting trends and discover information hidden in vast amounts of information. At which point, you will have the tools required to perform data analysis and modeling at scale. Subsequent chapters help you move away from your local computer into computing clusters required to solve many real world problems. The last chapters present additional topics, like real-time data processing and graph analysis, which you will need to truly master the art of analyzing data at any scale. The last chapter of this book provides you with tools and inspiration to consider contributing back to the Spark and R communities. We hope that this is a journey you will enjoy, that will help you to solve problems in your professional career, and to nudge the world into making better decisions that can benefit us all.

1.1 Overview

Search engines were unable to store all of the web page information required to support web searches in a single computer. This meant that they had to split information into several files and store them across many machines. This approach became known as the Google File System, and was presented in a research paper published in 2003 by Google.

1.2 Hadoop

One year later, Google published a new paper describing how to perform operations across the Google File System, an approach that came to be known as MapReduce. As you would expect, there are two operations in MapReduce: map and reduce. The map operation provides an arbitrary way to transform each file into a new file, whereas the reduce operation combines two files. Both operations require custom computer code, but the MapReduce framework takes care of automatically executing them across many computers at once. These two operations are sufficient to process all the data available on the web, while also providing enough flexibility to extract meaningful information from it. For example, as illustrated in Figure 1.2, we can use MapReduce to count words in two different text files stored in different machines. The map operation splits each word in the original file and outputs a new word-counting file with a mapping of words and counts. The reduce operation can be defined to take two word-counting files and combine them by aggregating the totals for each word; this last file will contain a list of word counts across all the original files. 
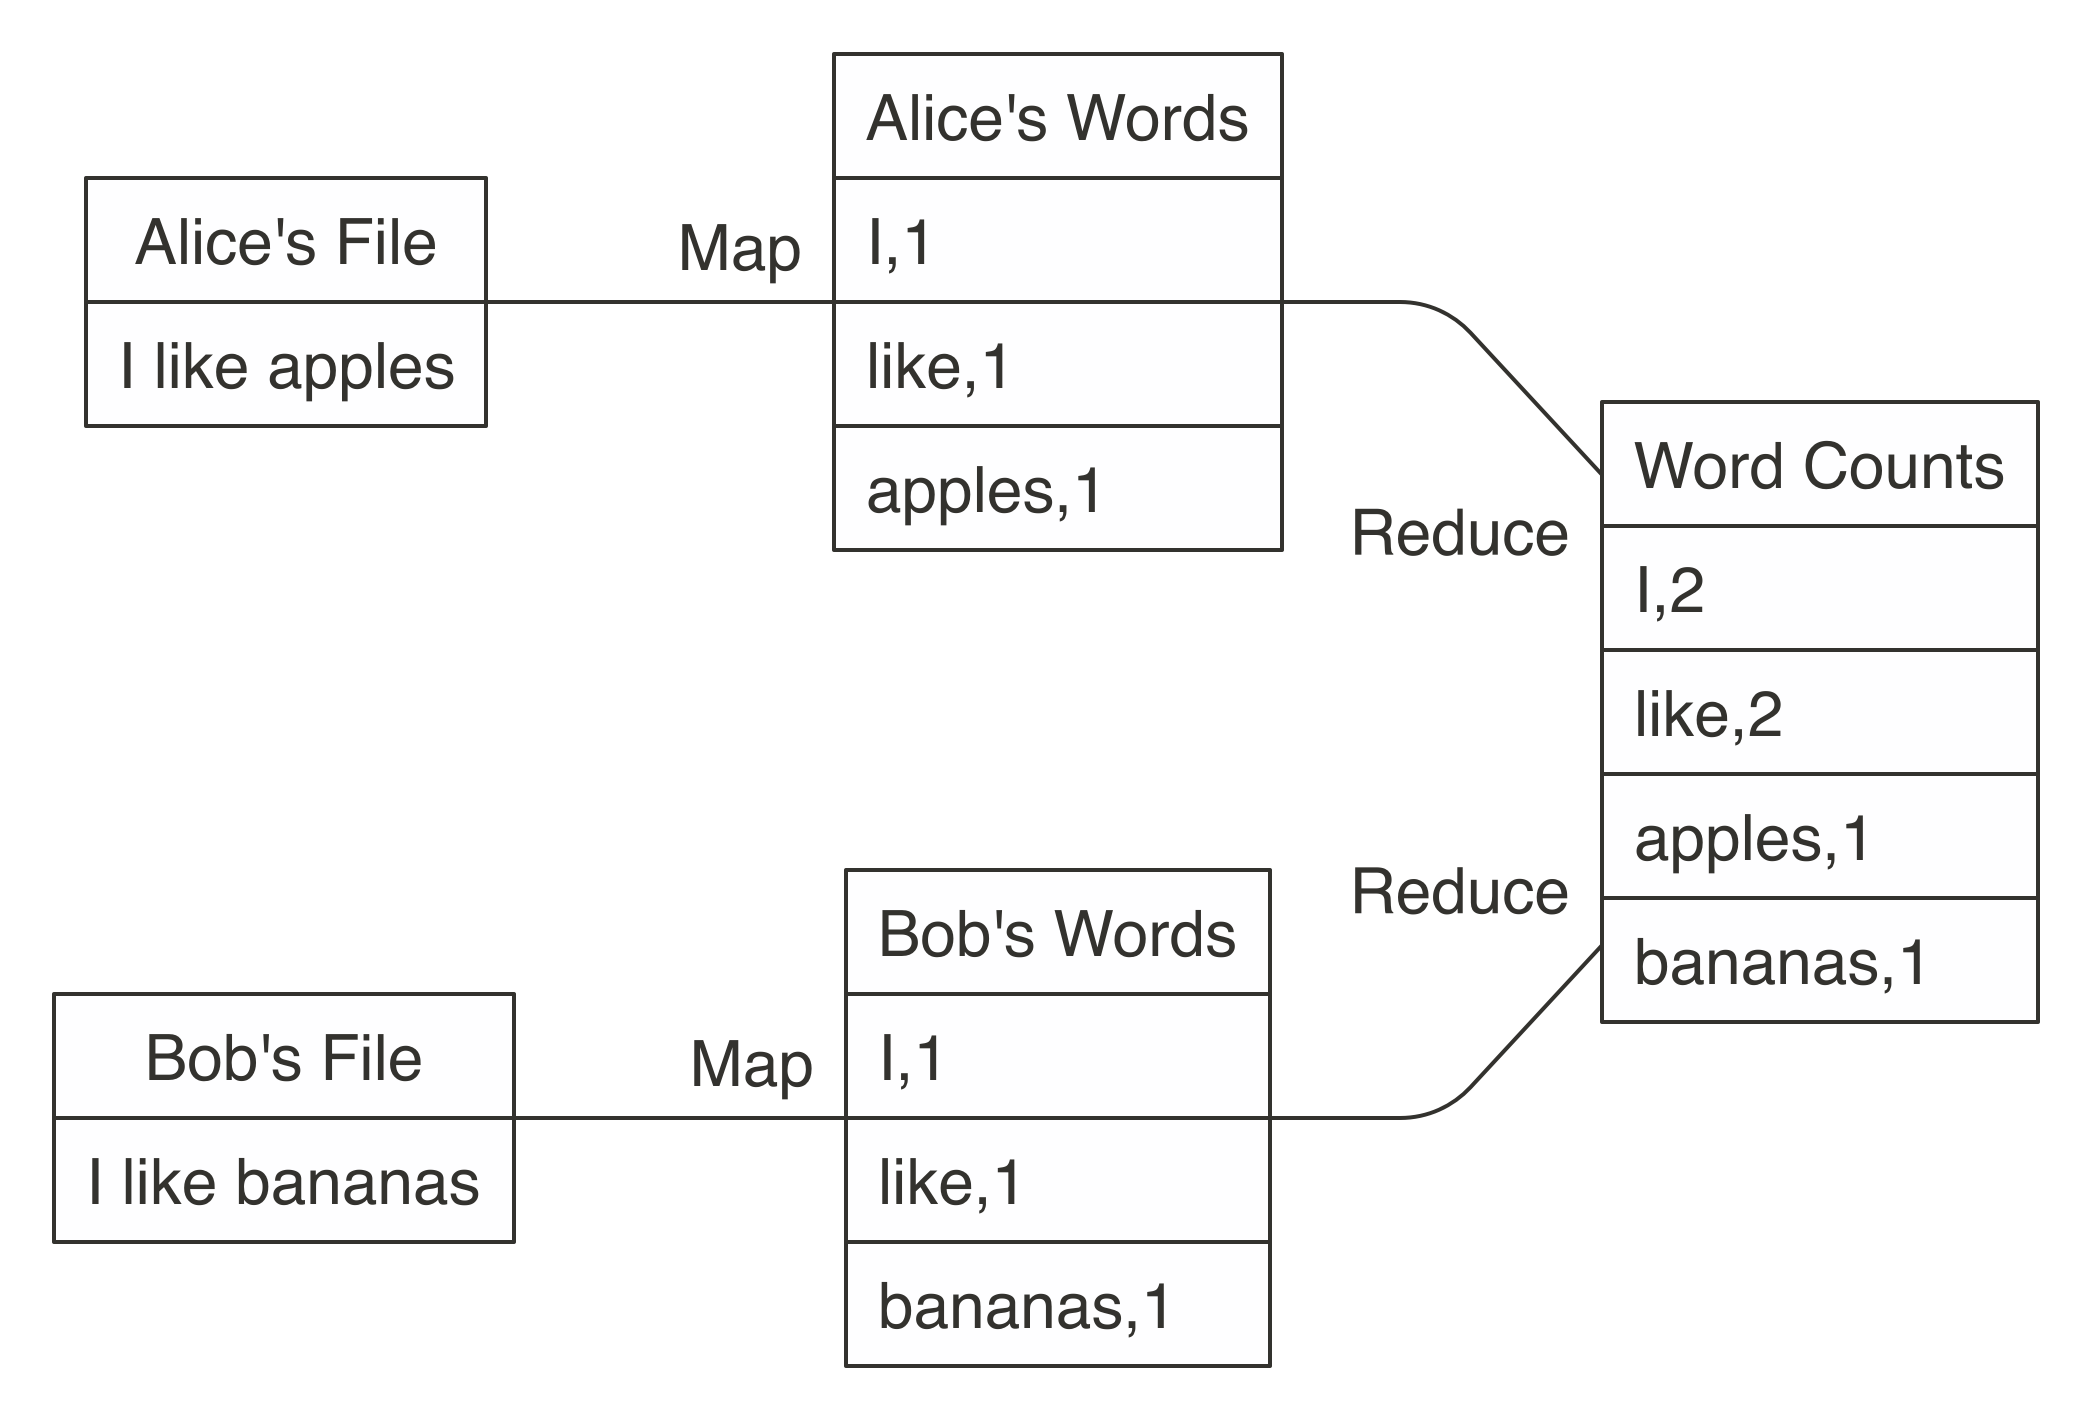
FIGURE 1.2: MapReduce example counting words across files Counting words is often the most basic MapReduce example, but we can also use MapReduce for much more sophisticated and interesting applications. For instance, we can use it to rank web pages in Google’s PageRank algorithm, which assigns ranks to web pages based on the count of hyperlinks linking to a web page and the rank of the page linking to it. After these papers were released by Google, a team at Yahoo worked on implementing the Google File System and MapReduce as a single open source project. This project was released in 2006 as Hadoop, with the Google File System implemented as the Hadoop Distributed File System (HDFS). The Hadoop project made distributed file-based computing accessible to a wider range of users and organizations, making MapReduce useful beyond web data processing. Although Hadoop provided support to perform MapReduce operations over a distributed file system, it still required MapReduce operations to be written with code every time a data analysis was run. To improve upon this tedious process, the Hive project, released in 2008 by Facebook, brought Structured Query Language (SQL) support to Hadoop. This meant that data analysis could now be performed at large scale without the need to write code for each MapReduce operation; instead, one could write generic data analysis statements in SQL, which are much easier to understand and write.

1.3 Spark

In 2009, Apache Spark began as a research project at UC Berkeley’s AMPLab to improve on MapReduce. Specifically, Spark provided a richer set of verbs beyond MapReduce to facilitate optimizing code running in multiple machines. Spark also loaded data in-memory, making operations much faster than Hadoop’s on-disk storage. One of the earliest results showed that running logistic regression, a data modeling technique that we will introduce in Chapter 4, allowed Spark to run 10 times faster than Hadoop by making use of in-memory datasets.. A chart similar to Figure 1.3 was presented in the original research publication. 
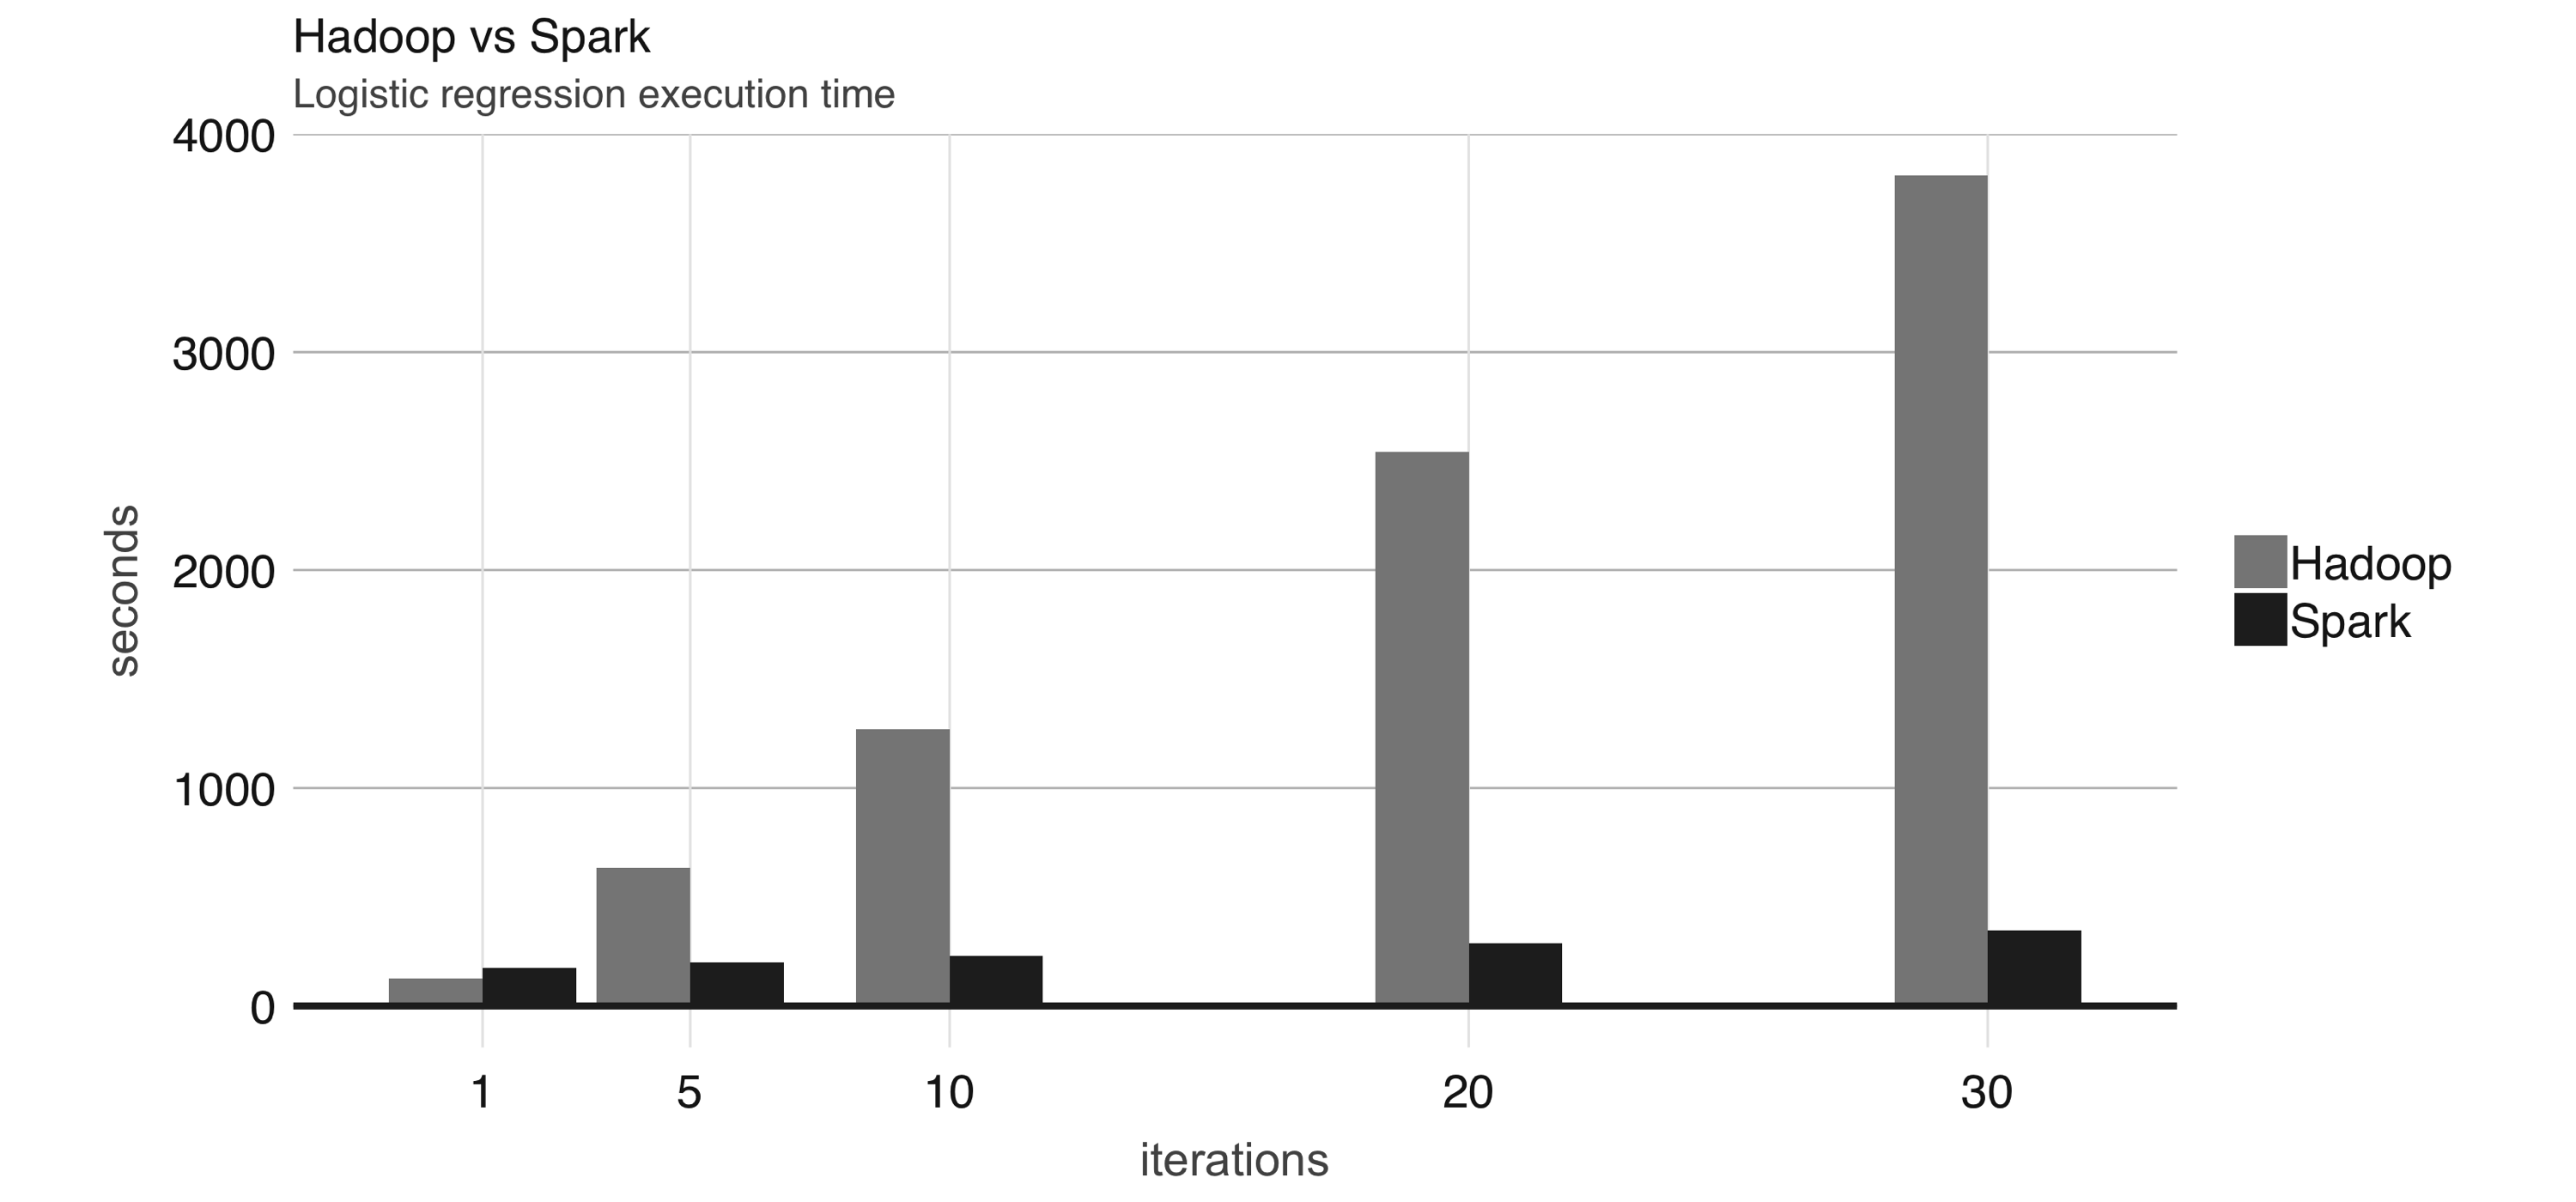
FIGURE 1.3: Logistic regression performance in Hadoop and Spark Even though Spark is well known for its in-memory performance, it was designed to be a general execution engine that works both in-memory and on-disk. For instance, Spark has set sorting, for which data was not loaded in-memory; rather, Spark made improvements in network serialization, network shuffling, and efficient use of the CPU’s cache to dramatically enhance performance. If you needed to sort large amounts of data, there was no other system in the world faster than Spark. To give you a sense of how much faster and efficient Spark is, it takes 72 minutes and 2,100 computers to sort 100 terabytes of data using Hadoop, but only 23 minutes and 206 computers using Spark. In addition, Spark holds the cloud sorting record, which makes it the most cost-effective solution for sorting large-datasets in the cloud.
Hadoop RecordSpark Record
Data Size102.5 TB100 TB
Elapsed Time72 mins23 mins
Nodes2100206
Cores504006592
Disk3150 GB/s618 GB/s
Network10Gbps10Gbps
Sort rate1.42 TB/min4.27 TB/min
Sort rate / node0.67 GB/min20.7 GB/min
Spark is also easier to use than Hadoop; for instance, the word-counting MapReduce example takes about 50 lines of code in Hadoop, but it takes only 2 lines of code in Spark. As you can see, Spark is much faster, more efficient, and easier to use than Hadoop. In 2010, Spark was released as an open source project and then donated to the Apache Software Foundation in 2013. Spark is licensed under Apache 2.0, which allows you to freely use, modify, and distribute it. Spark then reached more than 1,000 contributors, making it one of the most active projects in the Apache Software Foundation. This gives an overview of how Spark came to be, which we can now use to formally introduce Apache Spark as defined on the project’s website: To help us understand this definition of Apache Spark, we break it down as follows:
Unified
Spark supports many libraries, cluster technologies, and storage systems.
Analytics
Analytics is the discovery and interpretation of data to produce and communicate information.
Engine
Spark is expected to be efficient and generic.
Large-Scale
You can interpret large-scale as cluster-scale, a set of connected computers working together. Spark is described as an engine because it’s generic and efficient. It’s generic because it optimizes and executes generic code; that is, there are no restrictions as to what type of code you can write in Spark. It is efficient, because, as we mentioned earlier, Spark much faster than other technologies by making efficient use of memory, network, and CPUs to speed data processing algorithms in computing clusters. This makes Spark ideal in many analytics projects like ranking movies at Netflix, aligning protein sequences, or analyzing high-energy physics at CERN. As a unified platform, Spark is expected to support many cluster technologies and multiple data sources, which you learn about in Chapter 6 and Chapter 8, respectively. It is also expected to support many different libraries like Spark SQL, MLlib, GraphX, and Spark Streaming; libraries that you can use for analysis, modeling, graph processing, and real-time data processing, respectively. In summary, Spark is a platform providing access to clusters, data sources, and libraries for large-scale computing, as illustrated in Figure 1.4. 
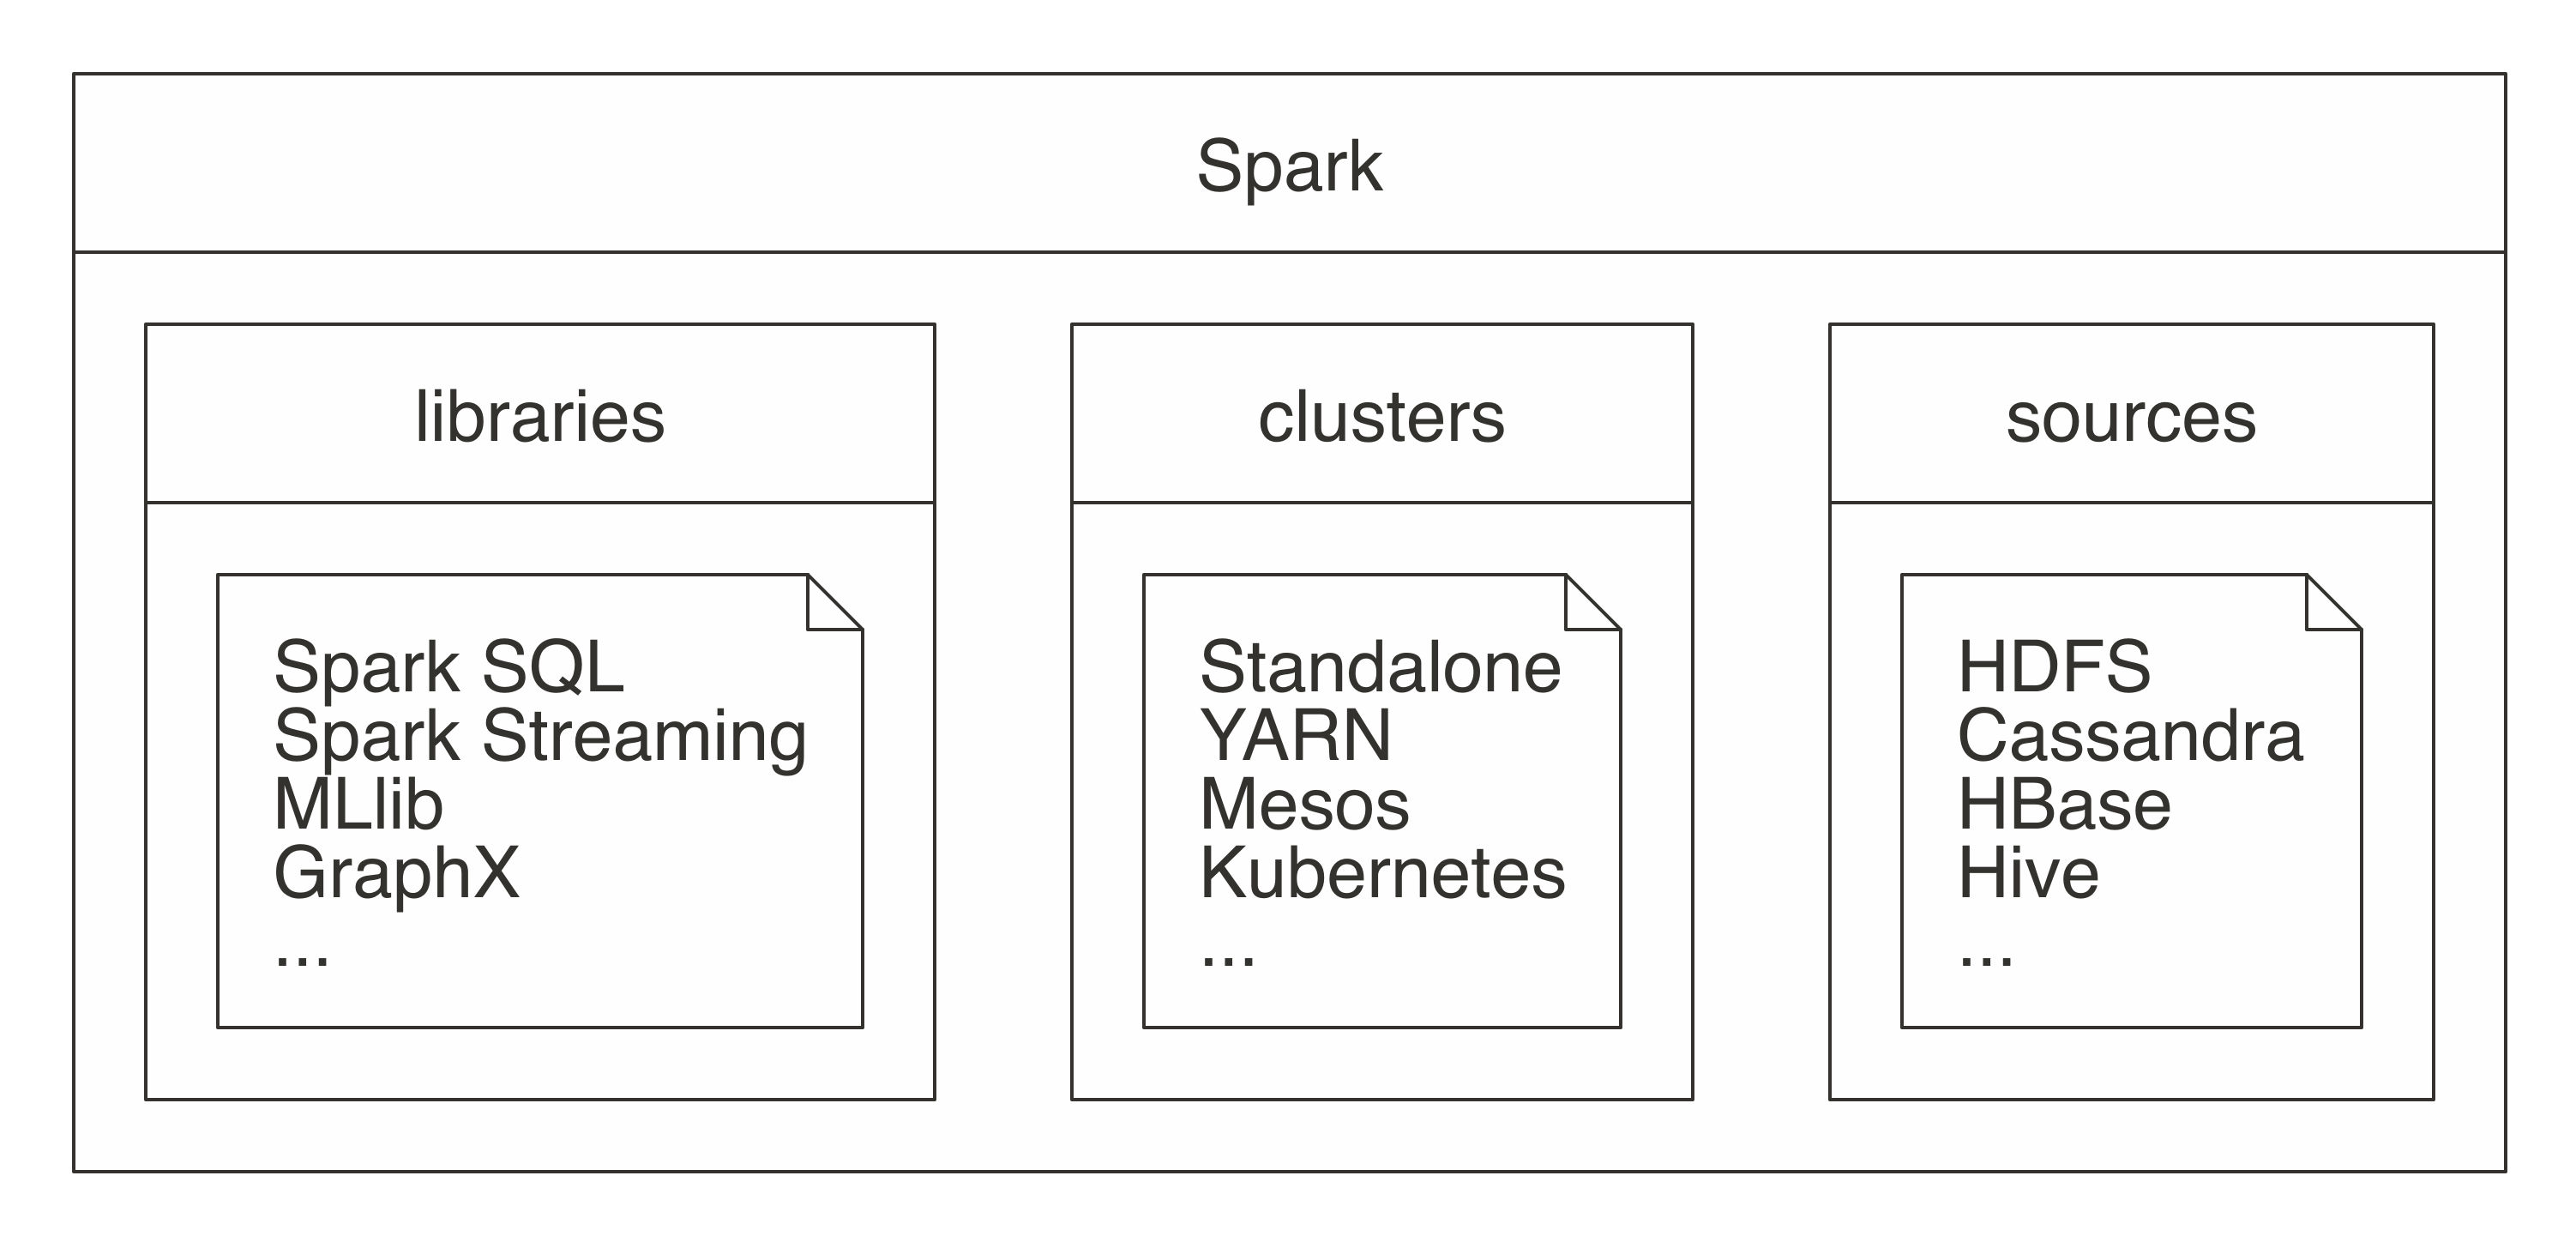
FIGURE 1.4: Spark as a unified analytics engine for large-scale data processing Describing Spark as large scale implies that a good use case for Spark is tackling problems that can be solved with multiple machines. For instance, when data does not fit on a single disk drive or into memory, Spark is a good candidate to consider. However, you can also consider it for problems that might not be large scale, but for which using multiple computers could speed up computation. For instance, CPU-intensive models and scientific simulations also benefit from running in Spark. Therefore, Spark is good at tackling large-scale data-processing problems, usually known as big data (datasets that are more voluminous and complex than traditional ones) but it is also good at tackling large-scale computation problems, known as big compute (tools and approaches using a large amount of CPU and memory resources in a coordinated way). Big data often requires big compute, but big compute does not necessarily require big data. Big data and big compute problems are usually easy to spot—if the data does not fit into a single machine, you might have a big data problem; if the data fits into a single machine but processing it takes days, weeks, or even months to compute, you might have a big compute problem. However, there is also a third problem space for which neither data nor compute is necessarily large scale and yet there are significant benefits to using cluster computing frameworks like Spark. For this third problem space, there are a few use cases:
Velocity
Suppose that you have a dataset of 10 GB and a process that takes 30 minutes to run over this data—this is neither big compute nor big data by any means. However, if you happen to be researching ways to improve the accuracy of your models, reducing the runtime down to three minutes is a significant improvement, which can lead to meaningful advances and productivity gains by increasing the velocity at which you can analyze data. Alternatively, you might need to process data faster—for stock trading, for instance. Whereas three minutes could seem fast enough, it can be far too slow for real-time data processing, for which you might need to process data in a few seconds—or even a few milliseconds.
Variety
You could also have an efficient process to collect data from many sources into a single location, usually a database; this process could be already running efficiently and close to real time. Such processes are known as Extract, Transform, Load (ETL); data is extracted from multiple sources, transformed to the required format, and loaded into a single data store. Although this has worked for years, the trade-off from this approach is that adding a new data source is expensive. Because the system is centralized and tightly controlled, making changes could cause the entire process to halt; therefore, adding new data source usually takes too long to be implemented. Instead, you can store all data in its natural format and process it as needed using cluster computing, an architecture known as a data lake. In addition, storing data in its raw format allows you to process a variety of new file formats like images, audio, and video without having to figure out how to fit them into conventional structured storage systems.
Veracity
When using many data sources, you might find the data quality varies greatly between them, which requires special analysis methods to improve their accuracy. For instance, suppose that you have a table of cities with values like San Francisco, Seattle, and Boston. What happens when data contains a misspelled entry like “Bston”? In a relational database, this invalid entry might be dropped. However, dropping values is not necessarily the best approach in all cases; you might want to correct this field by making use of geocodes, cross-referencing data sources, or attempting a best-effort match. Therefore, understanding and improving the veracity of the original data source can lead to more accurate results. If we include “volume” as a synonym for big data, you get the mnemonic people refer to as the four Vs of big data; others have expanded this to five or even 10 Vs of big data. Mnemonics aside, cluster computing is being used today in more innovative ways, and is not uncommon to see organizations experimenting with new workflows and a variety of tasks that were traditionally uncommon for cluster computing. Much of the hype attributed to big data falls into this space where, strictly speaking, you’re not handling big data, but there are still benefits from using tools designed for big data and big compute. Our hope is that this book will help you to understand the opportunities and limitations of cluster computing and, specifically, the opportunities and limitations of using Apache Spark with R.

1.4 R

The R computing language has its origins in the S language, which was created at Bell Laboratories. Rick Becker explained in useR 2016 that at that time in Bell Labs, computing was done by calling subroutines written in the Fortran language, which, apparently, were not pleasant to deal with. The S computing language was designed as an interface language to solve particular problems without having to worry about other languages, such as Fortran. The creator of S, John Chambers, shows in Figure 1.5 how S was designed to provide an interface that simplifies data processing; his co-creator presented this during useR! 2016 as the original diagram that inspired the creation of S. FIGURE 1.5: Interface language diagram by John Chambers (Rick Becker useR 2016) R is a modern and free implementation of S. Specifically, according to the R Project for Statistical Computing: While working with data, we believe there are two strong arguments for using R:
R Language
R was designed by statisticians for statisticians, meaning that this is one of the few successful languages designed for nonprogrammers, so learning R will probably feel more natural. Additionally, because the R language was designed to be an interface to other tools and languages, R allows you to focus more on understanding data and less on the particulars of computer science and engineering.
R Community
The R community provides a rich package archive provided by the Comprehensive R Archive Network (CRAN), which allows you to install ready-to-use packages to perform many tasks—most notably high-quality data manipulation, visualization, and statistical models, many of which are available only in R. In addition, the R community is a welcoming and active group of talented individuals motivated to help you succeed. Many packages provided by the R community make R, by far, the best option for statistical computing. Some of the most downloaded R packages include: dplyr to manipulate data, cluster to analyze clusters, and ggplot2 to visualize data. Figure 1.6 quantifies the growth of the R community by plotting daily downloads of R packages in CRAN. 
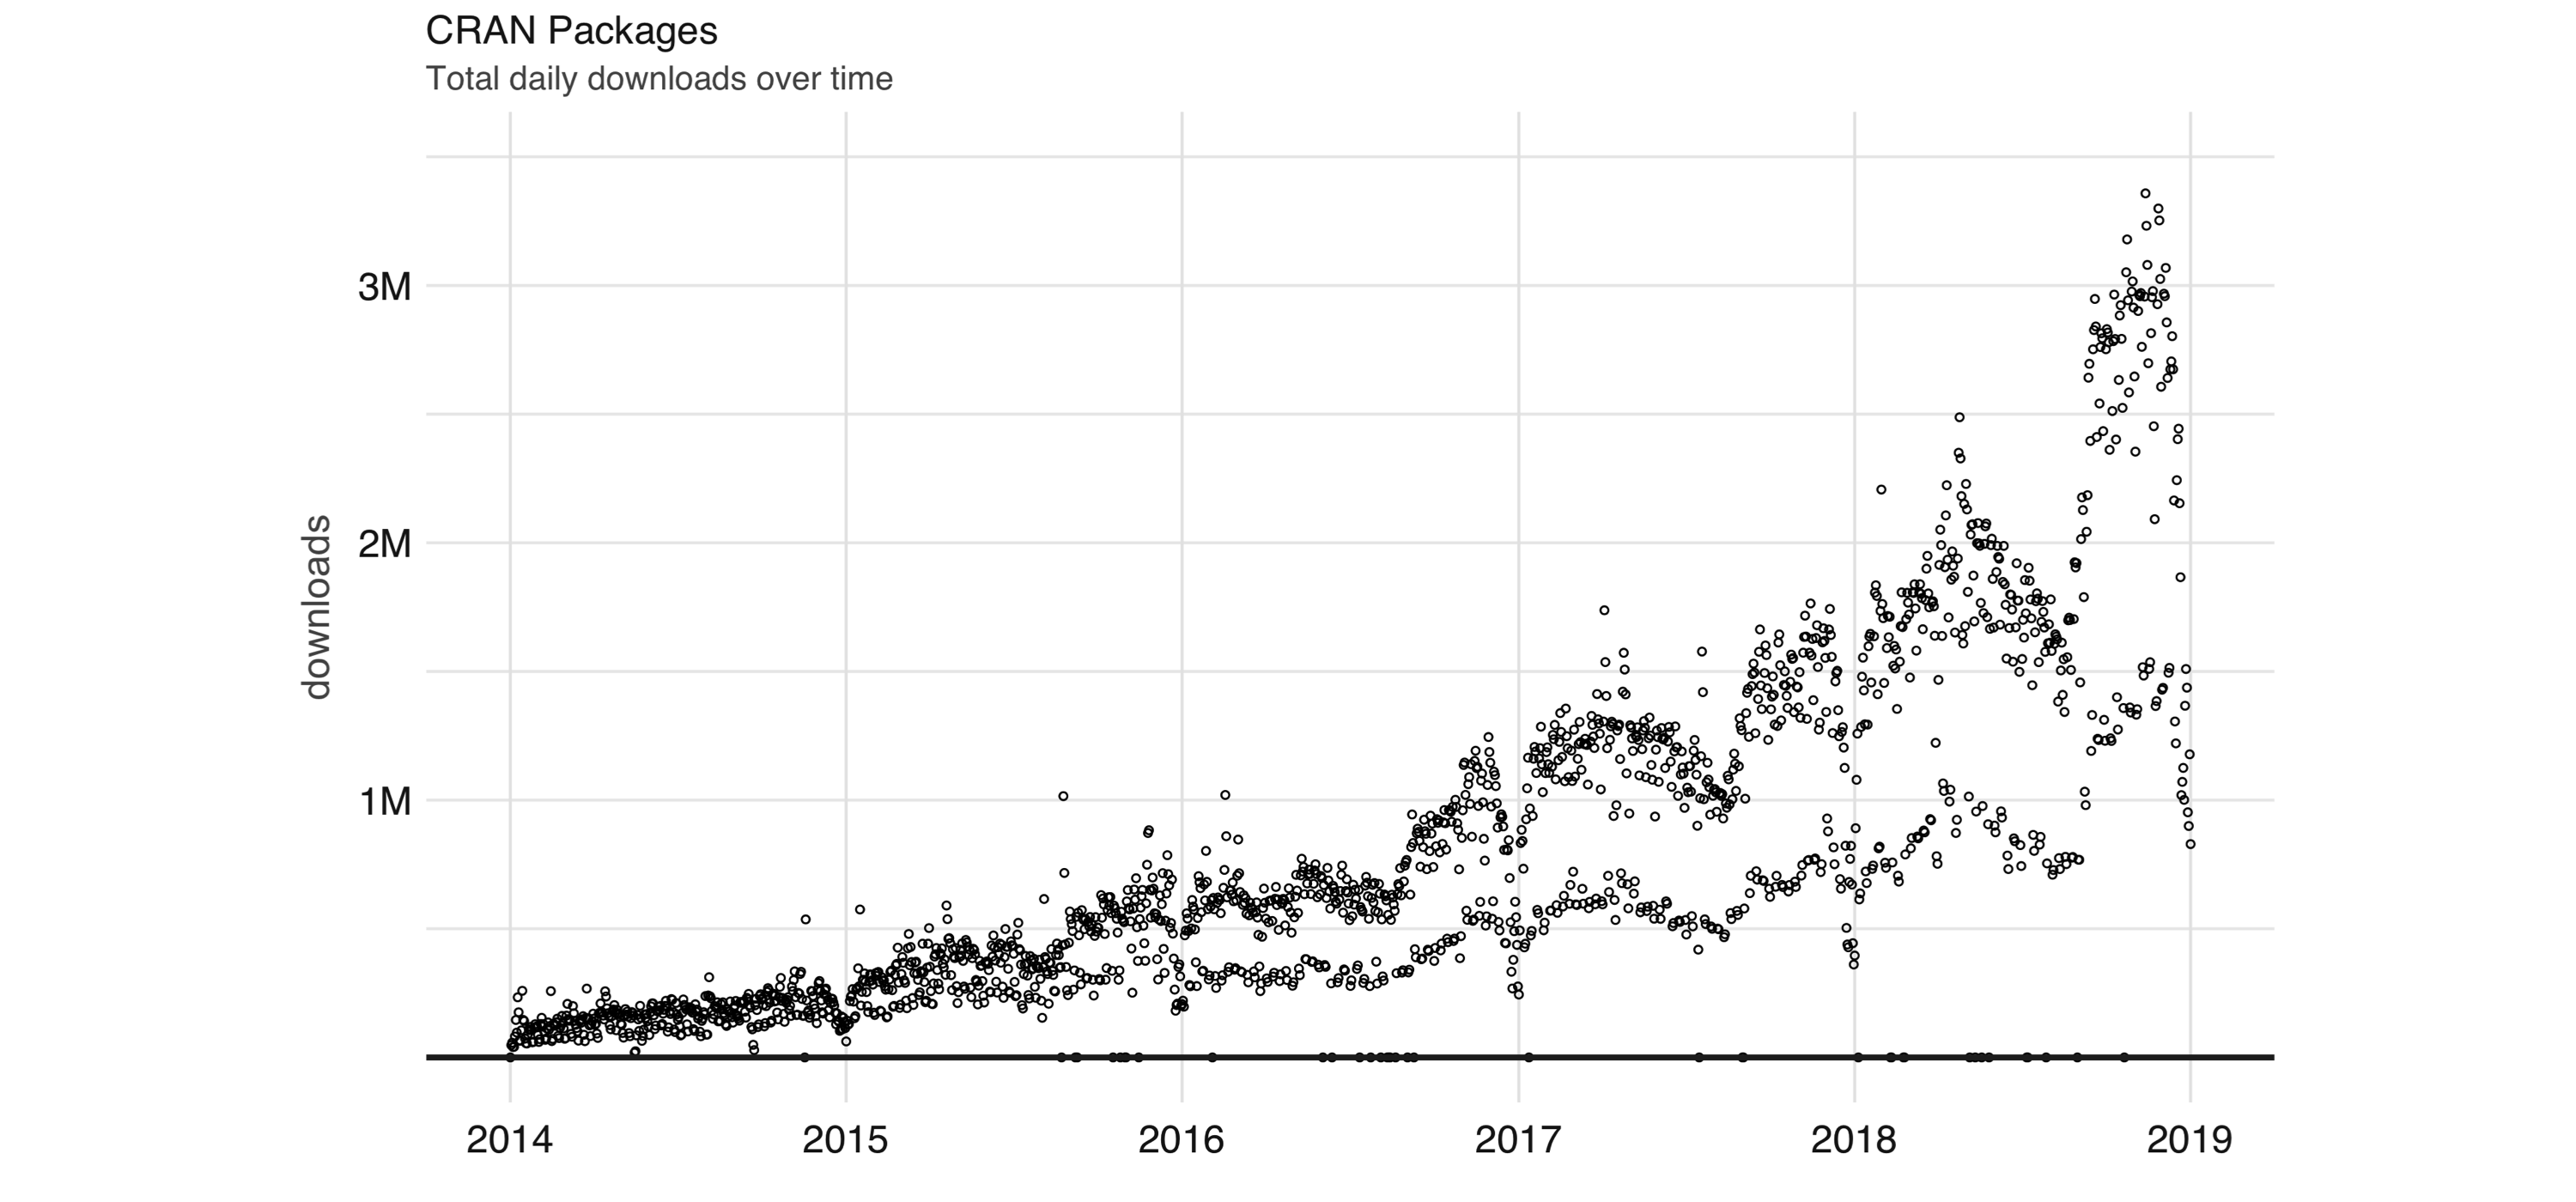
FIGURE 1.6: Daily downloads of CRAN packages Aside from statistics, R is also used in many other fields. The following areas are particularly relevant to this book:
Data Science
Data science is based on knowledge and practices from statistics and computer science that turn raw data into understanding by using data analysis and modeling techniques. Statistical methods provide a solid foundation to understand the world and perform predictions, while the automation provided by computing methods allows us to simplify statistical analysis and make it much more accessible. Some have advocated that statistics should be renamed data science; however, data science goes beyond statistics by also incorporating advances in computing. This book presents analysis and modeling techniques common in statistics but applied to large datasets, which requires incorporating advances in distributed computing.
Machine Learning
Machine learning uses practices from statistics and computer science; however, it is heavily focused on automation and prediction. For instance, Arthur Samuel coined the term machine learning while automating a computer program to play checkers. Although we could perform data science on particular games, writing a program to play checkers requires us to automate the entire process. Therefore, this falls in the realm of machine learning, not data science. Machine learning makes it possible for many users to take advantage of statistical methods without being aware of using them. One of the first important applications of machine learning was to filter spam emails. In this case, it’s just not feasible to perform data analysis and modeling over each email account; therefore, machine learning automates the entire process of finding spam and filtering it out without having to involve users at all. This book presents the methods to transition data science workflows into fully automated machine learning methods—for instance, by providing support to build and export Spark pipelines that can be easily reused in automated environments.
Deep Learning
Deep learning builds on knowledge of statistics, data science, and machine learning to define models loosely inspired by biological nervous systems. Deep learning models evolved from neural network models after the vanishing-gradient problem was resolved by training one layer at a time, and have proven useful in image and speech recognition tasks. For instance, in voice assistants like Siri, Alexa, Cortana, or Google Assistant, the model performing the audio-to-text conversion is most likely based on deep learning models. Although Graphic Processing Units (GPUs) have been successfully used to train deep learning models, some datasets cannot be processed in a single GPU. It is also the case that deep learning models require huge amounts of data, which needs to be preprocessed across many machines before it can be fed into a single GPU for training. This book doesn’t make any direct references to deep learning models; however, you can use the methods we present in this book to prepare data for deep learning and, in the years to come, using deep learning with large-scale computing will become a common practice. In fact, recent versions of Spark have already introduced execution models optimized for training deep learning in Spark. When working in any of the previous fields, you will be faced with increasingly large datasets or increasingly complex computations that are slow to execute or at times even impossible to process in a single computer. However, it is important to understand that Spark does not need to be the answer to all our computations problems; instead, when faced with computing challenges in R, using the following techniques can be as effective:
Sampling
A first approach to try is to reduce the amount of data being handled, through sampling. However, we must sample the data properly by applying sound statistical principles. For instance, selecting the top results is not sufficient in sorted datasets; with simple random sampling, there might be underrepresented groups, which we could overcome with stratified sampling, which in turn adds complexity to properly select categories. It’s beyond the scope of this book to teach how to properly perform statistical sampling, but many resources are available on this topic.
Profiling
You can try to understand why a computation is slow and make the necessary improvements. A profiler is a tool capable of inspecting code execution to help identify bottlenecks. In R, the R profiler, the profvis R package, and RStudio profiler feature allow you to easily to retrieve and visualize a profile; however, it’s not always trivial to optimize.
Scaling Up
Speeding up computation is usually possible by buying faster or more capable hardware (say, increasing your machine memory, upgrading your hard drive, or procuring a machine with many more CPUs); this approach is known as scaling up. However, there are usually hard limits as to how much a single computer can scale up, and even with significant CPUs, you need to find frameworks that parallelize computation efficiently.
Scaling Out
Finally, we can consider spreading computation and storage across multiple machines. This approach provides the highest degree of scalability because you can potentially use an arbitrary number of machines to perform a computation. This approach is commonly known as scaling out. However, spreading computation effectively across many machines is a complex endeavor, especially without using specialized tools and frameworks like Apache Spark. This last point brings us closer to the purpose of this book, which is to bring the power of distributed computing systems provided by Apache Spark to solve meaningful computation problems in data science and related fields, using R.

1.5 sparklyr

When you think of the computation power that Spark provides and the ease of use of the R language, it is natural to want them to work together, seamlessly. This is also what the R community expected: an R package that would provide an interface to Spark that was easy to use, compatible with other R packages, and available in CRAN. With this goal, we started developing sparklyr. The first version, sparklyr 0.4, was released during the useR! 2016 conference. This first version included support for dplyr, DBI, modeling with MLlib, and an extensible API that enabled extensions like H2O’s rsparkling package. Since then, many new features and improvements have been made available through sparklyr 0.5, 0.6, 0.7, 0.8, 0.9 and 1.0. Officially, sparklyr is an R interface for Apache Spark. It’s available in CRAN and works like any other CRAN package, meaning that it’s agnostic to Spark versions, it’s easy to install, it serves the R community, it embraces other packages and practices from the R community, and so on. It’s hosted in GitHub and licensed under Apache 2.0, which allows you to clone, modify, and contribute back to this project. When thinking of who should use sparklyr, the following roles come to mind:
New Users
For new users, it is our belief that sparklyr provides the easiest way to get started with Spark. Our hope is that the early chapters of this book will get you up and running with ease and set you up for long-term success.
Data Scientists
For data scientists who already use and love R, sparklyr integrates with many other R practices and packages like dplyr, magrittr, broom, DBI, tibble, rlang, and many others, which will make you feel at home while working with Spark. For those new to R and Spark, the combination of high-level workflows available in sparklyr and low-level extensibility mechanisms make it a productive environment to match the needs and skills of every data scientist.
Expert Users
For those users who are already immersed in Spark and can write code natively in Scala, consider making your Spark libraries available as an R package to the R community, a diverse and skilled community that can put your contributions to good use while moving open science forward. We wrote this book to describe and teach the exciting overlap between Apache Spark and R. sparklyr is the R package that brings together these communities, expectations, future directions, packages, and package extensions. We believe that there is an opportunity to use this book to bridge the R and Spark communities: to present to the R community why Spark is exciting, and to the Spark community what makes R great. Both communities are solving very similar problems with a set of different skills and backgrounds; therefore, it is our hope that sparklyr can be a fertile ground for innovation, a welcoming place for newcomers, a productive environment for experienced data scientists, and an open community where cluster computing, data science, and machine learning can come together.

1.6 Recap

This chapter presented Spark as a modern and powerful computing platform, R as an easy-to-use computing language with solid foundations in statistical methods, and sparklyr as a project bridging both technologies and communities. In a world in which the total amount of information is growing exponentially, learning how to analyze data at scale will help you to tackle the problems and opportunities humanity is facing today. However, before we start analyzing data, Chapter 2 will equip you with the tools you will need throughout the rest of this book. Be sure to follow each step carefully and take the time to install the recommended tools, which we hope will become familiar resources that you use and love.

Chapter 2 Getting Started

After reading Chapter 1, you should now be familiar with the kinds of problems that Spark can help you solve. And it should be clear that Spark solves problems by making use of multiple computers when data does not fit in a single machine or when computation is too slow. If you are newer to R, it should also be clear that combining Spark with data science tools like ggplot2 for visualization and dplyr to perform data transformations brings a promising landscape for doing data science at scale. We also hope you are excited to become proficient in large-scale computing. In this chapter, we take a tour of the tools you’ll need to become proficient in Spark. We encourage you to walk through the code in this chapter because it will force you to go through the motions of analyzing, modeling, reading, and writing data. In other words, you will need to do some wax-on, wax-off, repeat before you get fully immersed in the world of Spark. In Chapter 3 we dive into analysis followed by modeling, which presents examples using a single-cluster machine: your personal computer. Subsequent chapters introduce cluster computing and the concepts and techniques that you’ll need to successfully run code across multiple machines.

2.1 Overview

From R, getting started with Spark using sparklyr and a local cluster is as easy as installing and loading the sparklyr package followed by installing Spark using sparklyr however, we assume you are starting with a brand new computer running Windows, macOS, or Linux, so we’ll walk you through the prerequisites before connecting to a local Spark cluster. Although this chapter is designed to help you get ready to use Spark on your personal computer, it’s also likely that some readers will already have a Spark cluster available or might prefer to get started with an online Spark cluster. For instance, Databricks hosts a free community edition of Spark that you can easily access from your web browser. If you end up choosing this path, skip to Prerequisites, but make sure you consult the proper resources for your existing or online Spark cluster. Either way, after you are done with the prerequisites, you will first learn how to connect to Spark. We then present the most important tools and operations that you’ll use throughout the rest of this book. Less emphasis is placed on teaching concepts or how to use them—we can’t possibly explain modeling or streaming in a single chapter. However, going through this chapter should give you a brief glimpse of what to expect and give you the confidence that you have the tools correctly configured to tackle more challenging problems later on. The tools you’ll use are mostly divided into R code and the Spark web interface. All Spark operations are run from R; however, monitoring execution of distributed operations is performed from Spark’s web interface, which you can load from any web browser. We then disconnect from this local cluster, which is easy to forget to do but highly recommended while working with local clusters—and in shared Spark clusters as well! We close this chapter by walking you through some of the features that make using Spark with RStudio easier; more specifically, we present the RStudio extensions that sparklyr implements. However, if you are inclined to use Jupyter Notebooks or if your cluster is already equipped with a different R user interface, rest assured that you can use Spark with R through plain R code. Let’s move along and get your prerequisites properly configured.

2.2 Prerequisites

R can run in many platforms and environments; therefore, whether you use Windows, Mac, or Linux, the first step is to install R from r-project.org; detailed instructions are provided in Installing R. Most people use programming languages with tools to make them more productive; for R, RStudio is such a tool. Strictly speaking, RStudio is an integrated development environment (IDE), which also happens to support many platforms and environments. We strongly recommend you install RStudio if you haven’t done so already; see details in Using RStudio. Tip: When using Windows, we recommend avoiding directories with spaces in their path. If running getwd() from R returns a path with spaces, consider switching to a path with no spaces using setwd("path") or by creating an RStudio project in a path with no spaces. Additionally, because Spark is built in the Scala programming language, which is run by the Java Virtual Machine (JVM), you also need to install Java 8 on your system. It is likely that your system already has Java installed, but you should still check the version and update or downgrade as described in Installing Java. You can use the following R command to check which version is installed on your system: system("java -version") java version "1.8.0_201" Java(TM) SE Runtime Environment (build 1.8.0_201-b09) Java HotSpot(TM) 64-Bit Server VM (build 25.201-b09, mixed mode) You can also use the JAVA_HOME environment variable to point to a specific Java version by running Sys.setenv(JAVA_HOME = "path-to-java-8"); either way, before moving on to installing sparklyr, make sure that Java 8 is the version available for R.

2.2.1 Installing sparklyr

As with many other R packages, you can install sparklyr from CRAN as follows: install.packages("sparklyr") The examples in this book assume you are using the latest version of sparklyr. You can verify your version is as new as the one we are using by running the following: packageVersion("sparklyr") [1] ‘1.0.2’

2.2.2 Installing Spark

Start by loading sparklyr: library(sparklyr) This makes all sparklyr functions available in R, which is really helpful; otherwise, you would need to run each sparklyr command prefixed with sparklyr::. You can easily install Spark by running spark_install(). This downloads, installs, and configures the latest version of Spark locally on your computer; however, because we’ve written this book with Spark 2.3, you should also install this version to make sure that you can follow all the examples provided without any surprises: spark_install("2.3") You can display all of the versions of Spark that are available for installation by running the following: spark_available_versions() ## spark ## 1 1.6 ## 2 2.0 ## 3 2.1 ## 4 2.2 ## 5 2.3 ## 6 2.4 You can install a specific version by using the Spark version and, optionally, by also specifying the Hadoop version. For instance, to install Spark 1.6.3, you would run: spark_install(version = "1.6") You can also check which versions are installed by running this command: spark_installed_versions() spark hadoop dir 7 2.3.1 2.7 /spark/spark-2.3.1-bin-hadoop2.7 The path where Spark is installed is known as Spark’s home, which is defined in R code and system configuration settings with the SPARK_HOME identifier. When you are using a local Spark cluster installed with sparklyr, this path is already known and no additional configuration needs to take place. Finally, to uninstall a specific version of Spark you can run spark_uninstall() by specifying the Spark and Hadoop versions, like so: spark_uninstall(version = "1.6.3", hadoop = "2.6") Note: The default installation paths are ~/spark for macOS and Linux, and %LOCALAPPDATA%/spark for Windows. To customize the installation path, you can run options(spark.install.dir = "installation-path") before spark_install() and spark_connect().

2.3 Connecting

It’s important to mention that, so far, we’ve installed only a local Spark cluster. A local cluster is really helpful to get started, test code, and troubleshoot with ease. Later chapters explain where to find, install, and connect to real Spark clusters with many machines, but for the first few chapters, we focus on using local clusters. To connect to this local cluster, simply run the following: library(sparklyr) sc <- spark_connect(master = "local", version = "2.3") Note: If you are using your own or online Spark cluster, make sure that you connect as specified by your cluster administrator or the online documentation. If you need some pointers, you can take a quick look at Chapter 7, which explains in detail how to connect to any Spark cluster. The master parameter identifies which is the “main” machine from the Spark cluster; this machine is often called the driver node. While working with real clusters using many machines, you’ll find that most machines will be worker machines and one will be the master. Since we have only a local cluster with just one machine, we will default to using "local" for now. After a connection is established, spark_connect() retrieves an active Spark connection, which most code usually names sc; you will then make use of sc to execute Spark commands. If the connection fails, Chapter 7 contains a troubleshooting section that can help you to resolve your connection issue.

2.4 Using Spark

Now that you are connected, we can run a few simple commands. For instance, let’s start by copying the mtcars dataset into Apache Spark by using copy_to(): cars <- copy_to(sc, mtcars) The data was copied into Spark, but we can access it from R using the cars reference. To print its contents, we can simply type *cars*: cars # Source: spark<mtcars> [?? x 11] mpg cyl disp hp drat wt qsec vs am gear carb <dbl> <dbl> <dbl> <dbl> <dbl> <dbl> <dbl> <dbl> <dbl> <dbl> <dbl> 1 21 6 160 110 3.9 2.62 16.5 0 1 4 4 2 21 6 160 110 3.9 2.88 17.0 0 1 4 4 3 22.8 4 108 93 3.85 2.32 18.6 1 1 4 1 4 21.4 6 258 110 3.08 3.22 19.4 1 0 3 1 5 18.7 8 360 175 3.15 3.44 17.0 0 0 3 2 6 18.1 6 225 105 2.76 3.46 20.2 1 0 3 1 7 14.3 8 360 245 3.21 3.57 15.8 0 0 3 4 8 24.4 4 147. 62 3.69 3.19 20 1 0 4 2 9 22.8 4 141. 95 3.92 3.15 22.9 1 0 4 2 10 19.2 6 168. 123 3.92 3.44 18.3 1 0 4 4 # … with more rows Congrats! You have successfully connected and loaded your first dataset into Spark. Let’s explain what’s going on in copy_to(). The first parameter, sc, gives the function a reference to the active Spark connection that was created earlier with spark_connect(). The second parameter specifies a dataset to load into Spark. Now, copy_to() returns a reference to the dataset in Spark, which R automatically prints. Whenever a Spark dataset is printed, Spark collects some of the records and displays them for you. In this particular case, that dataset contains only a few rows describing automobile models and some of their specifications like horsepower and expected miles per gallon.

2.4.1 Web Interface

Most of the Spark commands are executed from the R console; however, monitoring and analyzing execution is done through Spark’s web interface, shown in Figure 2.1. This interface is a web application provided by Spark that you can access by running: spark_web(sc) 
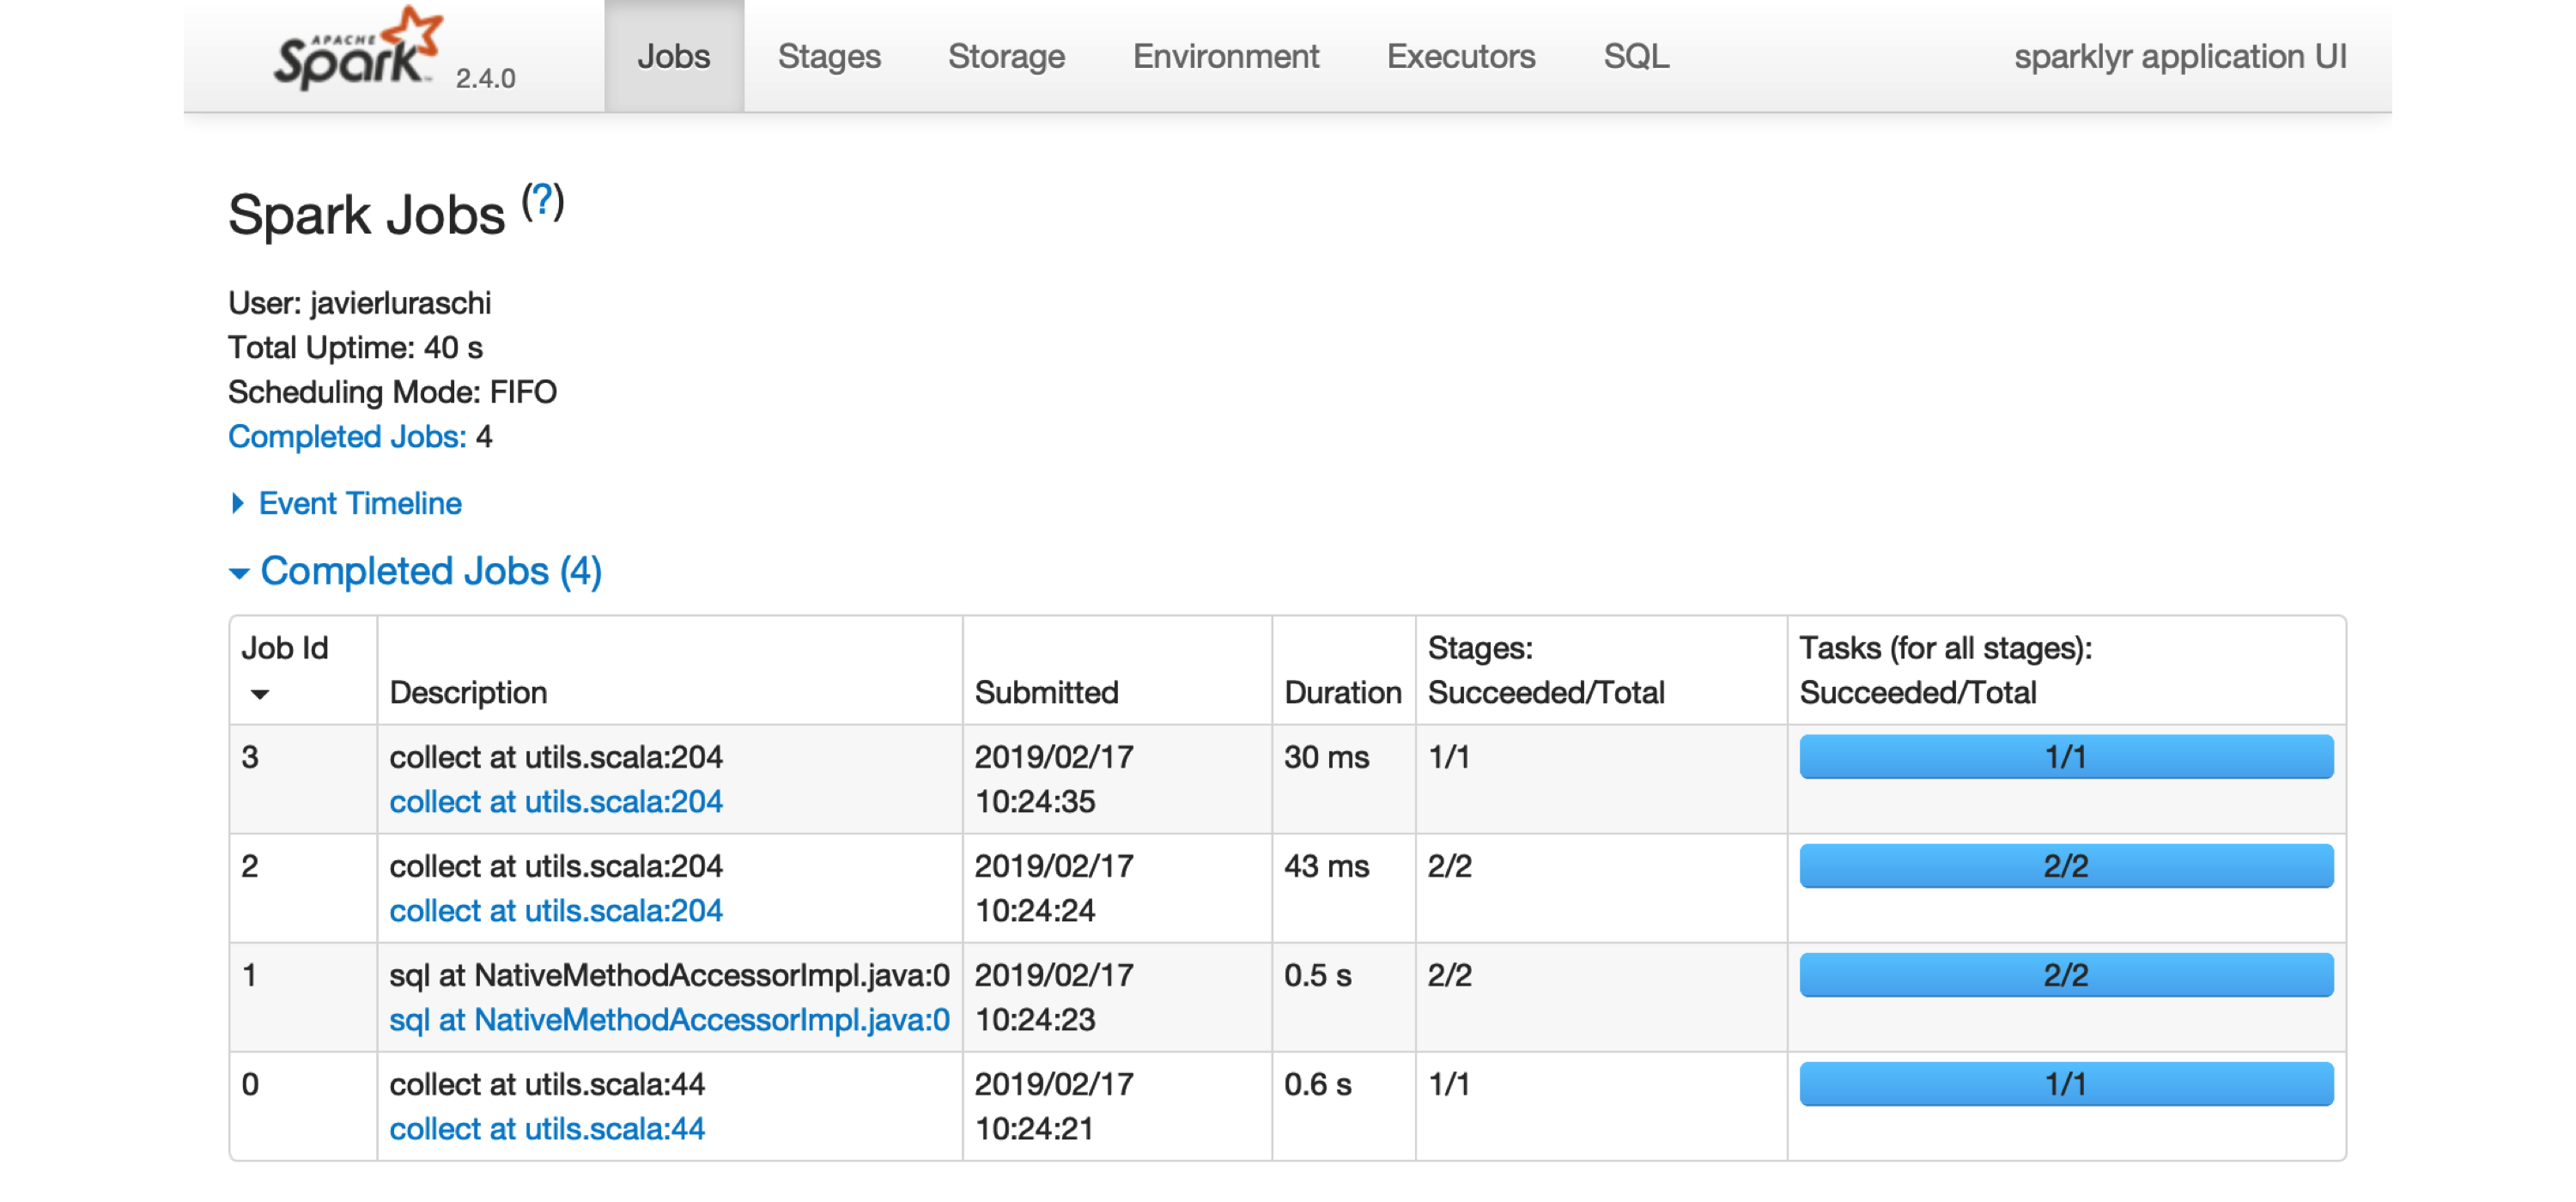
FIGURE 2.1: The Apache Spark web interface Printing the cars dataset collected a few records to be displayed in the R console. You can see in the Spark web interface that a job was started to collect this information back from Spark. You can also select the Storage tab to see the mtcars dataset cached in memory in Spark, as shown in Figure 2.2. 
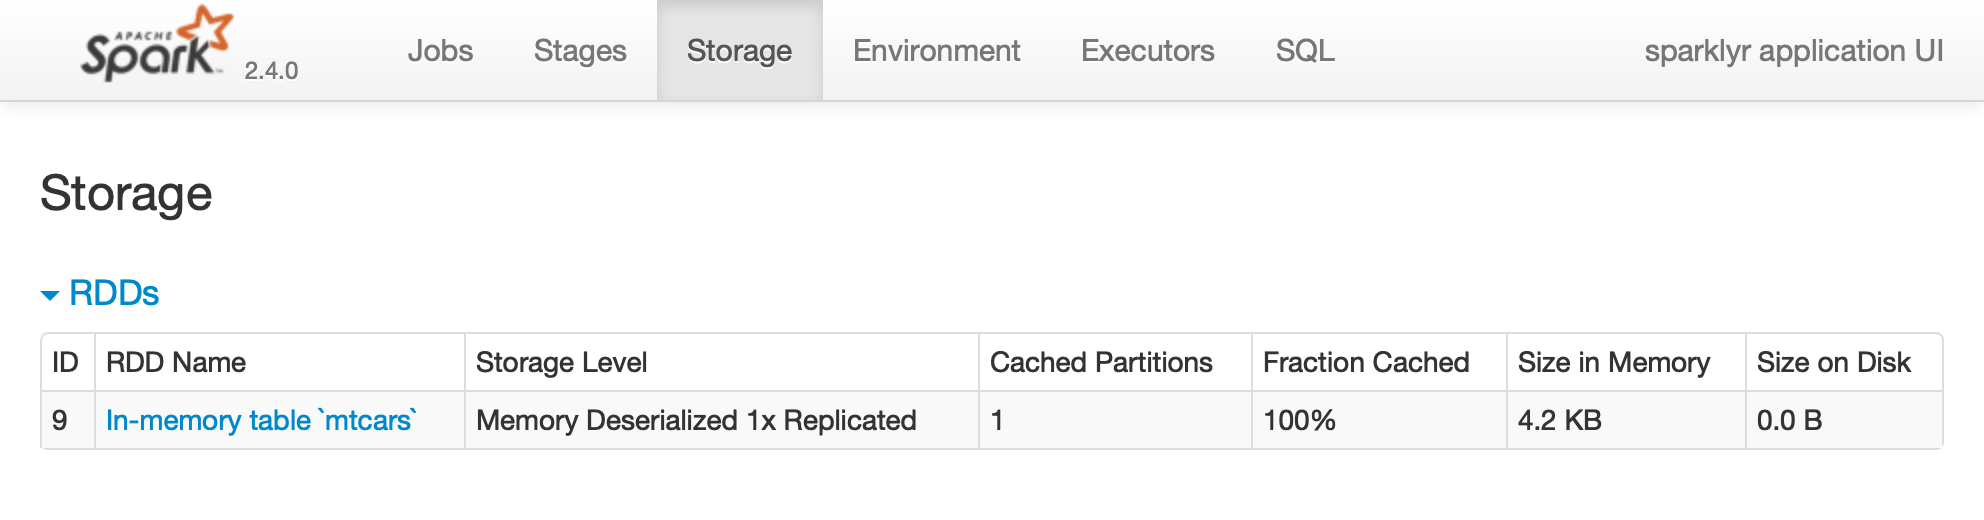
FIGURE 2.2: The Storage tab on the Apache Spark web interface Notice that this dataset is fully loaded into memory, as indicated by the Fraction Cached column, which shows 100%; thus, you can see exactly how much memory this dataset is using through the Size in Memory column. The Executors tab, shown in Figure 2.3, provides a view of your cluster resources. For local connections, you will find only one executor active with only 2 GB of memory allocated to Spark, and 384 MB available for computation. In Chapter 9 you will learn how to request more compute instances and resources, and how memory is allocated. FIGURE 2.3: The Executors tab on the Apache Spark web interface The last tab to explore is the Environment tab, shown in Figure 2.4; this tab lists all of the settings for this Spark application, which we look at in Chapter 9. As you will learn, most settings don’t need to be configured explicitly, but to properly run them at scale, you need to become familiar with some of them, eventually. FIGURE 2.4: The Environment tab on the Apache Spark web interface Next, you will make use of a small subset of the practices that we cover in depth in Chapter 3.

2.4.2 Analysis

When using Spark from R to analyze data, you can use SQL (Structured Query Language) or dplyr (a grammar of data manipulation). You can use SQL through the DBI package; for instance, to count how many records are available in our cars dataset, we can run the following: library(DBI) dbGetQuery(sc, "SELECT count(*) FROM mtcars") count(1) 1 32 When using dplyr, you write less code, and it’s often much easier to write than SQL. This is precisely why we won’t make use of SQL in this book; however, if you are proficient in SQL, this is a viable option for you. For instance, counting records in dplyr is more compact and easier to understand: library(dplyr) count(cars) # Source: spark<?> [?? x 1] n <dbl> 1 32 In general, we usually start by analyzing data in Spark with dplyr, followed by sampling rows and selecting a subset of the available columns. The last step is to collect data from Spark to perform further data processing in R, like data visualization. Let’s perform a very simple data analysis example by selecting, sampling, and plotting the cars dataset in Spark: select(cars, hp, mpg) %>% sample_n(100) %>% collect() %>% plot() 
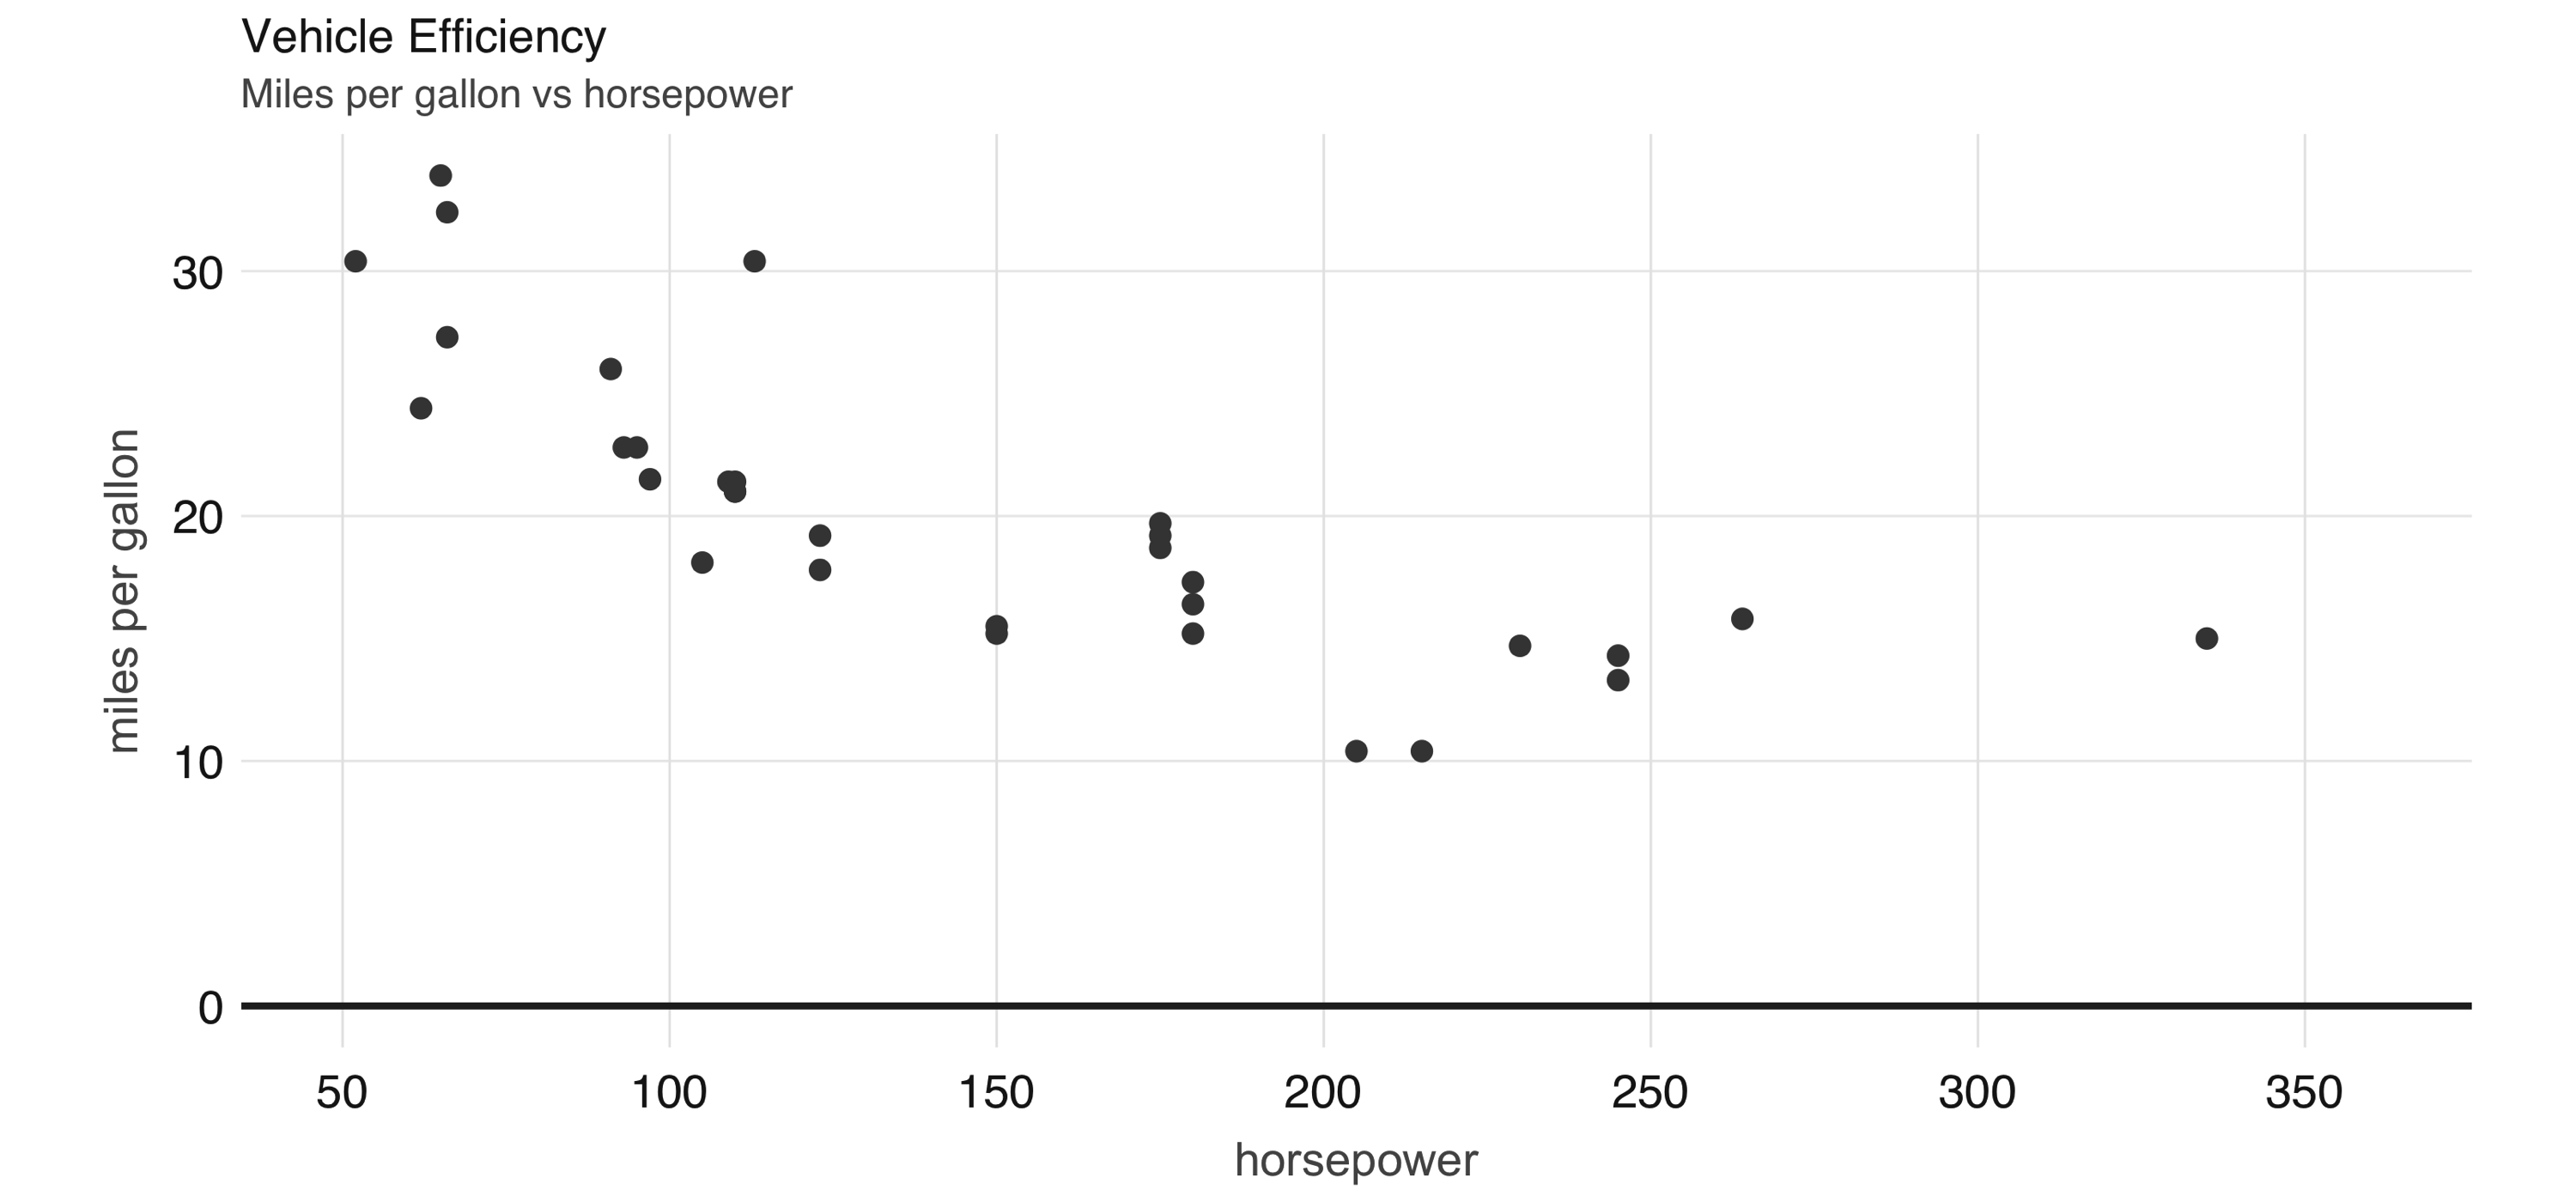
FIGURE 2.5: Horsepower versus miles per gallon The plot in Figure 2.5, shows that as we increase the horsepower in a vehicle, its fuel efficiency measured in miles per gallon decreases. Although this is insightful, it’s difficult to predict numerically how increased horsepower would affect fuel efficiency. Modeling can help us overcome this.

2.4.3 Modeling

Although data analysis can take you quite far toward understanding data, building a mathematical model that describes and generalizes the dataset is quite powerful. In Chapter 1 you learned that the fields of machine learning and data science make use of mathematical models to perform predictions and find additional insights. For instance, we can use a linear model to approximate the relationship between fuel efficiency and horsepower: model <- ml_linear_regression(cars, mpg ~ hp) model Formula: mpg ~ hp Coefficients: (Intercept) hp 30.09886054 -0.06822828 Now we can use this model to predict values that are not in the original dataset. For instance, we can add entries for cars with horsepower beyond 250 and also visualize the predicted values, as shown in Figure 2.6. model %>% ml_predict(copy_to(sc, data.frame(hp = 250 + 10 * 1:10))) %>% transmute(hp = hp, mpg = prediction) %>% full_join(select(cars, hp, mpg)) %>% collect() %>% plot() 
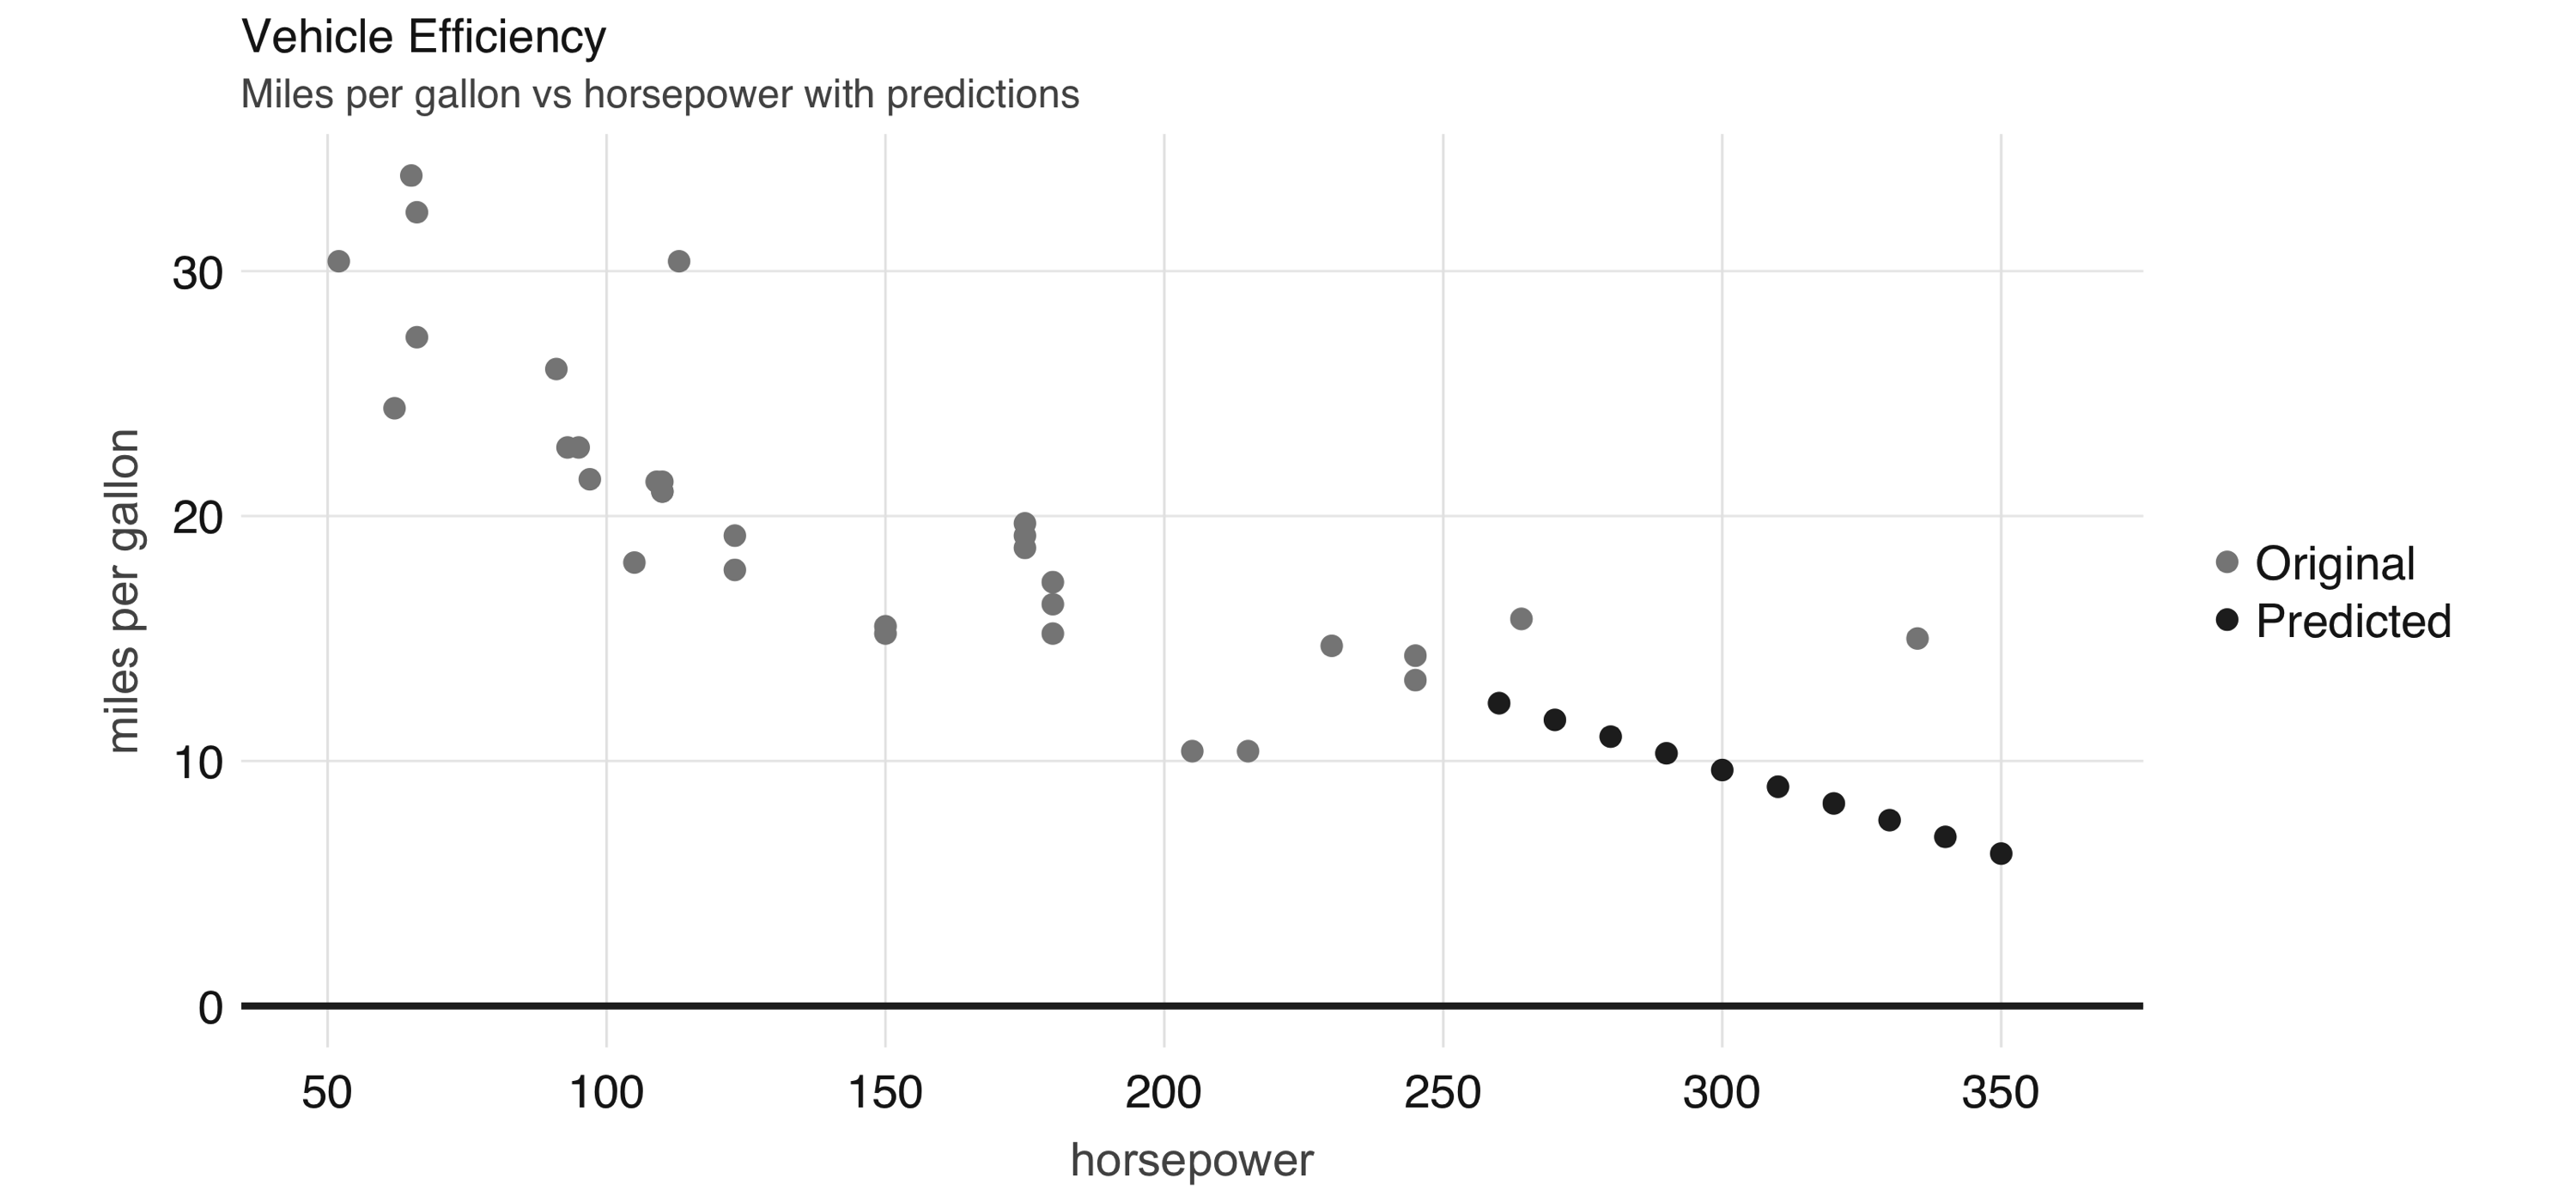
FIGURE 2.6: Horsepower versus miles per gallon with predictions Even though the previous example lacks many of the appropriate techniques that you should use while modeling, it’s also a simple example to briefly introduce the modeling capabilities of Spark. We introduce all of the Spark models, techniques, and best practices in Chapter 4.

2.4.4 Data

For simplicity, we copied the mtcars dataset into Spark; however, data is usually not copied into Spark. Instead, data is read from existing data sources in a variety of formats, like plain text, CSV, JSON, Java Database Connectivity (JDBC), and many more, which we examine in detail in Chapter 8. For instance, we can export our cars dataset as a CSV file: spark_write_csv(cars, "cars.csv") In practice, we would read an existing dataset from a distributed storage system like HDFS, but we can also read back from the local file system: cars <- spark_read_csv(sc, "cars.csv")

2.4.5 Extensions

In the same way that R is known for its vibrant community of package authors, at a smaller scale, many extensions for Spark and R have been written and are available to you. Chapter 10 introduces many interesting ones to perform advanced modeling, graph analysis, preprocessing of datasets for deep learning, and more. For instance, the sparkly.nested extension is an R package that extends sparklyr to help you manage values that contain nested information. A common use case involves JSON files that contain nested lists that require preprocessing before you can do meaningful data analysis. To use this extension, we first need to install it as follows: install.packages("sparklyr.nested") Then, we can use the sparklyr.nested extension to group all of the horsepower data points over the number of cylinders: sparklyr.nested::sdf_nest(cars, hp) %>% group_by(cyl) %>% summarise(data = collect_list(data)) # Source: spark<?> [?? x 2] cyl data <int> <list> 1 6 <list [7]> 2 4 <list [11]> 3 8 <list [14]> Even though nesting data makes it more difficult to read, it is a requirement when you are dealing with nested data formats like JSON using the spark_read_json() and spark_write_json() functions.

2.4.6 Distributed R

For those few cases when a particular functionality is not available in Spark and no extension has been developed, you can consider distributing your own R code across the Spark cluster. This is a powerful tool, but it comes with additional complexity, so you should only use it as a last resort. Suppose that we need to round all of the values across all the columns in our dataset. One approach would be running custom R code, making use of R’s round() function: cars %>% spark_apply(~round(.x)) # Source: spark<?> [?? x 11] mpg cyl disp hp drat wt qsec vs am gear carb <dbl> <dbl> <dbl> <dbl> <dbl> <dbl> <dbl> <dbl> <dbl> <dbl> <dbl> 1 21 6 160 110 4 3 16 0 1 4 4 2 21 6 160 110 4 3 17 0 1 4 4 3 23 4 108 93 4 2 19 1 1 4 1 4 21 6 258 110 3 3 19 1 0 3 1 5 19 8 360 175 3 3 17 0 0 3 2 6 18 6 225 105 3 3 20 1 0 3 1 7 14 8 360 245 3 4 16 0 0 3 4 8 24 4 147 62 4 3 20 1 0 4 2 9 23 4 141 95 4 3 23 1 0 4 2 10 19 6 168 123 4 3 18 1 0 4 4 # … with more rows If you are a proficient R user, it can be quite tempting to use spark_apply() for everything, but please, don’t! spark_apply() was designed for advanced use cases where Spark falls short. You will learn how to do proper data analysis and modeling without having to distribute custom R code across your cluster.

2.4.7 Streaming

While processing large static datasets is the most typical use case for Spark, processing dynamic datasets in real time is also possible and, for some applications, a requirement. You can think of a streaming dataset as a static data source with new data arriving continuously, like stock market quotes. Streaming data is usually read from Kafka (an open source stream-processing software platform) or from distributed storage that receives new data continuously. To try out streaming, let’s first create an input/ folder with some data that we will use as the input for this stream: dir.create("input") write.csv(mtcars, "input/cars_1.csv", row.names = F) Then, we define a stream that processes incoming data from the input/ folder, performs a custom transformation in R, and pushes the output into an output/ folder: stream <- stream_read_csv(sc, "input/") %>% select(mpg, cyl, disp) %>% stream_write_csv("output/") As soon as the stream of real-time data starts, the input/ folder is processed and turned into a set of new files under the output/ folder containing the new transformed files. Since the input contained only one file, the output folder will also contain a single file resulting from applying the custom spark_apply() transformation. dir("output", pattern = ".csv") [1] "part-00000-eece04d8-7cfa-4231-b61e-f1aef8edeb97-c000.csv" Up to this point, this resembles static data processing; however, we can keep adding files to the input/ location, and Spark will parallelize and process data automatically. Let’s add one more file and validate that it’s automatically processed: # Write more data into the stream source write.csv(mtcars, "input/cars_2.csv", row.names = F) Wait a few seconds and validate that the data is processed by the Spark stream: # Check the contents of the stream destination dir("output", pattern = ".csv") [1] "part-00000-2d8e5c07-a2eb-449d-a535-8a19c671477d-c000.csv" [2] "part-00000-eece04d8-7cfa-4231-b61e-f1aef8edeb97-c000.csv" You should then stop the stream: stream_stop(stream) You can use dplyr, SQL, Spark models, or distributed R to analyze streams in real time. In Chapter 12 we properly introduce you to all the interesting transformations you can perform to analyze real-time data.

2.4.8 Logs

Logging is definitely less interesting than real-time data processing; however, it’s a tool you should be or become familiar with. A log is just a text file to which Spark appends information relevant to the execution of tasks in the cluster. For local clusters, we can retrieve all the recent logs by running the following: spark_log(sc) 18/10/09 19:41:46 INFO Executor: Finished task 0.0 in stage 5.0 (TID 5)... 18/10/09 19:41:46 INFO TaskSetManager: Finished task 0.0 in stage 5.0... 18/10/09 19:41:46 INFO TaskSchedulerImpl: Removed TaskSet 5.0, whose... 18/10/09 19:41:46 INFO DAGScheduler: ResultStage 5 (collect at utils... 18/10/09 19:41:46 INFO DAGScheduler: Job 3 finished: collect at utils... Or, we can retrieve specific log entries containing, say, sparklyr, by using the filter parameter, as follows: spark_log(sc, filter = "sparklyr") ## 18/10/09 18:53:23 INFO SparkContext: Submitted application: sparklyr ## 18/10/09 18:53:23 INFO SparkContext: Added JAR... ## 18/10/09 18:53:27 INFO Executor: Fetching spark://localhost:52930/... ## 18/10/09 18:53:27 INFO Utils: Fetching spark://localhost:52930/... ## 18/10/09 18:53:27 INFO Executor: Adding file:/private/var/folders/... Most of the time, you won’t need to worry about Spark logs, except in cases for which you need to troubleshoot a failed computation; in those cases, logs are an invaluable resource to be aware of. Now you know.

2.5 Disconnecting

For local clusters (really, any cluster), after you are done processing data, you should disconnect by running the following: spark_disconnect(sc) This terminates the connection to the cluster as well as the cluster tasks. If multiple Spark connections are active, or if the connection instance sc is no longer available, you can also disconnect all your Spark connections by running this command: spark_disconnect_all() Notice that exiting R, or RStudio, or restarting your R session, also causes the Spark connection to terminate, which in turn terminates the Spark cluster and cached data that is not explicitly saved.

2.6 Using RStudio

Since it’s very common to use RStudio with R, sparklyr provides RStudio extensions to help simplify your workflows and increase your productivity while using Spark in RStudio. If you are not familiar with RStudio, take a quick look at Using RStudio. Otherwise, there are a couple extensions worth highlighting. First, instead of starting a new connection using spark_connect() from RStudio’s R console, you can use the New Connection action from the Connections tab and then select the Spark connection, which opens the dialog shown in Figure 2.7. You can then customize the versions and connect to Spark, which will simply generate the right spark_connect() command and execute this in the R console for you. 
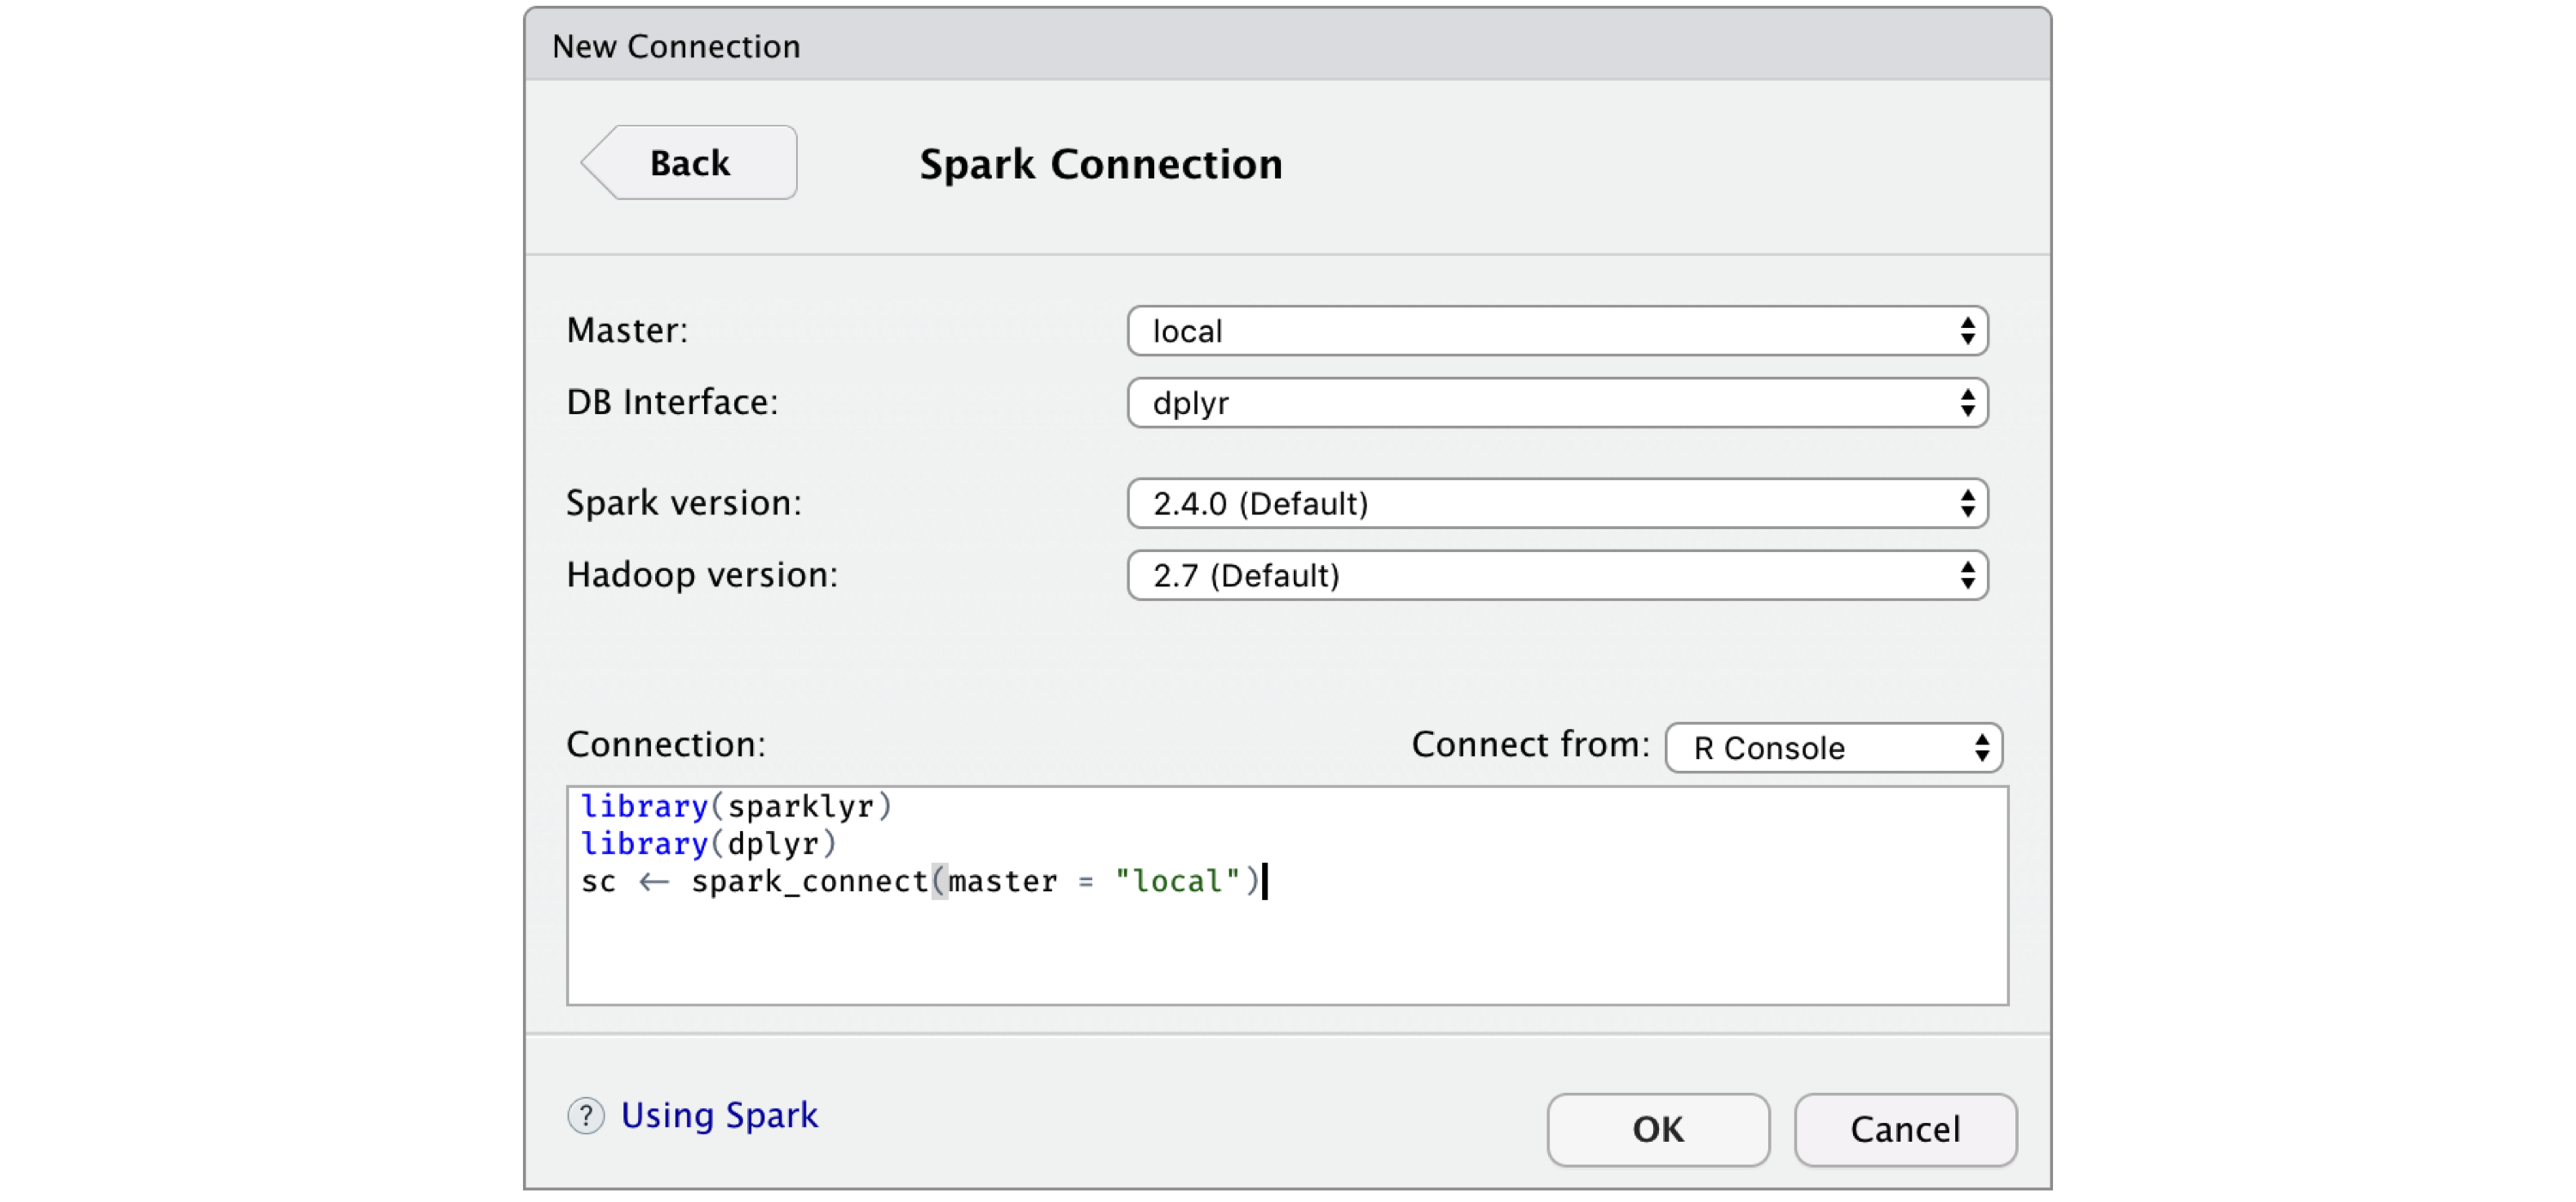
FIGURE 2.7: RStudio New Spark Connection dialog After you’re connected to Spark, RStudio displays your available datasets in the Connections tab, as shown in Figure 2.8. This is a useful way to track your existing datasets and provides an easy way to explore each of them. 
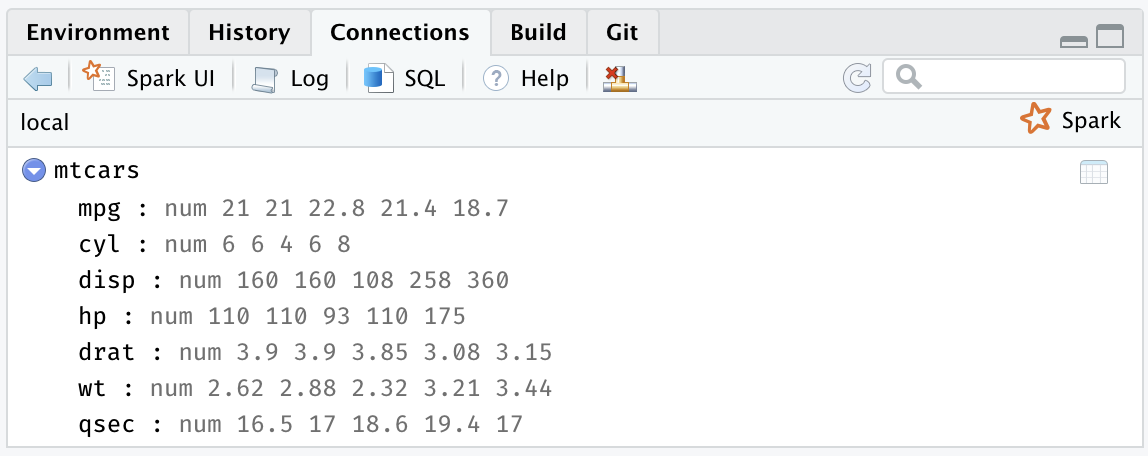
FIGURE 2.8: The RStudio Connections tab Additionally, an active connection provides the following custom actions:
Spark
Opens the Spark web interface; a shortcut to spark_web(sc).
Log
Opens the Spark web logs; a shortcut to spark_log(sc).
SQL
Opens a new SQL query. For more information about DBI and SQL support, see Chapter 3.
Help
Opens the reference documentation in a new web browser window.
Disconnect
Disconnects from Spark; a shortcut to spark_disconnect(sc). The rest of this book will use plain R code. It is up to you whether to execute this code in the R console, RStudio, Jupyter Notebooks, or any other tool that supports executing R code, since the examples provided in this book execute in any R environment.

2.7 Resources

While we’ve put significant effort into simplifying the onboarding process, there are many additional resources that can help you to troubleshoot particular issues while getting started and, in general, introduce you to the broader Spark and R communities to help you get specific answers, discuss topics, and connect with many users actively using Spark with R:
Documentation
The documentation site hosted in RStudio’s Spark website should be your first stop to learn more about Spark when using R. The documentation is kept up to date with examples, reference functions, and many more relevant resources.
Blog
To keep up to date with major sparklyr announcements, you can follow the RStudio blog.
Community
For general sparklyr questions, you can post in the RStudio Community tagged as sparklyr.
Stack Overflow
For general Spark questions, Stack Overflow is a great resource; there are also many topics specifically about sparklyr.
Github
If you believe something needs to be fixed, open a GitHub issue or send us a pull request.
Gitter
For urgent issues or to keep in touch, you can chat with us in Gitter.

2.8 Recap

In this chapter you learned about the prerequisites required to work with Spark. You saw how to connect to Spark using spark_connect(); install a local cluster using spark_install(); load a simple dataset, launch the web interface, and display logs using spark_web(sc) and spark_log(sc), respectively; and disconnect from RStudio using spark_disconnect(). We close by presenting the RStudio extensions that sparklyr provides. At this point, we hope that you feel ready to tackle actual data analysis and modeling problems in Spark and R, which will be introduced over the next two chapters. Chapter 3 will present data analysis as the process of inspecting, cleaning, and transforming data with the goal of discovering useful information. Modeling, the subject of Chapter 4, can be considered part of data analysis; however, it deserves its own chapter to truly describe and take advantage of the modeling functionality available in Spark.

Chapter 3 Analysis

Previous chapters focused on introducing Spark with R, getting you up to speed and encouraging you to try basic data analysis workflows. However, they have not properly introduced what data analysis means, especially with Spark. They presented the tools you will need throughout this book—tools that will help you spend more time learning and less time troubleshooting. This chapter introduces tools and concepts to perform data analysis in Spark from R. Spoiler alert: these are the same tools you use with plain R! This is not a mere coincidence; rather, we want data scientists to live in a world where technology is hidden from them, where you can use the R packages you know and love, and they “just work” in Spark! Now, we are not quite there yet, but we are also not that far. Therefore, in this chapter you learn widely used R packages and practices to perform data analysis—dplyr, ggplot2, formulas, rmarkdown, and so on—which also happen to work in Spark. Chapter 4 will focus on creating statistical models to predict, estimate, and describe datasets, but first, let’s get started with analysis!

3.1 Overview

In a data analysis project, the main goal is to understand what the data is trying to “tell us”, hoping that it provides an answer to a specific question. Most data analysis projects follow a set of steps, as shown in Figure 3.1. As the diagram illustrates, we first import data into our analysis stem, where we wrangle it by trying different data transformations, such as aggregations. We then visualize the data to help us perceive relationships and trends. To gain deeper insight, we can fit one or multiple statistical models against sample data. This will help us find out whether the patterns hold true when new data is applied to them. Lastly, the results are communicated publicly or privately to colleagues and stakeholders. 
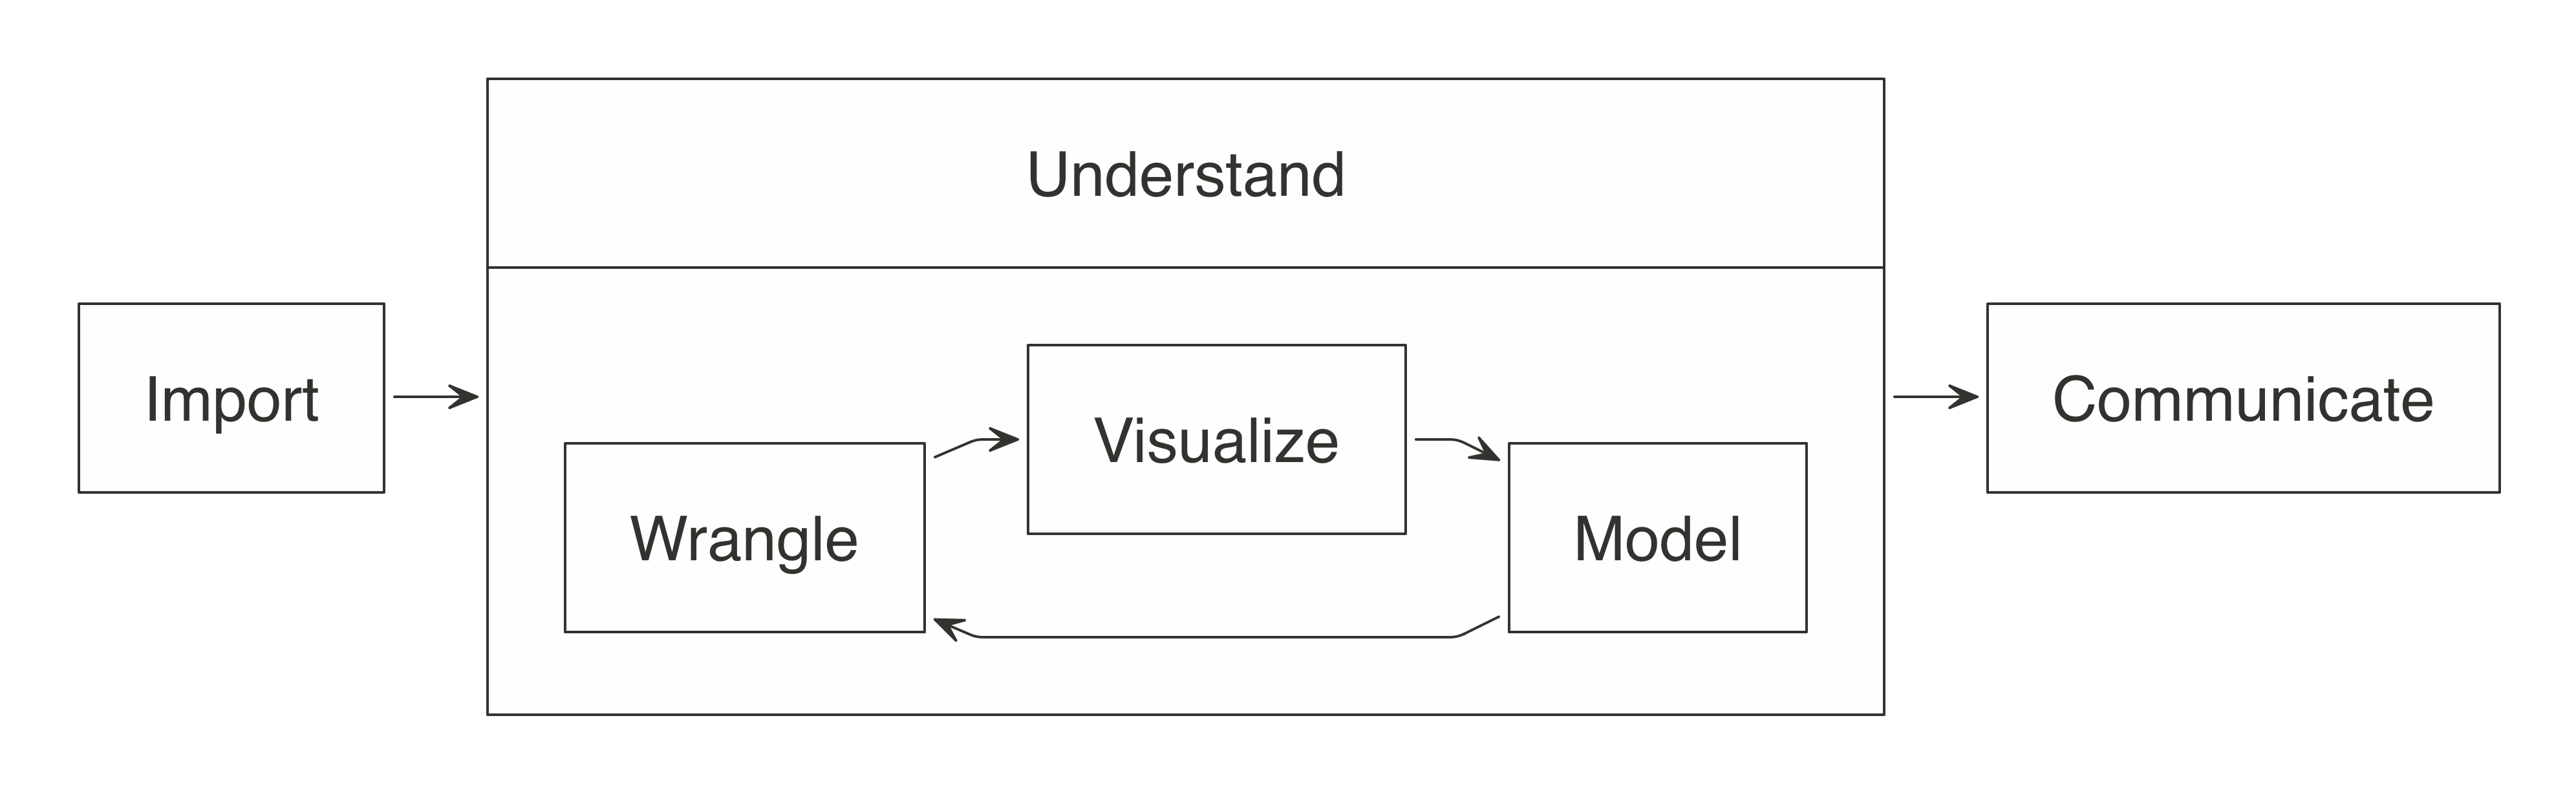
FIGURE 3.1: The general steps of a data analysis When working with not-large-scale datasets—as in datasets that fit in memory—we can perform all those steps from R, without using Spark. However, when data does not fit in memory or computation is simply too slow, we can slightly modify this approach by incorporating Spark. But how? For data analysis, the ideal approach is to let Spark do what it’s good at. Spark is a(((“parallel execution”))) parallel computation engine that works at a large scale and provides a SQL engine and modeling libraries. You can use these to perform most of the same operations R performs. Such operations include data selection, transformation, and modeling. Additionally, Spark includes tools for performing specialized computational work like graph analysis, stream processing, and many others. For now, we will skip those non-rectangular datasets and present them in later chapters. You can perform data import, wrangling, and modeling within Spark. You can also partly do visualization with Spark, which we cover later in this chapter. The idea is to use R to tell Spark what data operations to run, and then only bring the results into R. As illustrated in Figure 3.2, the ideal method pushes compute to the Spark cluster and then collects results into R. 
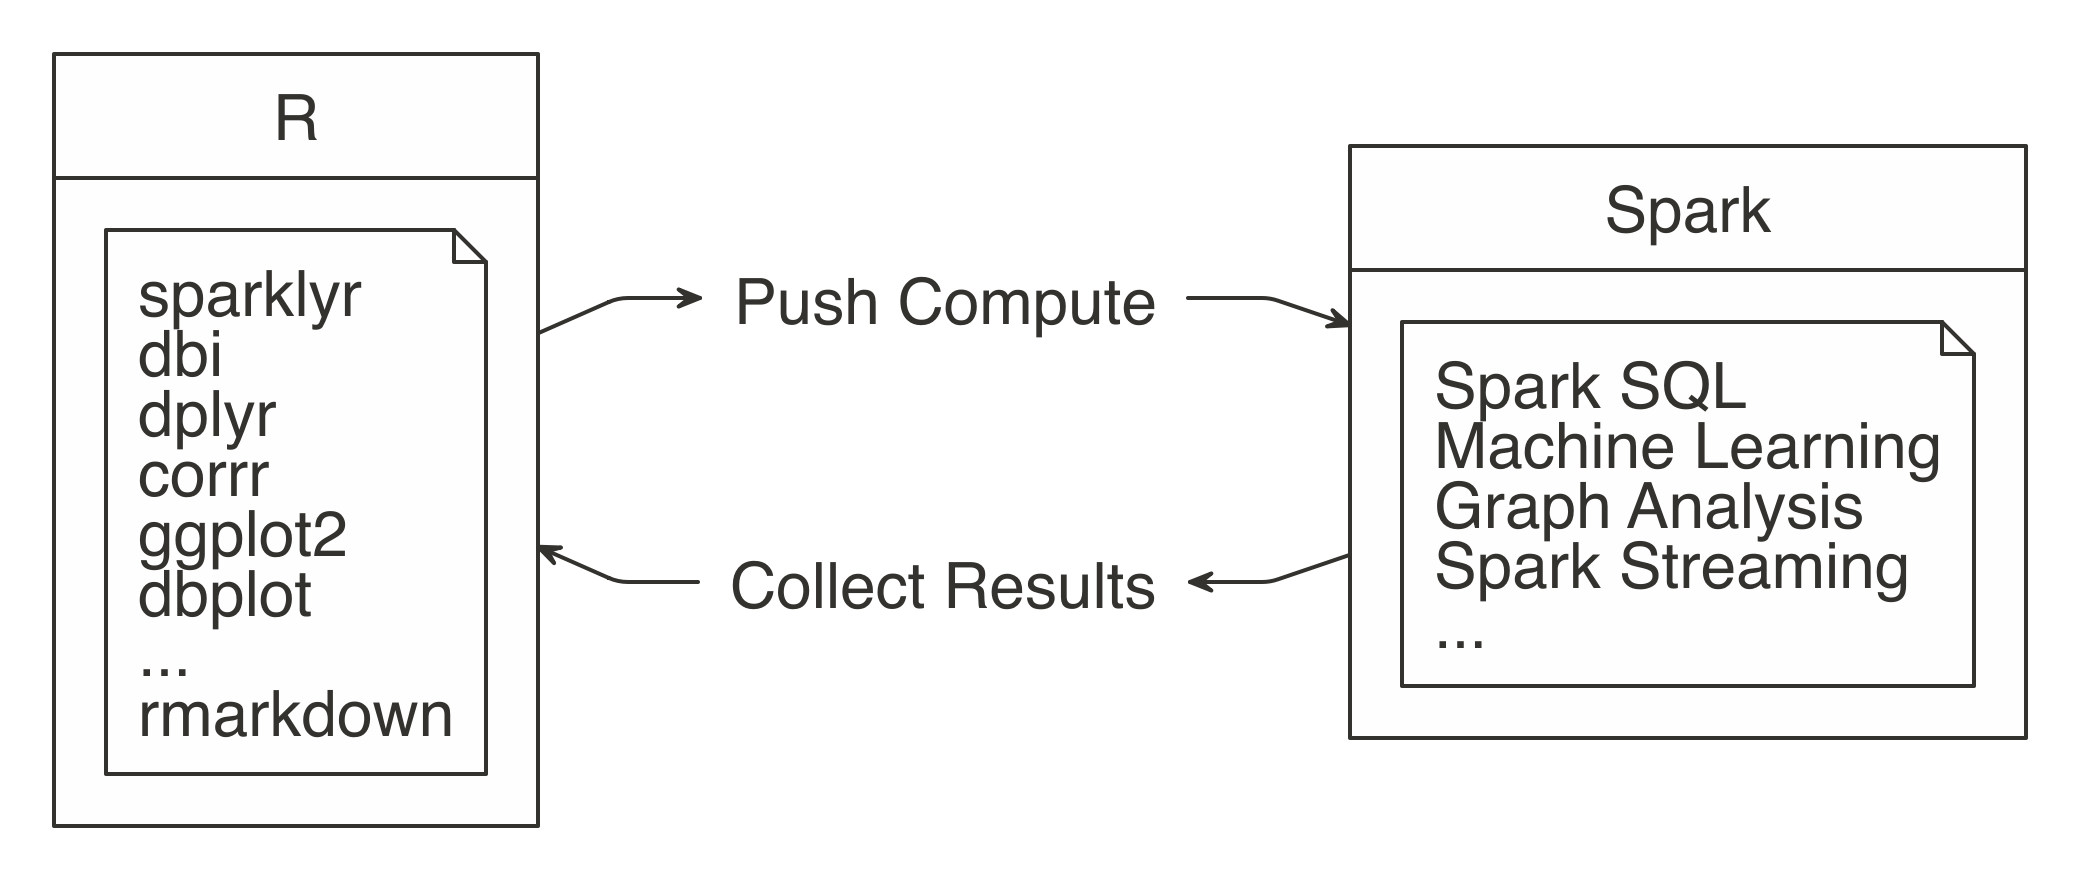
FIGURE 3.2: Spark computes while R collects results The sparklyr package aids in using the “push compute, collect results” principle. Most of its functions are wrappers on top of Spark API calls. This allows us to take advantage of Spark’s analysis components, instead of R’s. For example, when you need to fit a linear regression model, instead of using R’s familiar lm() function, you would use Spark’s ml_linear_regression() function. This R function then calls Spark to create this model. Figure 3.3 depicts this specific example. 
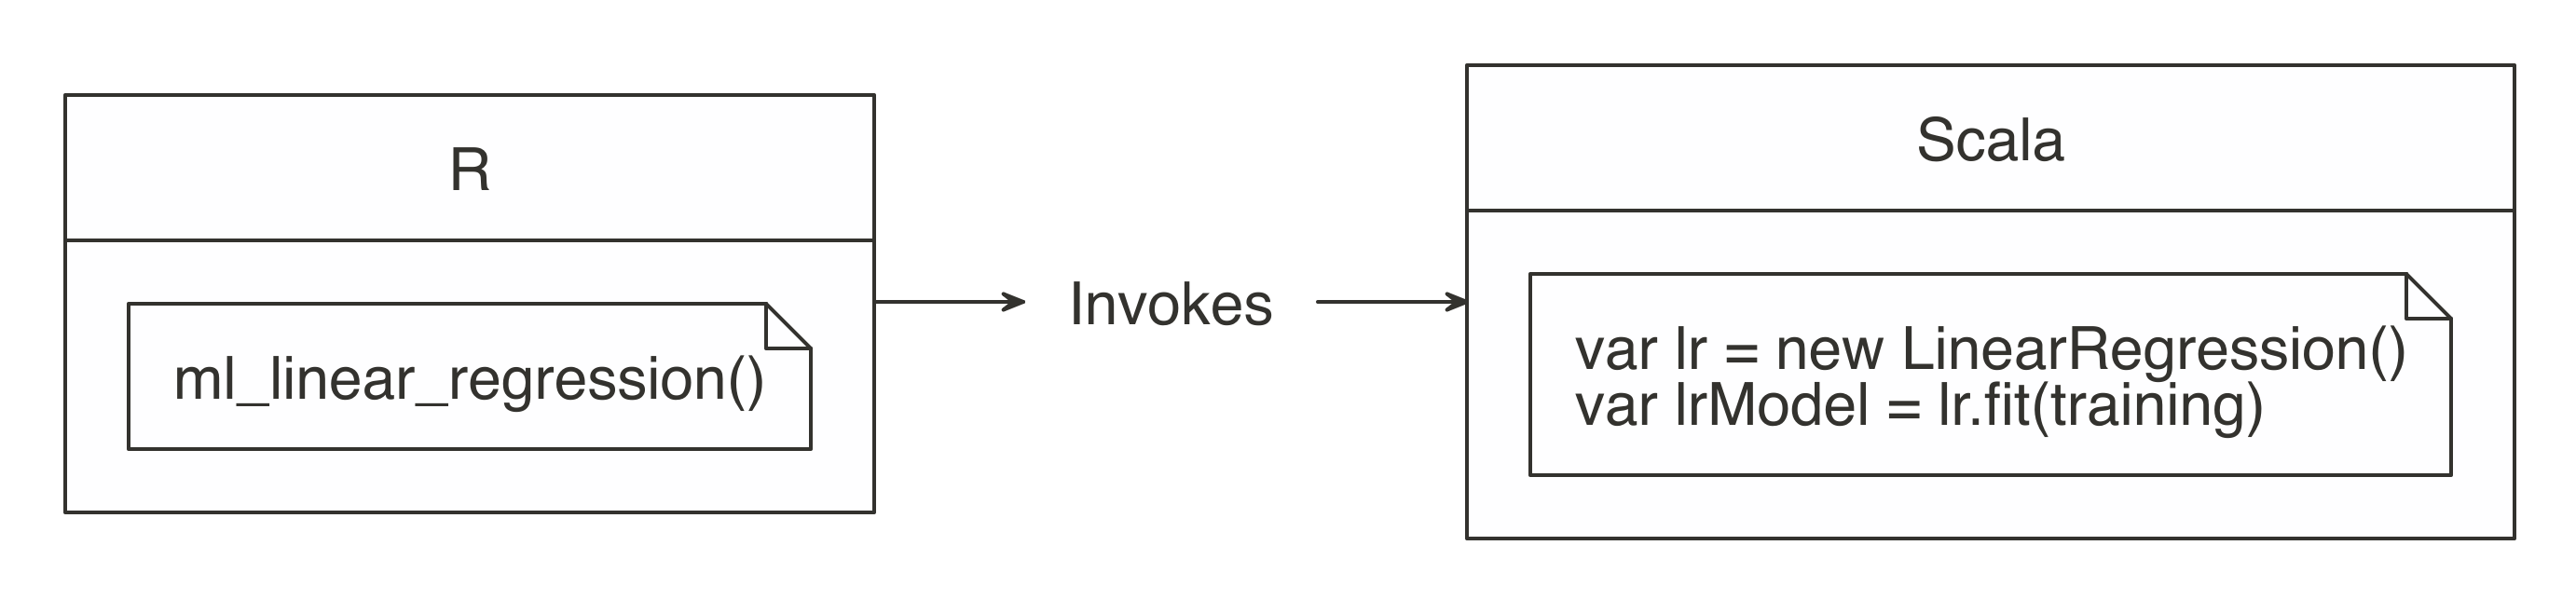
FIGURE 3.3: R functions call Spark functionality For more common data manipulation tasks, sparklyr provides a backend for dplyr. This means you can use dplyr verbs with which you’re already familiar in R, and then sparklyr and dplyr will translate those actions into Spark SQL statements, which are generally more compact and easier to read than SQL statements (see Figure 3.4). So, if you are already familiar with R and dplyr, there is nothing new to learn. This might feel a bit anticlimactic—indeed, it is—but it’s also great since you can focus that energy on learning other skills required to do large-scale computing. FIGURE 3.4: dplyr writes SQL in Spark To practice as you learn, the rest of this chapter’s code uses a single exercise that runs in the local Spark master. This way, you can replicate the code on your personal computer. Make sure sparklyr is already working, which should be the case if you completed Chapter 2. This chapter will make use of packages that you might not have installed. So, first, make sure the following packages are installed by running these commands: install.packages("ggplot2") install.packages("corrr") install.packages("dbplot") install.packages("rmarkdown") First, load the sparklyr and dplyr packages and then open a new local connection. library(sparklyr) library(dplyr) sc <- spark_connect(master = "local", version = "2.3") The environment is ready to be used, so our next task is to import data that we can later analyze.

3.2 Import

When using Spark with R, you need to approach importing data differently. Usually, importing means that R will read files and load them into memory; when you are using Spark, the data is imported into Spark, not R. In Figure 3.5, notice how the data source is connected to Spark instead of being connected to R. 
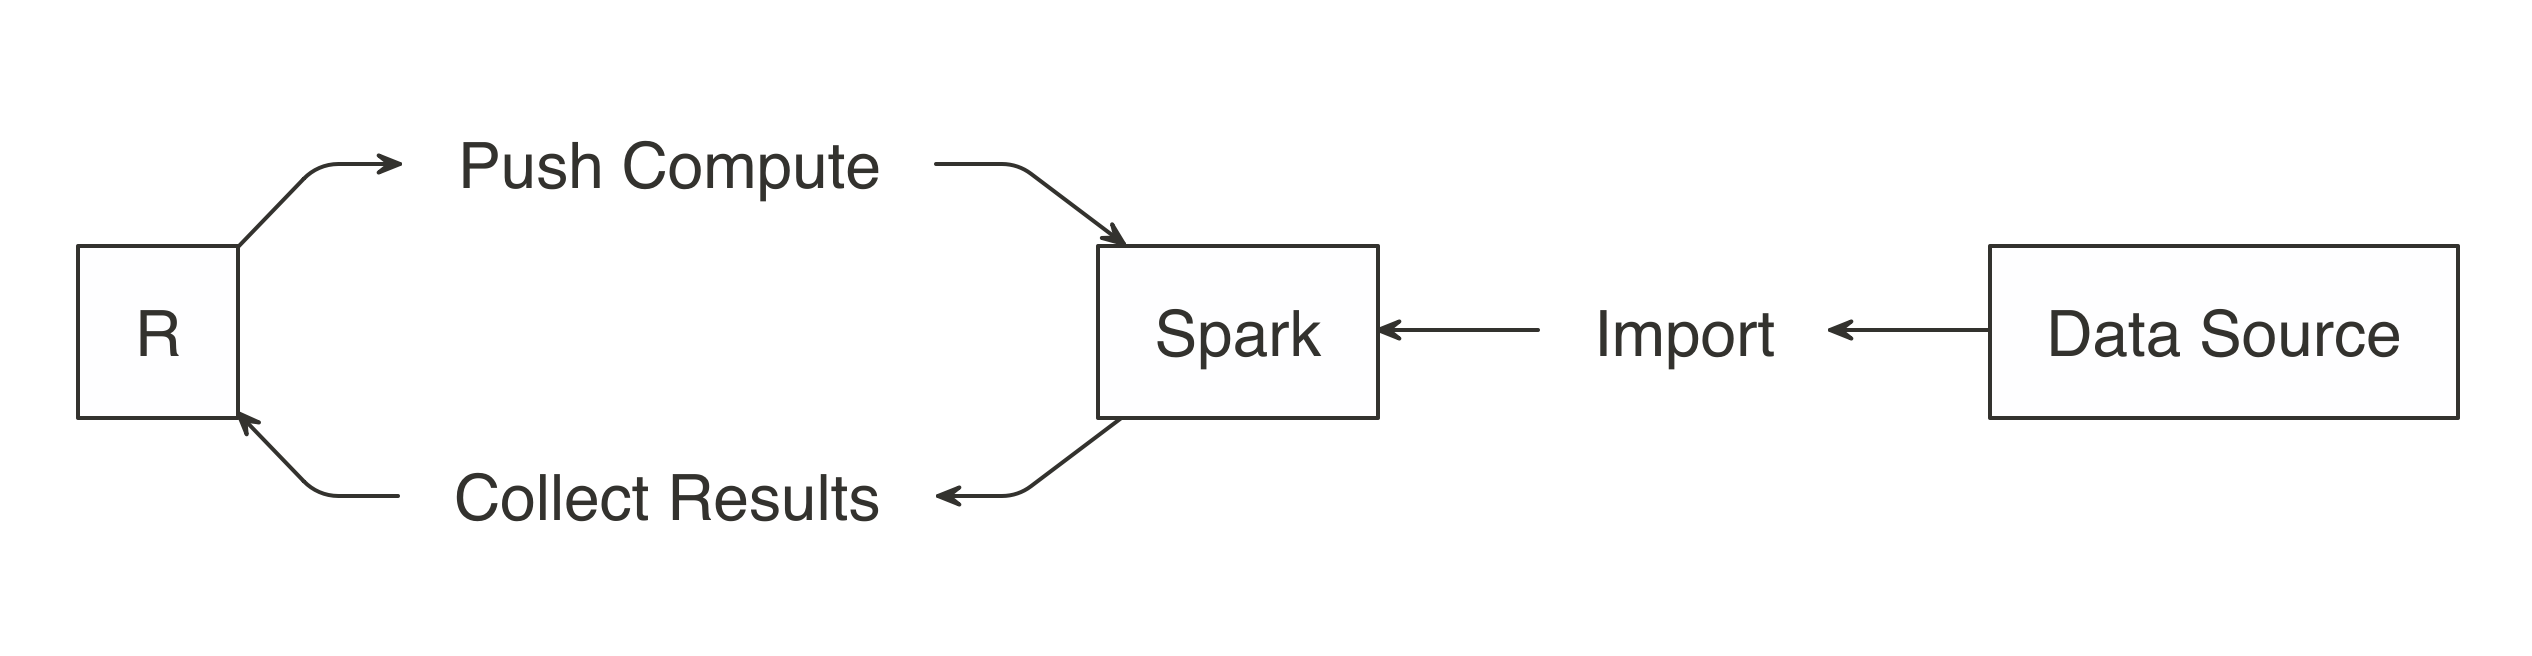
FIGURE 3.5: Import data to Spark not R Note: When you’re performing analysis over large-scale datasets, the vast majority of the necessary data will already be available in your Spark cluster (which is usually made available to users via Hive tables or by accessing the file system directly). Chapter 8 will cover this extensively. Rather than importing all data into Spark, you can request Spark to access the data source without importing it—this is a decision you should make based on speed and performance. Importing all of the data into the Spark session incurs a one-time up-front cost, since Spark needs to wait for the data to be loaded before analyzing it. If the data is not imported, you usually incur a cost with every Spark operation since Spark needs to retrieve a subset from the cluster’s storage, which is usually disk drives that happen to be much slower than reading from Spark’s memory. More on this topic will be covered in Chapter 9. Let’s prime the session with some data by importing mtcars into Spark using copy_to(); you can also import data from distributed files in many different file formats, which we look at in Chapter 8. cars <- copy_to(sc, mtcars) Note: When using real clusters, you should use copy_to() to transfer only small tables from R; large data transfers should be performed with specialized data transfer tools. The data is now accessible to Spark and you can now apply transformations with ease; the next section covers how to wrangle data by running transformations inside Spark, using dplyr.

3.3 Wrangle

Data wrangling uses transformations to understand the data. It is often referred to as the process of transforming data from one “raw” data form into another format with the intent of making it more appropriate for data analysis. Malformed or missing values and columns with multiple attributes are common data problems you might need to fix, since they prevent you from understanding your dataset. For example, a “name” field contains the last and first name of a customer. There are two attributes (first and last name) in a single column. To be usable, we need to transform the “name” field, by changing it into “first_name” and “last_name” fields. After the data is cleaned, you still need to understand the basics about its content. Other transformations such as aggregations can help with this task. For example, the result of requesting the average balance of all customers will return a single row and column. The value will be the average of all customers. That information will give us context when we see individual, or grouped, customer balances. The main goal is to write the data transformations using R syntax as much as possible. This saves us from the cognitive cost of having to switch between multiple computer technologies to accomplish a single task. In this case, it is better to take advantage of dplyr instead of writing Spark SQL statements for data exploration. In the R environment, cars can be treated as if it were a local DataFrame, so you can use dplyr verbs. For instance, we can find out the mean of all columns by using summarise_all(): summarize_all(cars, mean) # Source: spark<?> [?? x 11] mpg cyl disp hp drat wt qsec vs am gear carb <dbl> <dbl> <dbl> <dbl> <dbl> <dbl> <dbl> <dbl> <dbl> <dbl> <dbl> 1 20.1 6.19 231. 147. 3.60 3.22 17.8 0.438 0.406 3.69 2.81 While this code is exactly the same as the code you would run when using dplyr without Spark, a lot is happening under the hood. The data is not being imported into R; instead, dplyr converts this task into SQL statements that are then sent to Spark. The show_query() command makes it possible to peer into the SQL statement that sparklyr and dplyr created and sent to Spark. We can also use this time to introduce the pipe operator (%>%), a custom operator from the magrittr package that pipes a computation into the first argument of the next function, making your data analysis much easier to read: summarize_all(cars, mean) %>% show_query() <SQL> SELECT AVG(`mpg`) AS `mpg`, AVG(`cyl`) AS `cyl`, AVG(`disp`) AS `disp`, AVG(`hp`) AS `hp`, AVG(`drat`) AS `drat`, AVG(`wt`) AS `wt`, AVG(`qsec`) AS `qsec`, AVG(`vs`) AS `vs`, AVG(`am`) AS `am`, AVG(`gear`) AS `gear`, AVG(`carb`) AS `carb` FROM `mtcars` As is evident, dplyr is much more concise than SQL, but rest assured, you will not need to see or understand SQL when using dplyr. Your focus can remain on obtaining insights from the data, as opposed to figuring out how to express a given set of transformations in SQL. Here is another example that groups the cars dataset by transmission type: cars %>% mutate(transmission = ifelse(am == 0, "automatic", "manual")) %>% group_by(transmission) %>% summarise_all(mean) # Source: spark<?> [?? x 12] transmission mpg cyl disp hp drat wt qsec vs am gear carb <chr> <dbl> <dbl> <dbl> <dbl> <dbl> <dbl> <dbl> <dbl> <dbl> <dbl> <dbl> 1 automatic 17.1 6.95 290. 160. 3.29 3.77 18.2 0.368 0 3.21 2.74 2 manmual 24.4 5.08 144. 127. 4.05 2.41 17.4 0.538 1 4.38 2.92 Most of the data transformation operations made available by dplyr to work with local DataFrames are also available to use with a Spark connection. This means that you can focus on learning dplyr first and then reuse that skill when working with Spark. Chapter 5 from the book R for Data Science by Hadley Wickham and Garrett Grolemund (O’Reilly) is a great resource to learn dplyr in depth. If proficiency with dplyr is not an issue for you, we recommend that you take some time to experiment with different dplyr functions against the cars table. Sometimes, we might need to perform an operation not yet available through dplyr and sparklyr. Instead of downloading the data into R, there is usually a Hive function within Spark to accomplish what we need. The next section covers this scenario.

3.3.1 Built-in Functions

Spark SQL is based on Hive’s SQL conventions and functions, and it is possible to call all these functions using dplyr as well. This means that we can use any Spark SQL functions to accomplish operations that might not be available via dplyr. We can access the functions by calling them as if they were R functions. Instead of failing, dplyr passes functions it does not recognize as is to the query engine. This gives us a lot of flexibility on the functions we can use. For instance, the percentile() function returns the exact percentile of a column in a group. The function expects a column name, and either a single percentile value or an array of percentile values. We can use this Spark SQL function from dplyr, as follows: summarise(cars, mpg_percentile = percentile(mpg, 0.25)) # Source: spark<?> [?? x 1] mpg_percentile <dbl> 1 15.4 There is no percentile() function in R, so dplyr passes that portion of the code as-is to the resulting SQL query: summarise(cars, mpg_percentile = percentile(mpg, 0.25)) %>% show_query() <SQL> SELECT percentile(`mpg`, 0.25) AS `mpg_percentile` FROM `mtcars_remote` To pass multiple values to percentile(), we can call another Hive function called array(). In this case, array() would work similarly to R’s list() function. We can pass multiple values separated by commas. The output from Spark is an array variable, which is imported into R as a list variable column: summarise(cars, mpg_percentile = percentile(mpg, array(0.25, 0.5, 0.75))) # Source: spark<?> [?? x 1] mpg_percentile <list> 1 <list [3]> You can use the explode() function to separate Spark’s array value results into their own record. To do this, use explode() within a mutate() command, and pass the variable containing the results of the percentile operation: summarise(cars, mpg_percentile = percentile(mpg, array(0.25, 0.5, 0.75))) %>% mutate(mpg_percentile = explode(mpg_percentile)) # Source: spark<?> [?? x 1] mpg_percentile <dbl> 1 15.4 2 19.2 3 22.8 We have included a comprehensive list of all the Hive functions in the section Hive Functions. Glance over them to get a sense of the wide range of operations that you can accomplish with them.

3.3.2 Correlations

A very common exploration technique is to calculate and visualize correlations, which we often calculate to find out what kind of statistical relationship exists between paired sets of variables. Spark provides functions to calculate correlations across the entire dataset and returns the results to R as a DataFrame object: ml_corr(cars) # A tibble: 11 x 11 mpg cyl disp hp drat wt qsec <dbl> <dbl> <dbl> <dbl> <dbl> <dbl> <dbl> 1 1 -0.852 -0.848 -0.776 0.681 -0.868 0.419 2 -0.852 1 0.902 0.832 -0.700 0.782 -0.591 3 -0.848 0.902 1 0.791 -0.710 0.888 -0.434 4 -0.776 0.832 0.791 1 -0.449 0.659 -0.708 5 0.681 -0.700 -0.710 -0.449 1 -0.712 0.0912 6 -0.868 0.782 0.888 0.659 -0.712 1 -0.175 7 0.419 -0.591 -0.434 -0.708 0.0912 -0.175 1 8 0.664 -0.811 -0.710 -0.723 0.440 -0.555 0.745 9 0.600 -0.523 -0.591 -0.243 0.713 -0.692 -0.230 10 0.480 -0.493 -0.556 -0.126 0.700 -0.583 -0.213 11 -0.551 0.527 0.395 0.750 -0.0908 0.428 -0.656 # ... with 4 more variables: vs <dbl>, am <dbl>, # gear <dbl>, carb <dbl> The corrr R package specializes in correlations. It contains friendly functions to prepare and visualize the results. Included inside the package is a backend for Spark, so when a Spark object is used in corrr, the actual computation also happens in Spark. In the background, the correlate() function runs sparklyr::ml_corr(), so there is no need to collect any data into R prior to running the command: library(corrr) correlate(cars, use = "pairwise.complete.obs", method = "pearson") # A tibble: 11 x 12 rowname mpg cyl disp hp drat wt <chr> <dbl> <dbl> <dbl> <dbl> <dbl> <dbl> 1 mpg NA -0.852 -0.848 -0.776 0.681 -0.868 2 cyl -0.852 NA 0.902 0.832 -0.700 0.782 3 disp -0.848 0.902 NA 0.791 -0.710 0.888 4 hp -0.776 0.832 0.791 NA -0.449 0.659 5 drat 0.681 -0.700 -0.710 -0.449 NA -0.712 6 wt -0.868 0.782 0.888 0.659 -0.712 NA 7 qsec 0.419 -0.591 -0.434 -0.708 0.0912 -0.175 8 vs 0.664 -0.811 -0.710 -0.723 0.440 -0.555 9 am 0.600 -0.523 -0.591 -0.243 0.713 -0.692 10 gear 0.480 -0.493 -0.556 -0.126 0.700 -0.583 11 carb -0.551 0.527 0.395 0.750 -0.0908 0.428 # ... with 5 more variables: qsec <dbl>, vs <dbl>, # am <dbl>, gear <dbl>, carb <dbl> We can pipe the results to other corrr functions. For example, the shave() function turns all of the duplicated results into NAs. Again, while this feels like standard R code using existing R packages, Spark is being used under the hood to perform the correlation. Additionally, as shown in Figure 3.6, the results can be easily visualized using the rplot() function, as shown here: correlate(cars, use = "pairwise.complete.obs", method = "pearson") %>% shave() %>% rplot() 
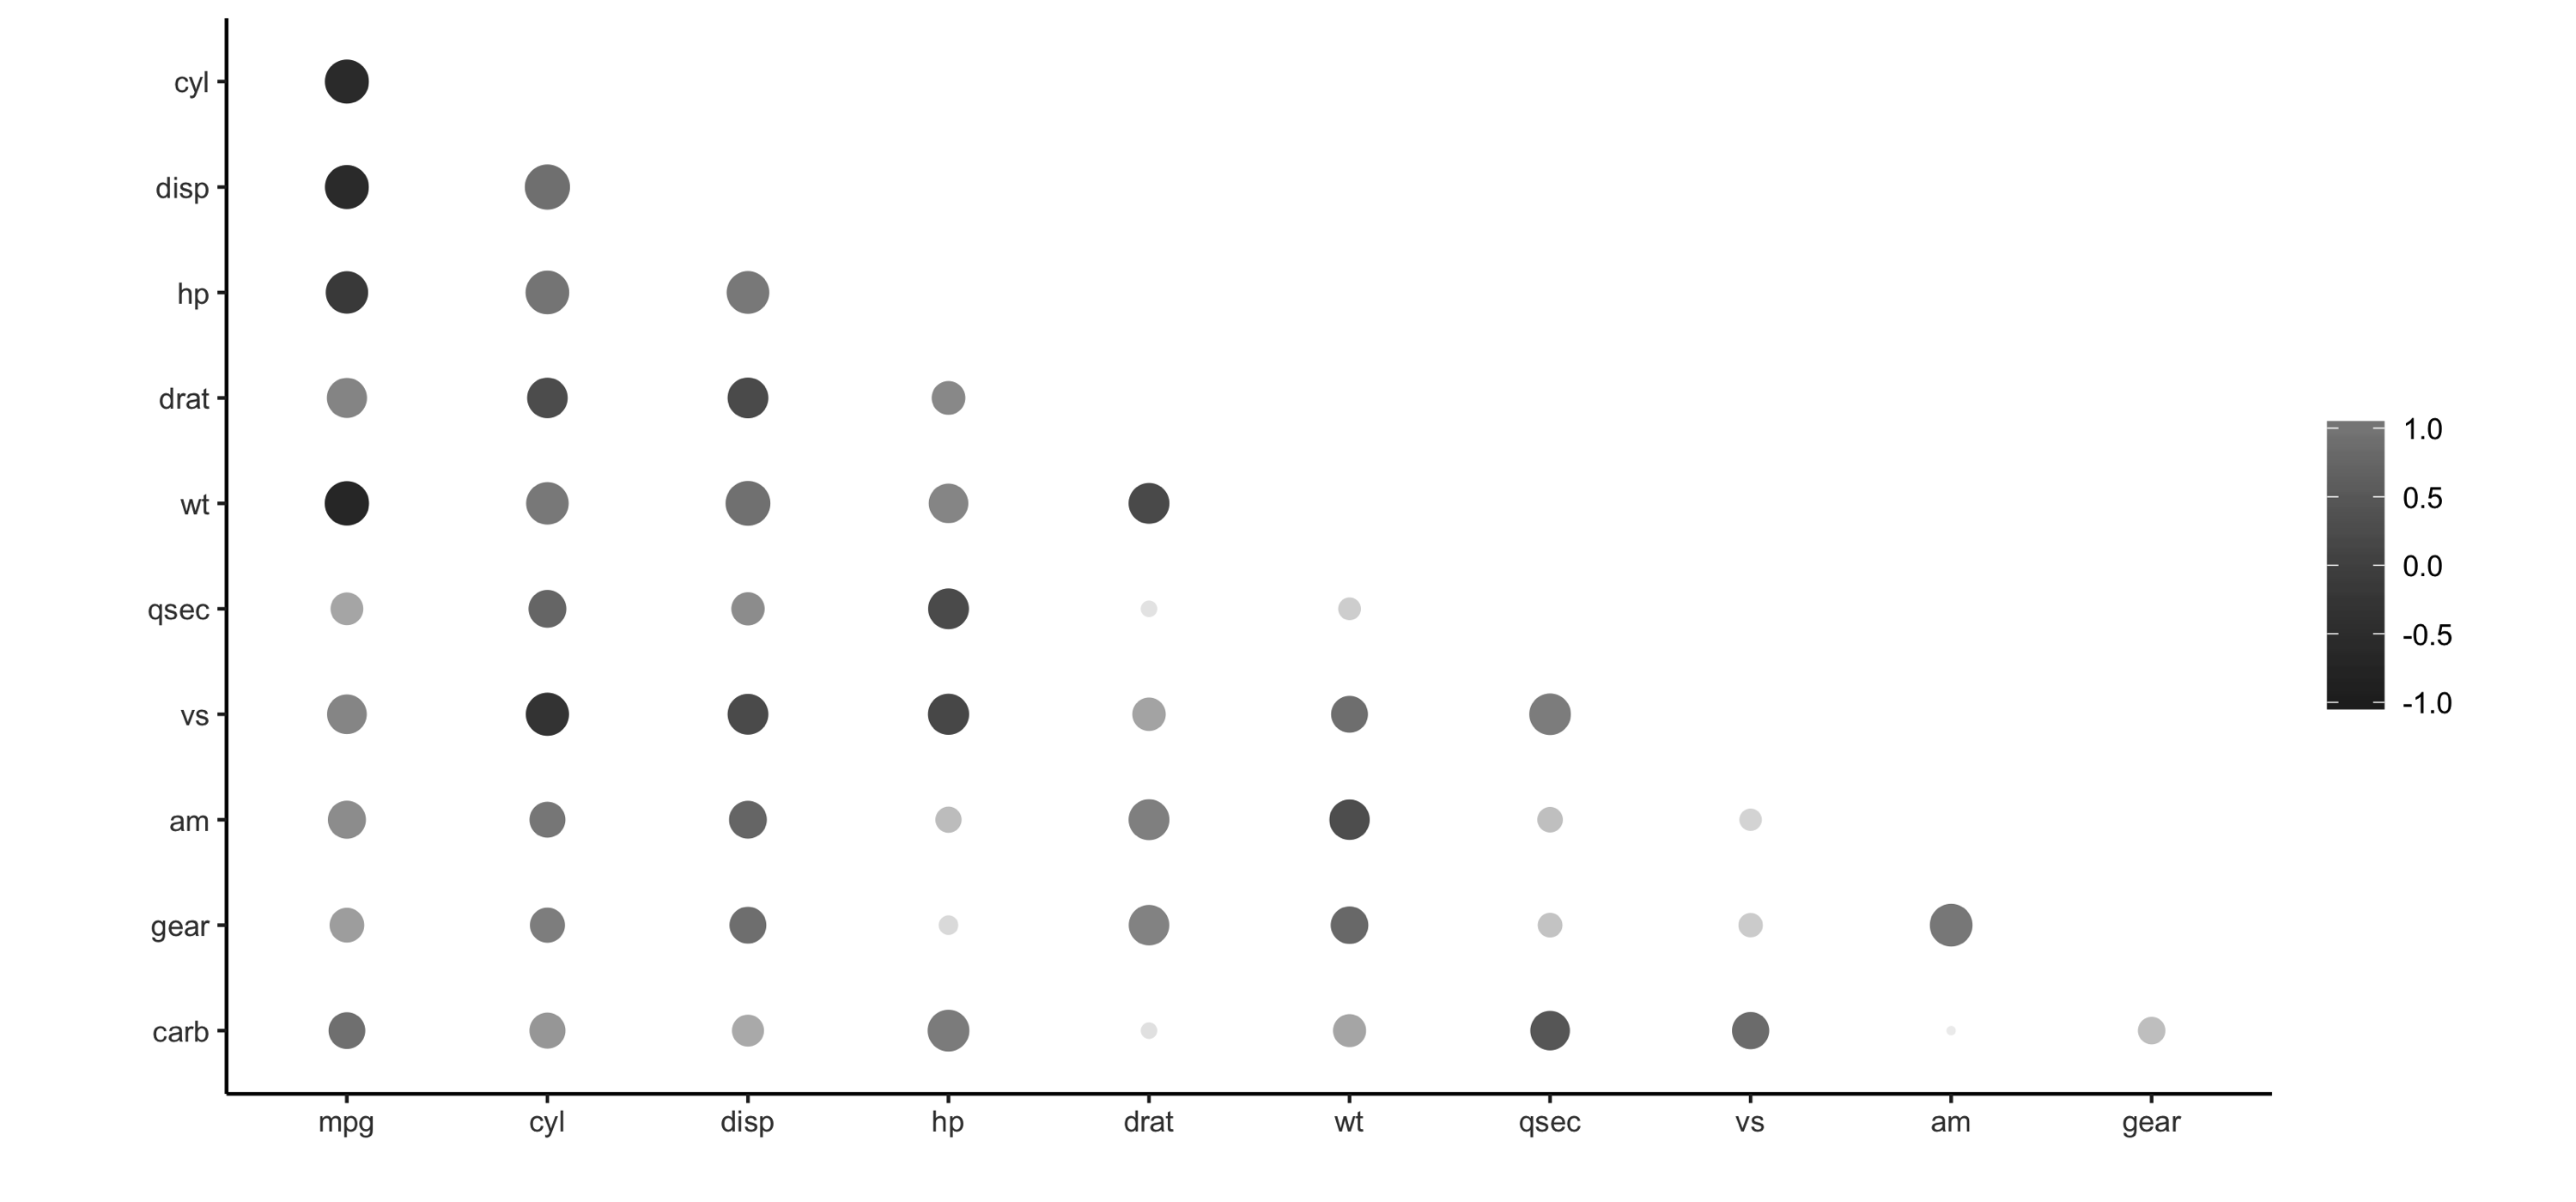
FIGURE 3.6: Using rplot() to visualize correlations It is much easier to see which relationships are positive or negative: positive relationships are in gray, and negative relationships are black. The size of the circle indicates how significant their relationship is. The power of visualizing data is in how much easier it makes it for us to understand results. The next section expands on this step of the process.

3.4 Visualize

Visualizations are a vital tool to help us find patterns in the data. It is easier for us to identify outliers in a dataset of 1,000 observations when plotted in a graph, as opposed to reading them from a list. R is great at data visualizations. Its capabilities for creating plots are extended by the many R packages that focus on this analysis step. Unfortunately, the vast majority of R functions that create plots depend on the data already being in local memory within R, so they fail when using a remote table within Spark. It is possible to create visualizations in R from data sources that exist in Spark. To understand how to do this, let’s first break down how computer programs build plots. To begin, a program takes the raw data and performs some sort of transformation. The transformed data is then mapped to a set of coordinates. Finally, the mapped values are drawn in a plot. Figure 3.7 summarizes each of the steps. FIGURE 3.7: Stages of an R plot In essence, the approach for visualizing is the same as in wrangling: push the computation to Spark, and then collect the results in R for plotting. As illustrated in Figure 3.8, the heavy lifting of preparing the data, such as aggregating the data by groups or bins, can be done within Spark, and then the much smaller dataset can be collected into R. Inside R, the plot becomes a more basic operation. For example, for a histogram, the bins are calculated in Spark, and then plotted in R using a simple column plot, as opposed to a histogram plot, because there is no need for R to recalculate the bins. 
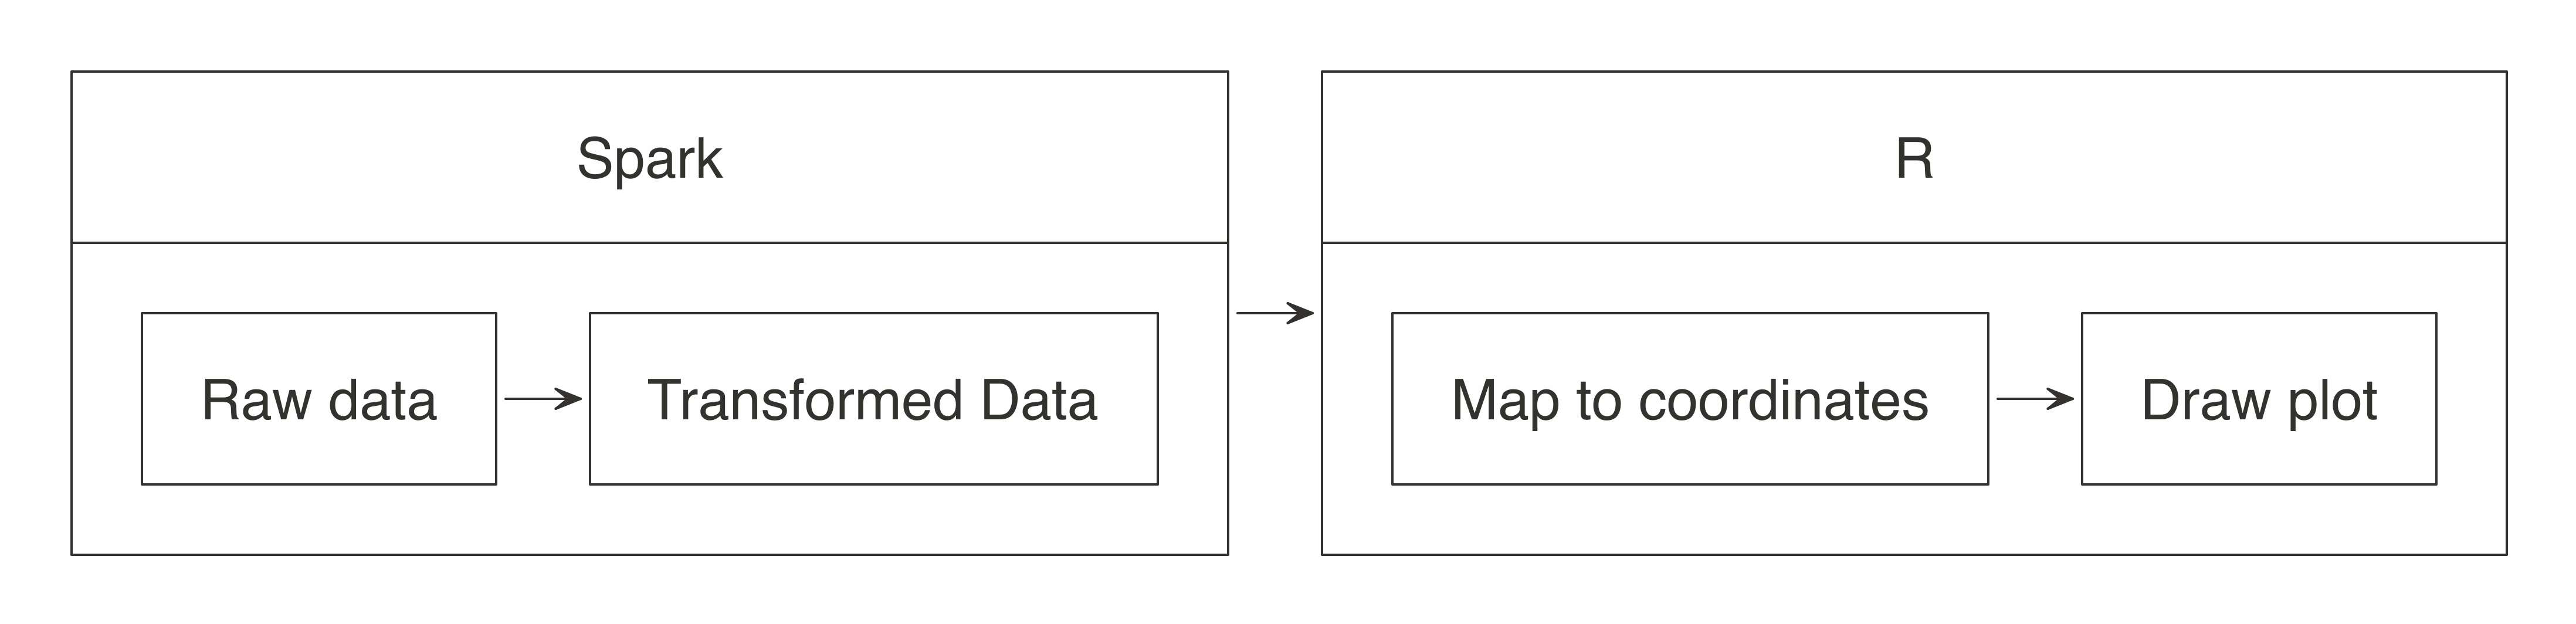
FIGURE 3.8: Plotting with Spark and R Let’s apply this conceptual model when using ggplot2.

3.4.1 Using ggplot2

To create a bar plot using ggplot2, we simply call a function: library(ggplot2) ## Warning: package 'ggplot2' was built under R version 3.5.2 ggplot(aes(as.factor(cyl), mpg), data = mtcars) + geom_col() FIGURE 3.9: Plotting inside R In this case, the mtcars raw data was automatically transformed into three discrete aggregated numbers. Next, each result was mapped into an x and y plane. Then the plot was drawn. As R users, all of the stages of building the plot are conveniently abstracted for us. In Spark, there are a couple of key steps when codifying the “push compute, collect results” approach. First, ensure that the transformation operations happen within Spark. In the example that follows, group_by() and summarise() will run inside Spark. The second is to bring the results back into R after the data has been transformed. Be sure to transform and then collect, in that order; if collect() is run first, R will try to ingest the entire dataset from Spark. Depending on the size of the data, collecting all of the data will slow down or can even bring down your system. car_group <- cars %>% group_by(cyl) %>% summarise(mpg = sum(mpg, na.rm = TRUE)) %>% collect() %>% print() # A tibble: 3 x 2 cyl mpg <dbl> <dbl> 1 6 138. 2 4 293. 3 8 211. In this example, now that the data has been preaggregated and collected into R, only three records are passed to the plotting function: ggplot(aes(as.factor(cyl), mpg), data = car_group) + geom_col(fill = "#999999") + coord_flip() Figure 3.10 shows the resulting plot. 
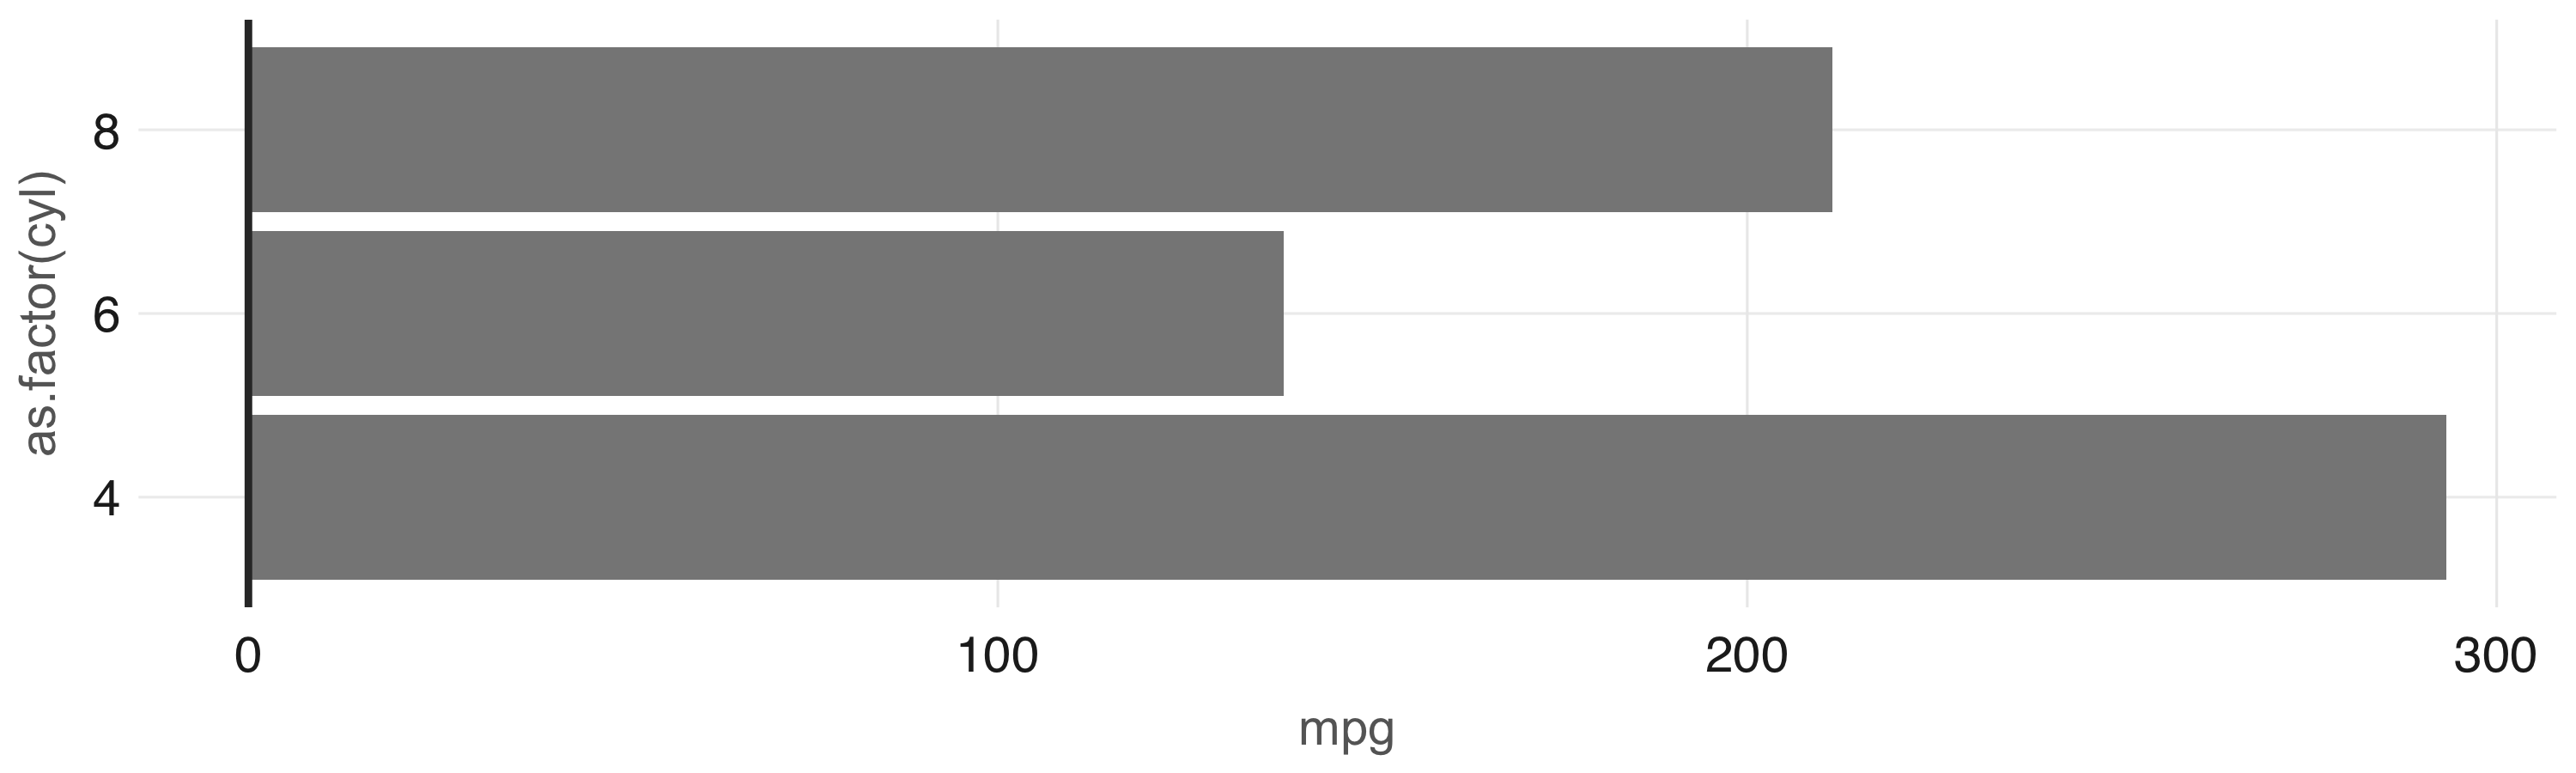
FIGURE 3.10: Plot with aggregation in Spark Any other ggplot2 visualization can be made to work using this approach; however, this is beyond the scope of the book. Instead, we recommend that you read R Graphics Cookbook, by Winston Chang (O’Reilly) to learn additional visualization techniques applicable to Spark. Now, to ease this transformation step before visualizing, the dbplot package provides a few ready-to-use visualizations that automate aggregation in Spark.

3.4.2 Using dbplot

The dbplot package provides helper functions for plotting with remote data. The R code dbplot that’s used to transform the data is written so that it can be translated into Spark. It then uses those results to create a graph using the ggplot2 package where data transformation and plotting are both triggered by a single function. The dbplot_histogram() function makes Spark calculate the bins and the count per bin and outputs a ggplot object, which we can further refine by adding more steps to the plot object. dbplot_histogram() also accepts a binwidth argument to control the range used to compute the bins: library(dbplot) cars %>% dbplot_histogram(mpg, binwidth = 3) + labs(title = "MPG Distribution", subtitle = "Histogram over miles per gallon") Figure 3.11 presents the resulting plot. 
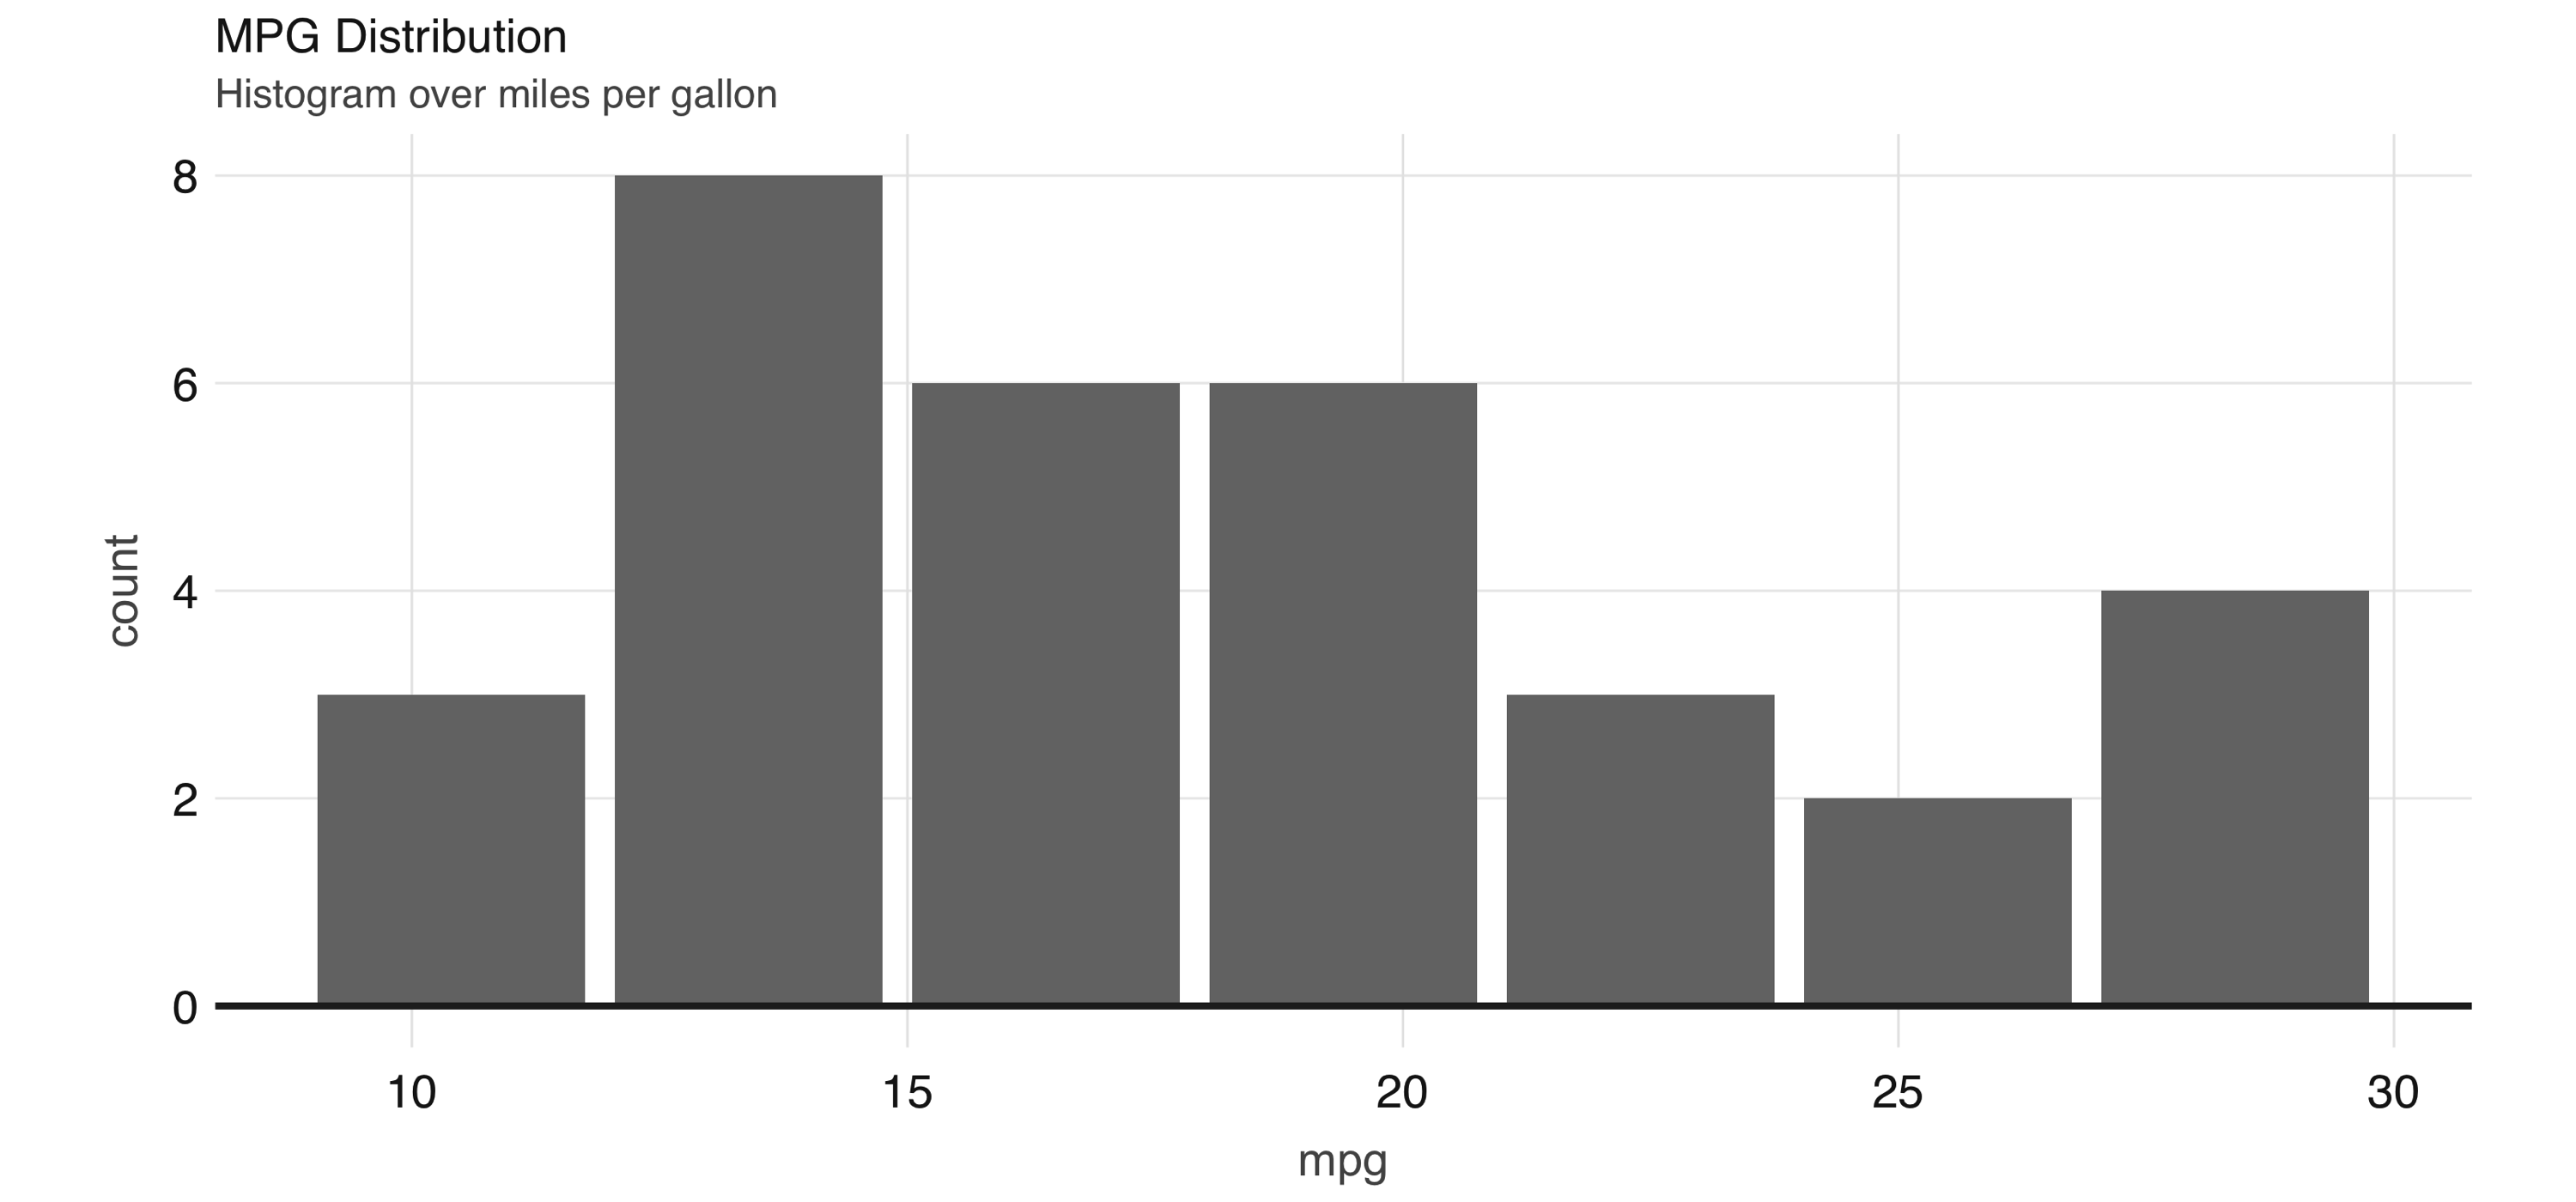
FIGURE 3.11: Histogram created by dbplot Histograms provide a great way to analyze a single variable. To analyze two variables, a scatter or raster plot is commonly used. Scatter plots are used to compare the relationship between two continuous variables. For example, a scatter plot will display the relationship between the weight of a car and its gas consumption. The plot in Figure 3.12 shows that the higher the weight, the higher the gas consumption because the dots clump together into almost a line that goes from the upper left toward the lower right. Here’s the code to generate the plot: ggplot(aes(mpg, wt), data = mtcars) + geom_point() 
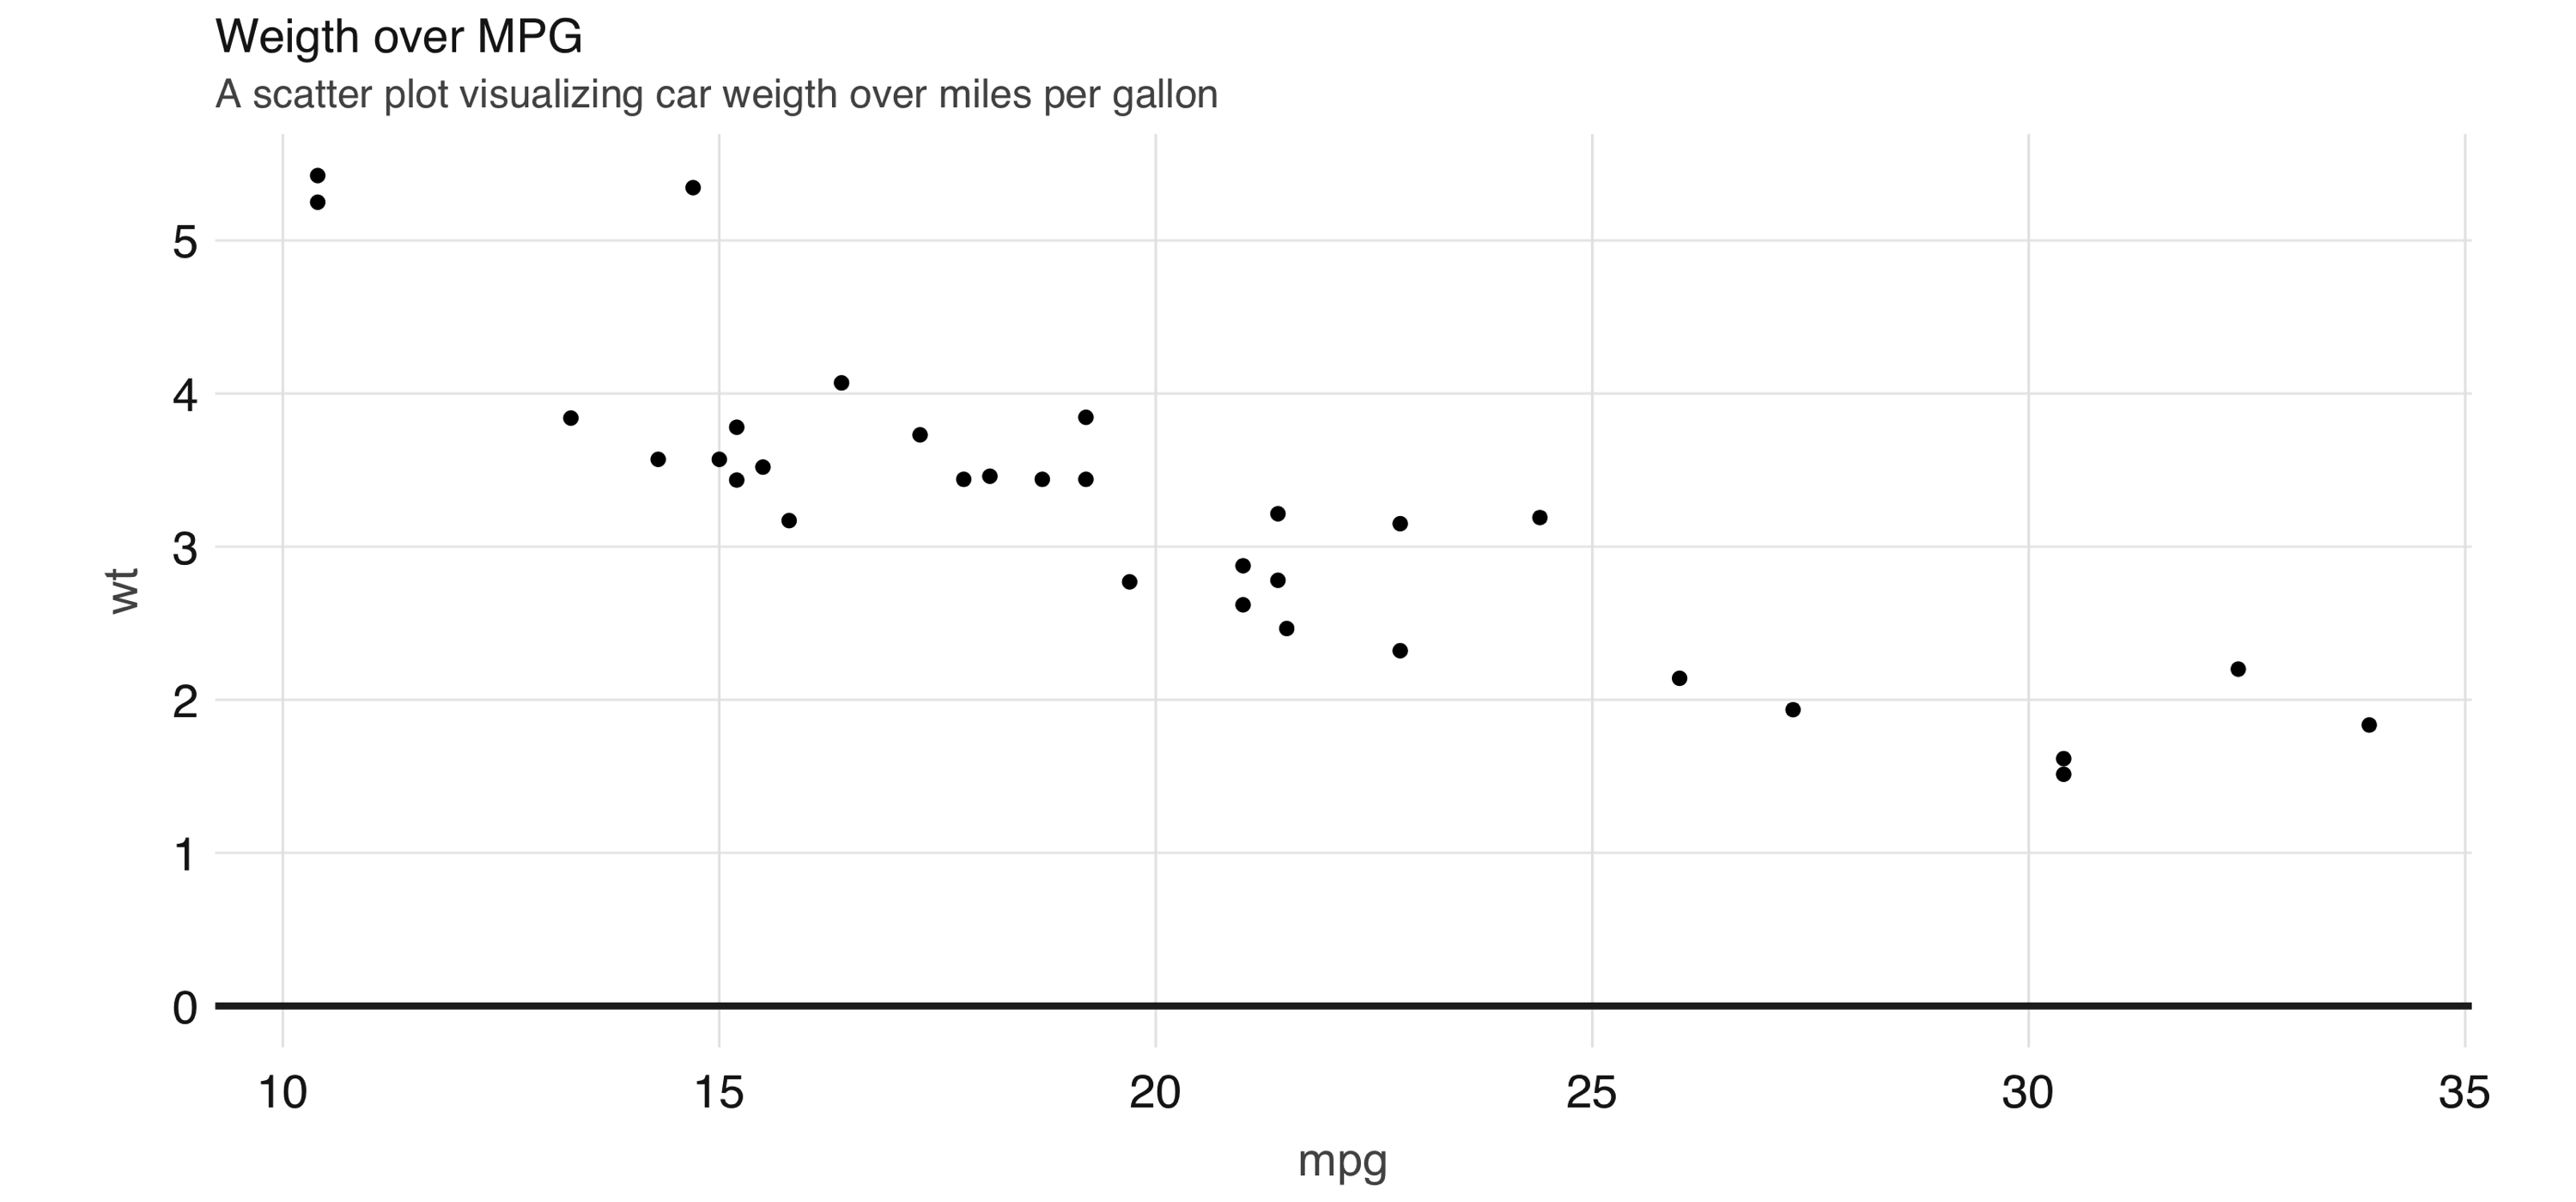
FIGURE 3.12: Scatter plot example in Spark However, for scatter plots, no amount of “pushing the computation” to Spark will help with this problem because the data must be plotted in individual dots. The best alternative is to find a plot type that represents the x/y relationship and concentration in a way that it is easy to perceive and to “physically” plot. The raster plot might be the best answer. A raster plot returns a grid of x/y positions and the results of a given aggregation, usually represented by the color of the square. You can use dbplot_raster() to create a scatter-like plot in Spark, while only retrieving (collecting) a small subset of the remote dataset: dbplot_raster(cars, mpg, wt, resolution = 16) FIGURE 3.13: A raster plot using Spark As shown in 3.13, the resulting plot returns a grid no bigger than 5 x 5. This limits the number of records that need to be collected into R to 25. Tip: You can also use dbplot to retrieve the raw data and visualize by other means; to retrieve the aggregates, but not the plots, use db_compute_bins(), db_compute_count(), db_compute_raster(), and db_compute_boxplot(). While visualizations are indispensable, you can complement data analysis using statistical models to gain even deeper insights into our data. The next section describes how we can prepare data for modeling with Spark.

3.5 Model

The next two chapters focus entirely on modeling, so rather than introducing modeling in too much detail in this chapter, we want to cover how to interact with models while doing data analysis. First, an analysis project goes through many transformations and models to find the answer. That’s why the first data analysis diagram we introduced in Figure 3.2, illustrates a cycle of: visualizing, wrangling, and modeling—we know you don’t end with modeling, not in R, nor when using Spark. Therefore, the ideal data analysis language enables you to quickly adjust over each wrangle-visualize-model iteration. Fortunately, this is the case when using Spark and R. To illustrate how easy it is to iterate over wrangling and modeling in Spark, consider the following example. We will start by performing a linear regression against all features and predict miles per gallon: cars %>% ml_linear_regression(mpg ~ .) %>% summary() Deviance Residuals: Min 1Q Median 3Q Max -3.4506 -1.6044 -0.1196 1.2193 4.6271 Coefficients: (Intercept) cyl disp hp drat wt 12.30337416 -0.11144048 0.01333524 -0.02148212 0.78711097 -3.71530393 qsec vs am gear carb 0.82104075 0.31776281 2.52022689 0.65541302 -0.19941925 R-Squared: 0.869 Root Mean Squared Error: 2.147 At this point, it is very easy to experiment with different features, we can simply change the R formula from mpg ~ . to, say, mpg ~ hp + cyl to only use horsepower and cylinders as features: cars %>% ml_linear_regression(mpg ~ hp + cyl) %>% summary() Deviance Residuals: Min 1Q Median 3Q Max -4.4948 -2.4901 -0.1828 1.9777 7.2934 Coefficients: (Intercept) hp cyl 36.9083305 -0.0191217 -2.2646936 R-Squared: 0.7407 Root Mean Squared Error: 3.021 Additionally, it is also very easy to iterate with other kinds of models. The following one replaces the linear model with a generalized linear model: cars %>% ml_generalized_linear_regression(mpg ~ hp + cyl) %>% summary() Deviance Residuals: Min 1Q Median 3Q Max -4.4948 -2.4901 -0.1828 1.9777 7.2934 Coefficients: (Intercept) hp cyl 36.9083305 -0.0191217 -2.2646936 (Dispersion parameter for gaussian family taken to be 10.06809) Null deviance: 1126.05 on 31 degress of freedom Residual deviance: 291.975 on 29 degrees of freedom AIC: 169.56 Usually, before fitting a model you would need to use multiple dplyr transformations to get it ready to be consumed by a model. To make sure the model can be fitted as efficiently as possible, you should cache your dataset before fitting it, as described next.

3.5.1 Caching

The examples in this chapter are built using a very small dataset. In real-life scenarios, large amounts of data are used for models. If the data needs to be transformed first, the volume of the data could exact a heavy toll on the Spark session. Before fitting the models, it is a good idea to save the results of all the transformations in a new table loaded in Spark memory. The compute() command can take the end of a dplyr command and save the results to Spark memory: cached_cars <- cars %>% mutate(cyl = paste0("cyl_", cyl)) %>% compute("cached_cars") cached_cars %>% ml_linear_regression(mpg ~ .) %>% summary() Deviance Residuals: Min 1Q Median 3Q Max -3.47339 -1.37936 -0.06554 1.05105 4.39057 Coefficients: (Intercept) cyl_cyl_8.0 cyl_cyl_4.0 disp hp drat 16.15953652 3.29774653 1.66030673 0.01391241 -0.04612835 0.02635025 wt qsec vs am gear carb -3.80624757 0.64695710 1.74738689 2.61726546 0.76402917 0.50935118 R-Squared: 0.8816 Root Mean Squared Error: 2.041 As more insights are gained from the data, more questions might be raised. That is why we expect to iterate through the data wrangle, visualize, and model cycle multiple times. Each iteration should provide incremental insights into what the data is “telling us”. There will be a point when we reach a satisfactory level of understanding. It is at this point that we will be ready to share the results of the analysis. This is the topic of the next section.

3.6 Communicate

It is important to clearly communicate the analysis results—as important as the analysis work itself! The public, colleagues, or stakeholders need to understand what you found out and how. To communicate effectively, we need to use artifacts such as reports and presentations; these are common output formats that we can create in R, using R Markdown. R Markdown documents allow you to weave narrative text and code together. The variety of output formats provides a very compelling reason to learn and use R Markdown. There are many available output formats like HTML, PDF, PowerPoint, Word, web slides, websites, books, and so on. Most of these outputs are available in the core R packages of R Markdown: knitr and rmarkdown. You can extend R Markdown with other R packages. For example, this book was written using R Markdown thanks to an extension provided by the bookdown package. The best resource to delve deeper into R Markdown is the official book. In R Markdown, one singular artifact could potentially be rendered in different formats. For example, you could render the same report in HTML or as a PDF file by changing a setting within the report itself. Conversely, multiple types of artifacts could be rendered as the same output. For example, a presentation deck and a report could be rendered in HTML. Creating a new R Markdown report that uses Spark as a computer engine is easy. At the top, R Markdown expects a YAML header. The first and last lines are three consecutive dashes (---). The content in between the dashes varies depending on the type of document. The only required field in the YAML header is the output value. R Markdown needs to know what kind of output it needs to render your report into. This YAML header is called frontmatter. Following the frontmatter are sections of code, called code chunks. These code chunks can be interlaced with the narratives. There is nothing particularly interesting to note when using Spark with R Markdown; it is just business as usual. Since an R Markdown document is self-contained and meant to be reproducible, before rendering documents, we should first disconnect from Spark to free resources: spark_disconnect(sc) The following example shows how easy it is to create a fully reproducible report that uses Spark to process large-scale datasets. The narrative, code, and, most important, the output of the code is recorded in the resulting HTML file. You can copy and paste the following code in a file. Save the file with a .Rmd extension, and choose whatever name you would like: --- title: "mtcars analysis" output: html_document: fig_width: 6 fig_height: 3 --- ```{r, setup, include = FALSE} library(sparklyr) library(dplyr) sc <- spark_connect(master = "local", version = "2.3") cars <- copy_to(sc, mtcars) ``` ## Visualize Aggregate data in Spark, visualize in R. ```{r fig.align='center', warning=FALSE} library(ggplot2) cars %>% group_by(cyl) %>% summarise(mpg = mean(mpg)) %>% ggplot(aes(cyl, mpg)) + geom_bar(stat="identity") ``` ## Model The selected model was a simple linear regression that uses the weight as the predictor of MPG ```{r} cars %>% ml_linear_regression(wt ~ mpg) %>% summary() ``` ```{r, include = FALSE} spark_disconnect(sc) ``` To(((“commands”, “render()”))) knit this report, save the file with a .Rmd extension such as report.Rmd, and run render() from R. The output should look like that shown in Figure 3.14. rmarkdown::render("report.Rmd") 
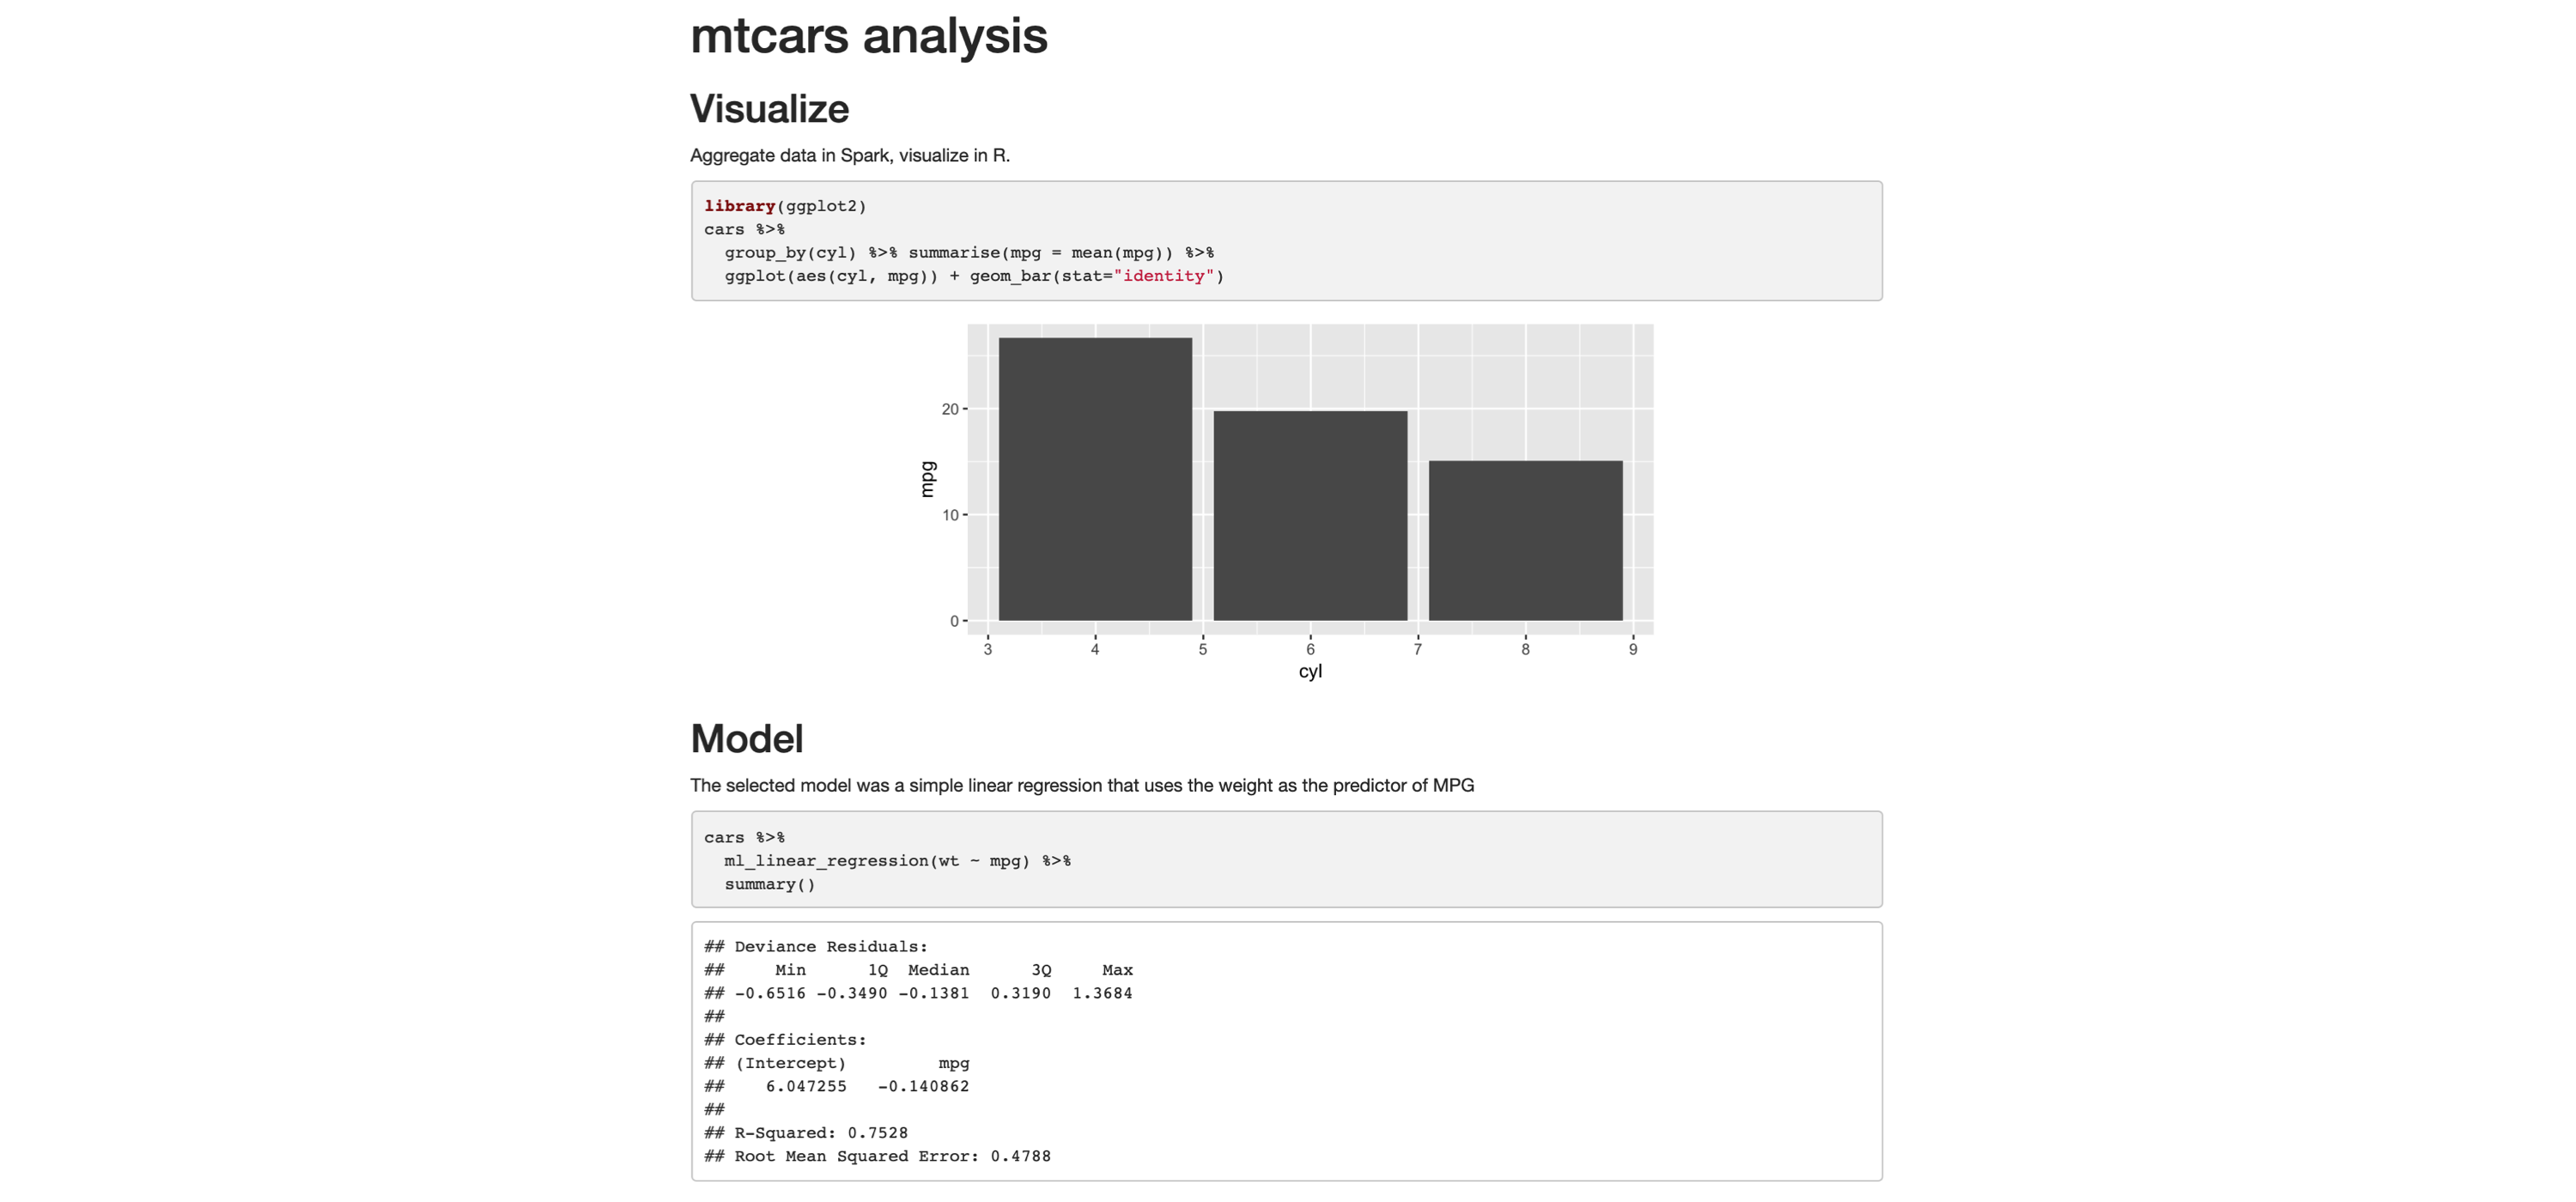
FIGURE 3.14: R Markdown HTML output You can now easily share this report, and viewers of won’t need Spark or R to read and consume its contents; it’s just a self-contained HTML file, trivial to open in any browser. It is also common to distill insights of a report into many other output formats. Switching is quite easy: in the top frontmatter, change the output option to powerpoint_presentation, pdf_document, word_document, or the like. Or you can even produce multiple output formats from the same report: --- title: "mtcars analysis" output: word_document: default pdf_document: default powerpoint_presentation: default --- The result will be a PowerPoint presentation, a Word document, and a PDF. All of the same information that was displayed in the original HTML report is computed in Spark and rendered in R. You’ll likely need to edit the PowerPoint template or the output of the code chunks. This minimal example shows how easy it is to go from one format to another. Of course, it will take some more editing on the R user’s side to make sure the slides contain only the pertinent information. The main point is that it does not require that you learn a different markup or code conventions to switch from one artifact to another.

3.7 Recap

This chapter presented a solid introduction to data analysis with R and Spark. Many of the techniques presented looked quite similar to using just R and no Spark, which, while anticlimactic, is the right design to help users already familiar with R to easily transition to Spark. For users unfamiliar with R, this chapter also served as a very brief introduction to some of the most popular (and useful!) packages available in R. It should now be quite obvious that, together, R and Spark are a powerful combination—a large-scale computing platform, along with an incredibly robust ecosystem of R packages, makes for an ideal analysis platform. While doing analysis in Spark with R, remember to push computation to Spark and focus on collecting results in R. This paradigm should set up a successful approach to data manipulation, visualization and communication through sharing your results in a variety of outputs. Chapter 4 will dive deeper into how to build statistical models in Spark using a much more interesting dataset (what’s more interesting than dating datasets?). You will also learn many more techniques that we did not even mention in the brief modeling section from this chapter.

Chapter 4 Modeling

In Chapter 3 you learned how to scale up data analysis to large datasets using Spark. In this chapter, we detail the steps required to build prediction models in Spark. We explore MLlib, the component of Spark that allows you to write high-level code to perform predictive modeling on distributed data, and use data wrangling in the context of feature engineering and exploratory data analysis. We will start this chapter by introducing modeling in the context of Spark and the dataset you will use throughout the chapter. We then demonstrate a supervised learning workflow that includes exploratory data analysis, feature engineering, and model building. Then we move on to an unsupervised topic modeling example using unstructured text data. Keep in mind that our goal is to show various techniques of executing data science tasks on large data rather than conducting a rigorous and coherent analysis. There are also many other models available in Spark that won’t be covered in this chapter, but by the end of the chapter, you will have the right tools to experiment with additional ones on your own. While predicting datasets manually is often a reasonable approach (by “manually,” we mean someone imports a dataset into Spark and uses the fitted model to enrich or predict values), it does beg the question, could we automate this process into systems that anyone can use? For instance, how can we build a system that automatically identifies an email as spam without having to manually analyze each email account? Chapter 5 presents the tools to automate data analysis and modeling with pipelines, but to get there, we need to first understand how to train models “by hand”.

4.1 Overview

The R interface to Spark provides modeling algorithms that should be familiar to R users, and we’ll go into detail in the chapter. For instance, we’ve already used ml_linear_regression(cars, mpg ~ .), but we could run ml_logistic_regression(cars, am ~ .) just as easily. Take a moment to look at the long list of MLlib functions included in the appendix of this book; a quick glance at this list shows that Spark supports Decision Trees, Gradient-Boosted Trees, Accelerated Failure Time Survival Regression, Isotonic Regression, K-Means Clustering, Gaussian Mixture Clustering, and more. As you can see, Spark provides a wide range of algorithms and feature transformers, and here we touch on a representative portion of the functionality. A complete treatment of predictive modeling concepts is beyond the scope of this book, so we recommend complementing this discussion with R for Data Science by Hadley Wickham and Garrett Grolemund G (O’Reilly) and Feature Engineering and Selection: A Practical Approach for Predictive Models, from which we adopted (sometimes verbatim) some of the examples and visualizations in this chapter. This chapter focuses on predictive modeling, since Spark aims to enable machine learning as opposed to statistical inference. Machine learning is often more concerned about forecasting the future rather than inferring the process by which our data is generated, which is then used to create automated systems. Machine learning can be categorized into supervised learning (predictive modeling) and unsupervised learning. In supervised learning, we try to learn a function that will map from X to Y, from a dataset of (x, y) examples. In unsupervised learning, we just have X and not the Y labels, so instead we try to learn something about the structure of X. Some practical use cases for supervised learning include forecasting tomorrow’s weather, determining whether a credit card transaction is fraudulent, and coming up with a quote for your car insurance policy. With unsupervised learning, examples include automated grouping of photos of individuals, segmenting customers based on their purchase history, and clustering of documents. The ML interface in sparklyr has been designed to minimize the cognitive effort for moving from a local, in-memory, native-R workflow to the cluster, and back. While the Spark ecosystem is very rich, there is still a tremendous number of packages from CRAN, with some implementing functionality that you might require for a project. Also, you might want to leverage your skills and experience working in R to maintain productivity. What we learned in Chapter 3 also applies here—it is important to keep track of where you are performing computations and move between the cluster and your R session as appropriate. The examples in this chapter utilize the OkCupid dataset. The dataset consists of user profile data from an online dating site and contains a diverse set of features, including biographical characteristics such as gender and profession, as well as free text fields related to personal interests. There are about 60,000 profiles in the dataset, which fits comfortably into memory on a modern laptop and wouldn’t be considered “big data”, so you can easily follow along running Spark in local mode. You can download this dataset as follows: download.file( "https://github.com/r-spark/okcupid/raw/master/profiles.csv.zip", "okcupid.zip") unzip("okcupid.zip", exdir = "data") unlink("okcupid.zip") We don’t recommend sampling this dataset since the model won’t be nearly as rich; however, if you have limited hardware resources, you are welcome to sample it as follows: profiles <- read.csv("data/profiles.csv") write.csv(dplyr::sample_n(profiles, 10^3), "data/profiles.csv", row.names = FALSE) Note: The examples in this chapter utilize small datasets so that you can easily follow along in local mode. In practice, if your dataset fits comfortably in memory on your local machine, you might be better off using an efficient, nondistributed implementation of the modeling algorithm. For example, you might want to use the ranger package instead of ml_random_forest_classifier(). In addition, to follow along, you will need to install a few additional packages: install.packages("ggmosaic") install.packages("forcats") install.packages("FactoMineR") To motivate the examples, we consider the following problem: Next up, we explore this dataset.

4.2 Exploratory Data Analysis

Exploratory data analysis (EDA), in the context of predictive modeling, is the exercise of looking at excerpts and summaries of the data. The specific goals of the EDA stage are informed by the business problem, but here are some common objectives: To begin, we connect to Spark, load libraries, and read in the data: library(sparklyr) library(ggplot2) library(dbplot) library(dplyr) sc <- spark_connect(master = "local", version = "2.3") okc <- spark_read_csv( sc, "data/profiles.csv", escape = "\", memory = FALSE, options = list(multiline = TRUE) ) %>% mutate( height = as.numeric(height), income = ifelse(income == "-1", NA, as.numeric(income)) ) %>% mutate(sex = ifelse(is.na(sex), "missing", sex)) %>% mutate(drinks = ifelse(is.na(drinks), "missing", drinks)) %>% mutate(drugs = ifelse(is.na(drugs), "missing", drugs)) %>% mutate(job = ifelse(is.na(job), "missing", job)) We specify escape = "\"" and options = list(multiline = TRUE) here to accommodate embedded quote characters and newlines in the essay fields. We also convert the height and income columns to numeric types and recode missing values in the string columns. Note that it might very well take a few tries of specifying different parameters to get the initial data ingest correct, and sometimes you might need to revisit this step after you learn more about the data during modeling. We can now take a quick look at our data by using glimpse(): glimpse(okc) Observations: ?? Variables: 31 Database: spark_connection $ age <int> 22, 35, 38, 23, 29, 29, 32, 31, 24, 37, 35… $ body_type <chr> "a little extra", "average", "thin", "thin… $ diet <chr> "strictly anything", "mostly other", "anyt… $ drinks <chr> "socially", "often", "socially", "socially… $ drugs <chr> "never", "sometimes", "missing", "missing"… $ education <chr> "working on college/university", "working … $ essay0 <chr> "about me:<br />\n<br />\ni would love to … $ essay1 <chr> "currently working as an international age… $ essay2 <chr> "making people laugh.<br />\nranting about… $ essay3 <chr> "the way i look. i am a six foot half asia… $ essay4 <chr> "books:<br />\nabsurdistan, the republic, … $ essay5 <chr> "food.<br />\nwater.<br />\ncell phone.<br… $ essay6 <chr> "duality and humorous things", "missing", … $ essay7 <chr> "trying to find someone to hang out with. … $ essay8 <chr> "i am new to california and looking for so… $ essay9 <chr> "you want to be swept off your feet!<br />… $ ethnicity <chr> "asian, white", "white", "missing", "white… $ height <dbl> 75, 70, 68, 71, 66, 67, 65, 65, 67, 65, 70… $ income <dbl> NaN, 80000, NaN, 20000, NaN, NaN, NaN, NaN… $ job <chr> "transportation", "hospitality / travel", … $ last_online <chr> "2012-06-28-20-30", "2012-06-29-21-41", "2… $ location <chr> "south san francisco, california", "oaklan… $ offspring <chr> "doesn&rsquo;t have kids, but might want t… $ orientation <chr> "straight", "straight", "straight", "strai… $ pets <chr> "likes dogs and likes cats", "likes dogs a… $ religion <chr> "agnosticism and very serious about it", "… $ sex <chr> "m", "m", "m", "m", "m", "m", "f", "f", "f… $ sign <chr> "gemini", "cancer", "pisces but it doesn&r… $ smokes <chr> "sometimes", "no", "no", "no", "no", "no",… $ speaks <chr> "english", "english (fluently), spanish (p… $ status <chr> "single", "single", "available", "single",… Now, we add our response variable as a column in the dataset and look at its distribution: okc <- okc %>% mutate( not_working = ifelse(job %in% c("student", "unemployed", "retired"), 1 , 0) ) okc %>% group_by(not_working) %>% tally() # Source: spark<?> [?? x 2] not_working n <dbl> <dbl> 1 0 54541 2 1 5405 Before we proceed further, let’s perform an initial split of our data into a training set and a testing set and put away the latter. In practice, this is a crucial step because we would like to have a holdout set that we set aside at the end of the modeling process to evaluate model performance. If we were to include the entire dataset during EDA, information from the testing set could “leak” into the visualizations and summary statistics and bias our model-building process even though the data is not used directly in a learning algorithm. This would undermine the credibility of our performance metrics. We can easily split the data by using the sdf_random_split() function: data_splits <- sdf_random_split(okc, training = 0.8, testing = 0.2, seed = 42) okc_train <- data_splits$training okc_test <- data_splits$testing We can quickly look at the distribution of our response variable: okc_train %>% group_by(not_working) %>% tally() %>% mutate(frac = n / sum(n)) # Source: spark<?> [?? x 3] not_working n frac <dbl> <dbl> <dbl> 1 0 43785 0.910 2 1 4317 0.0897 Using the sdf_describe() function, we can obtain numerical summaries of specific columns: sdf_describe(okc_train, cols = c("age", "income")) # Source: spark<?> [?? x 3] summary age income <chr> <chr> <chr> 1 count 48102 9193 2 mean 32.336534863415245 104968.99815076689 3 stddev 9.43908920033797 202235.2291773537 4 min 18 20000.0 5 max 110 1000000.0 Like we saw in Chapter 3, we can also utilize the dbplot package to plot distributions of these variables. In Figure 4.1 we show a histogram of the distribution of the age variable, which is the result of the following code: dbplot_histogram(okc_train, age) 
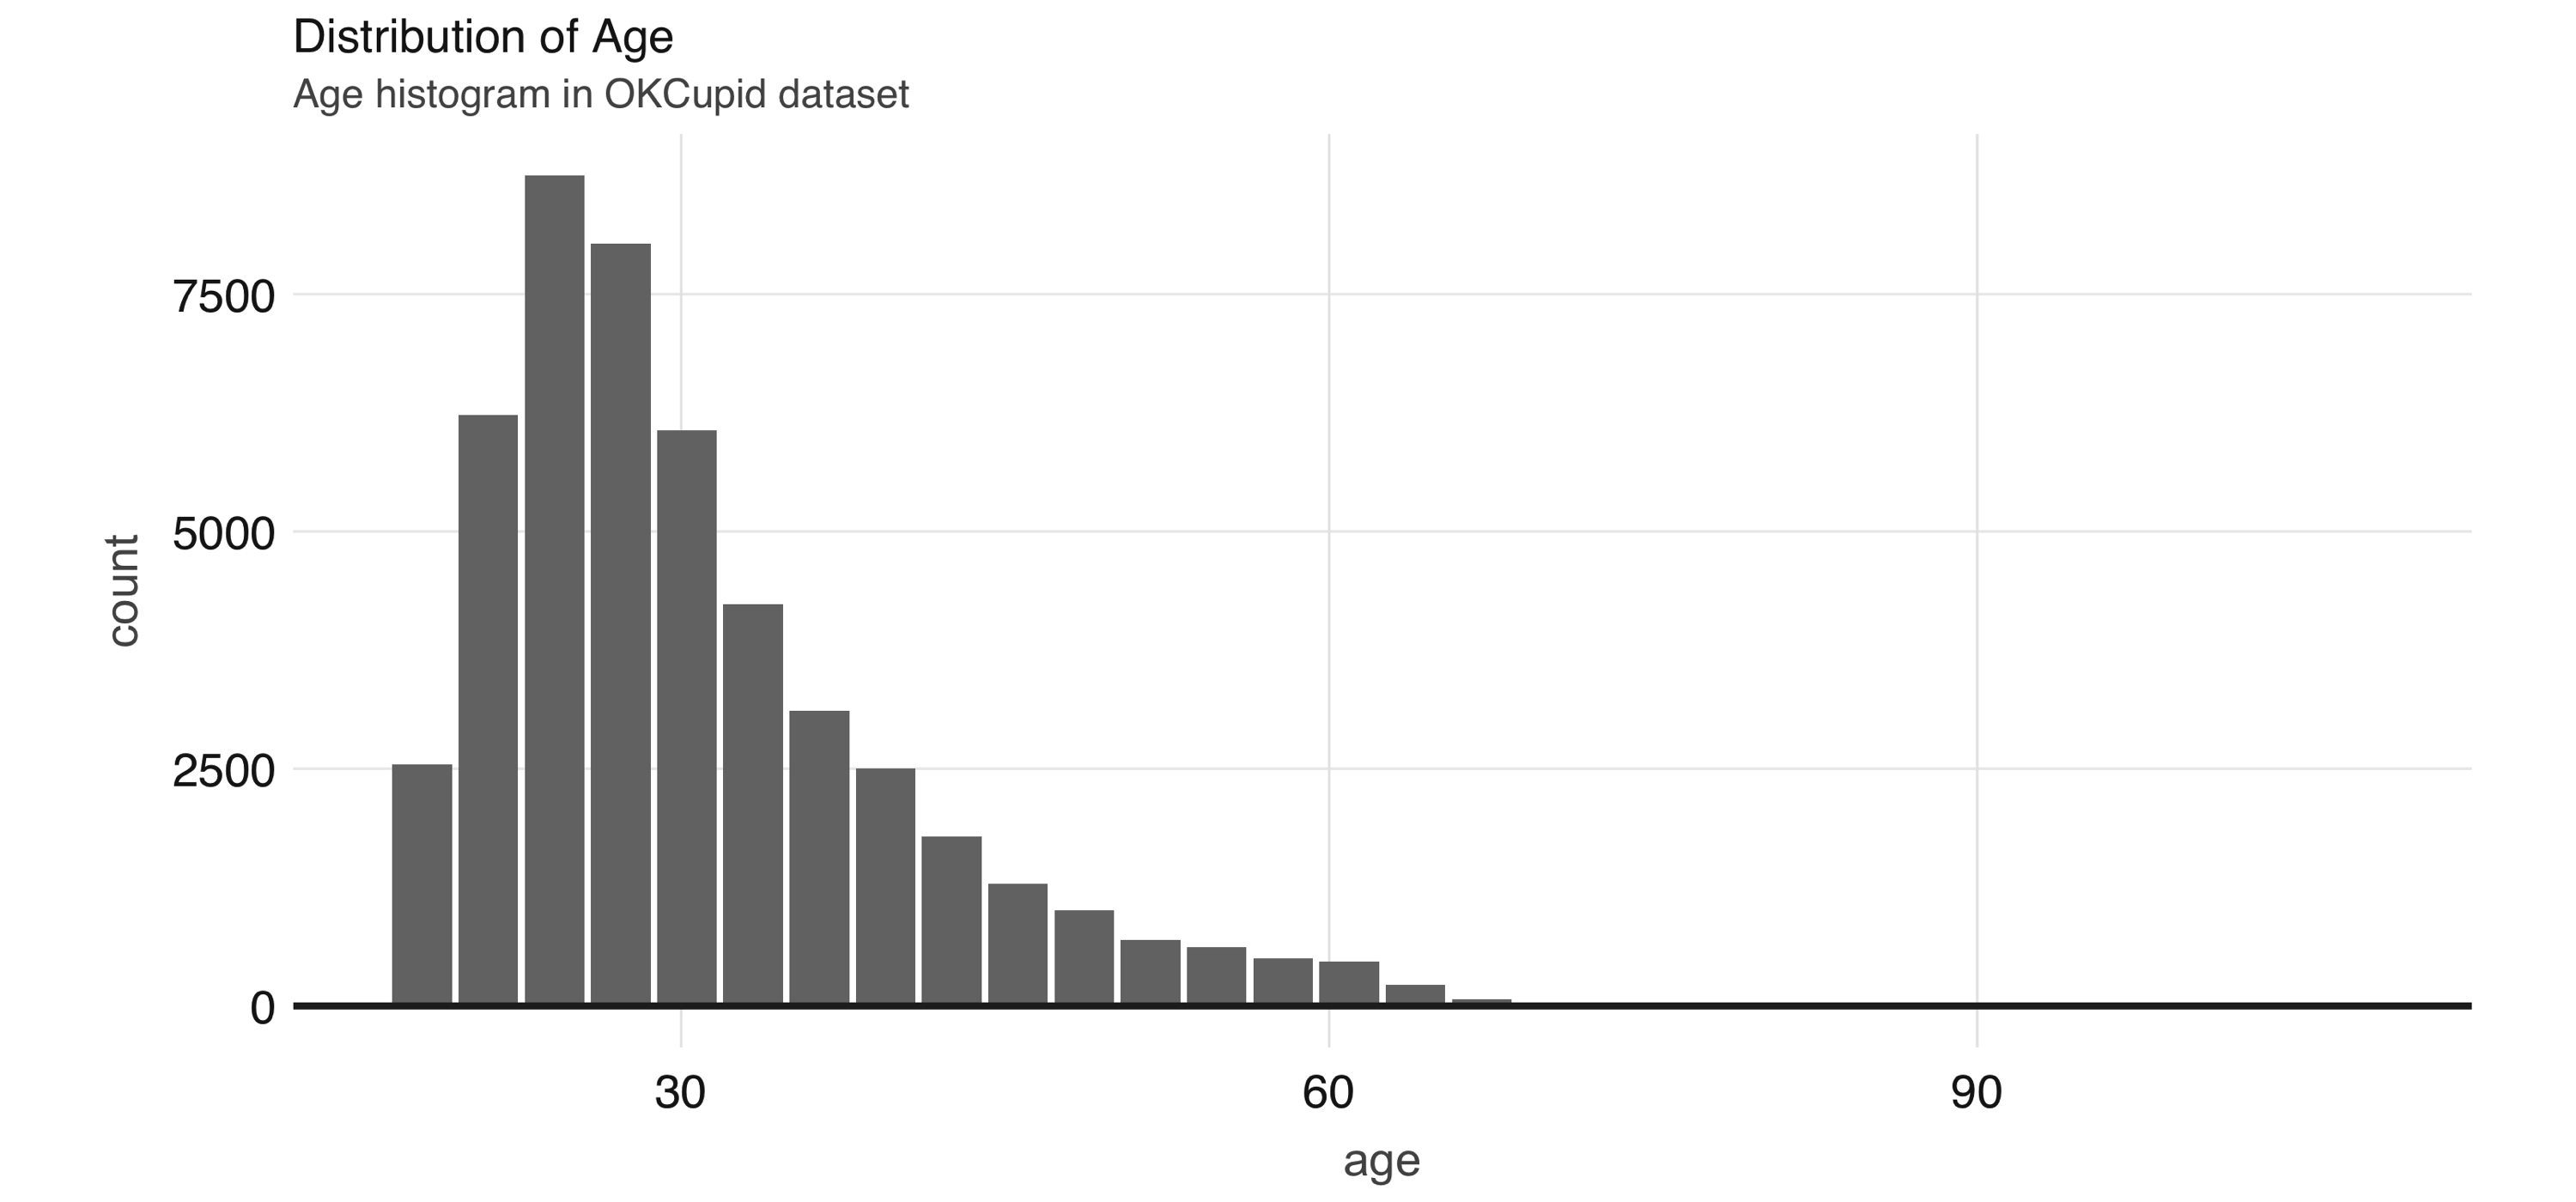
FIGURE 4.1: Distribution of age A common EDA exercise is to look at the relationships between the response and the individual predictors. Often, you might have prior business knowledge of what these relationships should be, so this can serve as a data quality check. Also, unexpected trends can inform variable interactions that you might want to include in the model. As an example, we can explore the religion variable: prop_data <- okc_train %>% mutate(religion = regexp_extract(religion, "^\\\\w+", 0)) %>% group_by(religion, not_working) %>% tally() %>% group_by(religion) %>% summarize( count = sum(n), prop = sum(not_working * n) / sum(n) ) %>% mutate(se = sqrt(prop * (1 - prop) / count)) %>% collect() prop_data # A tibble: 10 x 4 religion count prop se <chr> <dbl> <dbl> <dbl> 1 judaism 2520 0.0794 0.00539 2 atheism 5624 0.118 0.00436 3 christianity 4671 0.120 0.00480 4 hinduism 358 0.101 0.0159 5 islam 115 0.191 0.0367 6 agnosticism 7078 0.0958 0.00346 7 other 6240 0.0841 0.00346 8 missing 16152 0.0719 0.002 9 buddhism 1575 0.0851 0.007 10 catholicism 3769 0.0886 0.00458 Note that prop_data is a small DataFrame that has been collected into memory in our R session, we can take advantage of ggplot2 to create an informative visualization (see Figure 4.2): prop_data %>% ggplot(aes(x = religion, y = prop)) + geom_point(size = 2) + geom_errorbar(aes(ymin = prop - 1.96 * se, ymax = prop + 1.96 * se), width = .1) + geom_hline(yintercept = sum(prop_data$prop * prop_data$count) / sum(prop_data$count)) 
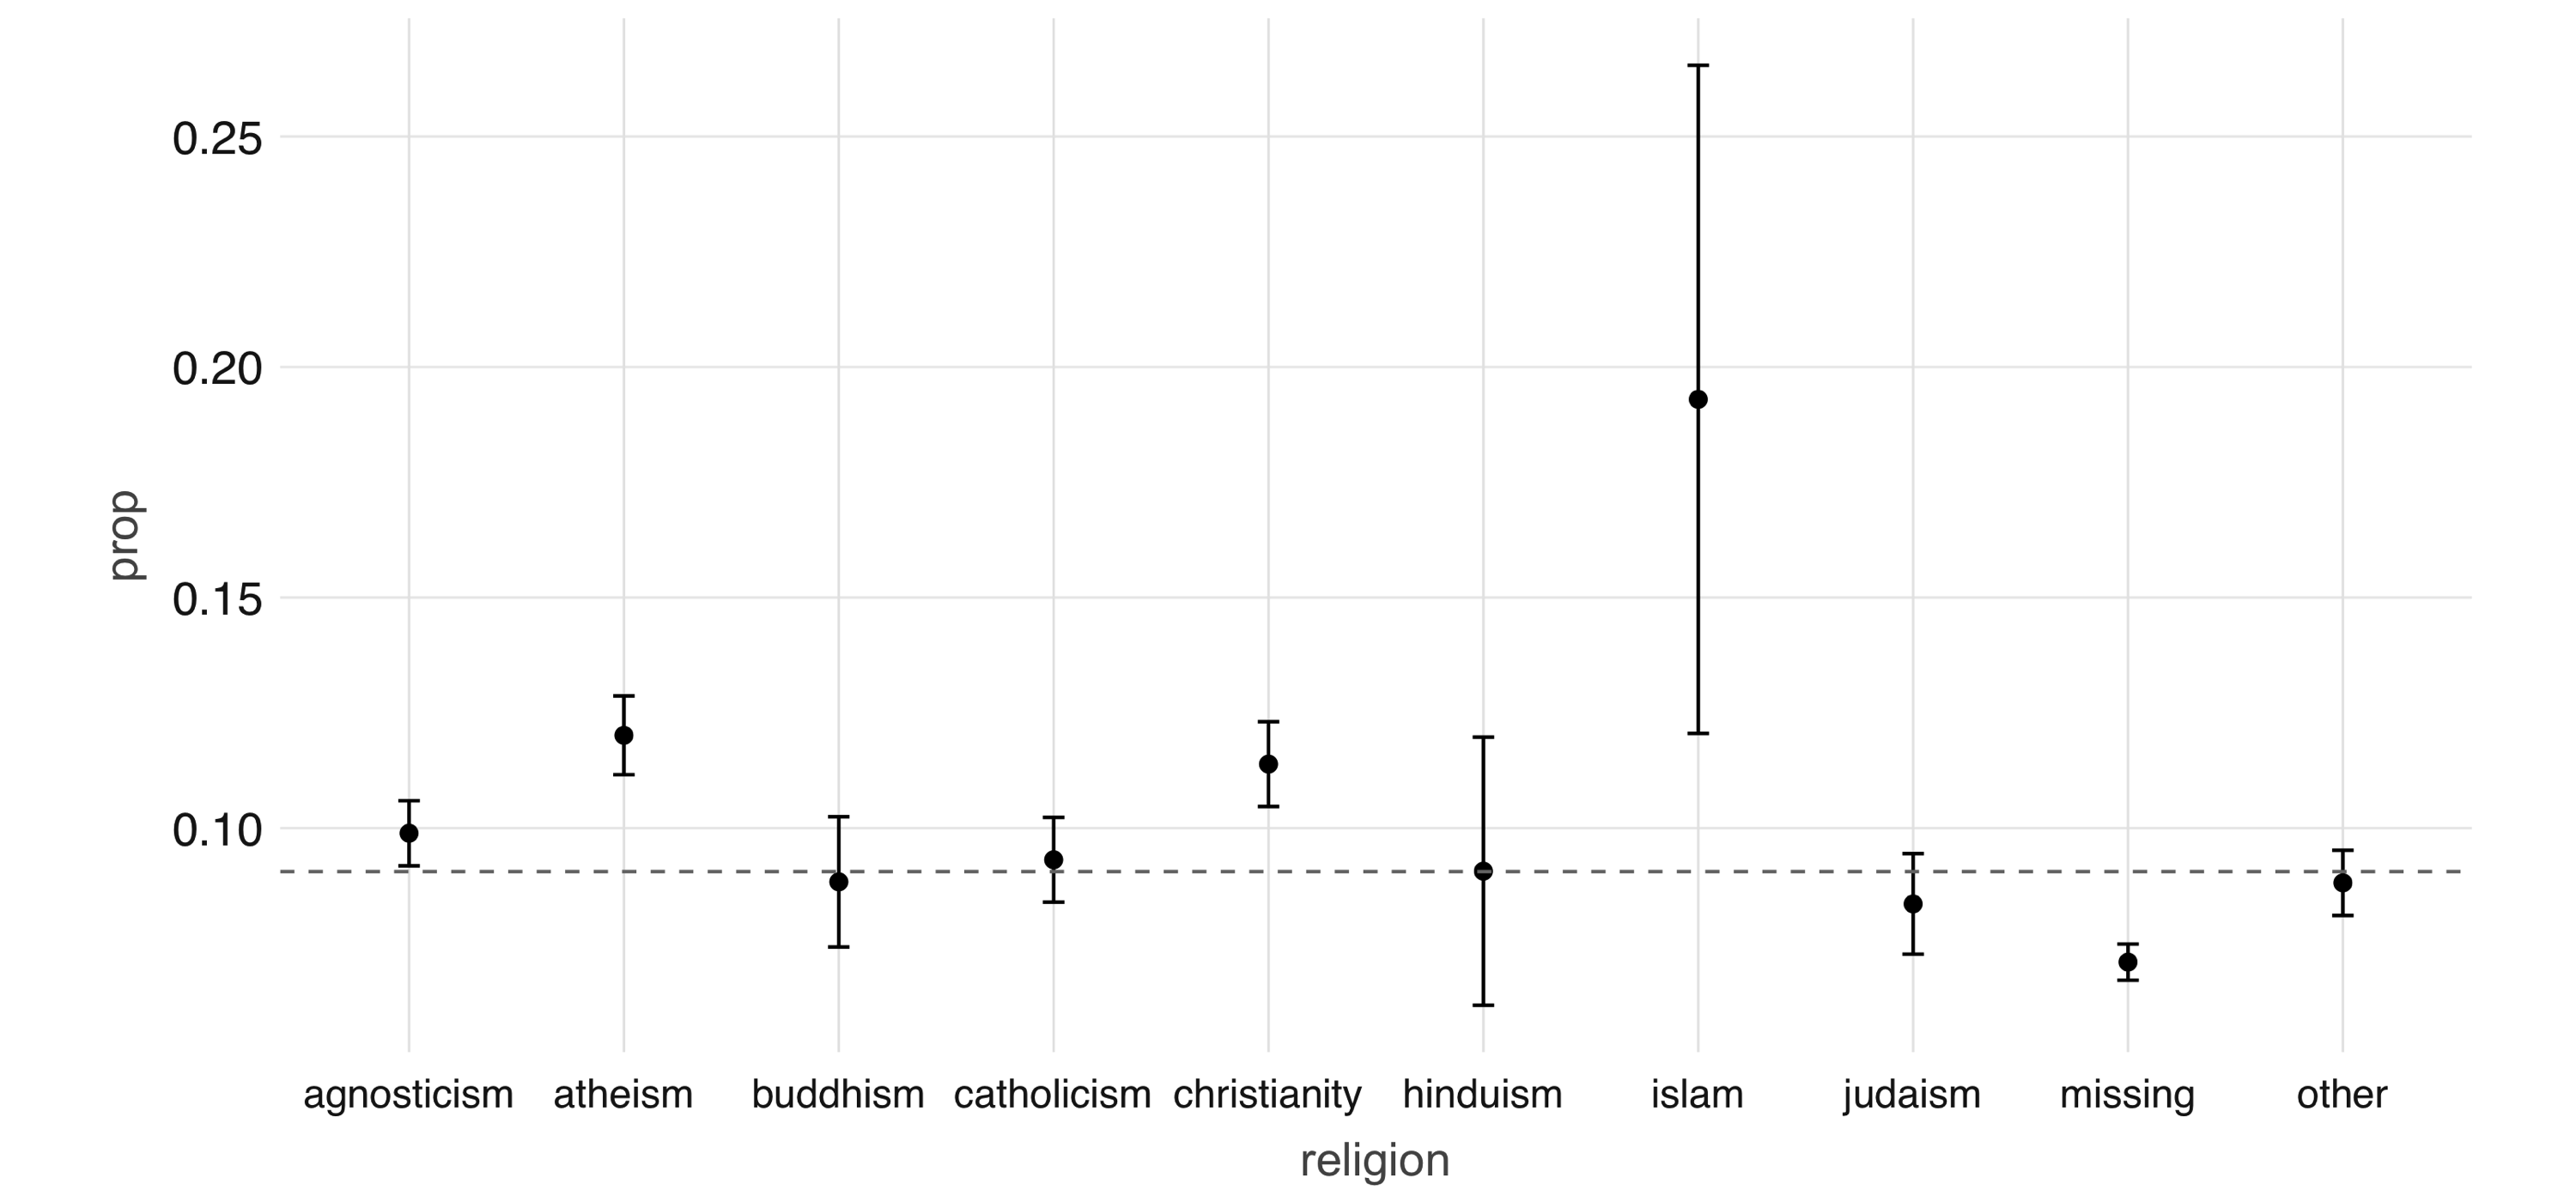
FIGURE 4.2: Proportion of individuals not currently employed, by religion Next, we take a look at the relationship between a couple of predictors: alcohol use and drug use. We would expect there to be some correlation between them. You can compute a contingency table via sdf_crosstab(): contingency_tbl <- okc_train %>% sdf_crosstab("drinks", "drugs") %>% collect() contingency_tbl # A tibble: 7 x 5 drinks_drugs missing never often sometimes <chr> <dbl> <dbl> <dbl> <dbl> 1 very often 54 144 44 137 2 socially 8221 21066 126 4106 3 not at all 146 2371 15 109 4 desperately 72 89 23 74 5 often 1049 1718 69 1271 6 missing 1121 1226 10 59 7 rarely 613 3689 35 445 We can visualize this contingency table using a mosaic plot (see Figure 4.3): library(ggmosaic) library(forcats) library(tidyr) contingency_tbl %>% rename(drinks = drinks_drugs) %>% gather("drugs", "count", missing:sometimes) %>% mutate( drinks = as_factor(drinks) %>% fct_relevel("missing", "not at all", "rarely", "socially", "very often", "desperately"), drugs = as_factor(drugs) %>% fct_relevel("missing", "never", "sometimes", "often") ) %>% ggplot() + geom_mosaic(aes(x = product(drinks, drugs), fill = drinks, weight = count)) 
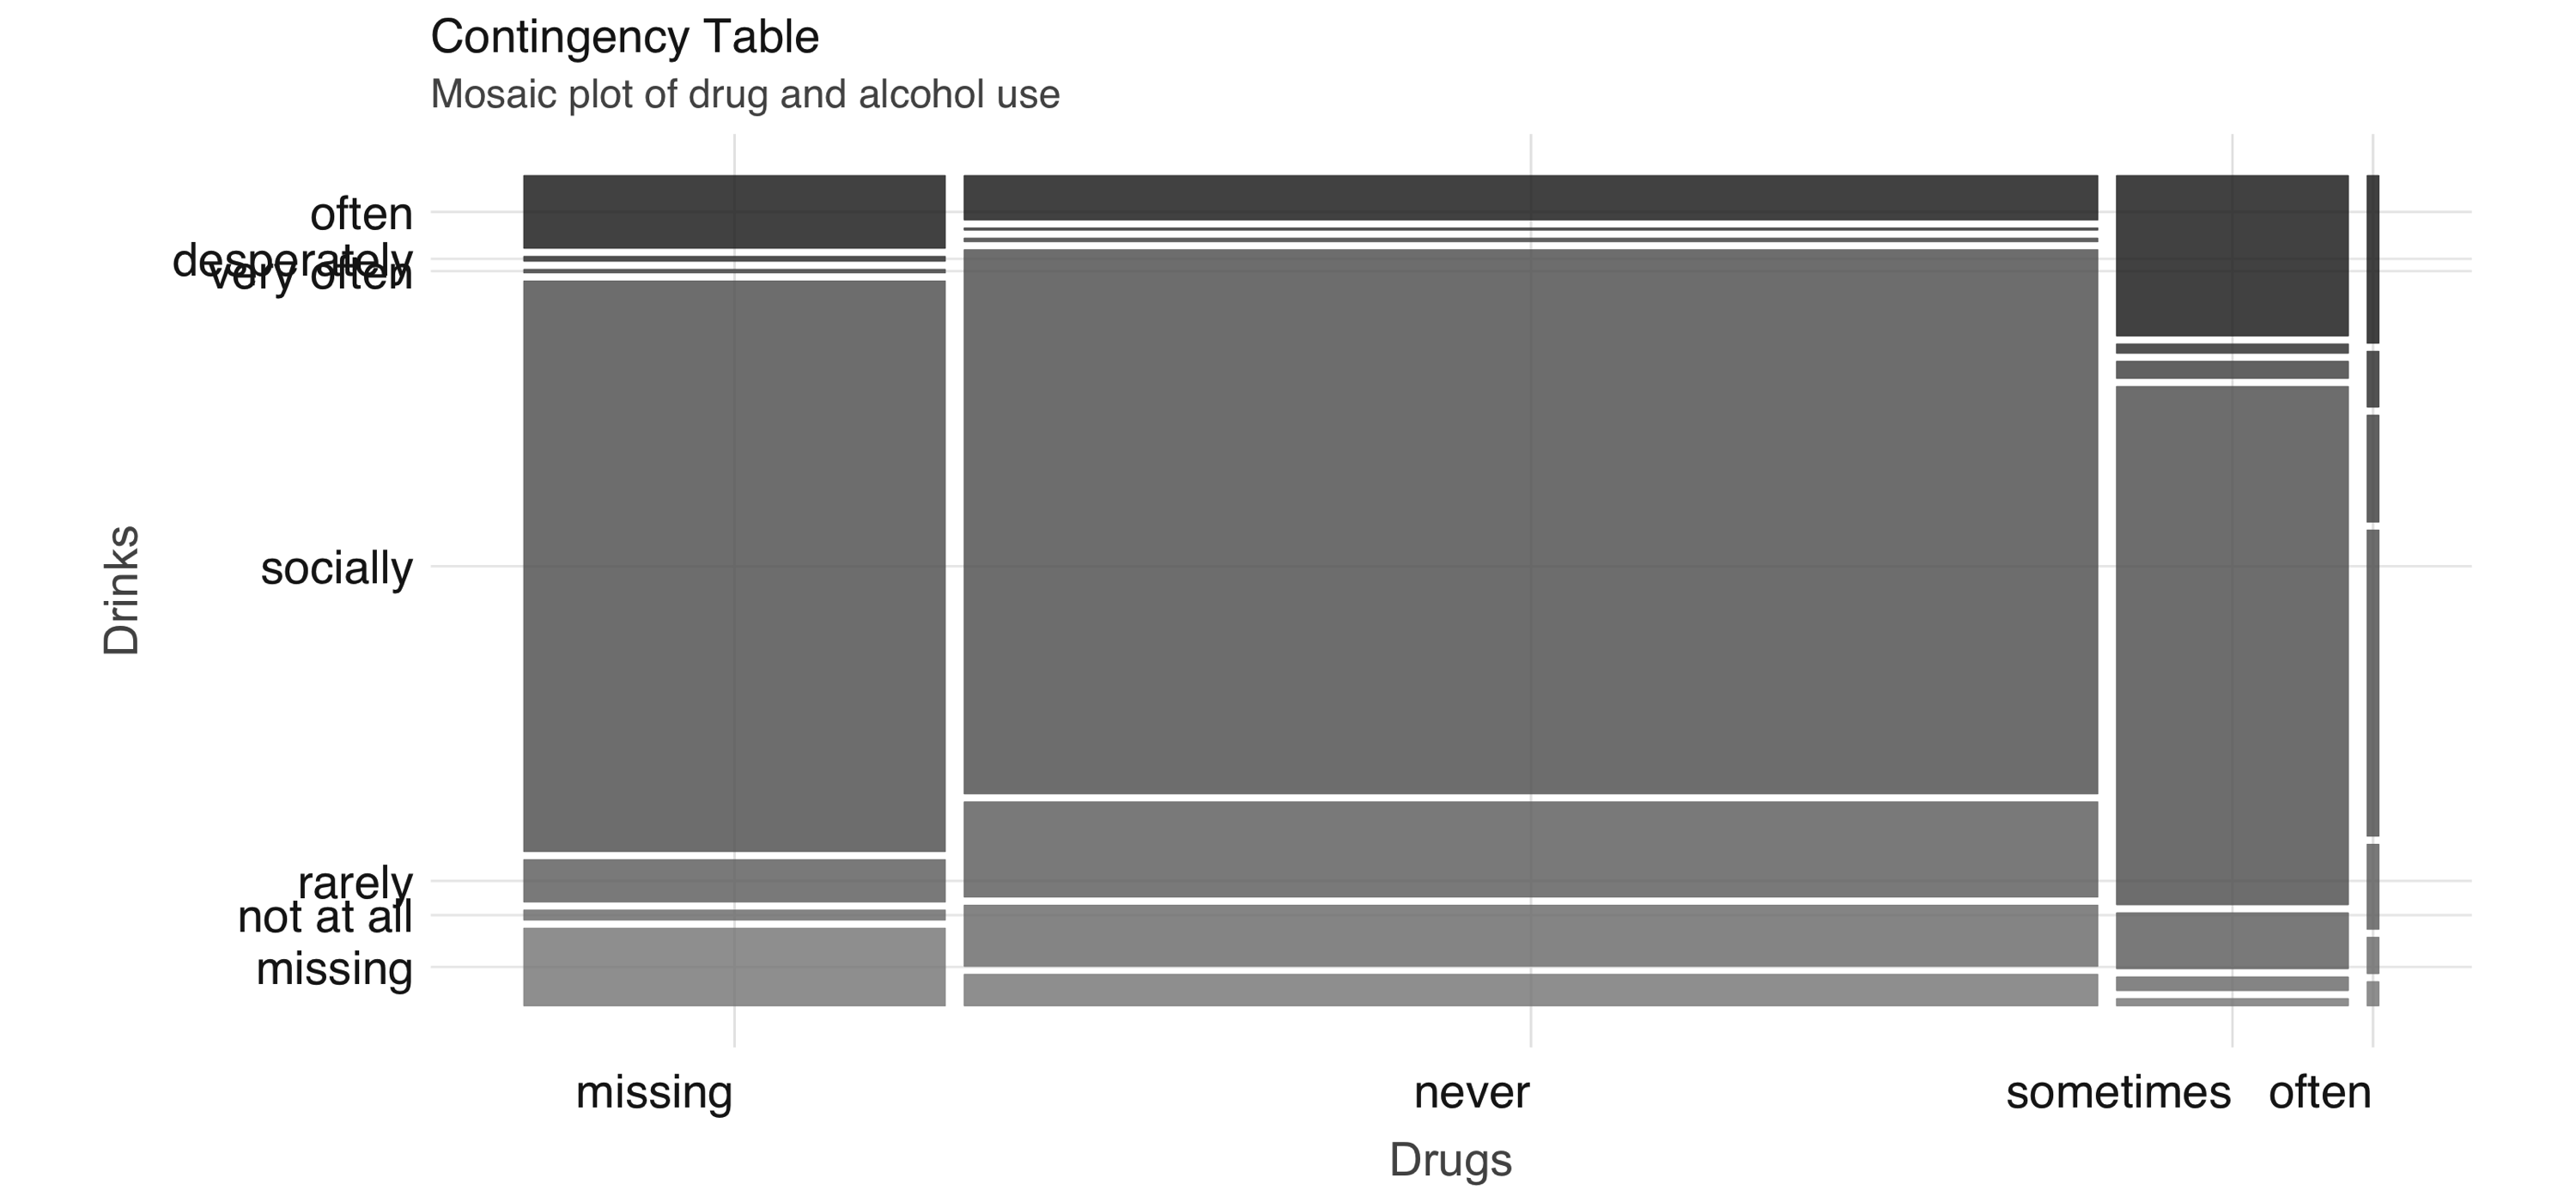
FIGURE 4.3: Mosaic plot of drug and alcohol use To further explore the relationship between these two variables, we can perform correspondence analysis using the FactoMineR package. This technique enables us to summarize the relationship between the high-dimensional factor levels by mapping each level to a point on the plane. We first obtain the mapping using FactoMineR::CA() as follows: dd_obj <- contingency_tbl %>% tibble::column_to_rownames(var = "drinks_drugs") %>% FactoMineR::CA(graph = FALSE) We can then plot the results using ggplot, which you can see in Figure 4.4: dd_drugs <- dd_obj$row$coord %>% as.data.frame() %>% mutate( label = gsub("_", " ", rownames(dd_obj$row$coord)), Variable = "Drugs" ) dd_drinks <- dd_obj$col$coord %>% as.data.frame() %>% mutate( label = gsub("_", " ", rownames(dd_obj$col$coord)), Variable = "Alcohol" ) ca_coord <- rbind(dd_drugs, dd_drinks) ggplot(ca_coord, aes(x = `Dim 1`, y = `Dim 2`, col = Variable)) + geom_vline(xintercept = 0) + geom_hline(yintercept = 0) + geom_text(aes(label = label)) + coord_equal() 
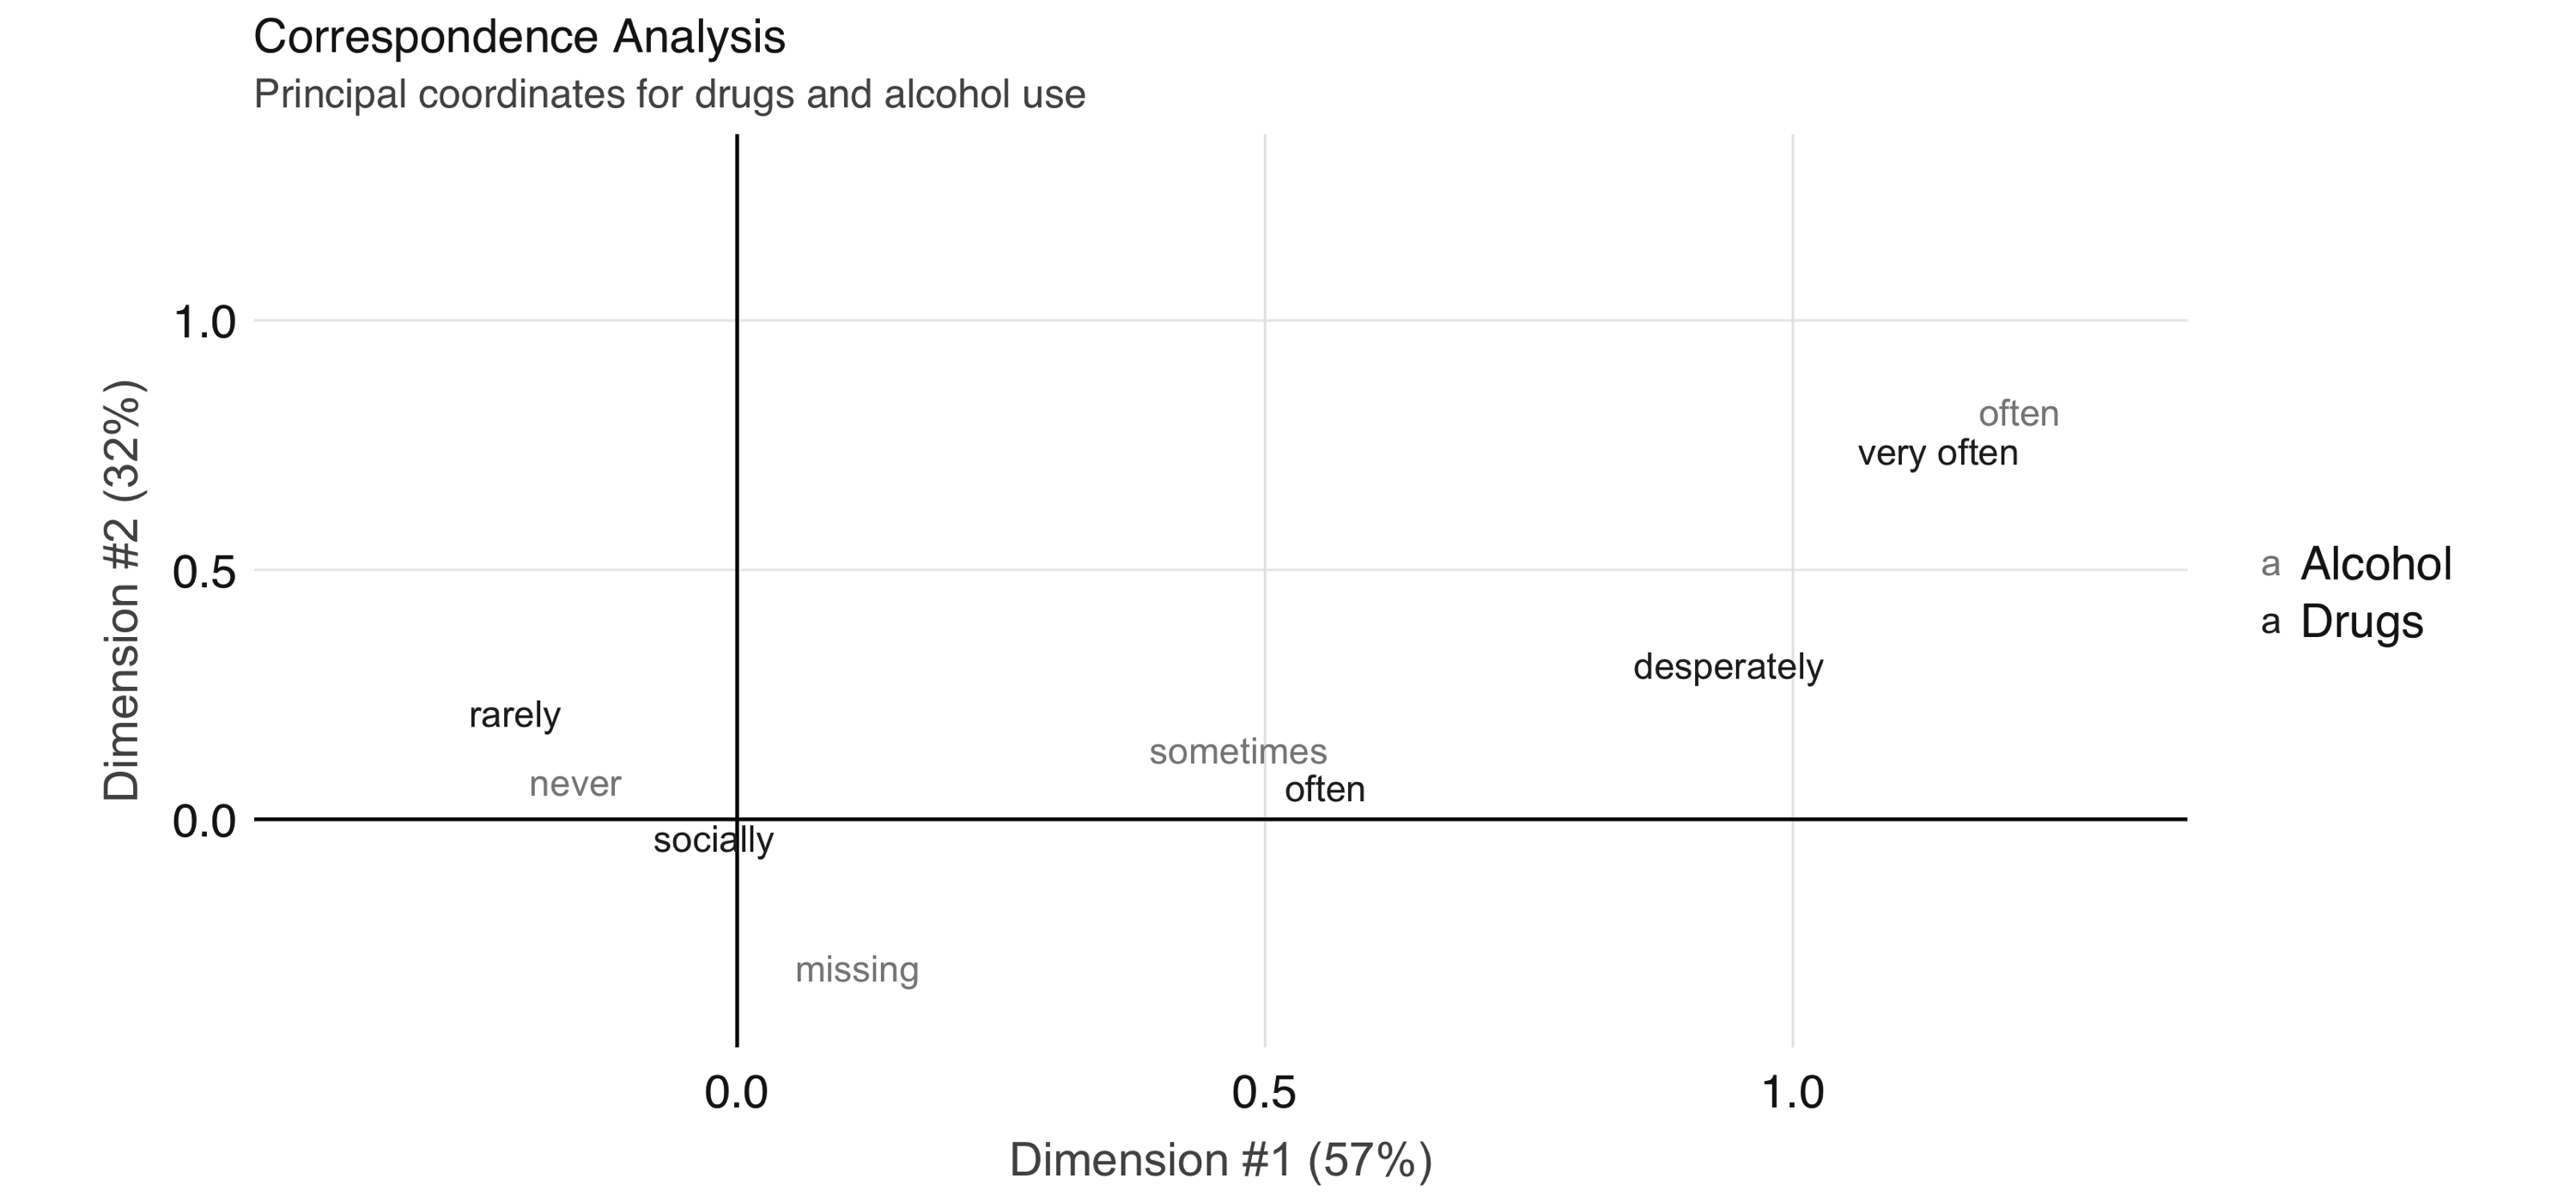
FIGURE 4.4: Correspondence analysis principal coordinates for drug and alcohol use In Figure 4.4, we see that the correspondence analysis procedure has transformed the factors into variables called principal coordinates, which correspond to the axes in the plot and represent how much information in the contingency table they contain. We can, for example, interpret the proximity of “drinking often” and “using drugs very often” as indicating association. This concludes our discussion on EDA. Let’s proceed to feature engineering.

4.3 Feature Engineering

The feature engineering exercise comprises transforming the data to increase the performance of the model. This can include things like centering and scaling numerical values and performing string manipulation to extract meaningful variables. It also often includes variable selection—the process of selecting which predictors are used in the model. In Figure 4.1 we see that the age variable has a range from 18 to over 60. Some algorithms, especially neural networks, train faster if we normalize our inputs so that they are of the same magnitude. Let’s now normalize the age variable by removing the mean and scaling to unit variance, beginning by calculating its mean and standard deviation: scale_values <- okc_train %>% summarize( mean_age = mean(age), sd_age = sd(age) ) %>% collect() scale_values # A tibble: 1 x 2 mean_age sd_age <dbl> <dbl> 1 32.3 9.44 We can then use these to transform the dataset: okc_train <- okc_train %>% mutate(scaled_age = (age - !!scale_values$mean_age) / !!scale_values$sd_age) dbplot_histogram(okc_train, scaled_age) In Figure 4.5, we see that the scaled age variable has values that are closer to zero. We now move on to discussing other types of transformations, but during your feature engineering workflow you might want to perform the normalization for all numeric variables that you want to include in the model. 
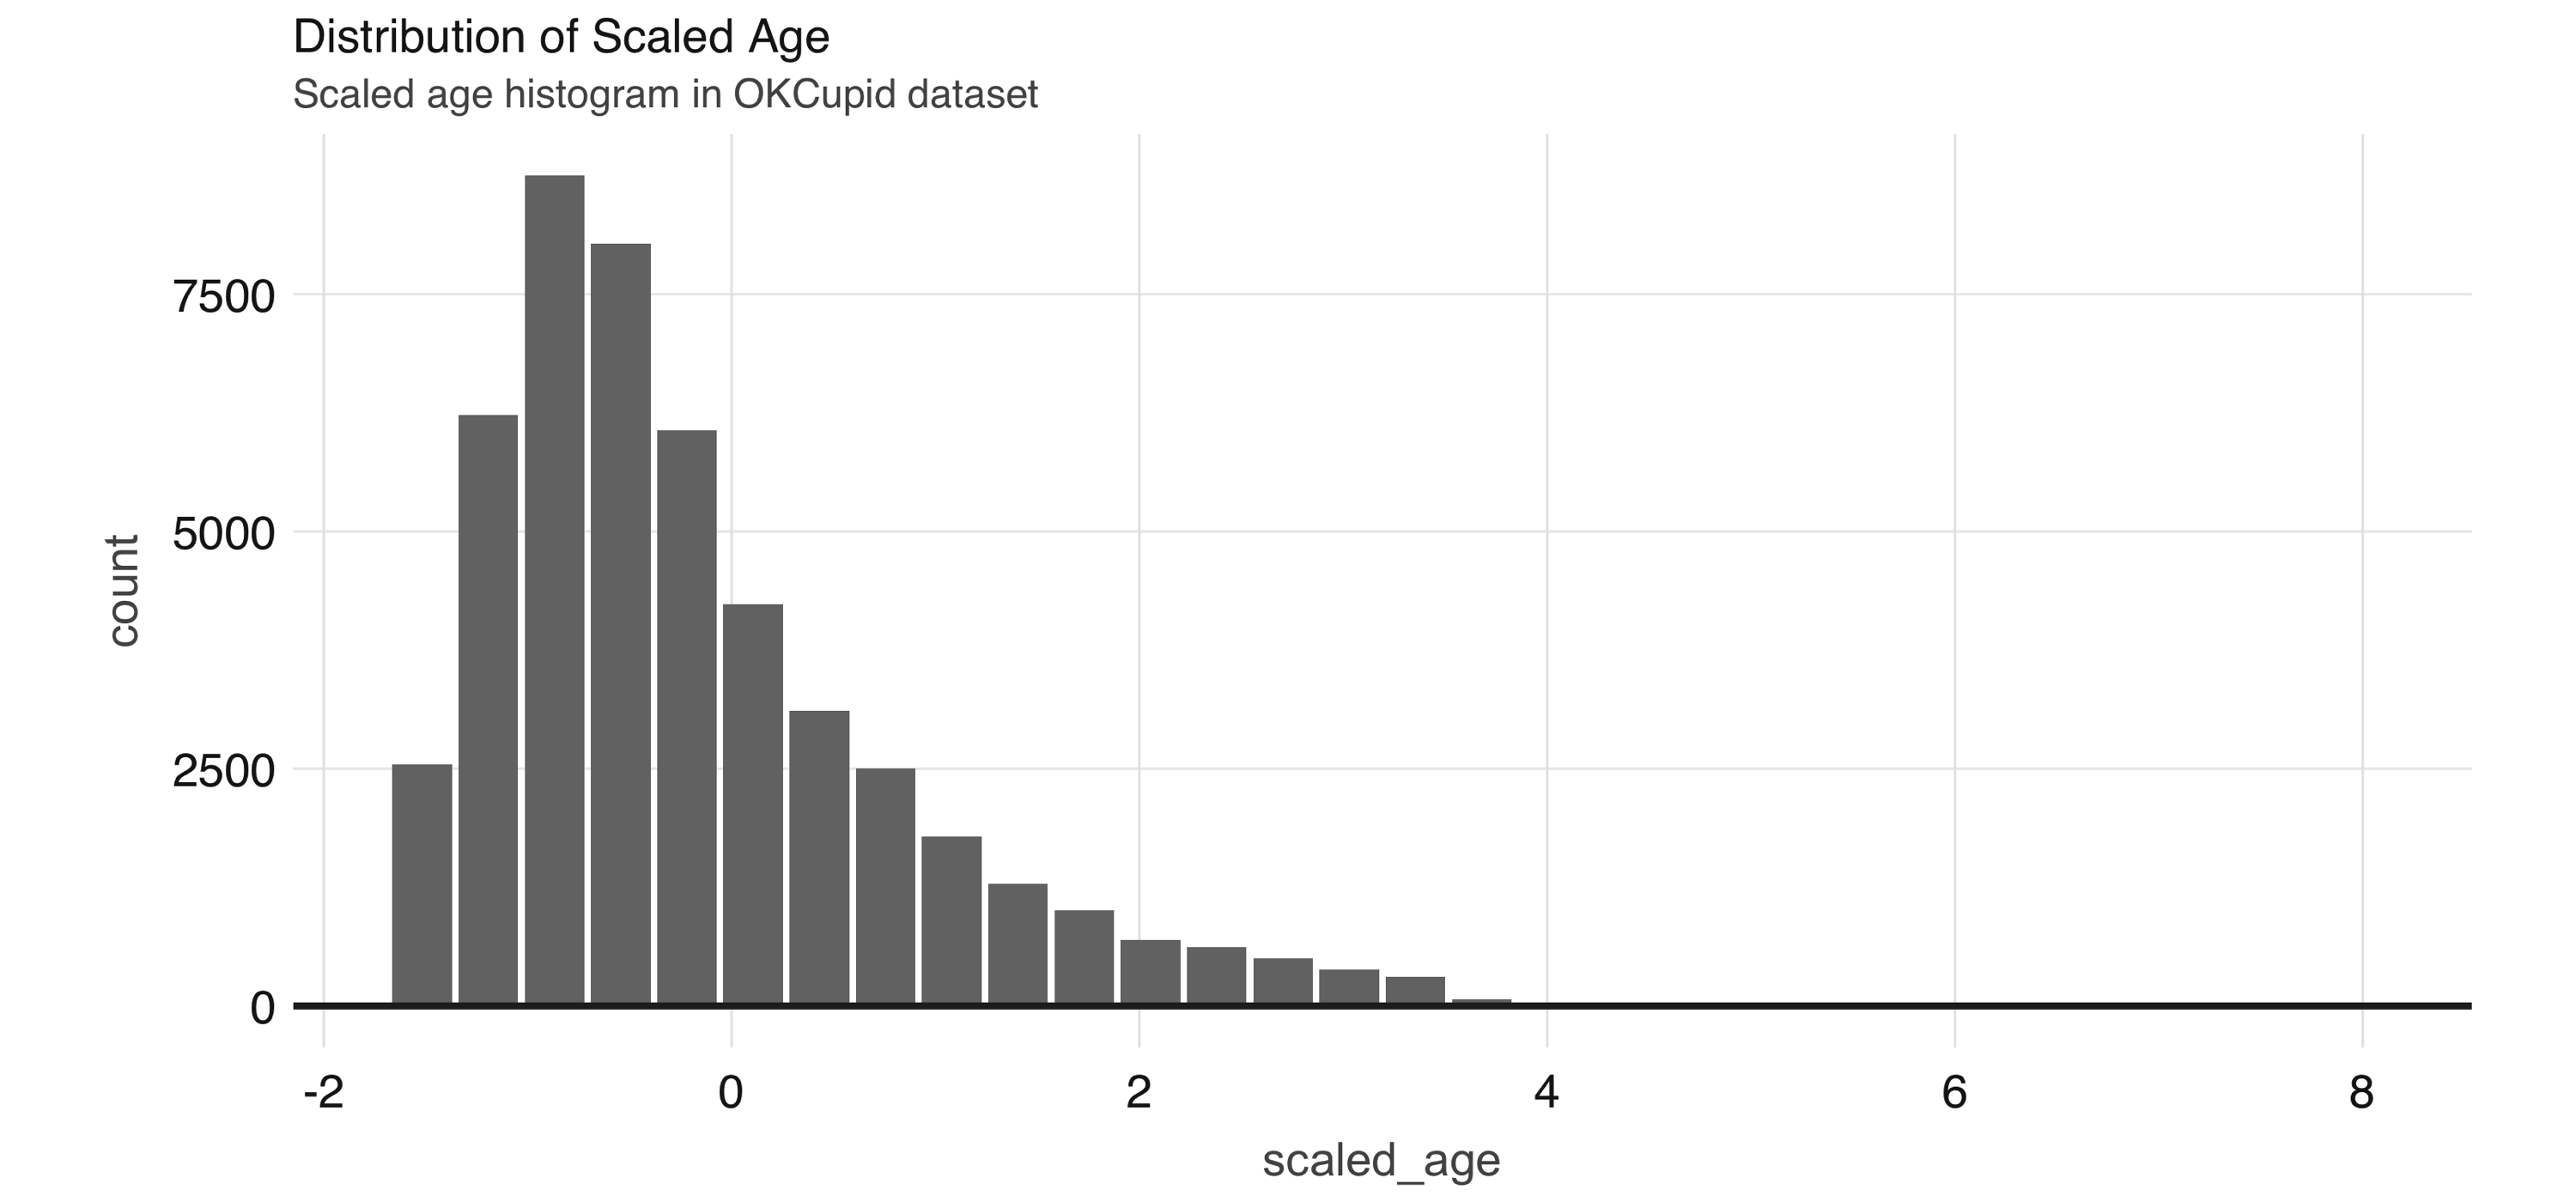
FIGURE 4.5: Distribution of scaled age Since some of the profile features are multiple-select—in other words, a person can choose to associate multiple options for a variable—we need to process them before we can build meaningful models. If we take a look at the ethnicity column, for example, we see that there are many different combinations: okc_train %>% group_by(ethnicity) %>% tally() # Source: spark<?> [?? x 2] ethnicity n <chr> <dbl> 1 hispanic / latin, white 1051 2 black, pacific islander, hispanic / latin 2 3 asian, black, pacific islander 5 4 black, native american, white 91 5 middle eastern, white, other 34 6 asian, other 78 7 asian, black, white 12 8 asian, hispanic / latin, white, other 7 9 middle eastern, pacific islander 1 10 indian, hispanic / latin 5 # … with more rows One way to proceed would be to treat each combination of races as a separate level, but that would lead to a very large number of levels, which becomes problematic in many algorithms. To better encode this information, we can create dummy variables for each race, as follows: ethnicities <- c("asian", "middle eastern", "black", "native american", "indian", "pacific islander", "hispanic / latin", "white", "other") ethnicity_vars <- ethnicities %>% purrr::map(~ expr(ifelse(like(ethnicity, !!.x), 1, 0))) %>% purrr::set_names(paste0("ethnicity_", gsub("\\s|/", ", ethnicities))) okc_train <- mutate(okc_train, !!!ethnicity_vars) okc_train %>% select(starts_with("ethnicity_")) %>% glimpse() Observations: ?? Variables: 9 Database: spark_connection $ ethnicity_asian <dbl> 0, 0, 0, 0, 0, 0, 0, 0, 0, 0… $ ethnicity_middleeastern <dbl> 0, 0, 0, 0, 0, 0, 0, 0, 0, 0… $ ethnicity_black <dbl> 0, 1, 0, 0, 0, 0, 0, 0, 0, 0… $ ethnicity_nativeamerican <dbl> 0, 0, 0, 0, 0, 0, 0, 0, 0, 0… $ ethnicity_indian <dbl> 0, 0, 0, 0, 0, 0, 0, 0, 0, 0… $ ethnicity_pacificislander <dbl> 0, 0, 0, 0, 0, 0, 0, 0, 0, 0… $ ethnicity_hispaniclatin <dbl> 0, 0, 0, 0, 0, 0, 0, 0, 0, 0… $ ethnicity_white <dbl> 1, 0, 1, 0, 1, 1, 1, 0, 1, 0… $ ethnicity_other <dbl> 0, 0, 0, 0, 0, 0, 0, 0, 0, 0… For the free text fields, a straightforward way to extract features is counting the total number of characters. We will store the train dataset in Spark’s memory with compute() to speed up computation. okc_train <- okc_train %>% mutate( essay_length = char_length(paste(!!!syms(paste0("essay", 0:9)))) ) %>% compute() dbplot_histogram(okc_train, essay_length, bins = 100) We can see the distribution of the essay_length variable in Figure 4.6. 
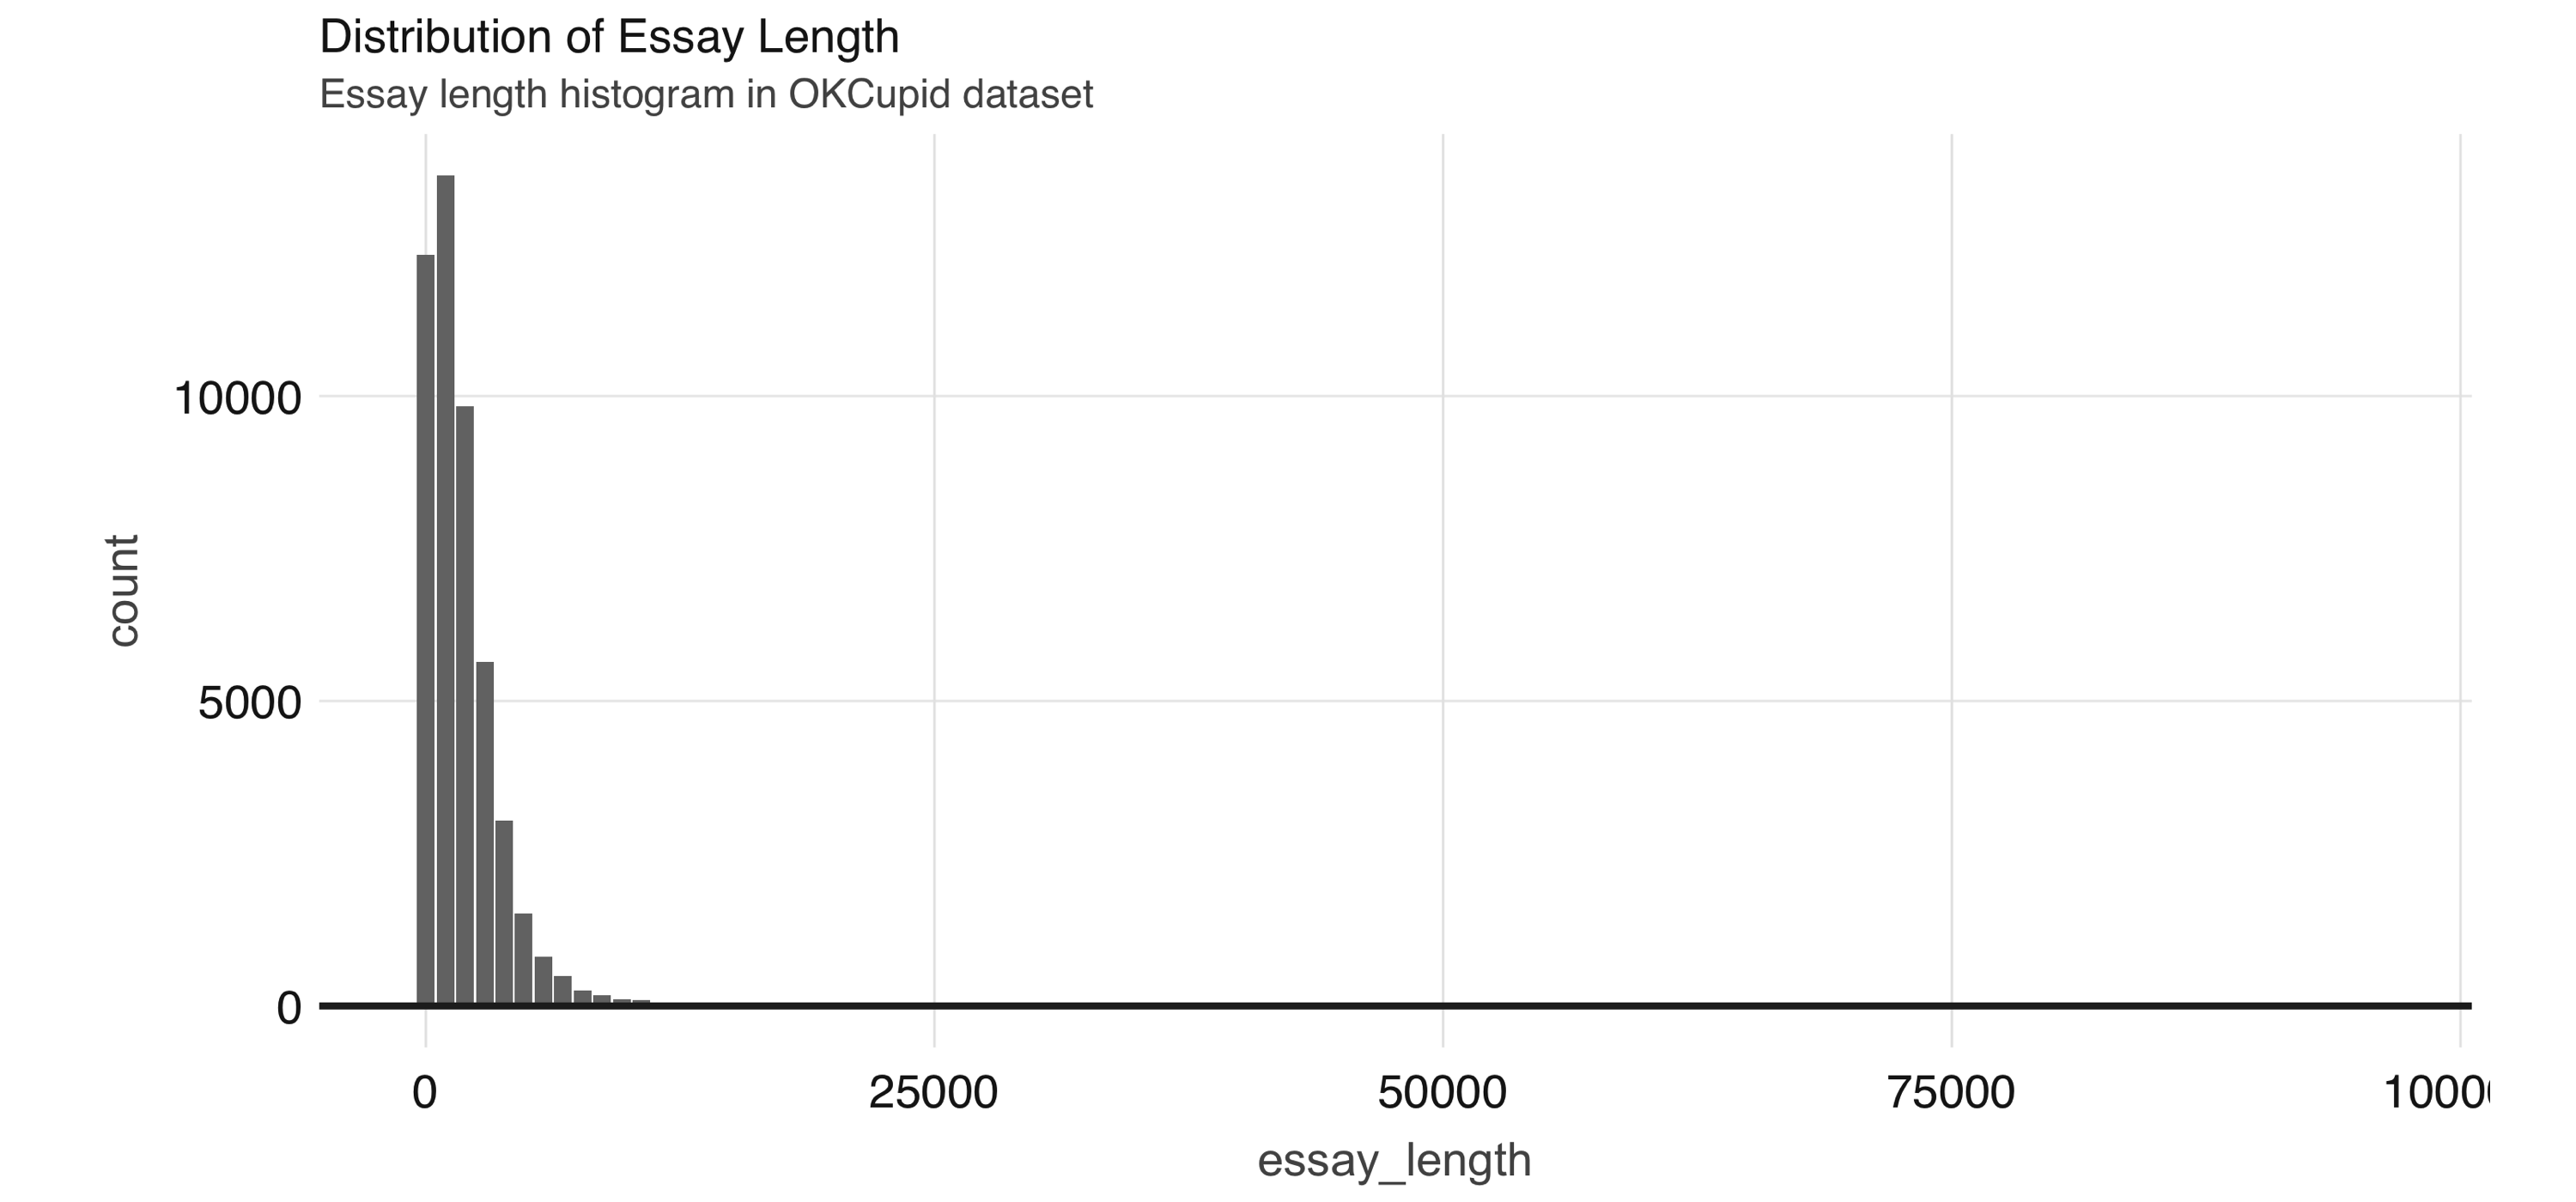
FIGURE 4.6: Distribution of essay length We use this dataset in Chapter 5, so let’s save it first as a Parquet file—an efficient file format ideal for numeric data: spark_write_parquet(okc_train, "data/okc-train.parquet") Now that we have a few more features to work with, we can begin running some unsupervised learning algorithms.

4.4 Supervised Learning

Once we have a good grasp on our dataset, we can start building some models. Before we do so, however, we need to come up with a plan to tune and validate the “candidate” models—in modeling projects, we often try different types of models and ways to fit them to see which ones perform the best. Since we are dealing with a binary classification problem, the metrics we can use include accuracy, precision, sensitivity, and area under the receiver operating characteristic curve (ROC AUC), among others. The metric you optimize depends on your specific business problem, but for this exercise, we will focus on the ROC AUC. It is important that we don’t peek at the testing holdout set until the very end, because any information we obtain could influence our modeling decisions, which would in turn make our estimates of model performance less credible. For tuning and validation, we perform 10-fold cross-validation, which is a standard approach for model tuning. The scheme works as follows: we first divide our dataset into 10 approximately equal-sized subsets. We take the 2nd to 10th sets together as the training set for an algorithm and validate the resulting model on the 1st set. Next, we reserve the 2nd set as the validation set and train the algorithm on the 1st and 3rd to 10th sets. In total, we train 10 models and average the performance. If time and resources allow, you can also perform this procedure multiple times with different random partitions of the data. In our case, we will demonstrate how to perform the cross-validation once. Hereinafter, we refer to the training set associated with each split as the analysis data, and the validation set as assessment data. Using the sdf_random_split() function, we can create a list of subsets from our okc_train table: vfolds <- sdf_random_split( okc_train, weights = purrr::set_names(rep(0.1, 10), paste0("fold", 1:10)), seed = 42 ) We then create our first analysis/assessment split as follows: analysis_set <- do.call(rbind, vfolds[2:10]) assessment_set <- vfolds[[1]] One item we need to carefully treat here is the scaling of variables. We need to make sure that we do not leak any information from the assessment set to the analysis set, so we calculate the mean and standard deviation on the analysis set only and apply the same transformation to both sets. Here is how we would handle this for the age variable: make_scale_age <- function(analysis_data) { scale_values <- analysis_data %>% summarize( mean_age = mean(age), sd_age = sd(age) ) %>% collect() function(data) { data %>% mutate(scaled_age = (age - !!scale_values$mean_age) / !!scale_values$sd_age) } } scale_age <- make_scale_age(analysis_set) train_set <- scale_age(analysis_set) validation_set <- scale_age(assessment_set) For brevity, here we show only how to transform the age variable. In practice, however, you would want to normalize each one of your continuous predictors, such as the essay_length variable we derived in the previous section. Logistic regression is often a reasonable starting point for binary classification problems, so let’s give it a try. Suppose also that our domain knowledge provides us with an initial set of predictors. We can then fit a model by using the Formula interface: lr <- ml_logistic_regression( analysis_set, not_working ~ scaled_age + sex + drinks + drugs + essay_length ) lr Formula: not_working ~ scaled_age + sex + drinks + drugs + essay_length Coefficients: (Intercept) scaled_age sex_m drinks_socially -2.823517e+00 -1.309498e+00 -1.918137e-01 2.235833e-01 drinks_rarely drinks_often drinks_not at all drinks_missing 6.732361e-01 7.572970e-02 8.214072e-01 -4.456326e-01 drinks_very often drugs_never drugs_missing drugs_sometimes 8.032052e-02 -1.712702e-01 -3.995422e-01 -7.483491e-02 essay_length 3.664964e-05 To obtain a summary of performance metrics on the assessment set, we can use the ml_evaluate() function: validation_summary <- ml_evaluate(lr, assessment_set) You can print validation_summary to see the available metrics: validation_summary BinaryLogisticRegressionSummaryImpl Access the following via `$` or `ml_summary()`. - features_col() - label_col() - predictions() - probability_col() - area_under_roc() - f_measure_by_threshold() - pr() - precision_by_threshold() - recall_by_threshold() - roc() - prediction_col() - accuracy() - f_measure_by_label() - false_positive_rate_by_label() - labels() - precision_by_label() - recall_by_label() - true_positive_rate_by_label() - weighted_f_measure() - weighted_false_positive_rate() - weighted_precision() - weighted_recall() - weighted_true_positive_rate() We can plot the ROC curve by collecting the output of validation_summary$roc() and using ggplot2: roc <- validation_summary$roc() %>% collect() ggplot(roc, aes(x = FPR, y = TPR)) + geom_line() + geom_abline(lty = "dashed") Figure 4.7 shows the results of the plot. 
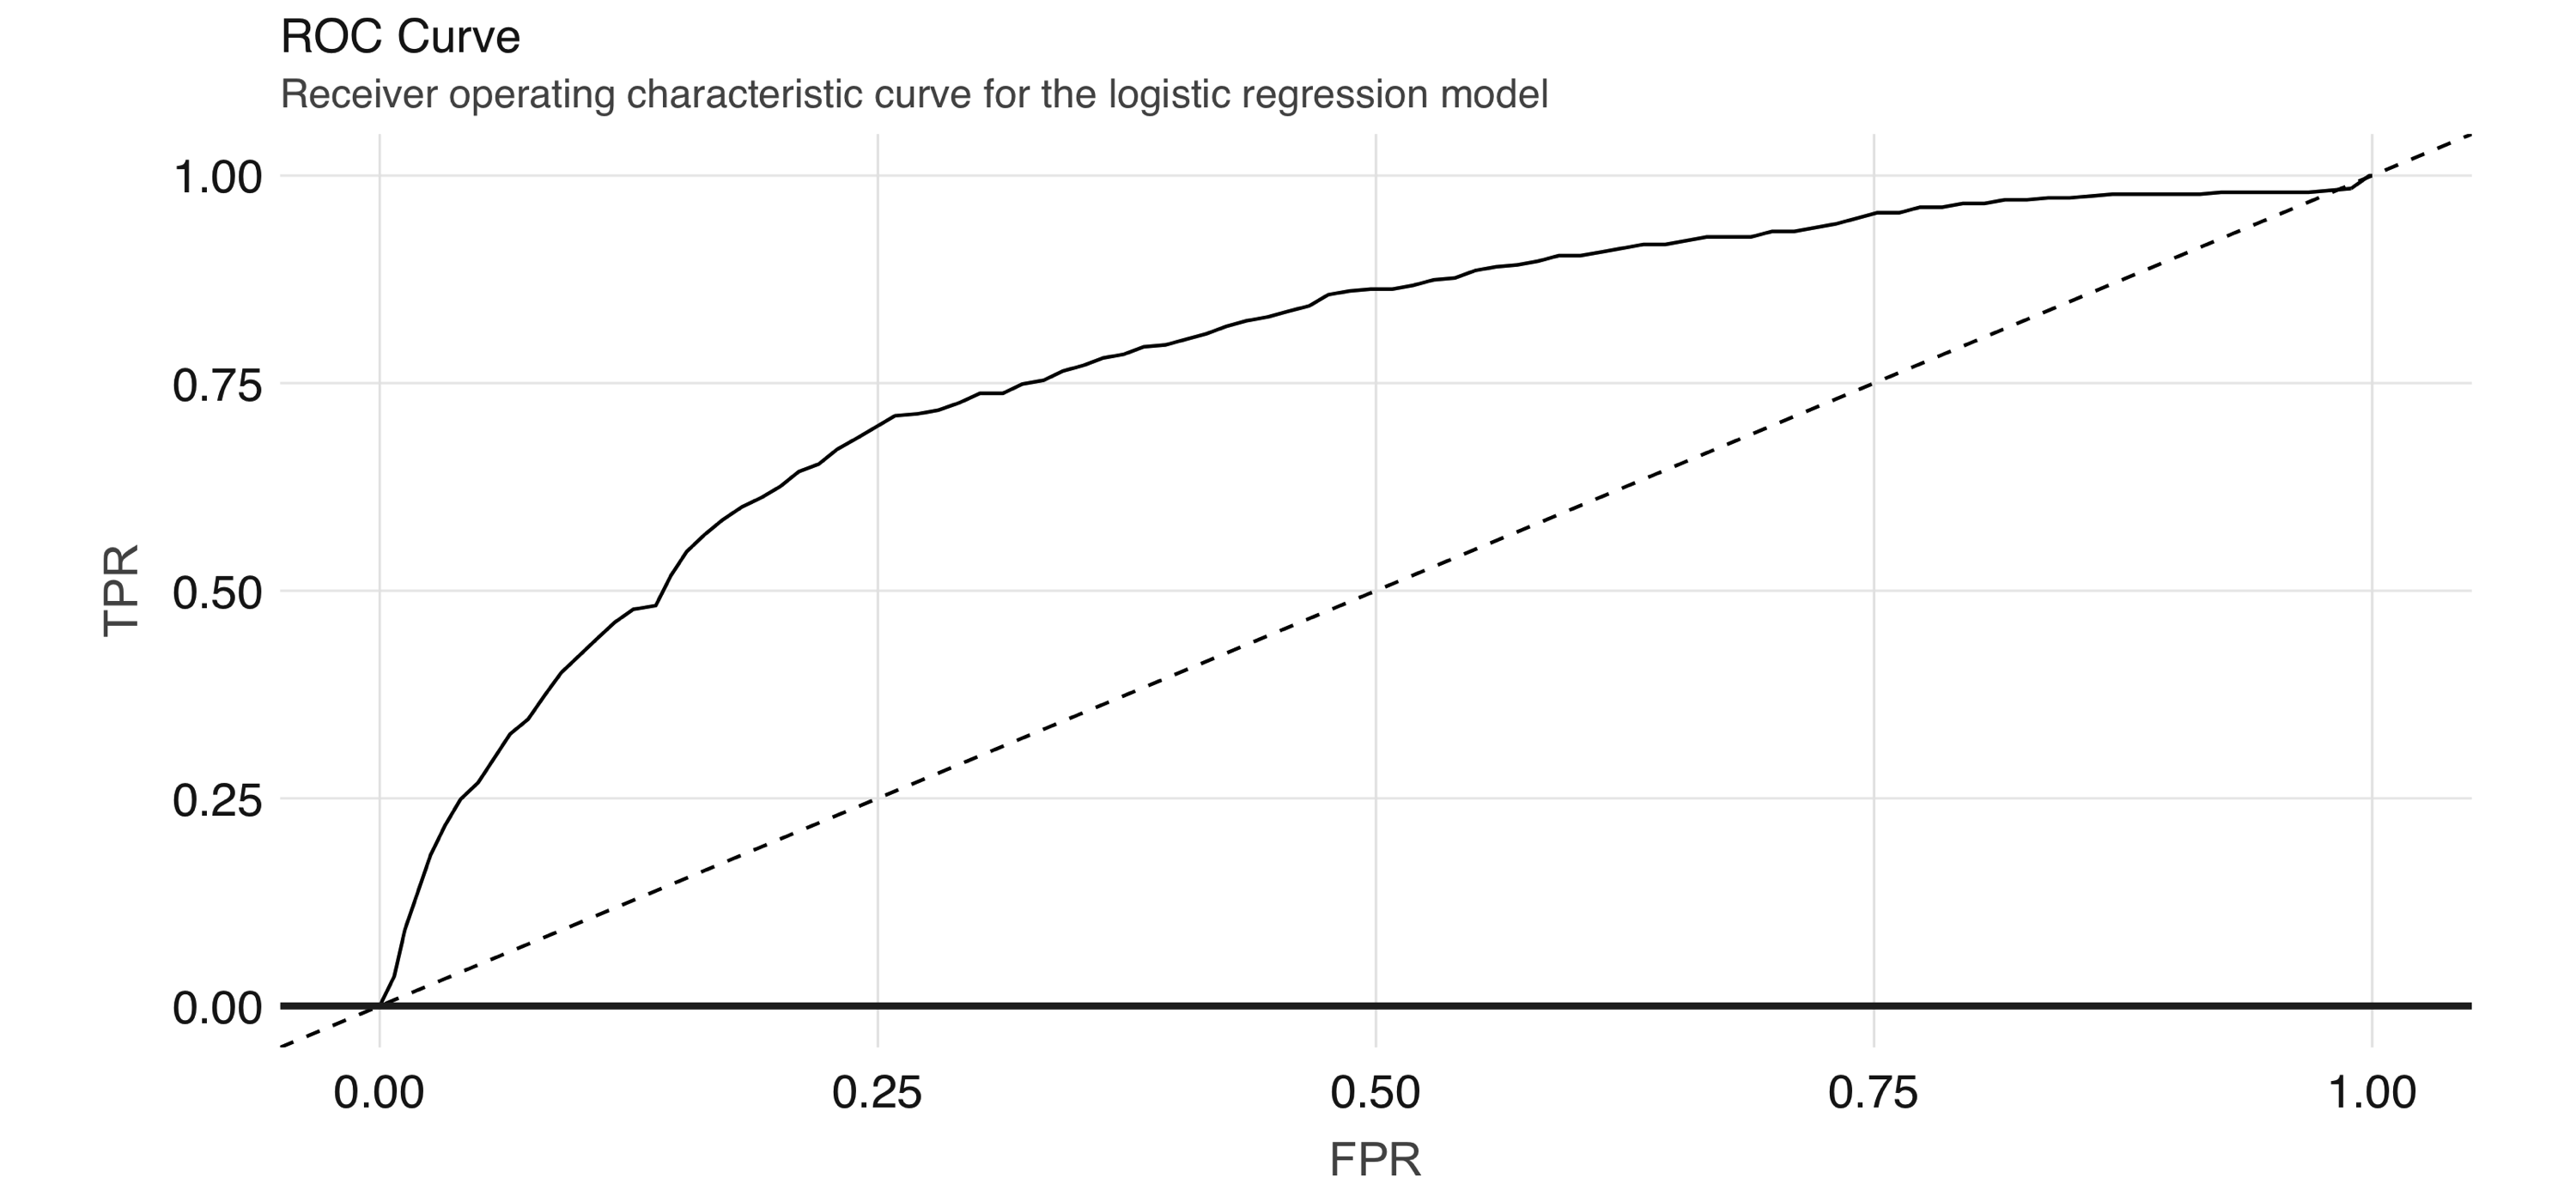
FIGURE 4.7: ROC curve for the logistic regression model The ROC curve plots the true positive rate (sensitivity) against the false positive rate (1–specificity) for varying values of the classification threshold. In practice, the business problem helps to determine where on the curve one sets the threshold for classification. The AUC is a summary measure for determining the quality of a model, and we can compute it by calling the area_under_roc() function. validation_summary$area_under_roc() [1] 0.7872754 Note: Spark provides evaluation methods for only generalized linear models (including linear models and logistic regression). For other algorithms, you can use the evaluator functions (e.g., ml_binary_classification_evaluator() on the prediction DataFrame) or compute your own metrics. Now, we can easily repeat the logic we already have and apply it to each analysis/assessment split: cv_results <- purrr::map_df(1:10, function(v) { analysis_set <- do.call(rbind, vfolds[setdiff(1:10, v)]) %>% compute() assessment_set <- vfolds[[v]] scale_age <- make_scale_age(analysis_set) train_set <- scale_age(analysis_set) validation_set <- scale_age(assessment_set) model <- ml_logistic_regression( analysis_set, not_working ~ scaled_age + sex + drinks + drugs + essay_length ) s <- ml_evaluate(model, assessment_set) roc_df <- s$roc() %>% collect() auc <- s$area_under_roc() tibble( Resample = paste0("Fold", stringr::str_pad(v, width = 2, pad = "0")), roc_df = list(roc_df), auc = auc ) }) This gives us 10 ROC curves: unnest(cv_results, roc_df) %>% ggplot(aes(x = FPR, y = TPR, color = Resample)) + geom_line() + geom_abline(lty = "dashed") Figure 4.8 shows the results of the plot. 
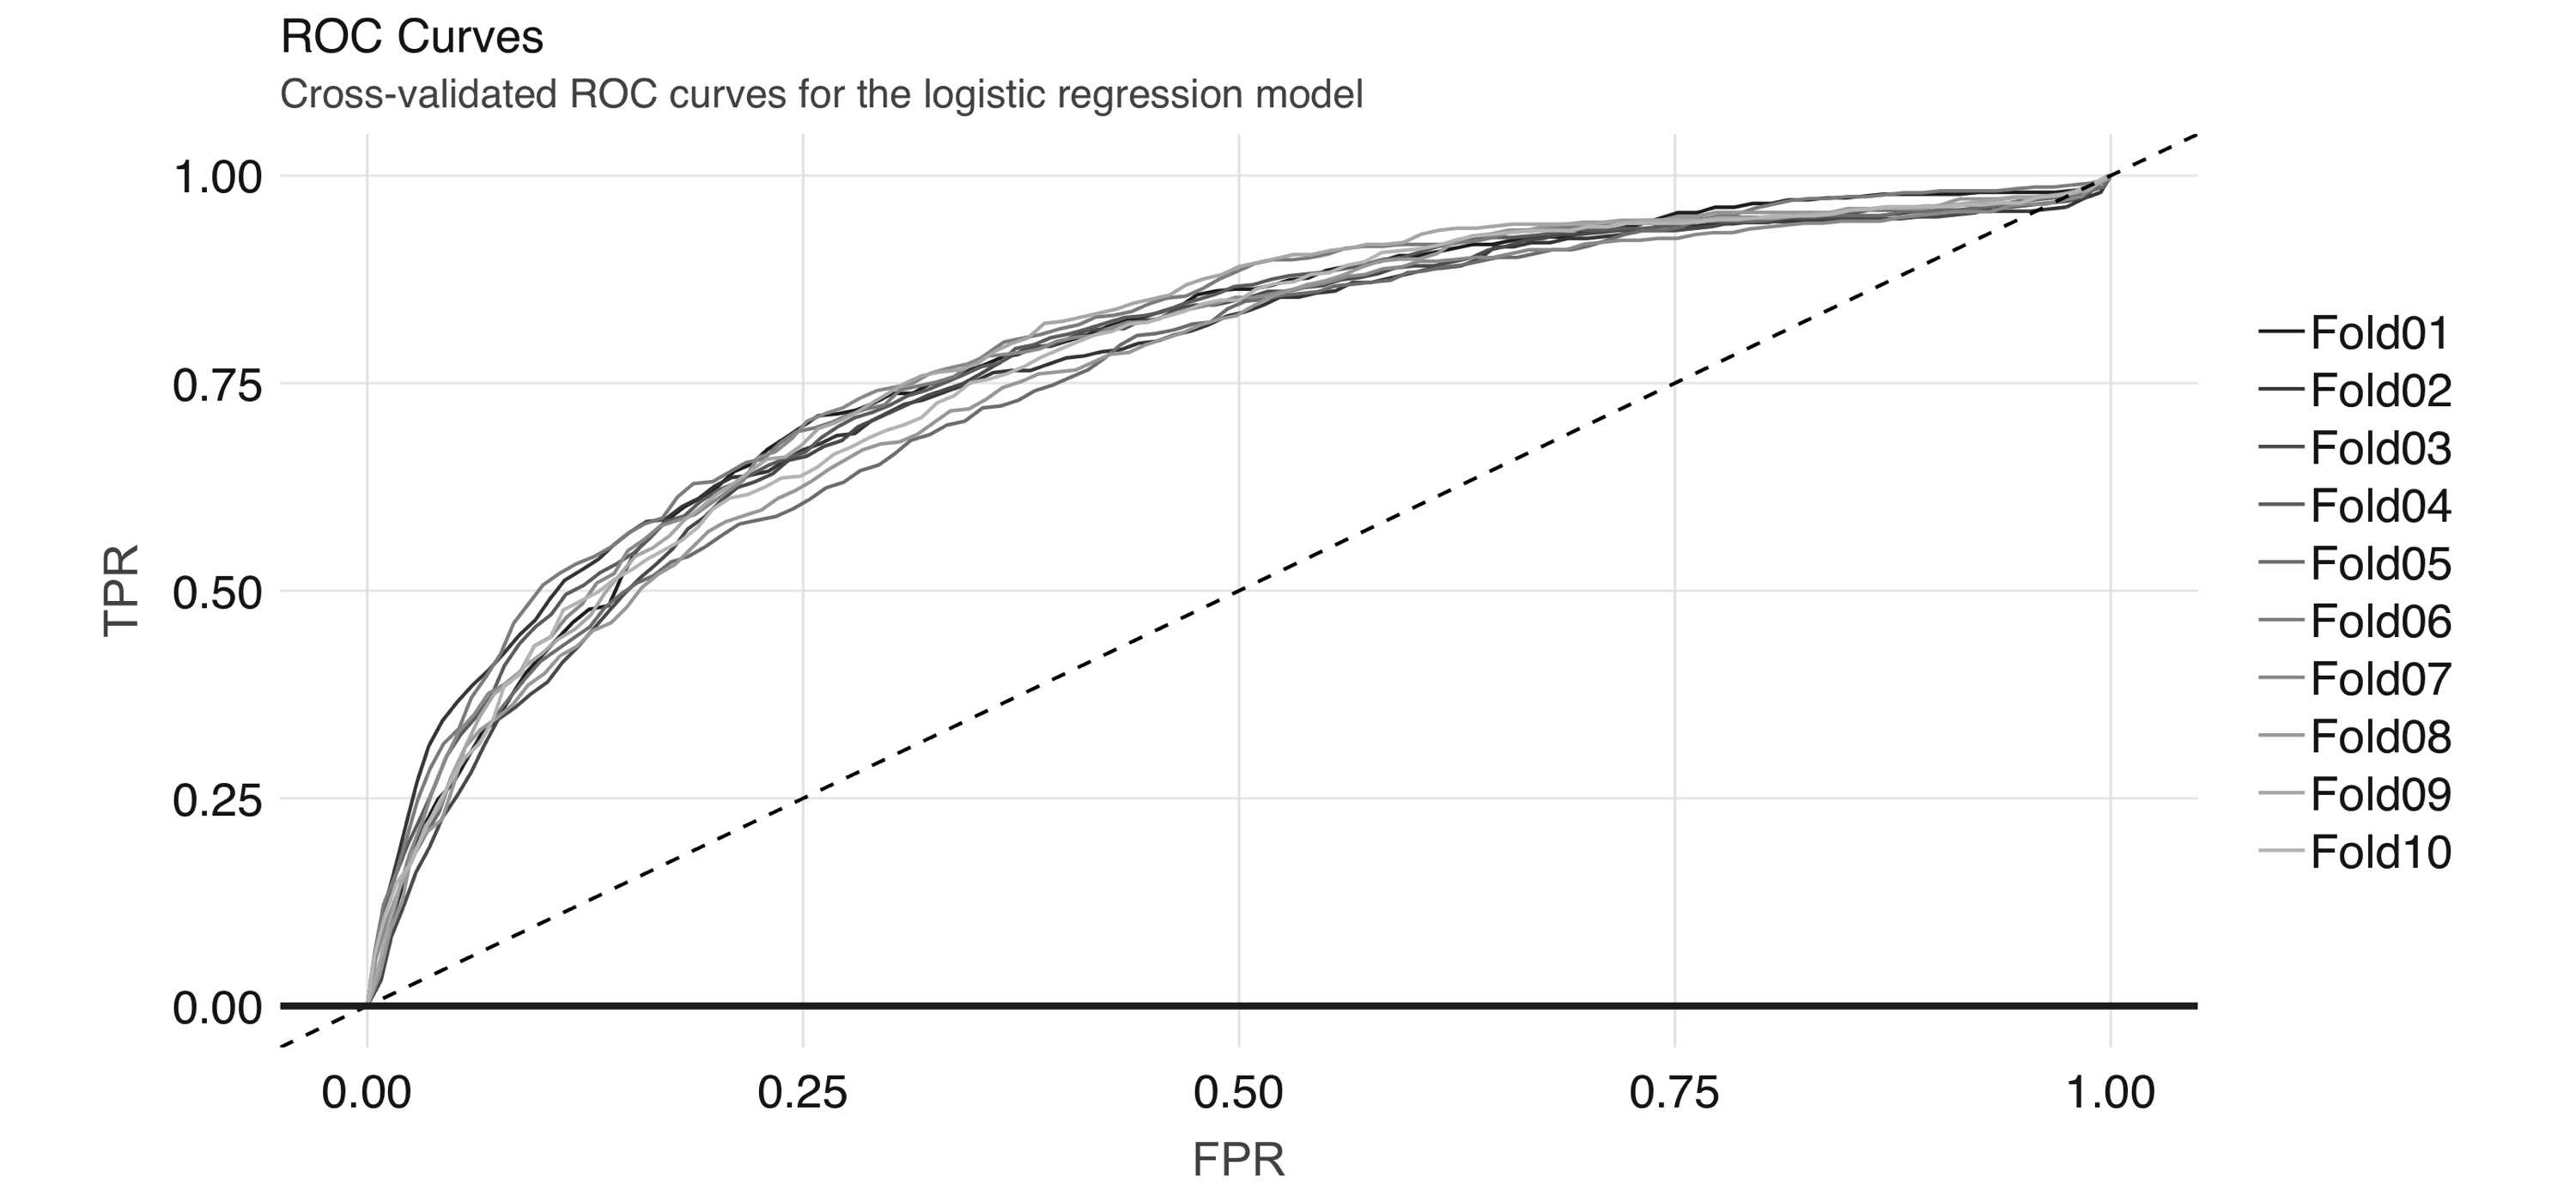
FIGURE 4.8: Cross-validated ROC curves for the logistic regression model And we can obtain the average AUC metric: mean(cv_results$auc) [1] 0.7715102

4.4.1 Generalized Linear Regression

If you are interested in generalized linear model (GLM) diagnostics,you can also fit a logistic regression via the generalized linear regression interface by specifying family = "binomial". Because the result is a regression model, the ml_predict() method does not give class probabilities. However, it includes confidence intervals for coefficient estimates: glr <- ml_generalized_linear_regression( analysis_set, not_working ~ scaled_age + sex + drinks + drugs, family = "binomial" ) tidy_glr <- tidy(glr) We can extract the coefficient estimates into a tidy DataFrame, which we can then process further—for example, to create a coefficient plot, which you can see in Figure 4.9. tidy_glr %>% ggplot(aes(x = term, y = estimate)) + geom_point() + geom_errorbar( aes(ymin = estimate - 1.96 * std.error, ymax = estimate + 1.96 * std.error, width = .1) ) + coord_flip() + geom_hline(yintercept = 0, linetype = "dashed") 
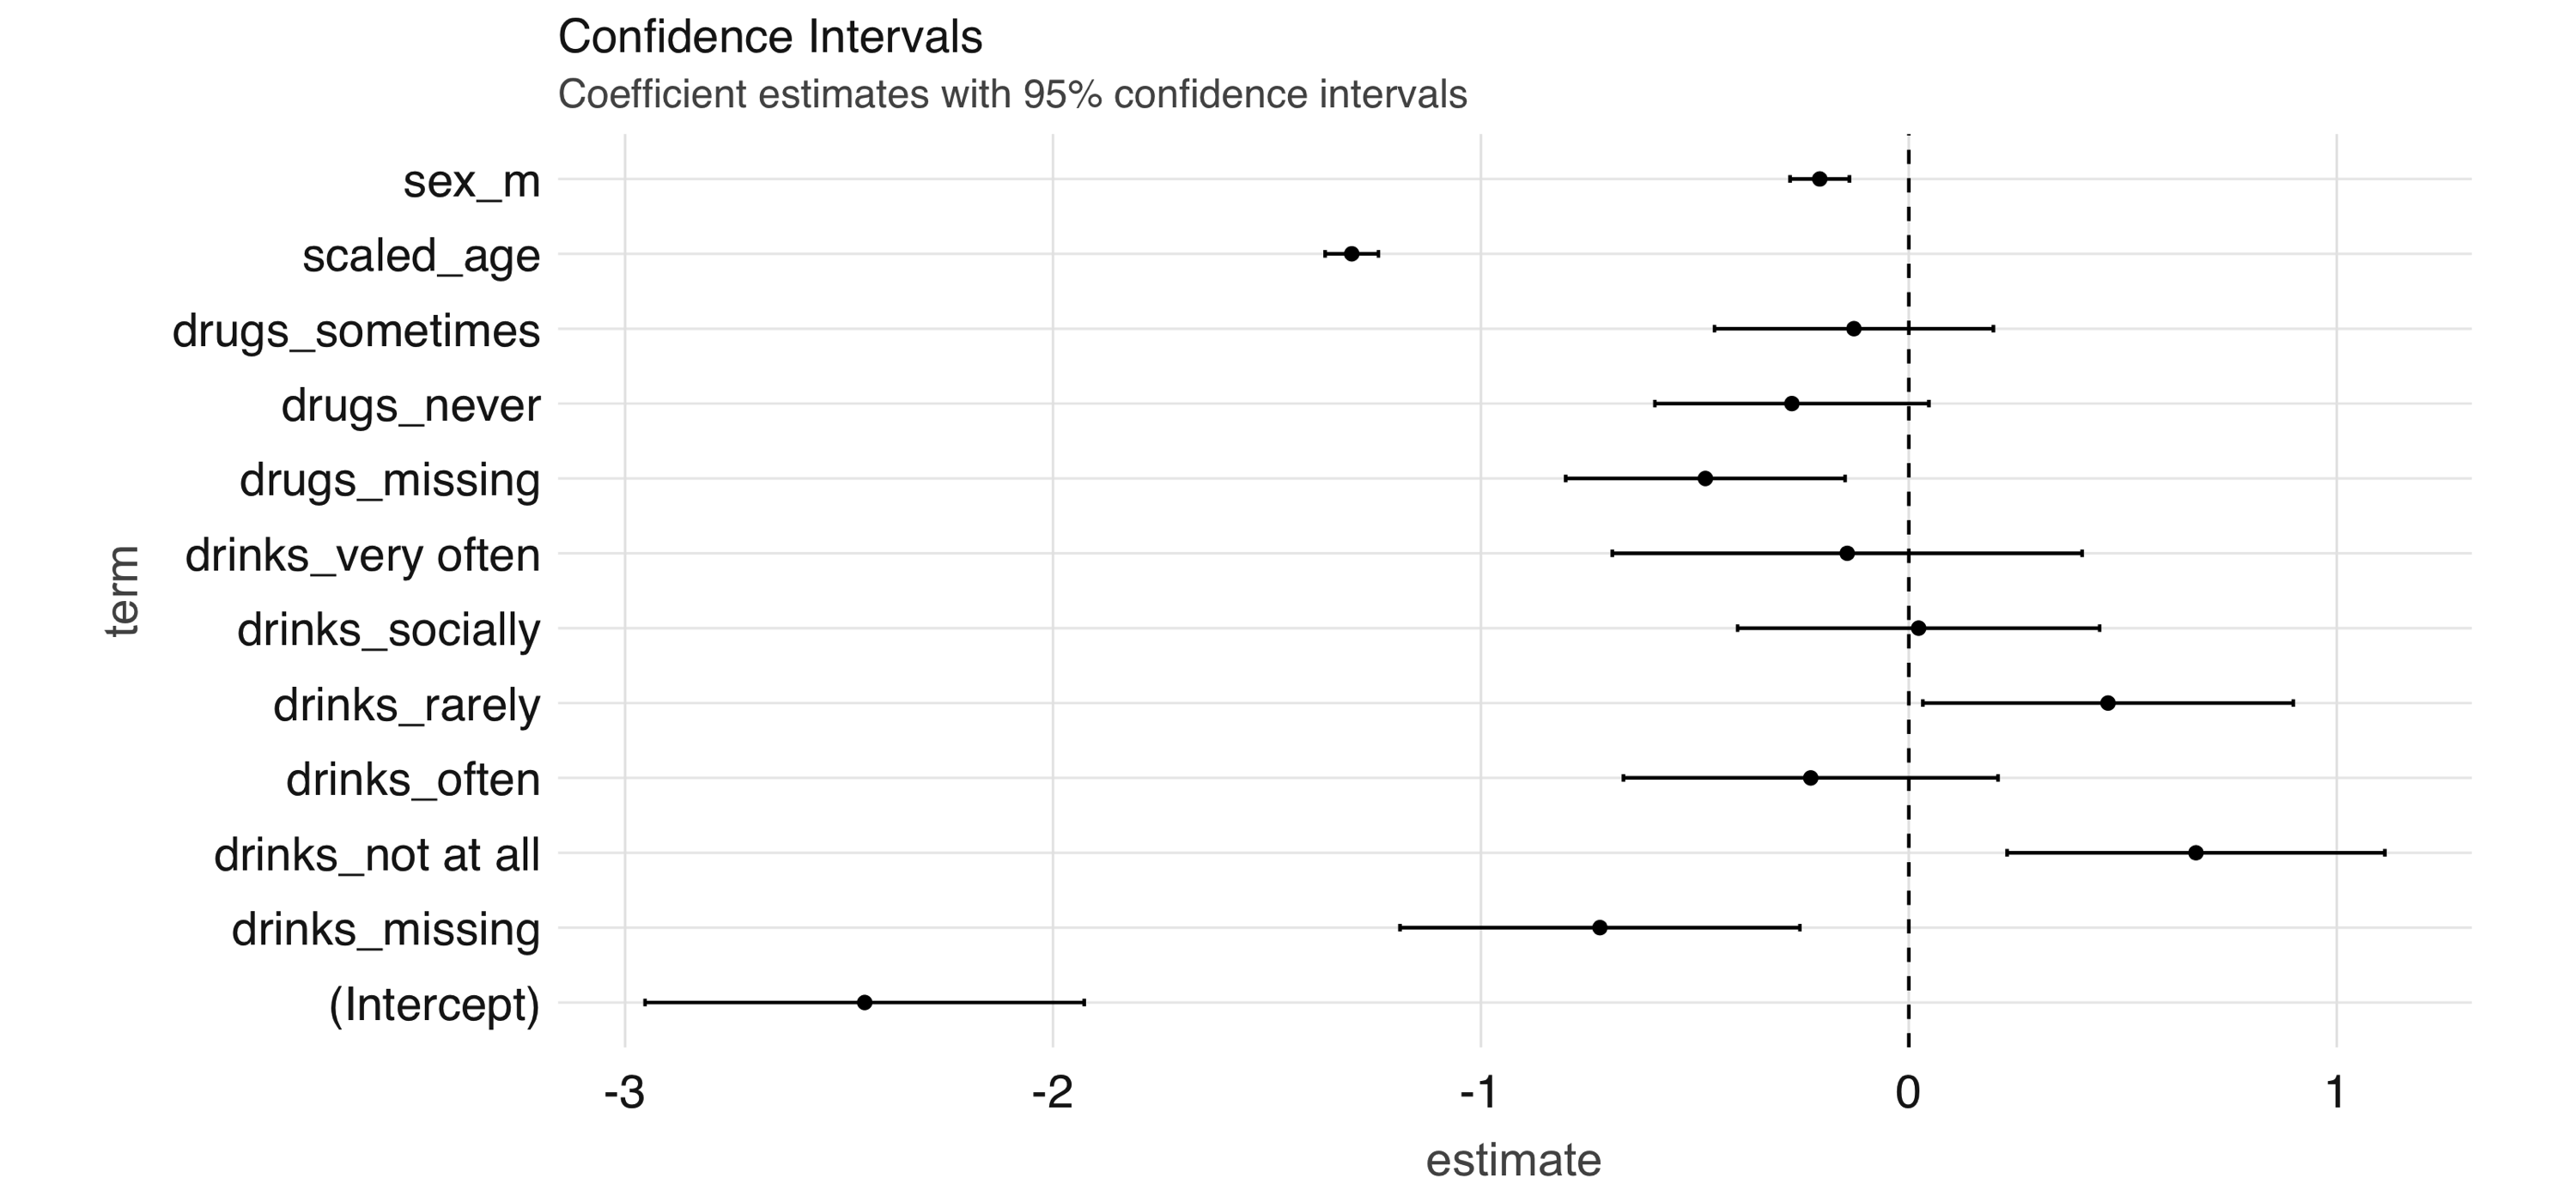
FIGURE 4.9: Coefficient estimates with 95% confidence intervals Note: Both ml_logistic_regression() and ml_linear_regression() support elastic net regularization through the reg_param and elastic_net_param parameters. reg_param corresponds to \(\lambda\), whereas elastic_net_param corresponds to \(\alpha\). ml_generalized_linear_regression() supports only reg_param.

4.4.2 Other Models

Spark supports many of the standard modeling algorithms and it’s easy to apply these models and hyperparameters (values that control the model-fitting process) for your particular problem. You can find a list of supported ML-related functions in the appendix. The interfaces to access these functionalities are largely identical, so it is easy to experiment with them. For example, to fit a neural network model we can run the following: nn <- ml_multilayer_perceptron_classifier( analysis_set, not_working ~ scaled_age + sex + drinks + drugs + essay_length, layers = c(12, 64, 64, 2) ) This gives us a feedforward neural network model with two hidden layers of 64 nodes each. Note that you have to specify the correct values for the input and output layers in the layers argument. We can obtain predictions on a validation set using ml_predict(): predictions <- ml_predict(nn, assessment_set) Then, we can compute the AUC via ml_binary_classification_evaluator(): ml_binary_classification_evaluator(predictions) [1] 0.7812709 Up until now, we have not looked into the unstructured text in the essay fields apart from doing simple character counts. In the next section, we explore the textual data in more depth.

4.5 Unsupervised Learning

Along with speech, images, and videos, textual data is one of the components of the big data explosion. Prior to modern text-mining techniques and the computational resources to support them, companies had little use for freeform text fields. Today, text is considered a rich source of insights that can be found anywhere from physician’s notes to customer complaints. In this section, we show some basic text analysis capabilities of sparklyr. If you would like more background on text-mining techniques, we recommend reading Text Mining with R by David Robinson and Julie Silge (O’Reilly). In this section, we show how to perform a basic topic-modeling task on the essay data in the OKCupid dataset. Our plan is to concatenate the essay fields (of which there are 10) of each profile and regard each profile as a document, then attempt to discover topics (we define these soon) using Latent Dirichlet Allocation (LDA).

4.5.1 Data Preparation

As always, before analyzing a dataset (or a subset of one), we want to take a quick look at it to orient ourselves. In this case, we are interested in the freeform text that the users entered into their dating profiles. essay_cols <- paste0("essay", 0:9) essays <- okc %>% select(!!essay_cols) essays %>% glimpse() Observations: ?? Variables: 10 Database: spark_connection $ essay0 <chr> "about me:<br />\n<br />\ni would love to think that… $ essay1 <chr> "currently working as an international agent for a f… $ essay2 <chr> "making people laugh.<br />\nranting about a good sa… $ essay3 <chr> "the way i look. i am a six foot half asian, half ca… $ essay4 <chr> "books:<br />\nabsurdistan, the republic, of mice an… $ essay5 <chr> "food.<br />\nwater.<br />\ncell phone.<br />\nshelt… $ essay6 <chr> "duality and humorous things", "missing", "missing",… $ essay7 <chr> "trying to find someone to hang out with. i am down … $ essay8 <chr> "i am new to california and looking for someone to w… $ essay9 <chr> "you want to be swept off your feet!<br />\nyou are … Just from this output, we see the following: The HTML tags and special characters pollute the data since they are not directly input by the user and do not provide interesting information. Similarly, since we have encoded missing character fields with the missing string, we need to remove it. (Note that by doing this we are also removing instances of the word “missing” written by the users, but the information lost from this removal is likely to be small.) As you analyze your own text data, you will quickly come across and become familiar with the peculiarities of the specific dataset. As with tabular numerical data, preprocessing text data is an iterative process, and after a few tries we have the following transformations: essays <- essays %>% # Replace `missing` with empty string. mutate_all(list(~ ifelse(. == "missing", ", .))) %>% # Concatenate the columns. mutate(essay = paste(!!!syms(essay_cols))) %>% # Remove miscellaneous characters and HTML tags mutate(words = regexp_replace(essay, "\\n|&nbsp;|<[^>]*>|[^A-Za-z|']", " ")) Note here we are using regex_replace(), which is a Spark SQL function. Next, we discuss LDA and how to apply it to our cleaned dataset.

4.5.2 Topic Modeling

LDA is a type of topic model for identifying abstract “topics” in a set of documents. It is an unsupervised algorithm in that we do not provide any labels, or topics, for the input documents. LDA posits that each document is a mixture of topics, and each topic is a mixture of words. During training, it attempts to estimate both of these simultaneously. A typical use case for topic models involves categorizing many documents, for which the large number of documents renders manual approaches infeasible. The application domains range from GitHub issues to legal documents. After we have a reasonably clean dataset following the workflow in the previous section, we can fit an LDA model with ml_lda(): stop_words <- ml_default_stop_words(sc) %>% c( "like", "love", "good", "music", "friends", "people", "life", "time", "things", "food", "really", "also", "movies" ) lda_model <- ml_lda(essays, ~ words, k = 6, max_iter = 1, min_token_length = 4, stop_words = stop_words, min_df = 5) We are also including a stop_words vector, consisting of commonly used English words and common words in our dataset, that instructs the algorithm to ignore them. After the model is fit, we can use the tidy() function to extract the associated betas, which are the per-topic-per-word probabilities, from the model. betas <- tidy(lda_model) betas # A tibble: 256,992 x 3 topic term beta <int> <chr> <dbl> 1 0 know 303. 2 0 work 250. 3 0 want 367. 4 0 books 211. 5 0 family 213. 6 0 think 291. 7 0 going 160. 8 0 anything 292. 9 0 enjoy 145. 10 0 much 272. # … with 256,982 more rows We can then visualize this output by looking at word probabilities by topic. In Figure 4.10 and Figure 4.11, we show the results at 1 iteration and 100 iterations. The code that generates Figure 4.10 follows; to generate Figure 4.11, you would need to set max_iter = 100 when running ml_lda(), but beware that this can take a really long time in a single machine—this is the kind of big-compute problem that a proper Spark cluster would be able to easily tackle. betas %>% group_by(topic) %>% top_n(10, beta) %>% ungroup() %>% arrange(topic, -beta) %>% mutate(term = reorder(term, beta)) %>% ggplot(aes(term, beta, fill = factor(topic))) + geom_col(show.legend = FALSE) + facet_wrap(~ topic, scales = "free") + coord_flip() 
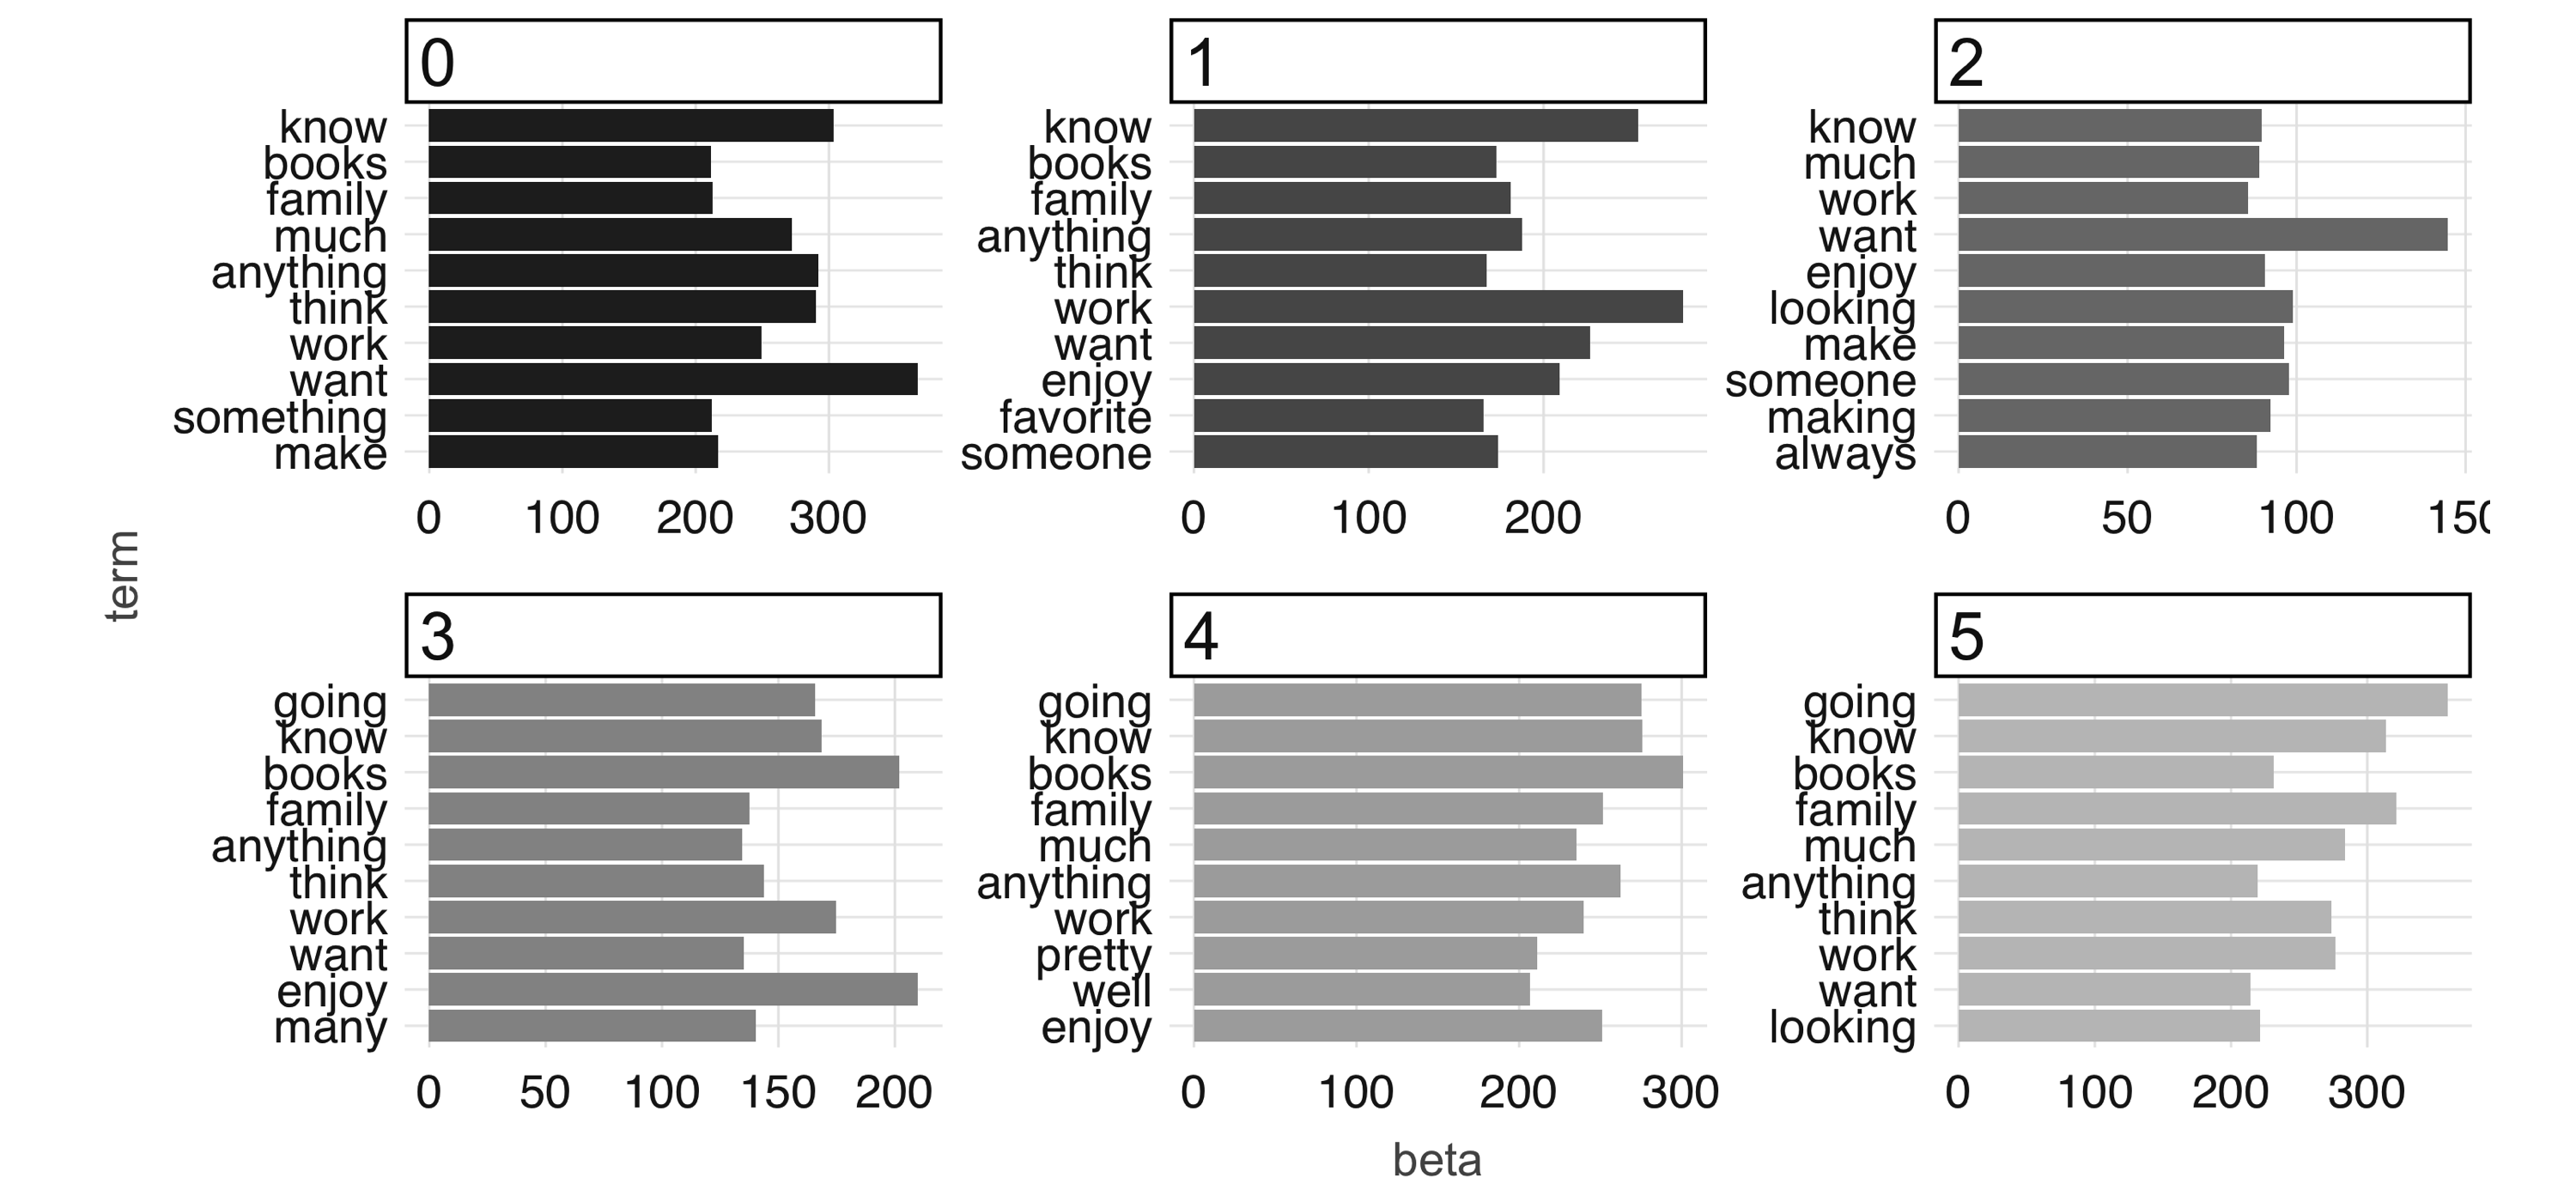
FIGURE 4.10: The most common terms per topic in the first iteration At 100 iterations, we can see “topics” starting to emerge. This could be interesting information in its own right if you were digging into a large collection of documents with which you aren’t familiar. The learned topics can also serve as features in a downstream supervised learning task; for example, we could consider using the topic number as a predictor in our model to predict employment status in our predictive modeling example. 
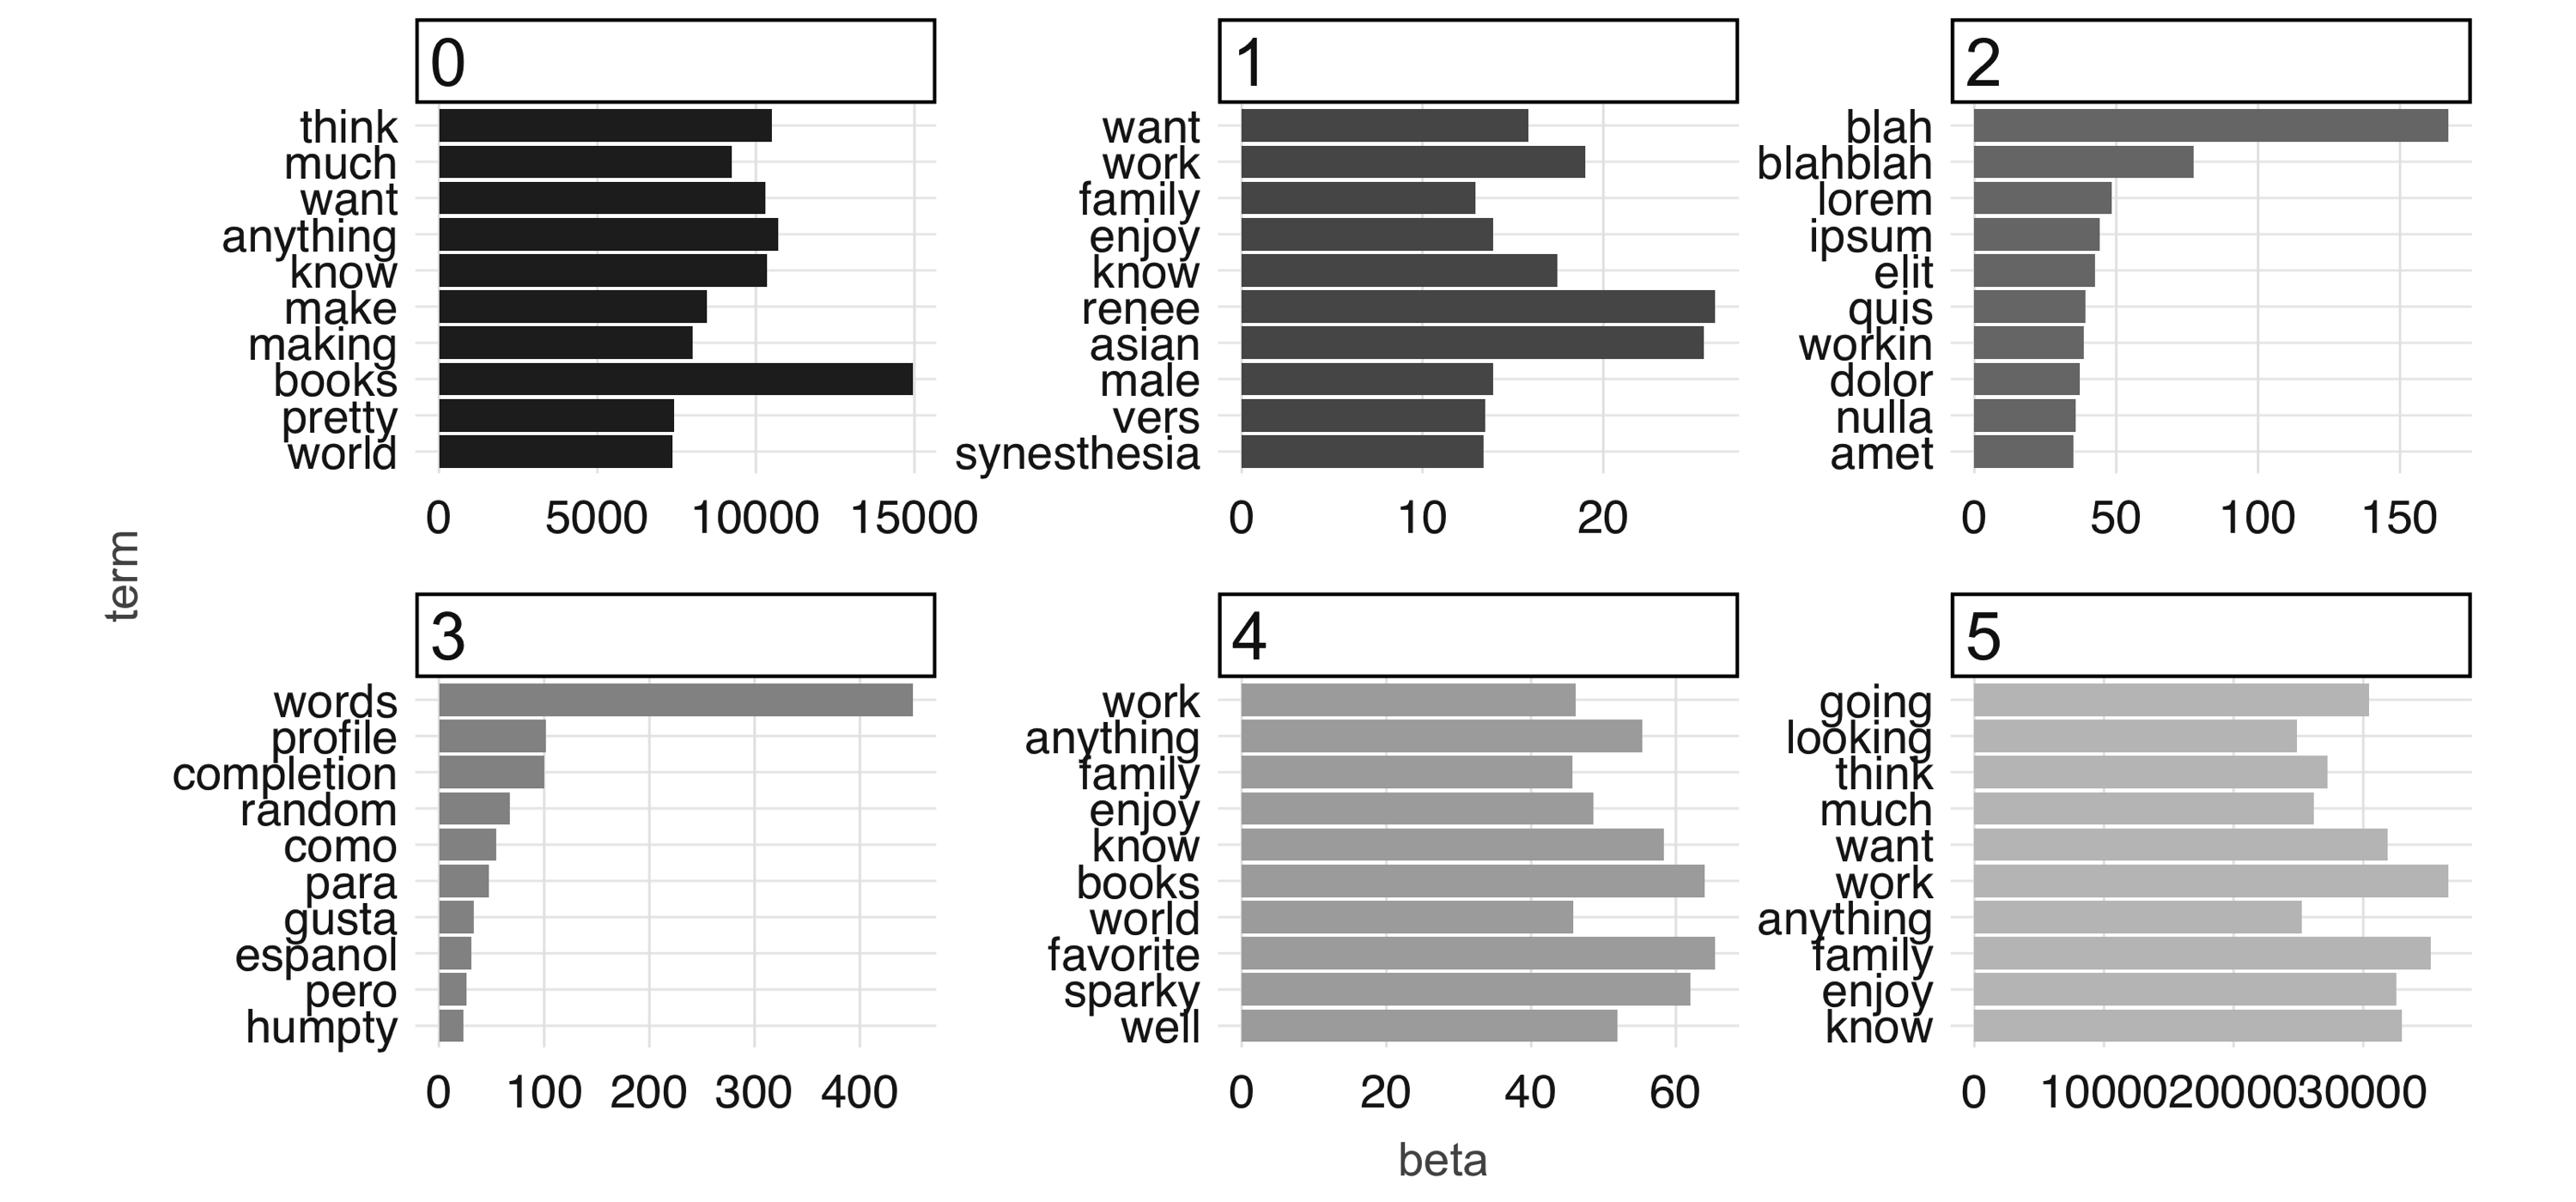
FIGURE 4.11: The most common terms per topic after 100 iterations Finally, to conclude this chapter you should disconnect from Spark. Chapter 5 also makes use of the OKCupid dataset, but we provide instructions to reload it from scratch: spark_disconnect(sc)

4.6 Recap

In this chapter, we covered the basics of building predictive models in Spark with R by presenting the topics of EDA, feature engineering, and building supervised models, in which we explored using logistic regression and neural networks—just to pick a few from dozens of models available in Spark through MLlib. We then explored how to use unsupervised learning to process raw text, in which you created a topic model that automatically grouped the profiles into six categories. We demonstrated that building the topic model can take a significant amount of time using a single machine, which is a nearly perfect segue to introduce full-sized computing clusters! But hold that thought: we first need to consider how to automate data science workflows. As we mentioned when introducing this chapter, emphasis was placed on predictive modeling. Spark can help with data science at scale, but it can also assist in productionizing data science workflows into automated processes, known by many as machine learning. Chapter 5 presents the tools we will need to take our predictive models, and even our entire training workflows, into automated environments that can run continuously or be exported and consumed in web applications, mobile applications, and more.

Chapter 5 Pipelines

In Chapter 4, you learned how to build predictive models using the high-level functions Spark provides and well-known R packages that work well together with Spark. You learned about supervised methods first and finished the chapter with an unsupervised method over raw text. In this chapter, we dive into Spark Pipelines, which is the engine that powers the features we demonstrated in Chapter 5. So, for instance, when you invoke an MLlib function via the formula interface in R—for example, ml_logistic_regression(cars, am ~ .)—a pipeline is constructed for you under the hood. Therefore, Pipelines(((“pipelines”, “purpose of”))) also allow you to make use of advanced data processing and modeling workflows. In addition, a pipeline also facilitates collaboration across data science and engineering teams by allowing you to deploy pipelines into production systems, web applications, mobile applications, and so on. This chapter also happens to be the last chapter that encourages using your local computer as a Spark cluster. You are just one chapter away from getting properly introduced to cluster computing and beginning to perform data science or machine learning that can scale to the most demanding computation problems.

5.1 Overview

The building blocks of pipelines are objects called transformers and estimators, which are collectively referred to as pipeline stages. A transformer can be used to apply transformations to a DataFrame and return another DataFrame; the resulting DataFrame often comprises the original DataFrame with new columns appended to it. An estimator, on the other hand, can be used to create a transformer giving some training data. Consider the following example to illustrate this relationship: a “center and scale” estimator can learn the mean and standard deviation of some data and store the statistics in a resulting transformer object; this transformer can then be used to normalize the data that it was trained on and also any new, yet unseen, data. Here is an example of how to define an estimator: library(sparklyr) library(dplyr) sc <- spark_connect(master = "local", version = "2.3") scaler <- ft_standard_scaler( sc, input_col = "features", output_col = "features_scaled", with_mean = TRUE) scaler StandardScaler (Estimator) <standard_scaler_7f6d46f452a1> (Parameters -- Column Names) input_col: features output_col: features_scaled (Parameters) with_mean: TRUE with_std: TRUE We can now create some data (for which we know the mean and standard deviation) and then fit our scaling model to it using the ml_fit() function: df <- copy_to(sc, data.frame(value = rnorm(100000))) %>% ft_vector_assembler(input_cols = "value", output_col = "features") scaler_model <- ml_fit(scaler, df) scaler_model StandardScalerModel (Transformer) <standard_scaler_7f6d46f452a1> (Parameters -- Column Names) input_col: features output_col: features_scaled (Transformer Info) mean: num 0.00421 std: num 0.999 Note: In Spark ML, many algorithms and feature transformers require that the input be a vector column. The function ft_vector_assembler() performs this task. You can also use the function to initialize a transformer to be used in a pipeline. We see that the mean and standard deviation are very close to 0 and 1, respectively, which is what we expect. We then can use the transformer to transform a DataFrame, using the ml_transform() function: scaler_model %>% ml_transform(df) %>% glimpse() Observations: ?? Variables: 3 Database: spark_connection $ value <dbl> 0.75373300, -0.84207731, 0.59365113, -… $ features <list> [0.753733, -0.8420773, 0.5936511, -0.… $ features_scaled <list> [0.7502211, -0.8470762, 0.58999, -0.4… Now that you’ve seen basic examples of estimators and transformers, we can move on to pipelines.

5.2 Creation

A pipeline is simply a sequence of transformers and estimators, and a pipeline model is a pipeline that has been trained on data so all of its components have been converted to transformers. There are a couple of ways to construct a pipeline in sparklyr, both of which use the ml_pipeline() function. We can initialize an empty pipeline with ml_pipeline(sc) and append stages to it: ml_pipeline(sc) %>% ft_standard_scaler( input_col = "features", output_col = "features_scaled", with_mean = TRUE) Pipeline (Estimator) with 1 stage <pipeline_7f6d6a6a38ee> Stages |--1 StandardScaler (Estimator) | <standard_scaler_7f6d63bfc7d6> | (Parameters -- Column Names) | input_col: features | output_col: features_scaled | (Parameters) | with_mean: TRUE | with_std: TRUE Alternatively, we can pass stages directly to ml_pipeline(): pipeline <- ml_pipeline(scaler) We fit a pipeline as we would fit an estimator: pipeline_model <- ml_fit(pipeline, df) pipeline_model PipelineModel (Transformer) with 1 stage <pipeline_7f6d64df6e45> Stages |--1 StandardScalerModel (Transformer) | <standard_scaler_7f6d46f452a1> | (Parameters -- Column Names) | input_col: features | output_col: features_scaled | (Transformer Info) | mean: num 0.00421 | std: num 0.999 pipeline Note: As a result of the design of Spark ML, pipelines are always estimator objects, even if they comprise only transformers. This means that if you have a pipeline with only transformers, you still need to call ml_fit() on it to obtain a transformer. The “fitting” procedure in this case wouldn’t actually modify any of the transformers.

5.3 Use Cases

Now that you have an understanding of the rudimentary concepts for ML Pipelines, let’s apply them to the predictive modeling problem from the previous chapter in which we are trying to predict whether people are currently employed by looking at their profiles. Our starting point is the okc_train DataFrame with the relevant columns. okc_train <- spark_read_parquet(sc, "data/okc-train.parquet") okc_train <- okc_train %>% select(not_working, age, sex, drinks, drugs, essay1:essay9, essay_length) We first exhibit the pipeline, which includes feature engineering and modeling steps, and then walk through it: pipeline <- ml_pipeline(sc) %>% ft_string_indexer(input_col = "sex", output_col = "sex_indexed") %>% ft_string_indexer(input_col = "drinks", output_col = "drinks_indexed") %>% ft_string_indexer(input_col = "drugs", output_col = "drugs_indexed") %>% ft_one_hot_encoder_estimator( input_cols = c("sex_indexed", "drinks_indexed", "drugs_indexed"), output_cols = c("sex_encoded", "drinks_encoded", "drugs_encoded") ) %>% ft_vector_assembler( input_cols = c("age", "sex_encoded", "drinks_encoded", "drugs_encoded", "essay_length"), output_col = "features" ) %>% ft_standard_scaler(input_col = "features", output_col = "features_scaled", with_mean = TRUE) %>% ml_logistic_regression(features_col = "features_scaled", label_col = "not_working") The first three stages index the sex, drinks, and drugs columns, which are characters, into numeric indices via ft_string_indexer(). This is necessary for the ft_one_hot_encoder_estimator() that comes next, which requires numeric column inputs. When all of our predictor variables are of numeric type (recall that age is numeric already), we can create our features vector using ft_vector_assembler(), which concatenates all of its inputs together into one column of vectors. We can then use ft_standard_scaler() to normalize all elements of the features column (including the one-hot-encoded 0/1 values of the categorical variables), and finally apply a logistic regression via ml_logistic_regression(). During prototyping, you might want to execute these transformations eagerly on a small subset of the data, by passing the DataFrame to the ft_ and ml_ functions, and inspecting the transformed DataFrame. The immediate feedback allows for rapid iteration of ideas; when you have arrived at the desired processing steps, you can roll them up into a pipeline. For example, you can do the following: okc_train %>% ft_string_indexer("sex", "sex_indexed") %>% select(sex_indexed) # Source: spark<?> [?? x 1] sex_indexed <dbl> 1 0 2 0 3 1 4 0 5 1 6 0 7 0 8 1 9 1 10 0 # … with more rows After you have found the appropriate transformations for your dataset, you can replace the DataFrame input with ml_pipeline(sc), and the result will be a pipeline that you can apply to any DataFrame with the appropriate schema. In the next section, we’ll see how pipelines can make it easier for us to test different model specifications.

5.3.1 Hyperparameter Tuning

Going back to the pipeline we have created earlier, we can use ml_cross_validator() to perform the cross-validation workflow we demonstrated in the previous chapter and easily test different hyperparameter combinations. In this example, we test whether centering the variables improves predictions together with various regularization values for the logistic regression. We define the cross-validator as follows: cv <- ml_cross_validator( sc, estimator = pipeline, estimator_param_maps = list( standard_scaler = list(with_mean = c(TRUE, FALSE)), logistic_regression = list( elastic_net_param = c(0.25, 0.75), reg_param = c(1e-2, 1e-3) ) ), evaluator = ml_binary_classification_evaluator(sc, label_col = "not_working"), num_folds = 10) The estimator argument is simply the estimator that we want to tune, and in this case it is the pipeline that we defined. We provide the hyperparameter values we are interested in via the estimator_param_maps parameter, which takes a nested named list. The names at the first level correspond to UIDs, which are unique identifiers associated with each pipeline stage object, of the stages we want to tune (if a partial UID is provided, sparklyr will attempt to match it to a pipeline stage), and the names at the second level correspond to parameters of each stage. In the preceding snippet, we are specifying that we want to test the following:
Standard scaler
The values TRUE and FALSE for with_mean, which denotes whether predictor values are centered.
Logistic regression
The values 0.25 and 0.75 for \(\alpha\), and the values 1e-2 and 1e-3 for \(\lambda\). We expect this to give rise to \(2 \times 2 \times 2 = 8\) hyperparameter combinations, which we can confirm by printing the cv object: cv CrossValidator (Estimator) <cross_validator_d5676ac6f5> (Parameters -- Tuning) estimator: Pipeline <pipeline_d563b0cba31> evaluator: BinaryClassificationEvaluator <binary_classification_evaluator_d561d90b53d> with metric areaUnderROC num_folds: 10 [Tuned over 8 hyperparameter sets] As with any other estimator, we can fit the cross-validator by using ml_fit() cv_model <- ml_fit(cv, okc_train) and then inspect the results: ml_validation_metrics(cv_model) %>% arrange(-areaUnderROC) areaUnderROC elastic_net_param_1 reg_param_1 with_mean_2 1 0.7722700 0.75 0.001 TRUE 2 0.7718431 0.75 0.010 FALSE 3 0.7718350 0.75 0.010 TRUE 4 0.7717677 0.25 0.001 TRUE 5 0.7716070 0.25 0.010 TRUE 6 0.7715972 0.25 0.010 FALSE 7 0.7713816 0.75 0.001 FALSE 8 0.7703913 0.25 0.001 FALSE Now that we have seen the pipelines API in action, let’s talk more formally about how they behave in various contexts.

5.4 Operating Modes

By now, you have likely noticed that the pipeline stage functions, such as ft_string_indexer() and ml_logistic_regression(), return different types of objects depending on the first argument passed to them. Table 5.1 presents the full pattern.
TABLE 5.1: Operating modes in machine learning functions.
First.argumentReturnsExample
Spark connectionEstimator or transformer objectft_string_indexer(sc)
PipelinePipelineml_pipeline(sc) %>% ft_string_indexer()
Data frame, without formulaData frameft_string_indexer(iris, “Species”, “indexed”)
Data frame, with formulasparklyr ML model objectml_logistic_regression(iris, Species ~ .)
These functions are implemented using S3, which is the most popular object-oriented programming paradigm provided by R. For our purposes, it suffices to know that the behavior of an ml_ or ft_ function is dictated by the class of the first argument provided. This allows us to provide a wide range of features without introducing additional function names. We now can summarize the behavior of these functions: The formula interface approach is what we studied in Chapter 5, and this is what we recommend users new to Spark start with, since its syntax is similar to existing R modeling packages and abstracts away some Spark ML peculiarities. However, to take advantage of the full power of Spark ML and leverage pipelines for workflow organization and interoperability, it is worthwhile to learn the ML Pipelines API. With the basics of pipelines down, we are now ready to discuss the collaboration and model deployment aspects hinted at in the introduction of this chapter.

5.5 Interoperability

One of the most powerful aspects of pipelines is that they can be serialized to disk and are fully interoperable with the other Spark APIs such as Python and Scala. This means that you can easily share them among users of Spark working in different languages, which might include other data scientists, data engineers, and deployment engineers. To save a pipeline model, call ml_save() and provide a path: model_dir <- file.path("spark_model") ml_save(cv_model$best_model, model_dir, overwrite = TRUE) Model successfully saved. Let’s take a look at the directory to which we just wrote: list.dirs(model_dir,full.names = FALSE) %>% head(10) [1] " [2] "metadata" [3] "stages" [4] "stages/0_string_indexer_5b42c72817b" [5] "stages/0_string_indexer_5b42c72817b/data" [6] "stages/0_string_indexer_5b42c72817b/metadata" [7] "stages/1_string_indexer_5b423192b89f" [8] "stages/1_string_indexer_5b423192b89f/data" [9] "stages/1_string_indexer_5b423192b89f/metadata" [10] "stages/2_string_indexer_5b421796e826" We can dive into a couple of the files to see what type of data was saved: spark_read_json(sc, file.path( file.path(dir(file.path(model_dir, "stages"), pattern = "1_string_indexer.*", full.names = TRUE), "metadata") )) %>% glimpse() Observations: ?? Variables: 5 Database: spark_connection $ class <chr> "org.apache.spark.ml.feature.StringIndexerModel" $ paramMap <list> [["error", "drinks", "drinks_indexed", "frequencyDesc"]] $ sparkVersion <chr> "2.3.2" $ timestamp <dbl> 1.561763e+12 $ uid <chr> "string_indexer_ce05afa9899" spark_read_parquet(sc, file.path( file.path(dir(file.path(model_dir, "stages"), pattern = "6_logistic_regression.*", full.names = TRUE), "data") )) # Source: spark<data> [?? x 5] numClasses numFeatures interceptVector coefficientMatr… isMultinomial <int> <int> <list> <list> <lgl> 1 2 12 <dbl [1]> <-1.27950828662… FALSE We see that quite a bit of information has been exported, from the SQL statement in the dplyr transformer to the fitted coefficient estimates of the logistic regression. We can then (in a new Spark session) reconstruct the model by using ml_load(): model_reload <- ml_load(sc, model_dir) Let’s see if we can retrieve the logistic regression stage from this pipeline model: ml_stage(model_reload, "logistic_regression") LogisticRegressionModel (Transformer) <logistic_regression_5b423b539d0f> (Parameters -- Column Names) features_col: features_scaled label_col: not_working prediction_col: prediction probability_col: probability raw_prediction_col: rawPrediction (Transformer Info) coefficient_matrix: num [1, 1:12] -1.2795 -0.0915 0 0.126 -0.0324 ... coefficients: num [1:12] -1.2795 -0.0915 0 0.126 -0.0324 ... intercept: num -2.79 intercept_vector: num -2.79 num_classes: int 2 num_features: int 12 threshold: num 0.5 thresholds: num [1:2] 0.5 0.5 Note that the exported JSON and parquet files are agnostic of the API that exported them. This means that in a multilingual machine learning engineering team, you can pick up a data preprocessing pipeline from a data engineer working in Python, build a prediction model on top of it, and then hand off the final pipeline to a deployment engineering working in Scala. In the next section, we discuss deployment of models in more detail. Note: When ml_save() is called for sparklyr ML models (created using the formula interface), the associated pipeline model is saved, but any sparklyr-specific metadata, such as index labels, is not. In other words, saving a sparklyr ml_model object and then loading it will yield a pipeline model object, as if you created it via the ML Pipelines API. This behavior is required to use pipelines with other programming languages. Before we move on to discuss how to run pipelines in production, make sure you disconnect from Spark: spark_disconnect(sc) That way, we can start from a brand new environment, which is also expected when you are deploying pipelines to production.

5.6 Deployment

What we have just demonstrated bears emphasizing: by collaborating within the framework of ML Pipelines, we reduce friction among different personas in a data science team. In particular, we cut down on the time from modeling to deployment. In many cases, a data science project does not end with just a slide deck with insights and recommendations. Instead, the business problem at hand might require scoring new data points on a schedule or on-demand in real time. For example, a bank might want to evaluate its mortgage portfolio risk nightly or provide instant decisions on credit card applications. This process of taking a model and turning it into a service that others can consume is usually referred to as deployment or productionization. Historically, there was a large gap between the analyst who built the model and the engineer who deployed it: the former might work in R and develop extensive documentation on the scoring mechanism, so that the latter can reimplement the model in C++ or Java. This practice, which might easily take months in some organizations, is less prevalent today, but is almost always unnecessary in Spark ML workflows. The aforementioned nightly portfolio risk and credit application scoring examples represent two modes of ML deployment known as batch and real time. Loosely, batch processing implies processing many records at the same time, and that execution time is not important as long it is reasonable (often on the scale of minutes to hours). On the other hand, real-time processing implies scoring one or a few records at a time, but the latency is crucial (on the scale of <1 second). Let’s turn now to see how we can take our OKCupid pipeline model to “production”.

5.6.1 Batch Scoring

For both scoring methods, batch and real time, we will expose our model as web services, in the form of an API over the Hypertext Transfer Protocol (HTTP). This is the primary medium over which software communicates. By providing an API, other services or end users can utilize our model without any knowledge of R or Spark. The plumber R package enables us to do this very easily by annotating our prediction function. You will need make sure that plumber, callr, and the httr package are installed by running the following: install.packages(c("plumber", "callr", "httr")) The callr package provides support to run R code in separate R sessions; it is not strictly required, but we will use it to start a web service in the background. The httr package allows us to use web APIs from R. In the batch scoring use case, we simply initiate a Spark connection and load the saved model. Save the following script as plumber/spark-plumber.R: library(sparklyr) sc <- spark_connect(master = "local", version = "2.3") spark_model <- ml_load(sc, "spark_model") #* @post /predict score_spark <- function(age, sex, drinks, drugs, essay_length) { new_data <- data.frame( age = age, sex = sex, drinks = drinks, drugs = drugs, essay_length = essay_length, stringsAsFactors = FALSE ) new_data_tbl <- copy_to(sc, new_data, overwrite = TRUE) ml_transform(spark_model, new_data_tbl) %>% dplyr::pull(prediction) } We can then initialize the service by executing the following: service <- callr::r_bg(function() { p <- plumber::plumb("plumber/spark-plumber.R") p$run(port = 8000) }) This starts the web service locally, and then we can query the service with new data to be scored; however, you might need to wait a few seconds for the Spark service to initialize: httr::content(httr::POST( "http://127.0.0.1:8000/predict", body = '{"age": 42, "sex": "m", "drinks": "not at all", "drugs": "never", "essay_length": 99}' )) [[1]] [1] 0 This reply tell us that this particular profile is likely to not be unemployed, that is, employed. We can now terminate the plumber service by stopping the callr service: service$interrupt() If we were to time this operation (e.g., with system.time()), we see that the latency is on the order of hundreds of milliseconds, which might be appropriate for batch applications but is insufficient for real time. The main bottleneck is the serialization of the R DataFrame to a Spark DataFrame and back. Also, it requires an active Spark session, which is a heavy runtime requirement. To ameliorate these issues, we discuss next a deployment method more suitable for real-time deployment.

5.6.2 Real-Time Scoring

For real-time production, we want to keep dependencies as light as possible so we can target more platforms for deployment. We now show how we can use the mleap package, which provides an interface to the MLeap library, to serialize and serve Spark ML models. MLeap is open source (Apache License 2.0) and supports a wide range of, though not all, Spark ML transformers. At runtime, the only prerequisites for the environment are the Java Virtual Machine (JVM) and the MLeap runtime library. This avoids both the Spark binaries and expensive overhead in converting data to and from Spark DataFrames. Since mleap is a sparklyr extension and an R package, first we need to install it from CRAN: install.packages("mleap") It then must be loaded when spark_connect() is called; so let’s restart your R session, establish a new Spark connection, and load the pipeline model that we previously saved: library(sparklyr) library(mleap) sc <- spark_connect(master = "local", version = "2.3") spark_model <- ml_load(sc, "spark_model") The way we save a model to MLeap bundle format is very similar to saving a model using the Spark ML Pipelines API; the only additional argument is sample_input, which is a Spark DataFrame with schema that we expect new data to be scored to have: sample_input <- data.frame( sex = "m", drinks = "not at all", drugs = "never", essay_length = 99, age = 25, stringsAsFactors = FALSE ) sample_input_tbl <- copy_to(sc, sample_input) ml_write_bundle(spark_model, sample_input_tbl, "mleap_model.zip", overwrite = TRUE) We can now deploy the artifact we just created, mleap_model.zip, in any device that runs Java and has the open source MLeap runtime dependencies, without needing Spark or R! In fact, we can go ahead and disconnect from Spark already: spark_disconnect(sc) Before we use this MLeap model, make sure the runtime dependencies are installed: mleap::install_maven() mleap::install_mleap() To test this model, we can create a new plumber API to expose it. The script plumber/mleap-plumber.R is very similar to the previous example: library(mleap) mleap_model <- mleap_load_bundle("mleap_model.zip") #* @post /predict score_spark <- function(age, sex, drinks, drugs, essay_length) { new_data <- data.frame( age = as.double(age), sex = sex, drinks = drinks, drugs = drugs, essay_length = as.double(essay_length), stringsAsFactors = FALSE ) mleap_transform(mleap_model, new_data)$prediction } And the way we launch the service is exactly the same: service <- callr::r_bg(function() { p <- plumber::plumb("plumber/mleap-plumber.R") p$run(port = 8000) }) We can run the exact same code we did previously to test unemployment predictions in this new service: httr::POST( "http://127.0.0.1:8000/predict", body = '{"age": 42, "sex": "m", "drinks": "not at all", "drugs": "never", "essay_length": 99}' ) %>% httr::content() [[1]] [1] 0 If we were to time this operation, we would see that the service now returns predictions in tens of milliseconds. Let’s stop this service and then wrap up this chapter: service$interrupt()

5.7 Recap

In this chapter, we discussed Spark Pipelines, which is the engine behind the modeling functions introduced in Chapter 4. You learned how to tidy up your predictive modeling workflows by organizing data processing and modeling algorithms into pipelines. You learned that pipelines also facilitate collaboration among members of a multilingual data science and engineering team by sharing a language-agnostic serialization format—you can export a Spark pipeline from R and let others reload your pipeline into Spark using Python or Scala, which allows them to collaborate without changing their language of choice. You also learned how to deploy pipelines using mleap, a Java runtime that provides another path to productionize Spark models—you can export a pipeline and integrate it to Java-enabled environments without requiring the target environment to support Spark or R. You probably noticed that some algorithms, especially the unsupervised learning kind, were slow, even for the OKCupid dataset, which can be loaded into memory. If we had access to a proper Spark cluster, we could spend more time modeling and less time waiting! Not only that, but we could use cluster resources to run broader hyperparameter-tuning jobs and process large datasets. To get there, Chapter 6 presents what exactly a computing cluster is and explains the various options you can consider, like building your own or using cloud clusters on demand.

Chapter 6 Clusters

Previous chapters focused on using Spark over a single computing instance, your personal computer. In this chapter, we introduce techniques to run Spark over multiple computing instances, also known as a computing cluster. This chapter and subsequent ones will introduce and make use of concepts applicable to computing clusters; however, it’s not required to use a computing cluster to follow along, so you can still use your personal computer. It’s worth mentioning that while previous chapters focused on single computing instances, you can also use all the data analysis and modeling techniques we presented in a computing cluster without changing any code. If you already have a Spark cluster in your organization, you could consider skipping to Chapter 7, which teaches you how to connect to an existing cluster. Otherwise, if you don’t have a cluster or are considering improvements to your existing infrastructure, this chapter introduces the cluster trends, managers, and providers available today.

6.1 Overview

There are three major trends in cluster computing worth discussing: on-premises, cloud computing, and Kubernetes. Framing these trends over time will help us understand how they came to be, what they are, and what their future might be. To illustrate this, Figure 6.1 plots these trends over time using data from Google trends. For on-premises clusters, you or someone in your organization purchased physical computers that were intended to be used for cluster computing. The computers in this cluster are made of off-the-shelf hardware, meaning that someone placed an order to purchase computers usually found on store shelves, or high-performance hardware, meaning that a computing vendor provided highly customized computing hardware, which also comes optimized for high-performance network connectivity, power consumption, and so on. 
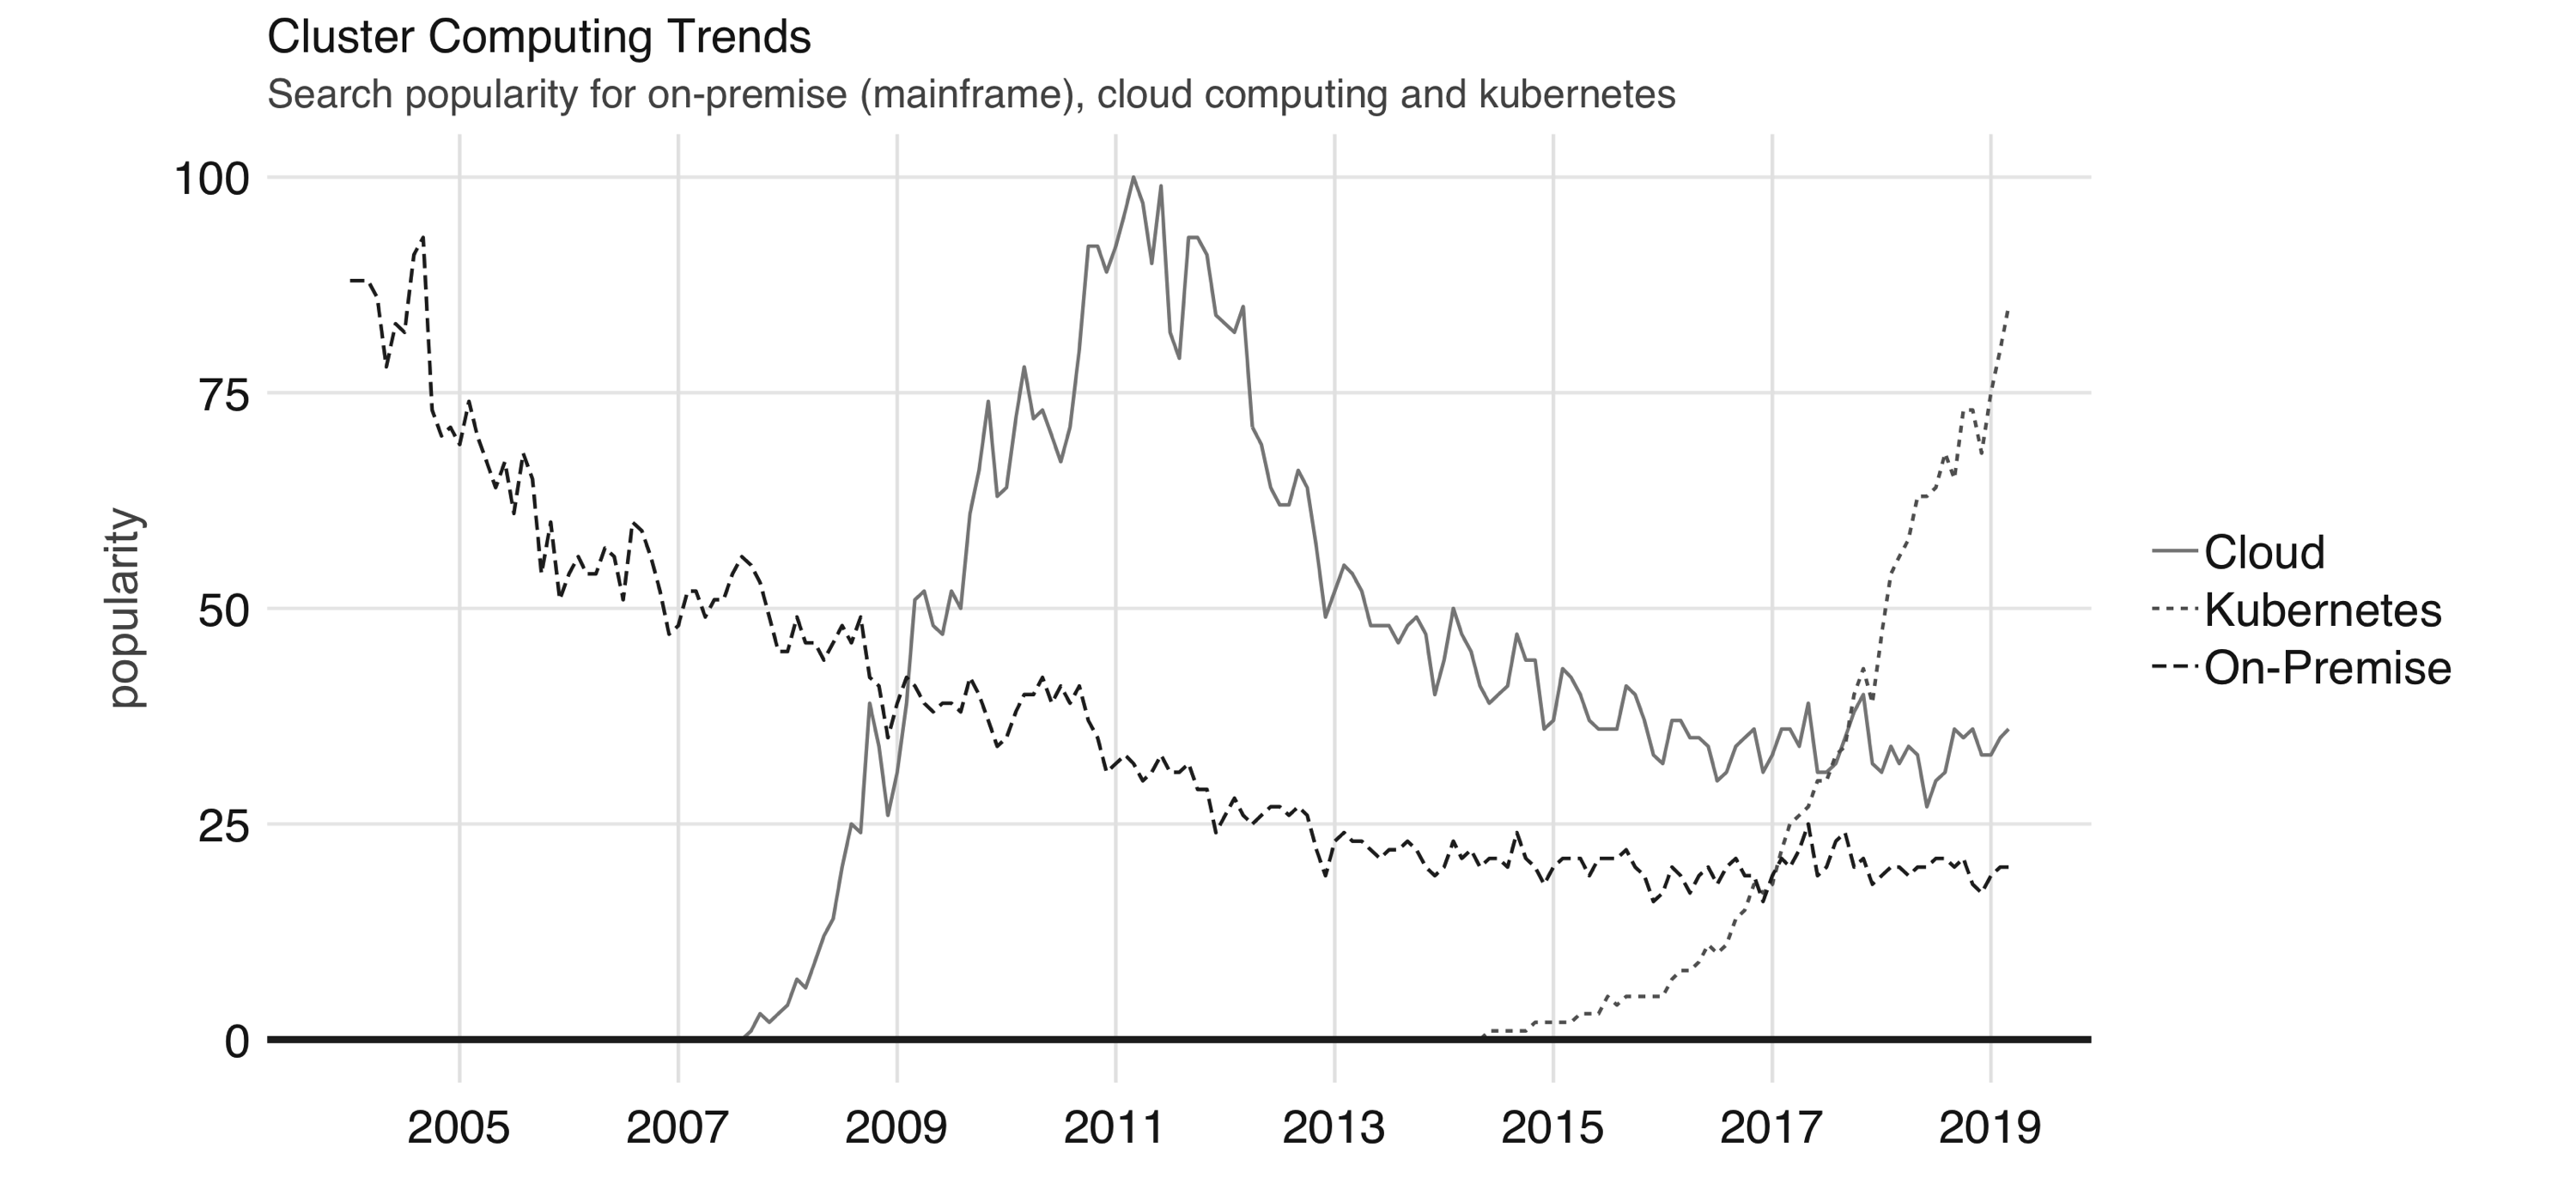
FIGURE 6.1: Google trends for on-premises (mainframe), cloud computing, and Kubernetes When purchasing hundreds or thousands of computing instances, it doesn’t make sense to keep them in the usual computing case that we are all familiar with; instead, it makes sense to stack them as efficiently as possible on top of one another to minimize the space the use. This group of efficiently stacked computing instances is known as a rack. After a cluster grows to thousands of computers, you will also need to host hundreds of racks of computing devices; at this scale, you would also need significant physical space to host those racks. A building that provides racks of computing instances is usually known as a datacenter. At the scale of a datacenter, you would also need to find ways to make the building more efficient, especially the cooling system, power supplies, network connectivity, and so on. Since this is time-consuming, a few organizations have come together to open source their infrastructure under the Open Compute Project initiative, which provides a set of datacenter blueprints free for anyone to use. There is nothing preventing you from building our own datacenter, and, in fact, many organizations have followed this path. For instance, Amazon started as an online bookstore, but over the years it grew to sell much more than just books. Along with its online store growth, its datacenters also grew in size. In 2002, Amazon considered renting servers in their datacenters to the public, and two years later, Amazon Web Services (AWS) launched as a way to let anyone rent servers in the company’s datacenters on demand, meaning that you did not need to purchase, configure, maintain, or tear down your own clusters; rather, you could rent them directly from AWS. This on-demand compute model is what we know today as cloud computing. In the cloud, the cluster you use is not owned by you, and it’s not in your physical building; instead it’s a datacenter owned and managed by someone else. Today, there are many cloud providers in this space, including AWS, Databricks, Google, Microsoft, Qubole, and many others. Most cloud computing platforms provide a user interface through either a web application or command line to request and manage resources. While the benefits of processing data in the cloud were obvious for many years, picking a cloud provider had the unintended side effect of locking in organizations with one particular provider, making it hard to switch between providers or back to on-premises clusters. Kubernetes, announced by Google in 2014, is an open source system for managing containerized applications across multiple hosts. In practice, it makes it easier to deploy across multiple cloud providers and on-premises as well. In summary, we have seen a transition from on-premises to cloud computing and, more recently, Kubernetes. These technologies are often loosely described as the private cloud, the public cloud, and as one of the orchestration services that can enable a hybrid cloud, respectively. This chapter walks you through each cluster computing trend in the context of Spark and R.

6.2 On-Premise

As mentioned in the overview section, on-premises clusters represent a set of computing instances procured and managed by staff members from your organization. These clusters can be highly customized and controlled; however, they can also incur higher initial expenses and maintenance costs. When using on-premises Spark clusters, there are two concepts you should consider:
Cluster manager
In a similar way as to how an operating system (like Windows or macOS) allows you to run multiple applications in the same computer, a cluster manager allows multiple applications to be run in the same cluster. You need to choose one yourself when working with on-premises clusters.
Spark distribution
While you can install Spark from the Apache Spark site, many organizations partner with companies that can provide support and enhancements to Apache Spark, which we often refer to as Spark distributions.

6.2.1 Managers

To run Spark within a computing cluster, you will need to run software capable of initializing Spark over each physical machine and register all the available computing nodes. This software is known as a cluster manager. The available cluster managers in Spark are Spark Standalone, YARN, Mesos, and Kubernetes. Note: In distributed systems and clusters literature, we often refer to each physical machine as a compute instance, compute node, instance, or node.

6.2.1.1 Standalone

In Spark Standalone, Spark uses itself as its own cluster manager, which allows you to use Spark without installing additional software in your cluster. This can be useful if you are planning to use your cluster to run only Spark applications; if this cluster is not dedicated to Spark, a generic cluster manager like YARN, Mesos, or Kubernetes would be more suitable. The Spark Standalone documentation contains detailed information on configuring, launching, monitoring, and enabling high availability, as illustrated in Figure 6.2. However, since Spark Standalone is contained within a Spark installation, by completing Chapter 2, you have now a Spark installation available that you can use to initialize a local Spark Standalone cluster on your own machine. In practice, you would want to start the worker nodes on different machines, but for simplicity, we present the code to start a standalone cluster on a single machine. First, retrieve the SPARK_HOME directory by running spark_home_dir(), and then start the master node and a worker node as follows: # Retrieve the Spark installation directory spark_home <- spark_home_dir() # Build paths and classes spark_path <- file.path(spark_home, "bin", "spark-class") # Start cluster manager master node system2(spark_path, "org.apache.spark.deploy.master.Master", wait = FALSE) 
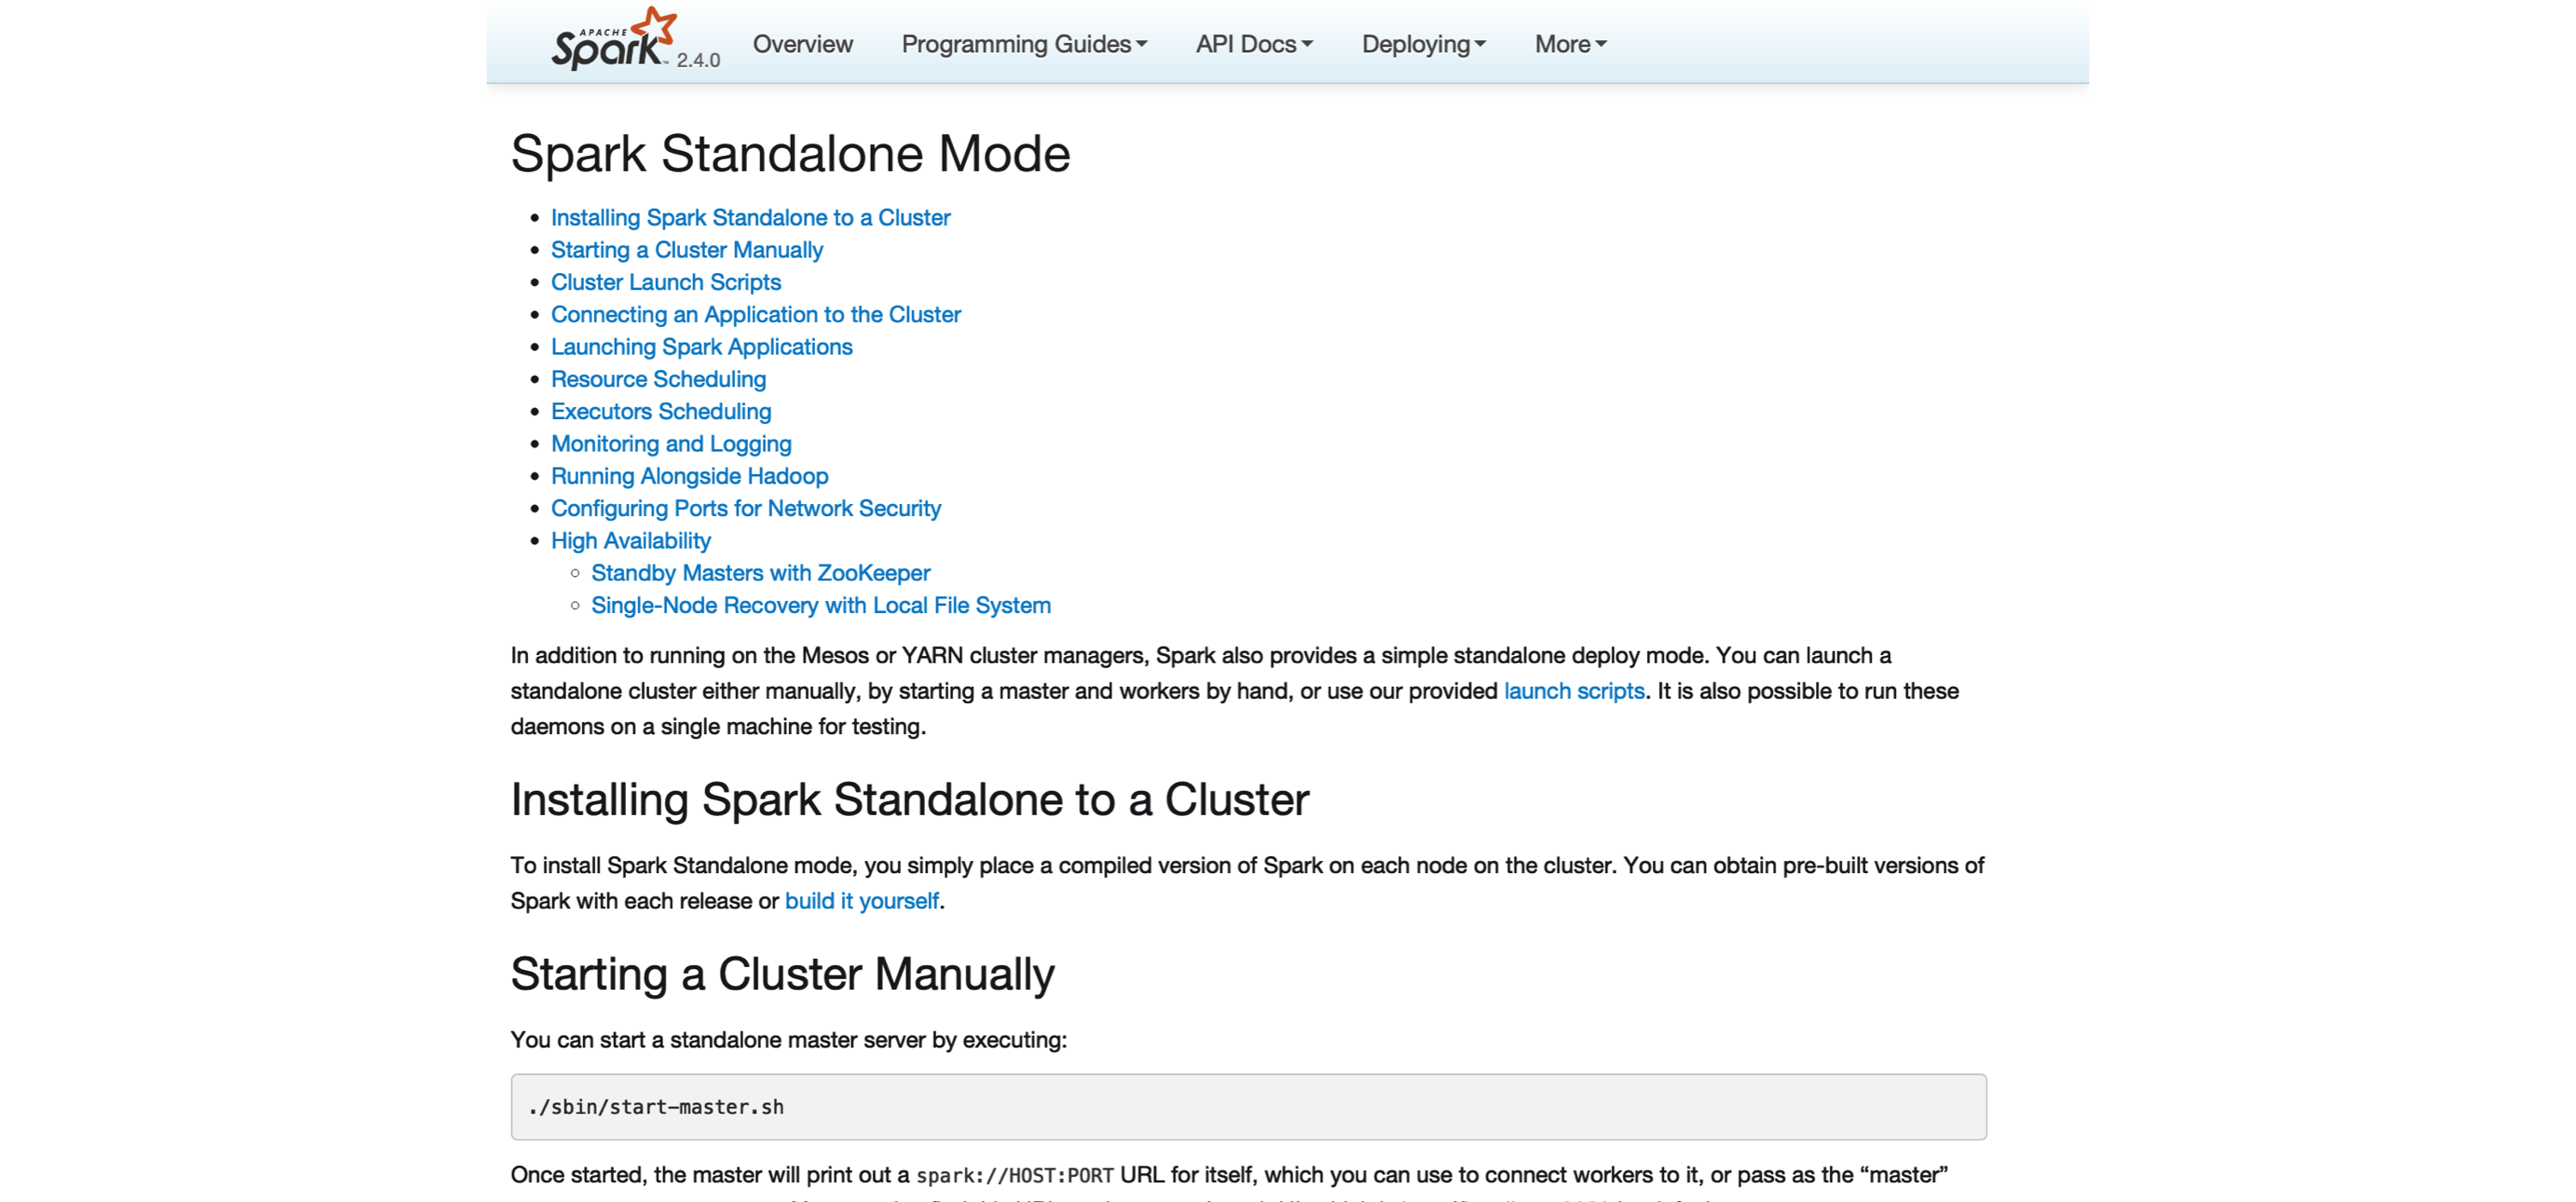
FIGURE 6.2: Spark Standalone website The previous command initializes the master node. You can access the master node interface at localhost:8080, as captured in Figure 6.3. Note that the Spark master URL is specified as spark://address:port; you will need this URL to initialize worker nodes. We then can initialize a single worker using the master URL; however, you could use a similar approach to initialize multiple workers by running the code multiple times and, potentially, across different machines: # Start worker node, find master URL at http://localhost:8080/ system2(spark_path, c("org.apache.spark.deploy.worker.Worker", "spark://address:port"), wait = FALSE) 
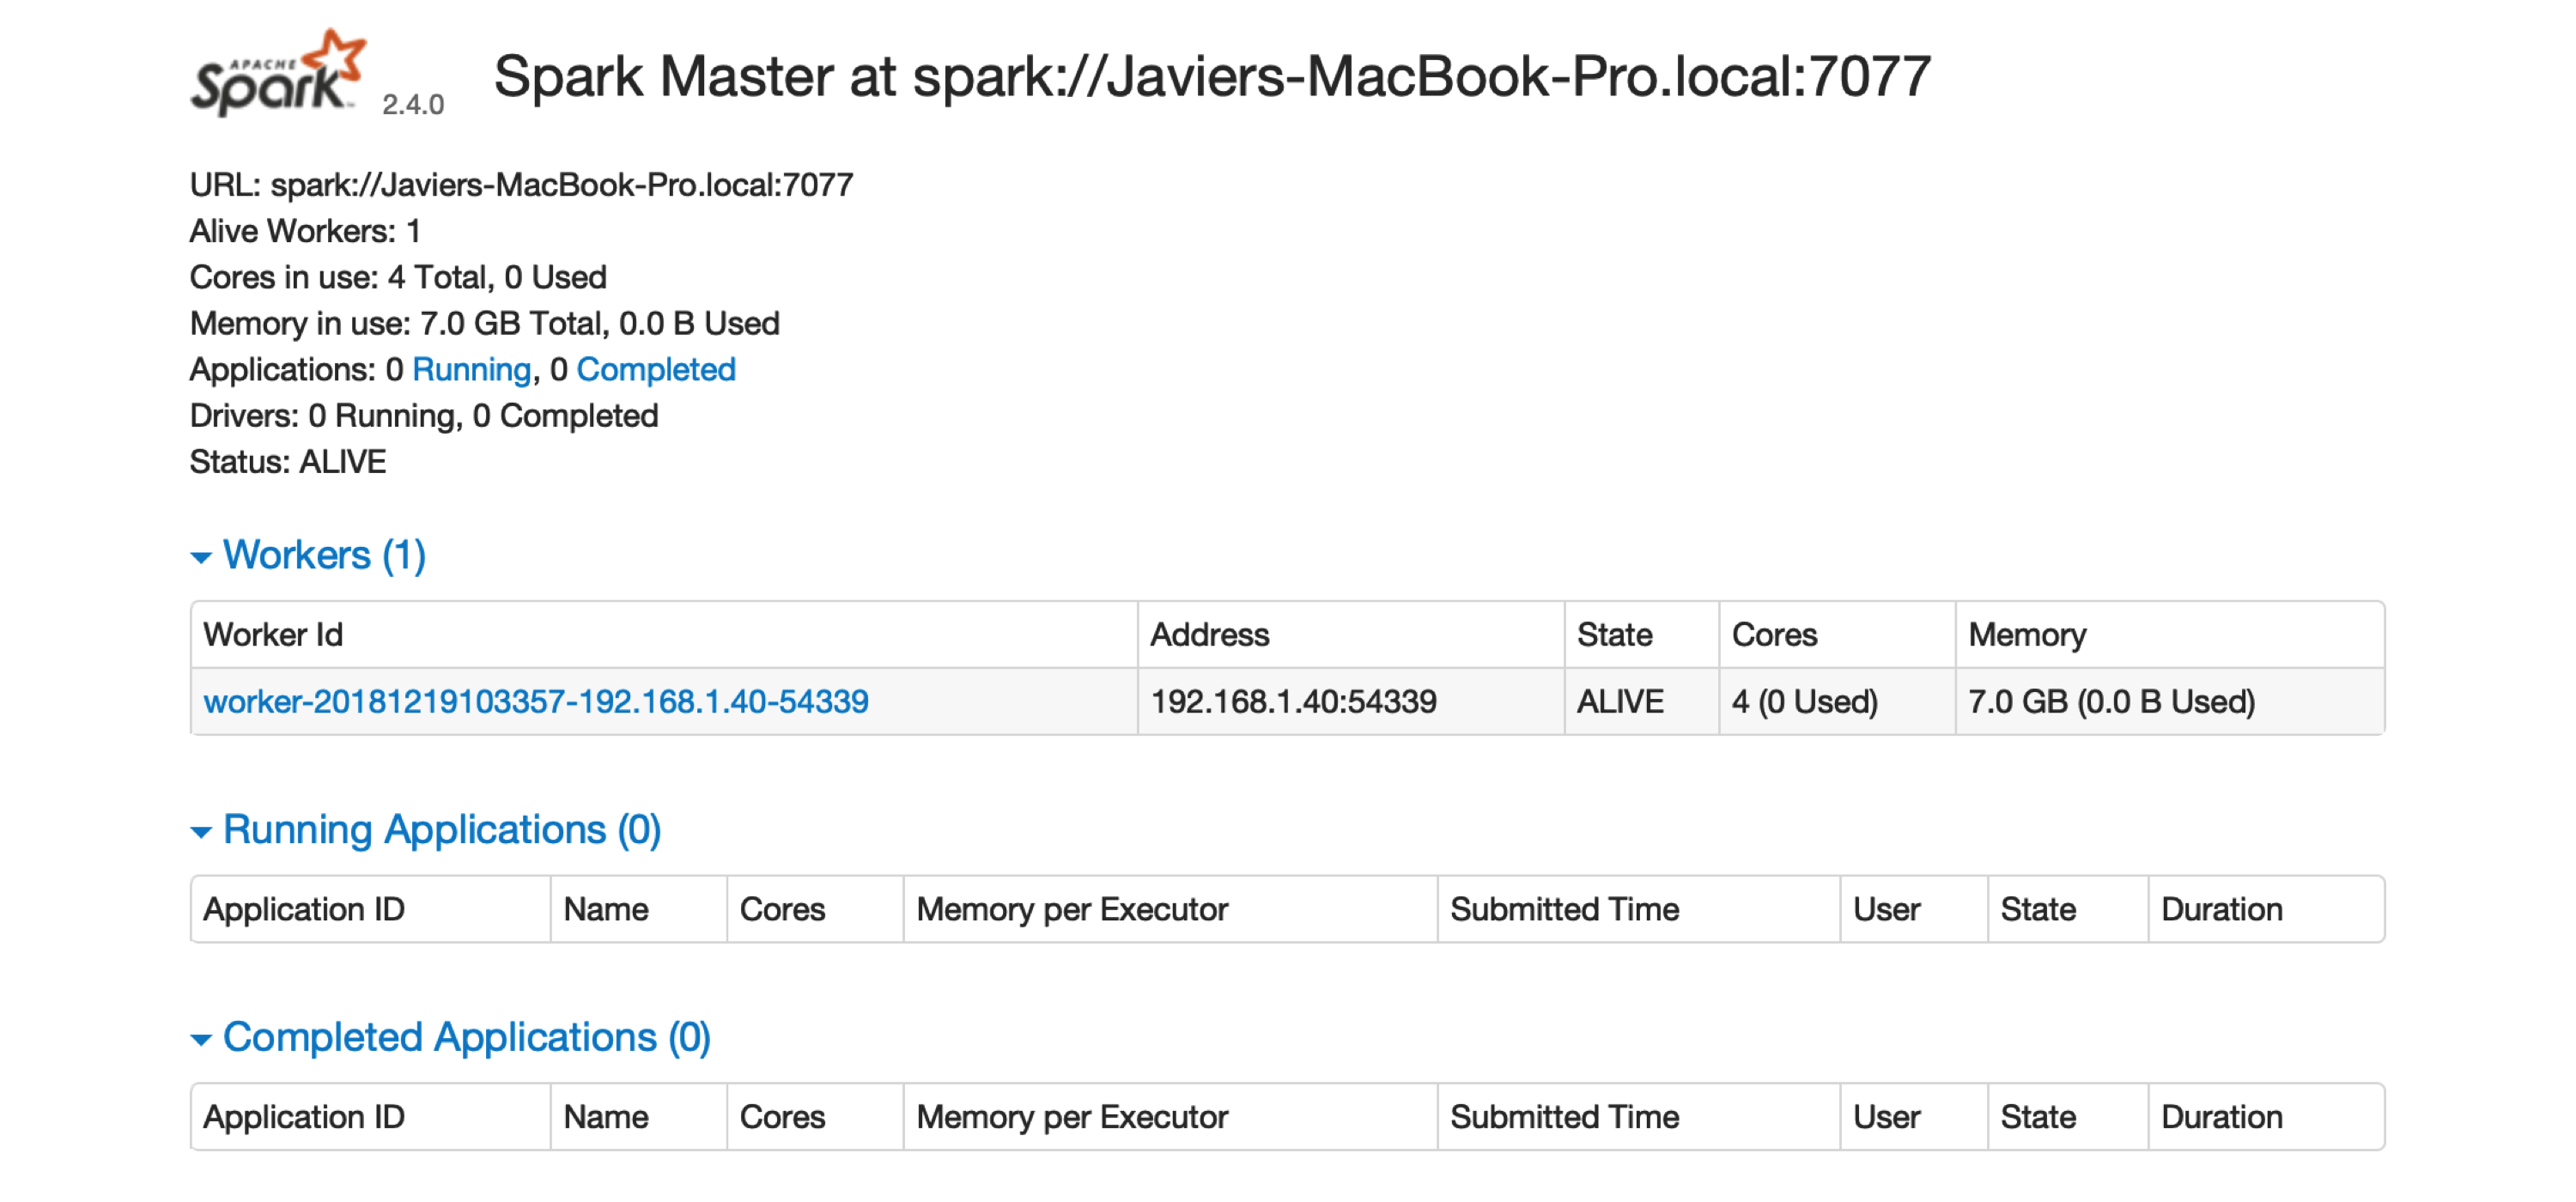
FIGURE 6.3: The Spark Standalone web interface There is one worker register in Spark Standalone. Click the link to this worker node to view details for this particular worker, like available memory and cores, as shown in Figure 6.4. 
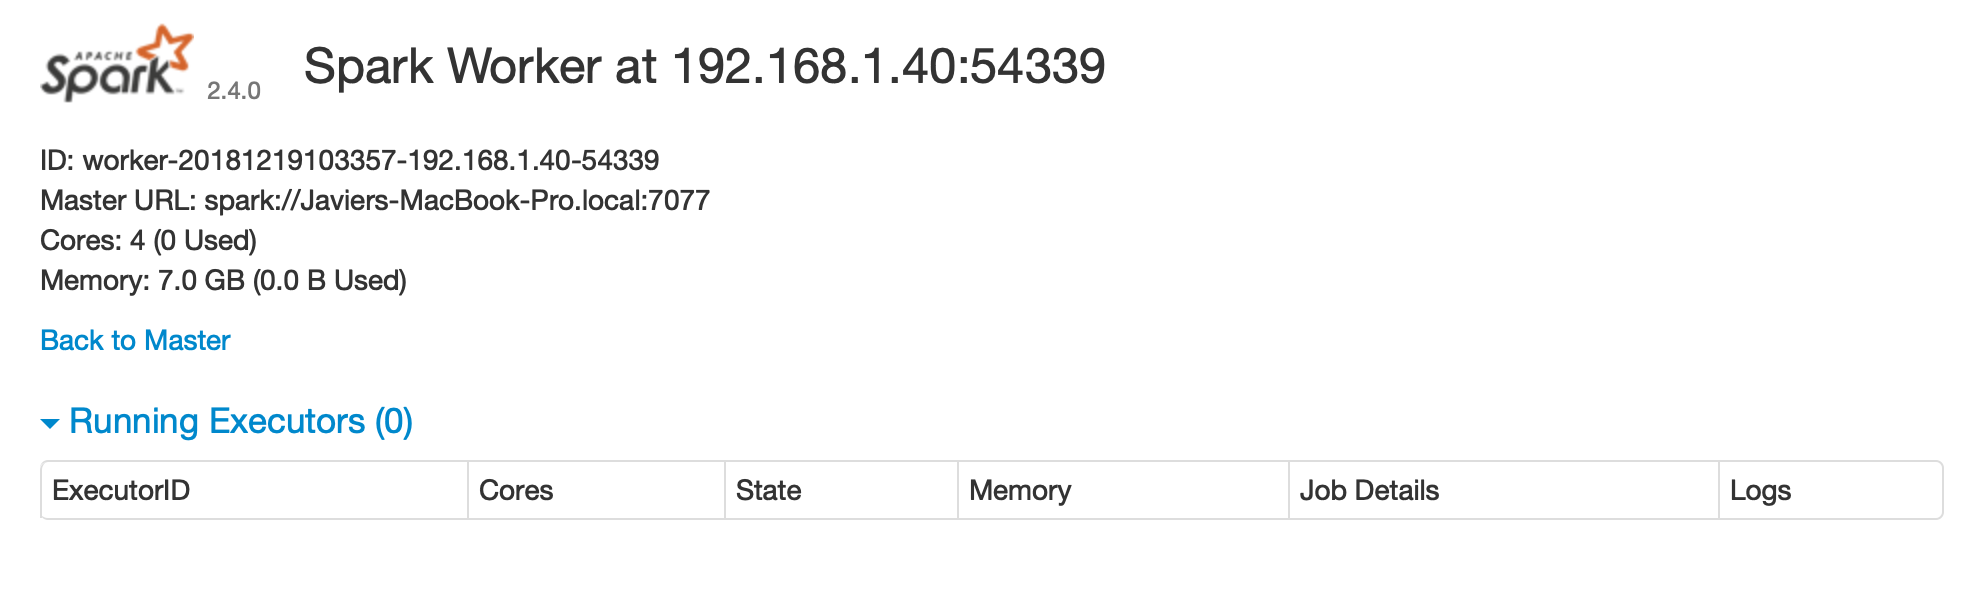
FIGURE 6.4: Spark Standalone worker web interface After you are done performing computations in this cluster, you will need to stop the master and worker nodes. You can use the jps command to identify the process numbers to terminate. In the following example, 15330 and 15353 are the processes that you can terminate to finalize this cluster. To terminate a process, you can use system("Taskkill /PID ##### /F") in Windows, or system("kill -9 #####") in macOS and Linux. system("jps") 15330 Master 15365 Jps 15353 Worker 1689 QuorumPeerMain You can follow a similar approach to configure a cluster by running the initialization code over each machine in the cluster. While it’s possible to initialize a simple standalone cluster, configuring a proper Spark Standalone cluster that can recover from computer restarts and failures, and supports multiple users, permissions, and so on, is usually a much longer process that falls beyond the scope of this book. The following sections present several alternatives that can be much easier to manage on-premises or through cloud services. We will start by introducing YARN.

6.2.1.2 Yarn

Hadoop YARN, or simply YARN, as it is commonly called, is the resource manager of the Hadoop project. It was originally developed in the Hadoop project but was refactored into its own project in Hadoop 2. As we mentioned in Chapter 1, Spark was built to speed up computation over Hadoop, and therefore it’s very common to find Spark installed on Hadoop clusters. One advantage of YARN is that it is likely to be already installed in many existing clusters that support Hadoop; this means that you can easily use Spark with many existing Hadoop clusters without requesting any major changes to the existing cluster infrastructure. It is also very common to find Spark deployed in YARN clusters since many started out as Hadoop clusters and were eventually upgraded to also support Spark. You can submit YARN applications in two modes: yarn-client and yarn-cluster. In yarn-cluster mode the driver is running remotely (potentially), while in yarn-client mode, the driver is running locally. Both modes are supported, and we explain them further in Chapter 7. YARN provides a resource management user interface useful to access logs, monitor available resources, terminate applications, and more. After you connect to Spark from R, you will be able to manage the running application in YARN, as shown in Figure 6.5. Since YARN is the cluster manager from the Hadoop project, you can find YARN’s documentation at hadoop.apache.org. You can also reference the “Running Spark on YARN” guide at spark.apache.org. 
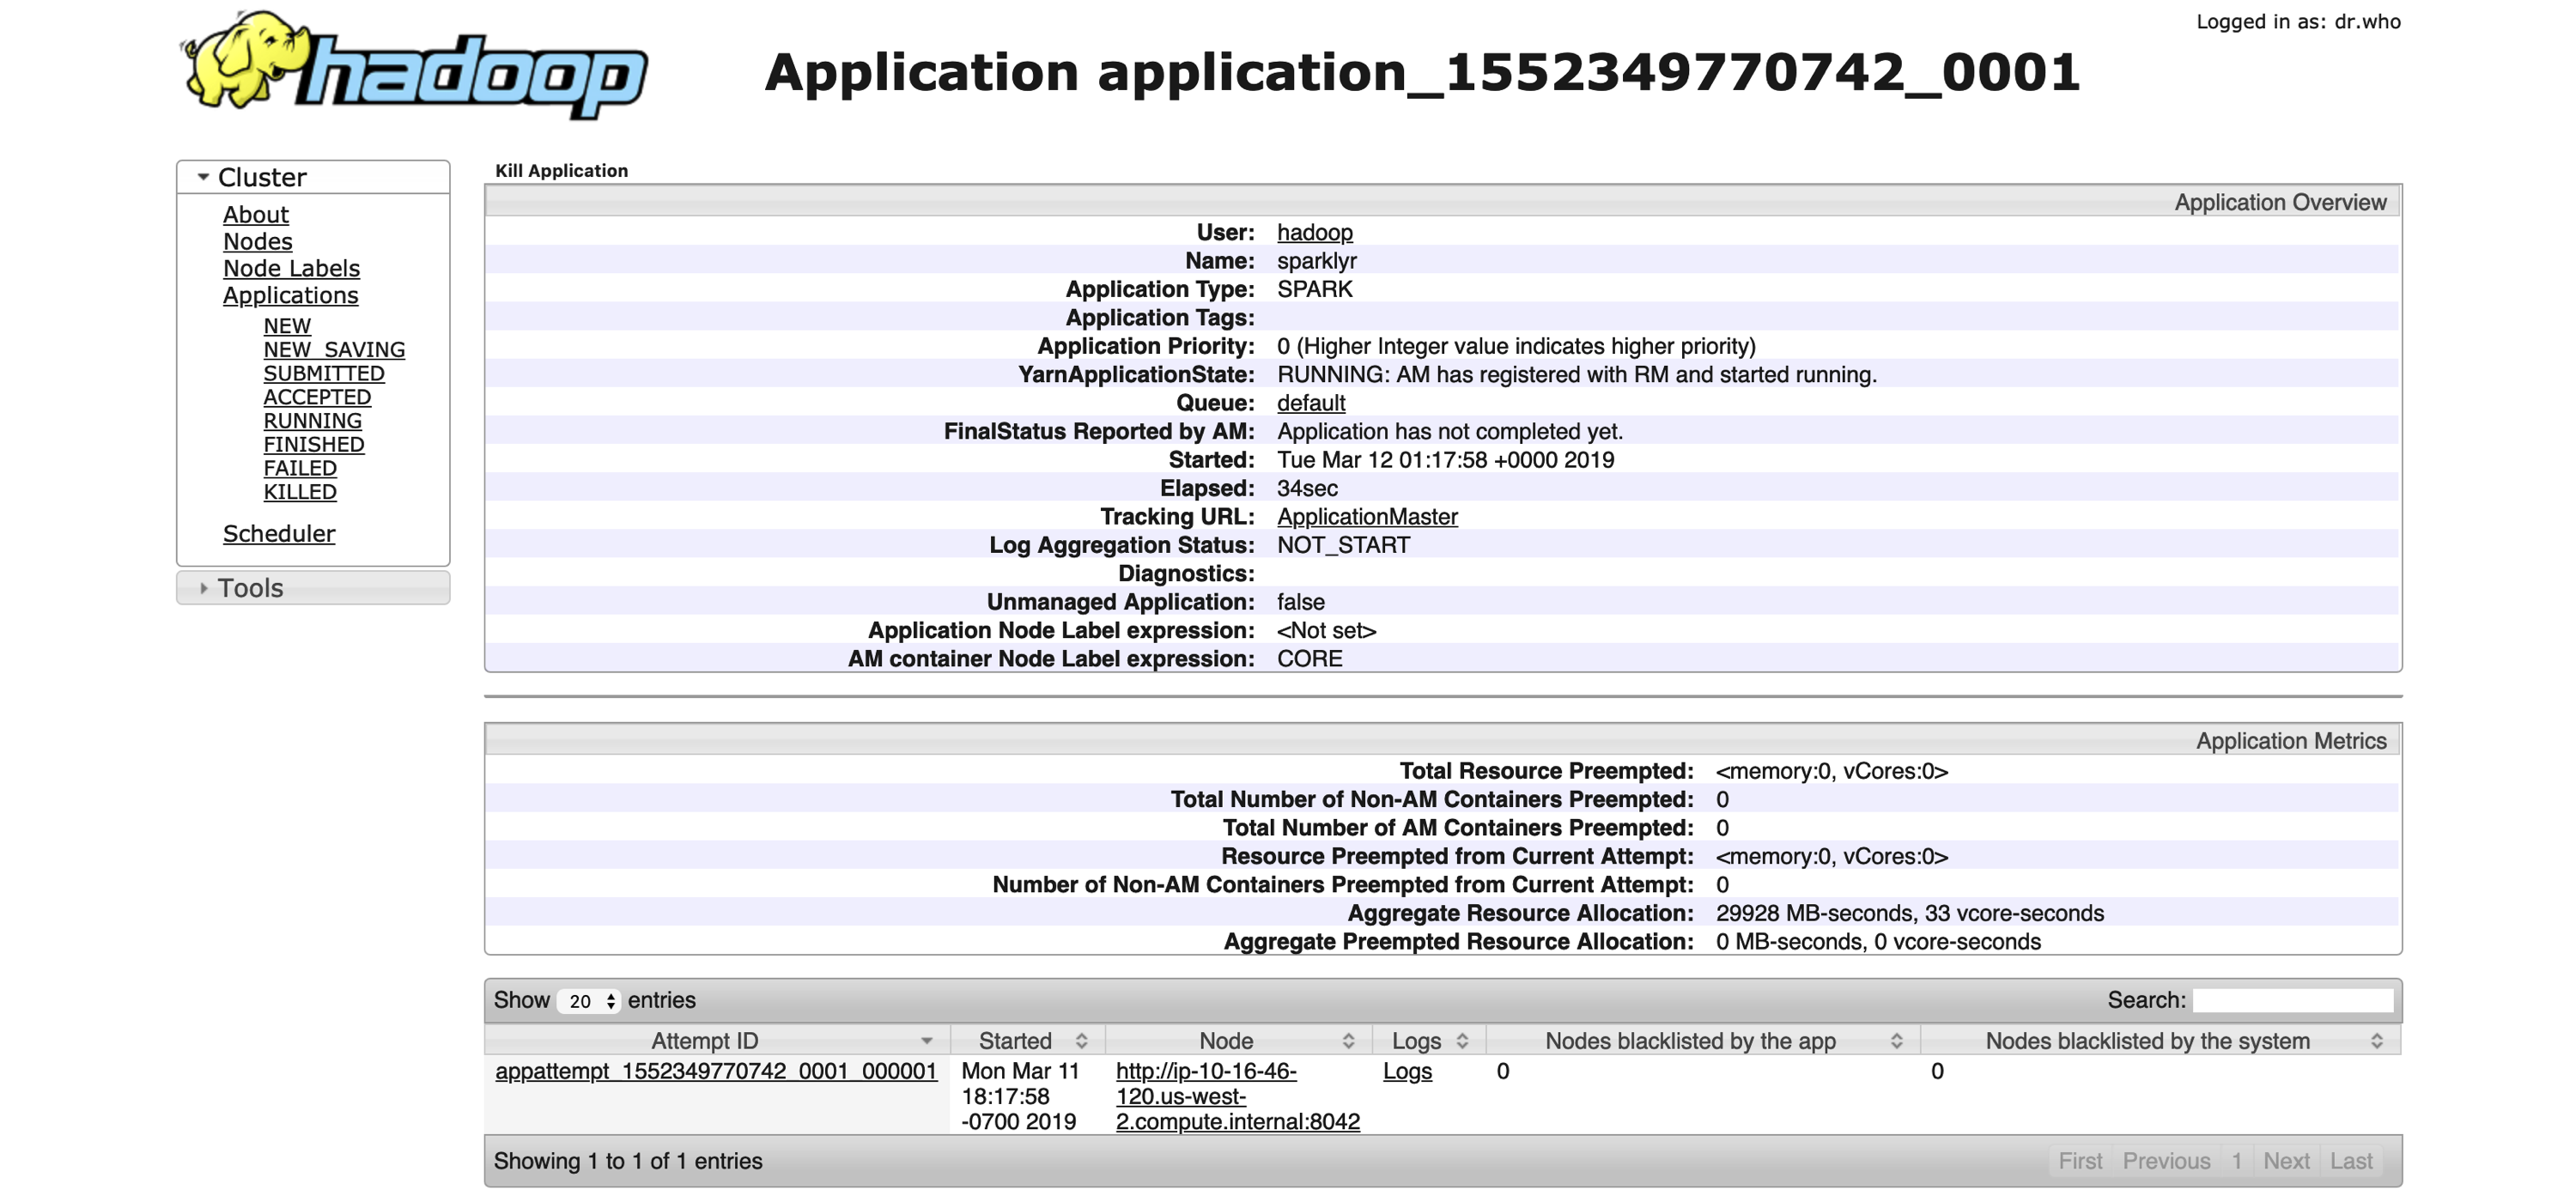
FIGURE 6.5: YARN’s Resource Manager running a sparklyr application

6.2.1.3 Mesos

Apache Mesos is an open source project to manage computer clusters. Mesos began as a research project in the UC Berkeley RAD Lab. It makes use of Linux Cgroups to provide isolation for CPU, memory, I/O, and file system access. Mesos, like YARN, supports executing many cluster frameworks, including Spark. However, one advantage particular to Mesos is that it allows cluster frameworks like Spark to implement custom task schedulers. A scheduler is the component that coordinates in a cluster which applications are allocated execution time and which resources are assigned to them. Spark uses a coarse-grained scheduler, which schedules resources for the duration of the application; however, other frameworks might use Mesos’ fine-grained scheduler, which can increase the overall efficiency in the cluster by scheduling tasks in shorter intervals, allowing them to share resources between them. Mesos provides a web interface to manage your running applications, resources, and so on. After connecting to Spark from R, your application will be registered like any other application running in Mesos. Figure 6.6 shows a successful connection to Spark from R. Mesos is an Apache project with its documentation available at mesos.apache.org. The Running Spark on Mesos guide is also a great resource if you choose to use Mesos as your cluster manager. 
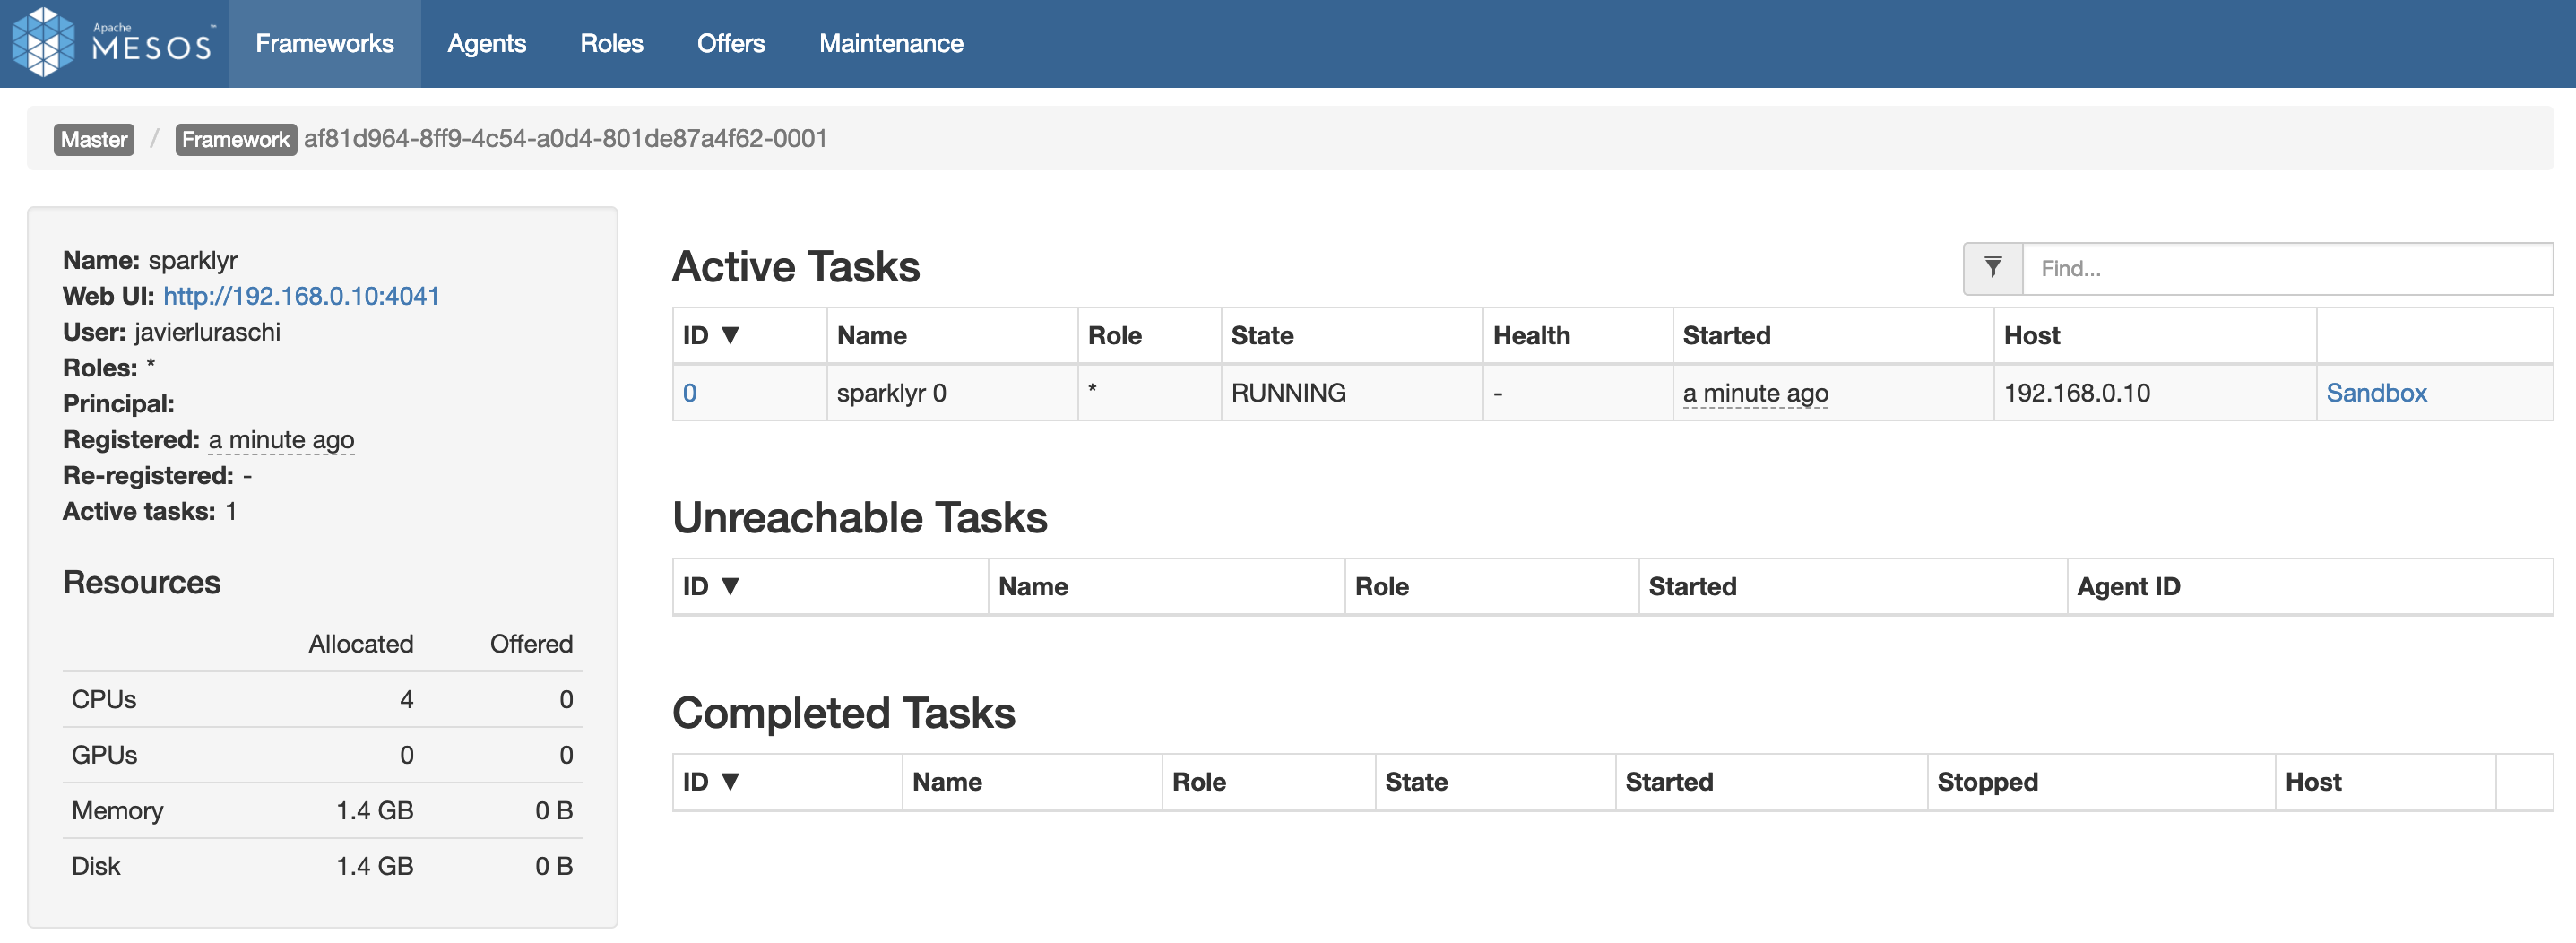
FIGURE 6.6: Mesos web interface running Spark and R

6.2.2 Distributions

You can use a cluster manager in on-premises clusters, as described in the previous section; however, many organizations—including, but not limited to, Apache Spark—choose to partner with companies providing additional management software, services, and resources to help manage applications in their cluster. Some of the on-premises cluster providers include Cloudera, Hortonworks, and MapR, which we briefly introduce next. Cloudera, Inc., is a US-based software company that provides Apache Hadoop and Apache Spark–based software, support and services, and training to business customers. Cloudera’s hybrid open source Apache Hadoop distribution, Cloudera Distribution Including Apache Hadoop (CDH), targets enterprise-class deployments of that technology. Cloudera donates more than 50% of its engineering output to the various Apache-licensed open source projects (Apache Hive, Apache Avro, Apache HBase, and so on) that combine to form the Apache Hadoop platform. Cloudera is also a sponsor of the Apache Software Foundation. Cloudera clusters make use of parcels, which are binary distributions containing program files and metadata. Spark happens to be installed as a parcel in Cloudera. It’s beyond the scope of this book to present how to configure Cloudera clusters, but resources and documentation can be found under cloudera.com, and “Introducing sparklyr, an R Interface for Apache Spark” on the Cloudera blog. Cloudera provides the Cloudera Manager web interface to manage resources, services, parcels, diagnostics, and more. Figure 6.7 shows a Spark parcel running in Cloudera Manager, which you can later use to connect from R. 
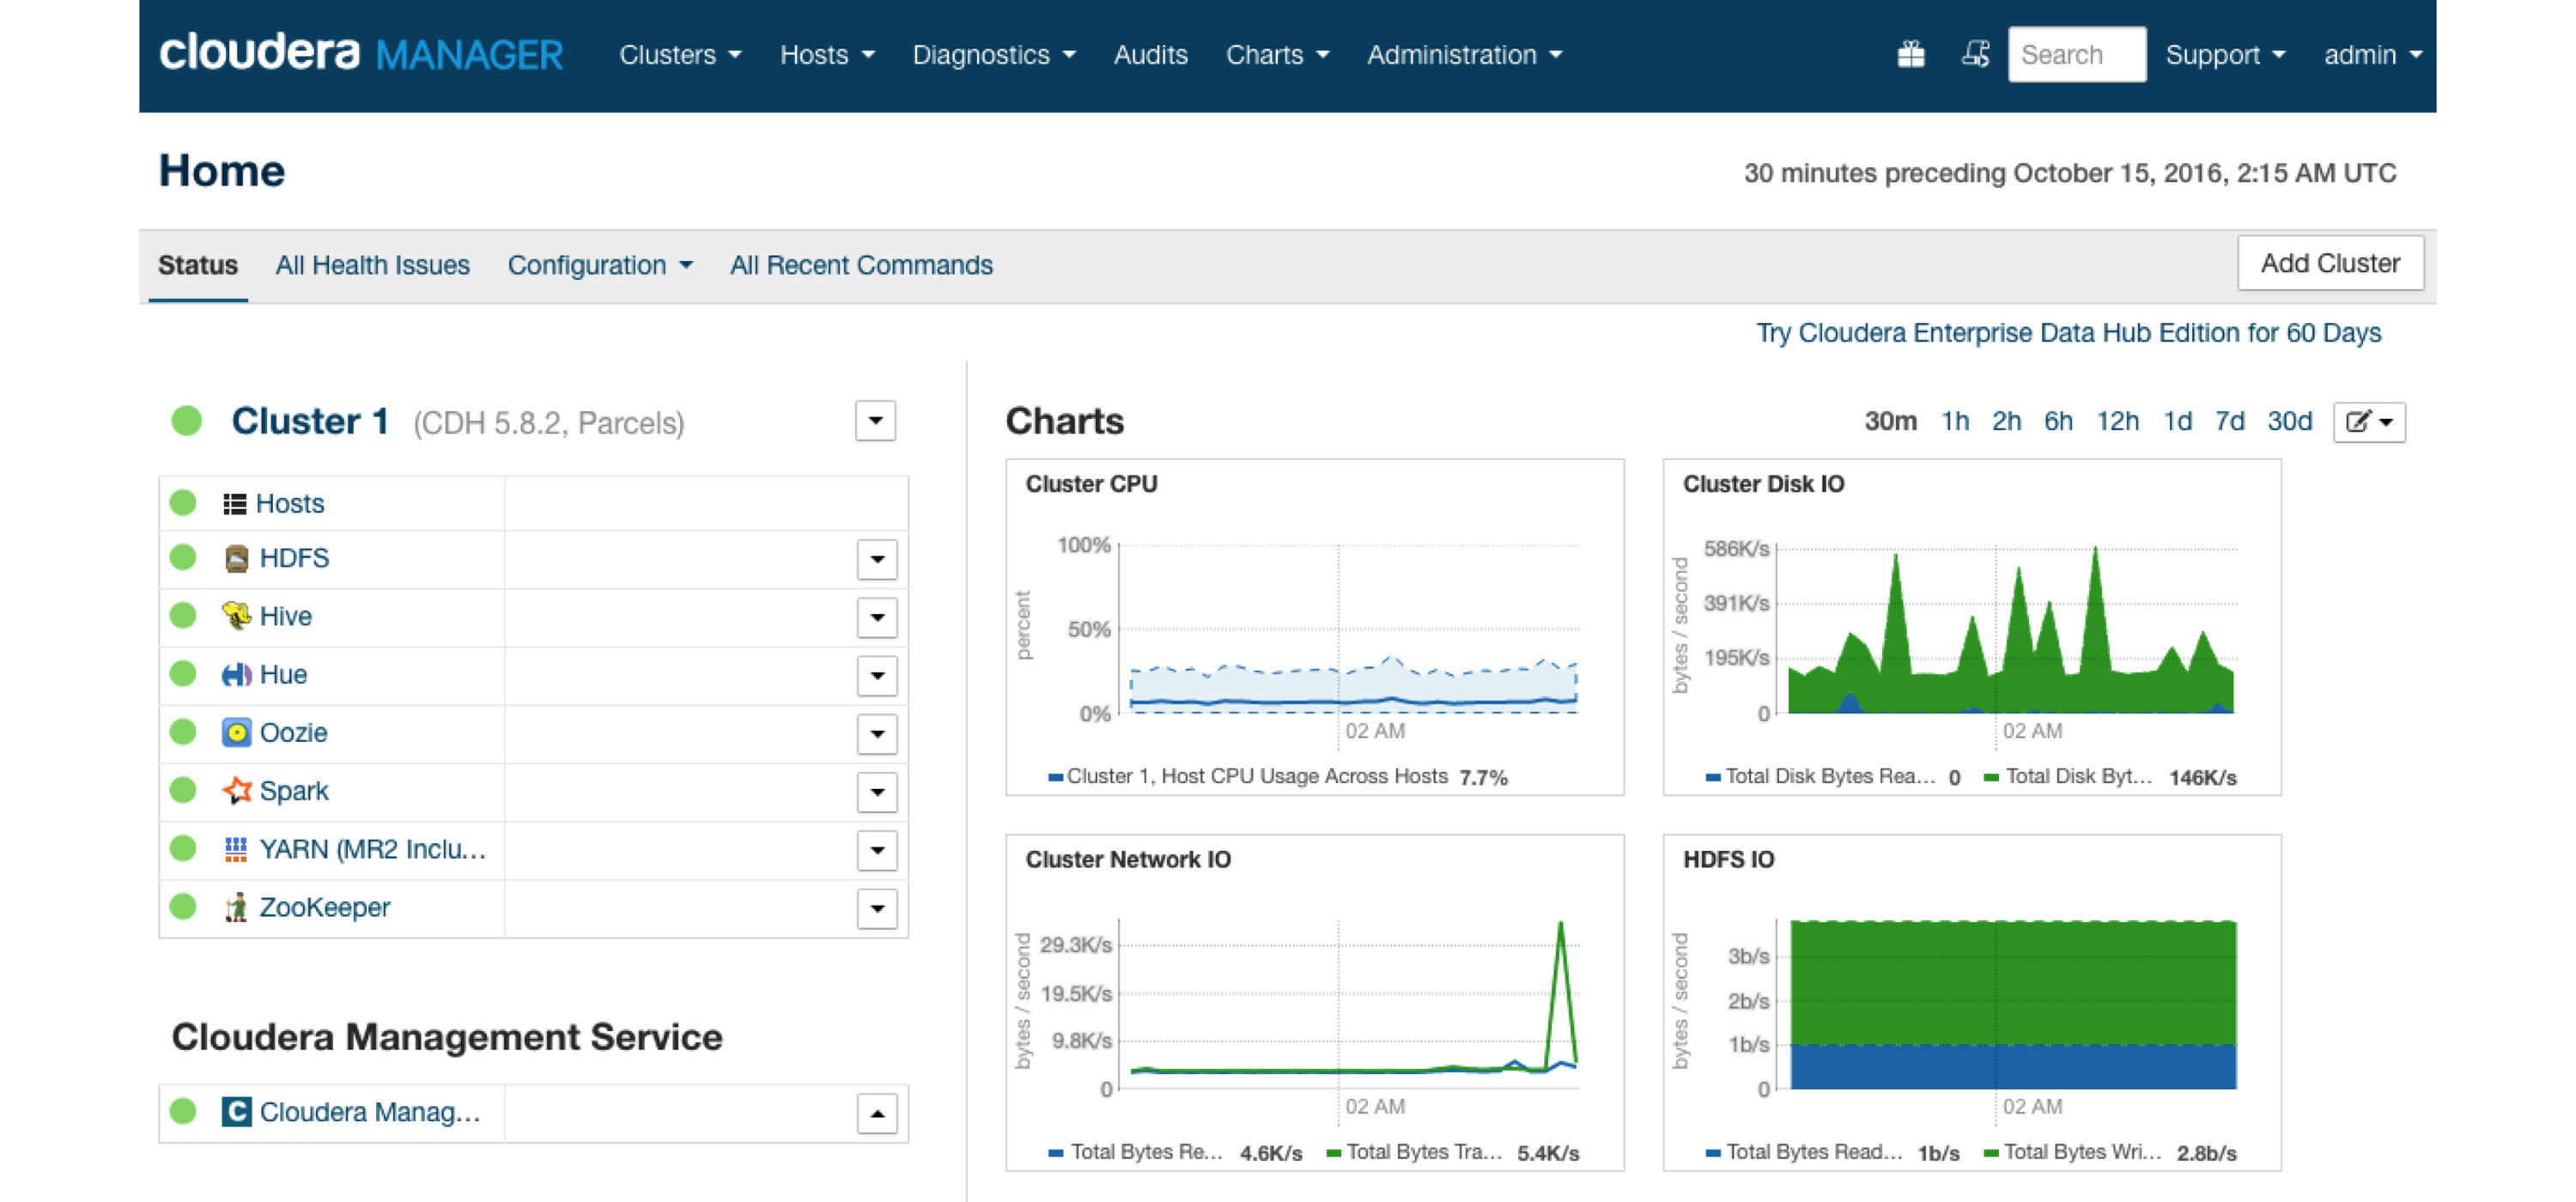
FIGURE 6.7: Cloudera Manager running Spark parcel sparklyr is certified with Cloudera, meaning that Cloudera’s support is aware of sparklyr and can be effective helping organizations that are using Spark and R. Table 6.1 summarizes the versions currently certified.
TABLE 6.1: Versions of sparklyr certified with Cloudera
Cloudera.VersionProductVersionComponentsKerberos
CDH5.9sparklyr0.5HDFS, SparkYes
CDH5.9sparklyr0.6HDFS, SparkYes
CDH5.9sparklyr0.7HDFS, SparkYes
Hortonworks is a big data software company based in Santa Clara, California. The company develops, supports, and provides expertise on an expansive set of entirely open source software designed to manage data and processing for everything from Internet of Things (IoT) to advanced analytics and machine learning. Hortonworks believes that it is a data management company bridging the cloud and the datacenter. Hortonworks partnered with Microsoft to improve support in Microsoft Windows for Hadoop and Spark, which used to be a differentiation point from Cloudera; however, comparing Hortonworks and Cloudera is less relevant today since the companies merged in January 2019. Despite the merger, support for the Cloudera and Hortonworks Spark distributions are still available. Additional resources to configure Spark under Hortonworks are available at hortonworks.com. MapR is a business software company headquartered in Santa Clara, California. MapR provides access to a variety of data sources from a single computer cluster, including big data workloads such as Apache Hadoop and Apache Spark, a distributed file system, a multimodel database management system, and event stream processing, combining analytics in real time with operational applications. Its technology runs on both commodity hardware and public cloud computing services.

6.3 Cloud

If you have neither an on-premises cluster nor spare machines to reuse, starting with a cloud cluster can be quite convenient since it will allow you to access a proper cluster in a matter of minutes. This section briefly mentions some of the major cloud infrastructure providers and gives you resources to help you get started if you choose to use a cloud provider. In cloud services, the compute instances are billed for as long the Spark cluster runs; your billing starts when the cluster launches, and it stops when the cluster stops. This cost needs to be multiplied by the number of instances reserved for your cluster. So, for instance, if a cloud provider charges $1.00 per compute instance per hour, and you start a three-node cluster that you use for one hour and 10 minutes, it is likely that you’ll receive a bill for $1.00 x 2 hours x 3 nodes = $6.00. Some cloud providers charge per minute, but at least you can rely on all of them charging per compute hour. Be aware that, while computing costs can be quite low for small clusters, accidentally leaving a cluster running can cause significant billing expenses. Therefore, it’s worth taking the extra time to check twice that your cluster is terminated when you no longer need it. It’s also a good practice to monitor costs daily while using clusters to make sure your expectations match the daily bill. From past experience, you should also plan to request compute resources in advance while dealing with large-scale projects; various cloud providers will not allow you to start a cluster with hundreds of machines before requesting them explicitly through a support request. While this can be cumbersome, it’s also a way to help you control costs in your organization. Since the cluster size is flexible, it is a good practice to start with small clusters and scale compute resources as needed. Even if you know in advance that a cluster of significant size will be required, starting small provides an opportunity to troubleshoot issues at a lower cost since it’s unlikely that your data analysis will run at scale flawlessly on the first try. As a rule of thumb, grow the instances exponentially; if you need to run a computation over an eight-node cluster, start with one node and an eighth of the entire dataset, then two nodes with a fourth, then four nodes with half of the dataset, and then, finally, eight nodes and the entire dataset. As you become more experienced, you’ll develop a good sense of how to troubleshoot issues, and of the size of the required cluster, and you’ll be able to skip intermediate steps, but for starters, this is a good practice to follow. You can also use a cloud provider to acquire bare computing resources and then install the on-premises distributions presented in the previous section yourself; for instance, you can run the Cloudera distribution on Amazon Elastic Compute Cloud (Amazon EC2). This model would avoid procuring colocated hardware, but it still allows you to closely manage and customize your cluster. This book presents an overview of only the fully managed Spark services available by cloud providers; however, you can usually find with ease instructions online on how to install on-premises distributions in the cloud. Some of the major providers of cloud computing infrastructure are Amazon, Databricks, Google, IBM, and Microsoft and Qubole. The subsections that follow briefly introduce each one.

6.3.1 Amazon

Amazon provides cloud services through AWS; more specifically, it provides an on-demand Spark cluster through Amazon EMR. Detailed instructions on using R with Amazon EMR were published under Amazon’s Big Data blog in a post called “Running sparklyr on Amazon EMR”. This post introduced the launch of sparklyr and instructions to configure Amazon EMR clusters with sparklyr. For instance, it suggests you can use the Amazon Command Line Interface to launch a cluster with three nodes, as follows: aws emr create-cluster --applications Name=Hadoop Name=Spark Name=Hive \ --release-label emr-5.8.0 --service-role EMR_DefaultRole --instance-groups \ InstanceGroupType=MASTER,InstanceCount=1,InstanceType=m3.2xlarge \ InstanceGroupType=CORE,InstanceCount=2,InstanceType=m3.2xlarge \ --bootstrap-action Path=s3://aws-bigdata-blog/artifacts/aws-blog-emr-\ rstudio-sparklyr/rstudio_sparklyr_emr5.sh,Args=["--user-pw", "<password>", \ "--rstudio", "--arrow"] --ec2-attributes InstanceProfile=EMR_EC2_DefaultRole You can then see the cluster launching and then eventually running under the AWS portal, as illustrated in Figure 6.8. You then can navigate to the Master Public DNS and find RStudio under port 8787—for example, ec2-12-34-567-890.us-west-1.compute.amazonaws.com:8787—and then log in with user hadoop and password password. 
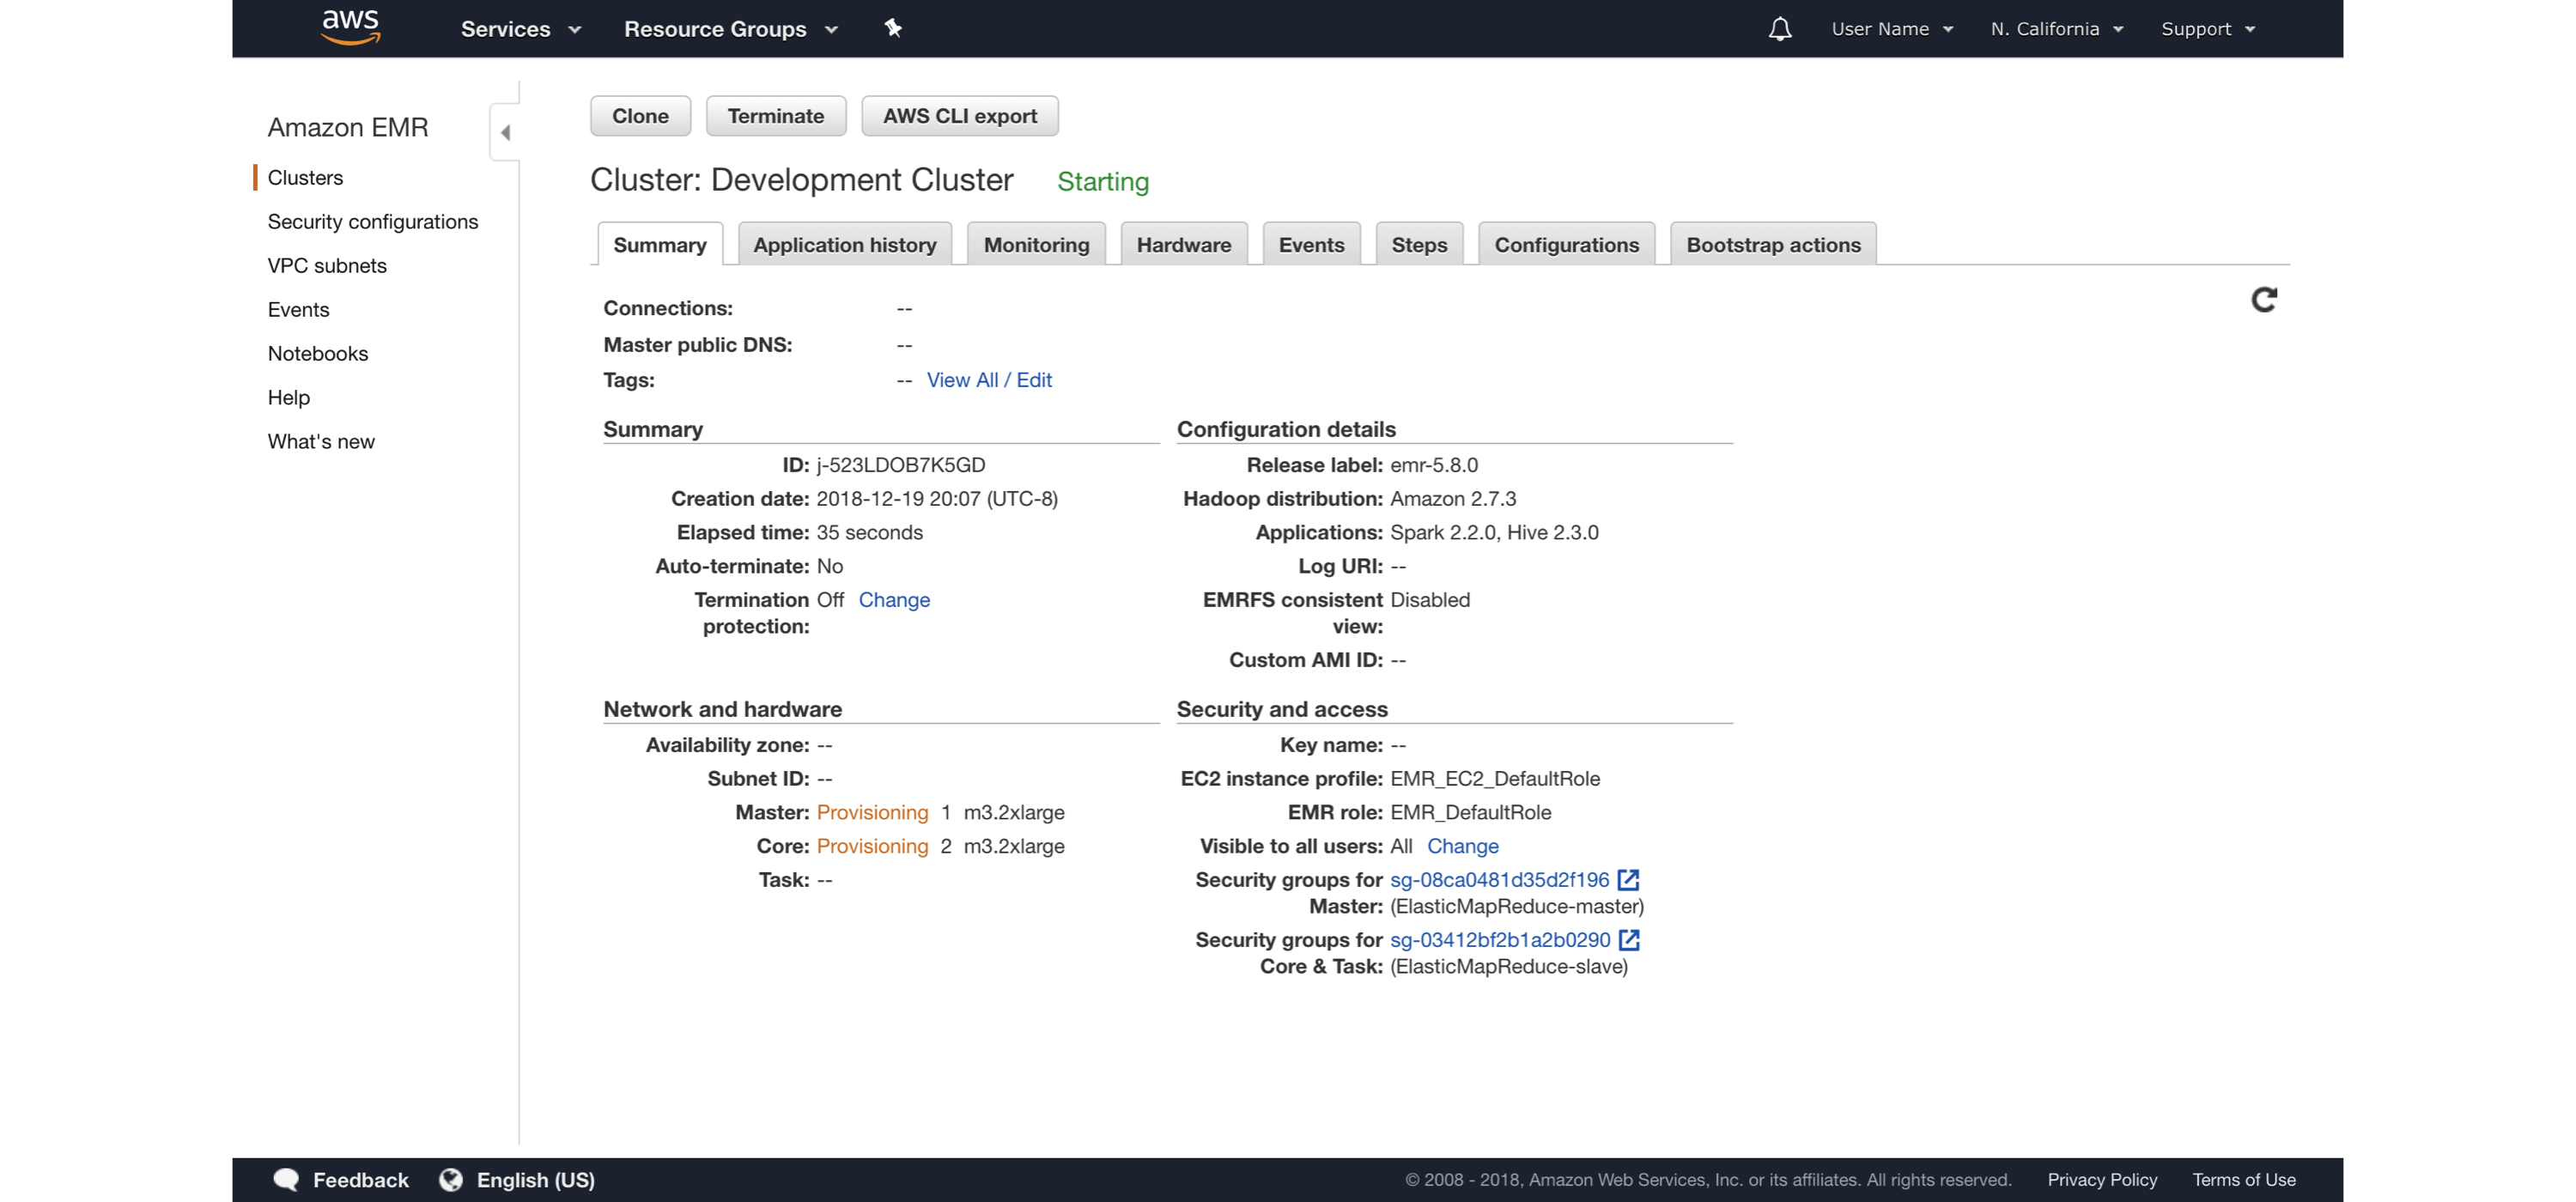
FIGURE 6.8: Launching an Amazon EMR cluster It is also possible to launch the Amazon EMR cluster using the web interface; the same introductory post contains additional details and walkthroughs specifically designed for Amazon EMR. Remember to turn off your cluster to avoid unnecessary charges and use appropriate security restrictions when starting Amazon EMR clusters for sensitive data analysis. Regarding cost, you can find the most up-to-date information at https://amzn.to/2YRGb5r[Amazon EMR Pricing]. Table 6.2 presents some of the instance types available in the us-west-1 region (as of this writing); this is meant to provide a glimpse of the resources and costs associated with cloud processing. Notice that the “EMR price is in addition to the Amazon EC2 price (the price for the underlying servers)”.
TABLE 6.2: Amazon EMR pricing information
InstanceCPUsMemoryStorageEC2.CostEMR.Cost
c1.medium21.7GB350GB$0.148 USD/hr$0.030 USD/hr
m3.2xlarge830GB160GB$0.616 USD/hr$0.140 USD/hr
i2.8xlarge32244GB6400GB$7.502 USD/hr$0.270 USD/hr
Note: We are presenting only a subset of the available compute instances for Amazon and subsequent cloud providers as of 2019; however, note that hardware (CPU speed, hard drive speed, etc.) varies between vendors and locations; therefore, you can’t use these hardware tables as an accurate price comparison. Accurate comparison would require running your particular workloads and considering other aspects beyond compute instance cost.

6.3.2 Databricks

Databricks is a company founded by the creators of Apache Spark, whose aim is to help clients with cloud-based big data processing using Spark. Databricks grew out of the AMPLab project at the University of California, Berkeley. Databricks provides enterprise-level cluster computing plans as well as a free/community tier to explore functionality and become familiar with their environment. After a cluster is launched, you can use R and sparklyr from Databricks notebooks following the steps provided in Chapter 2 or by installing RStudio on Databricks. Figure 6.9 shows a Databricks notebook using Spark through sparkylyr. 
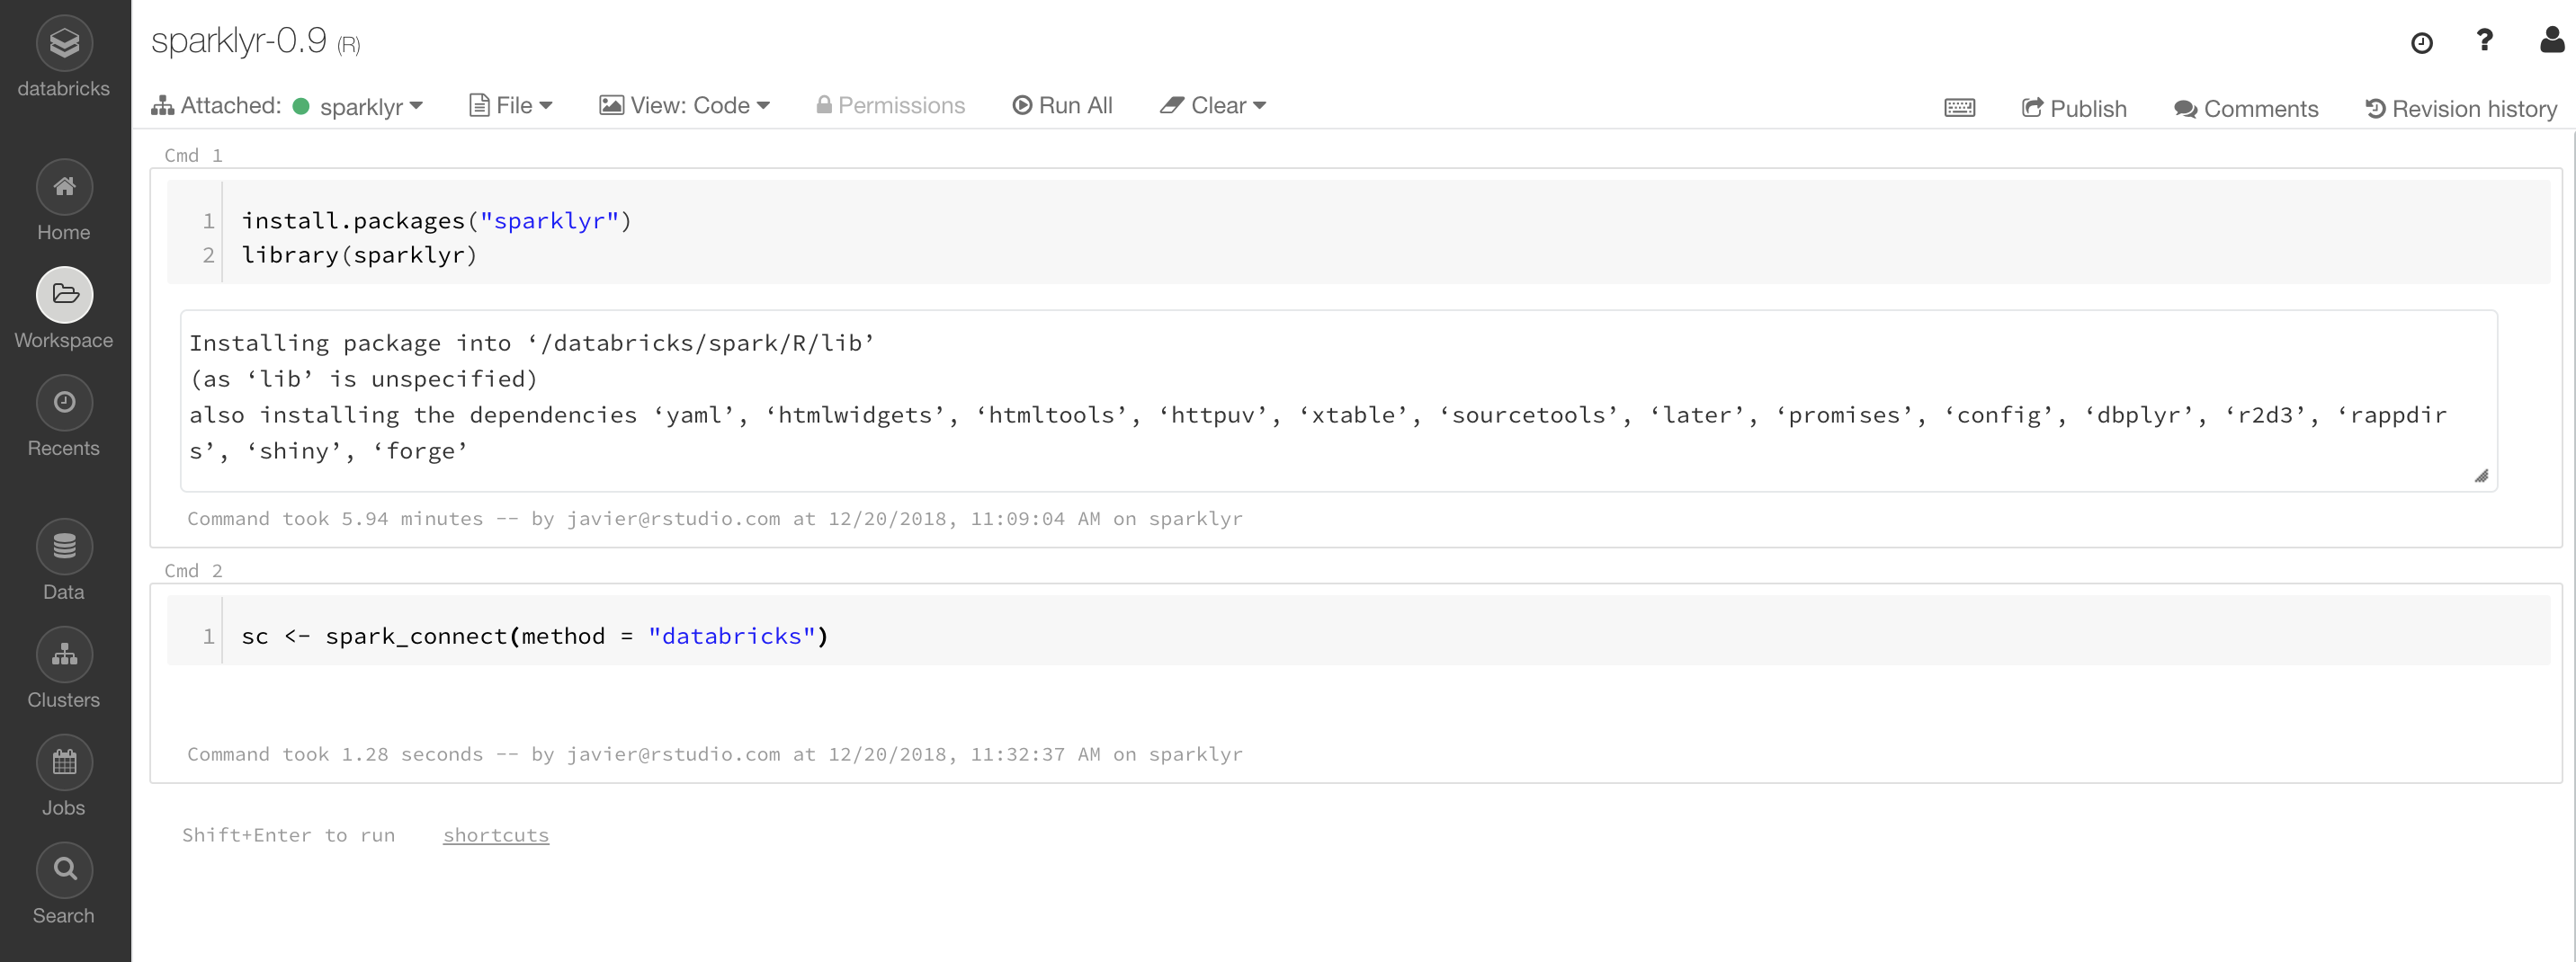
FIGURE 6.9: Databricks community notebook running sparklyr Additional resources are available under the Databricks Engineering Blog post “Using sparklyr in Databricks” and the Databricks documentation for sparklyr. You can find the latest pricing information at databricks.com/product/pricing. Table 6.3 lists the available plans as of this writing.
TABLE 6.3: Databricks procong information.
PlanBasicData.EngineeringData.Analytics
AWS Standard$0.07 USD/DBU$0.20 USD/DBU$0.40 USD/DBU
Azure Standard$0.20 USD/DBU$0.40 USD/DBU
Azure Premium$0.35 USD/DBU$0.55 USD/DBU
Notice that pricing is based on cost of DBU per hour. From Databricks, “a Databricks Unit (DBU) is a unit of Apache Spark processing capability per hour. For a varied set of instances, DBUs are a more transparent way to view usage instead of the node-hour”.

6.3.3 Google

Google provides Google Cloud Dataproc as a cloud-based managed Spark and Hadoop service offered on Google Cloud Platform (GCP). Dataproc utilizes many GCP technologies, such as Google Compute Engine and Google Cloud Storage, to offer fully managed clusters running popular data processing frameworks such as Apache Hadoop and Apache Spark. You can easily create a cluster from the Google Cloud console or the Google Cloud command-line interface (CLI) as illustrated in Figure 6.10. 
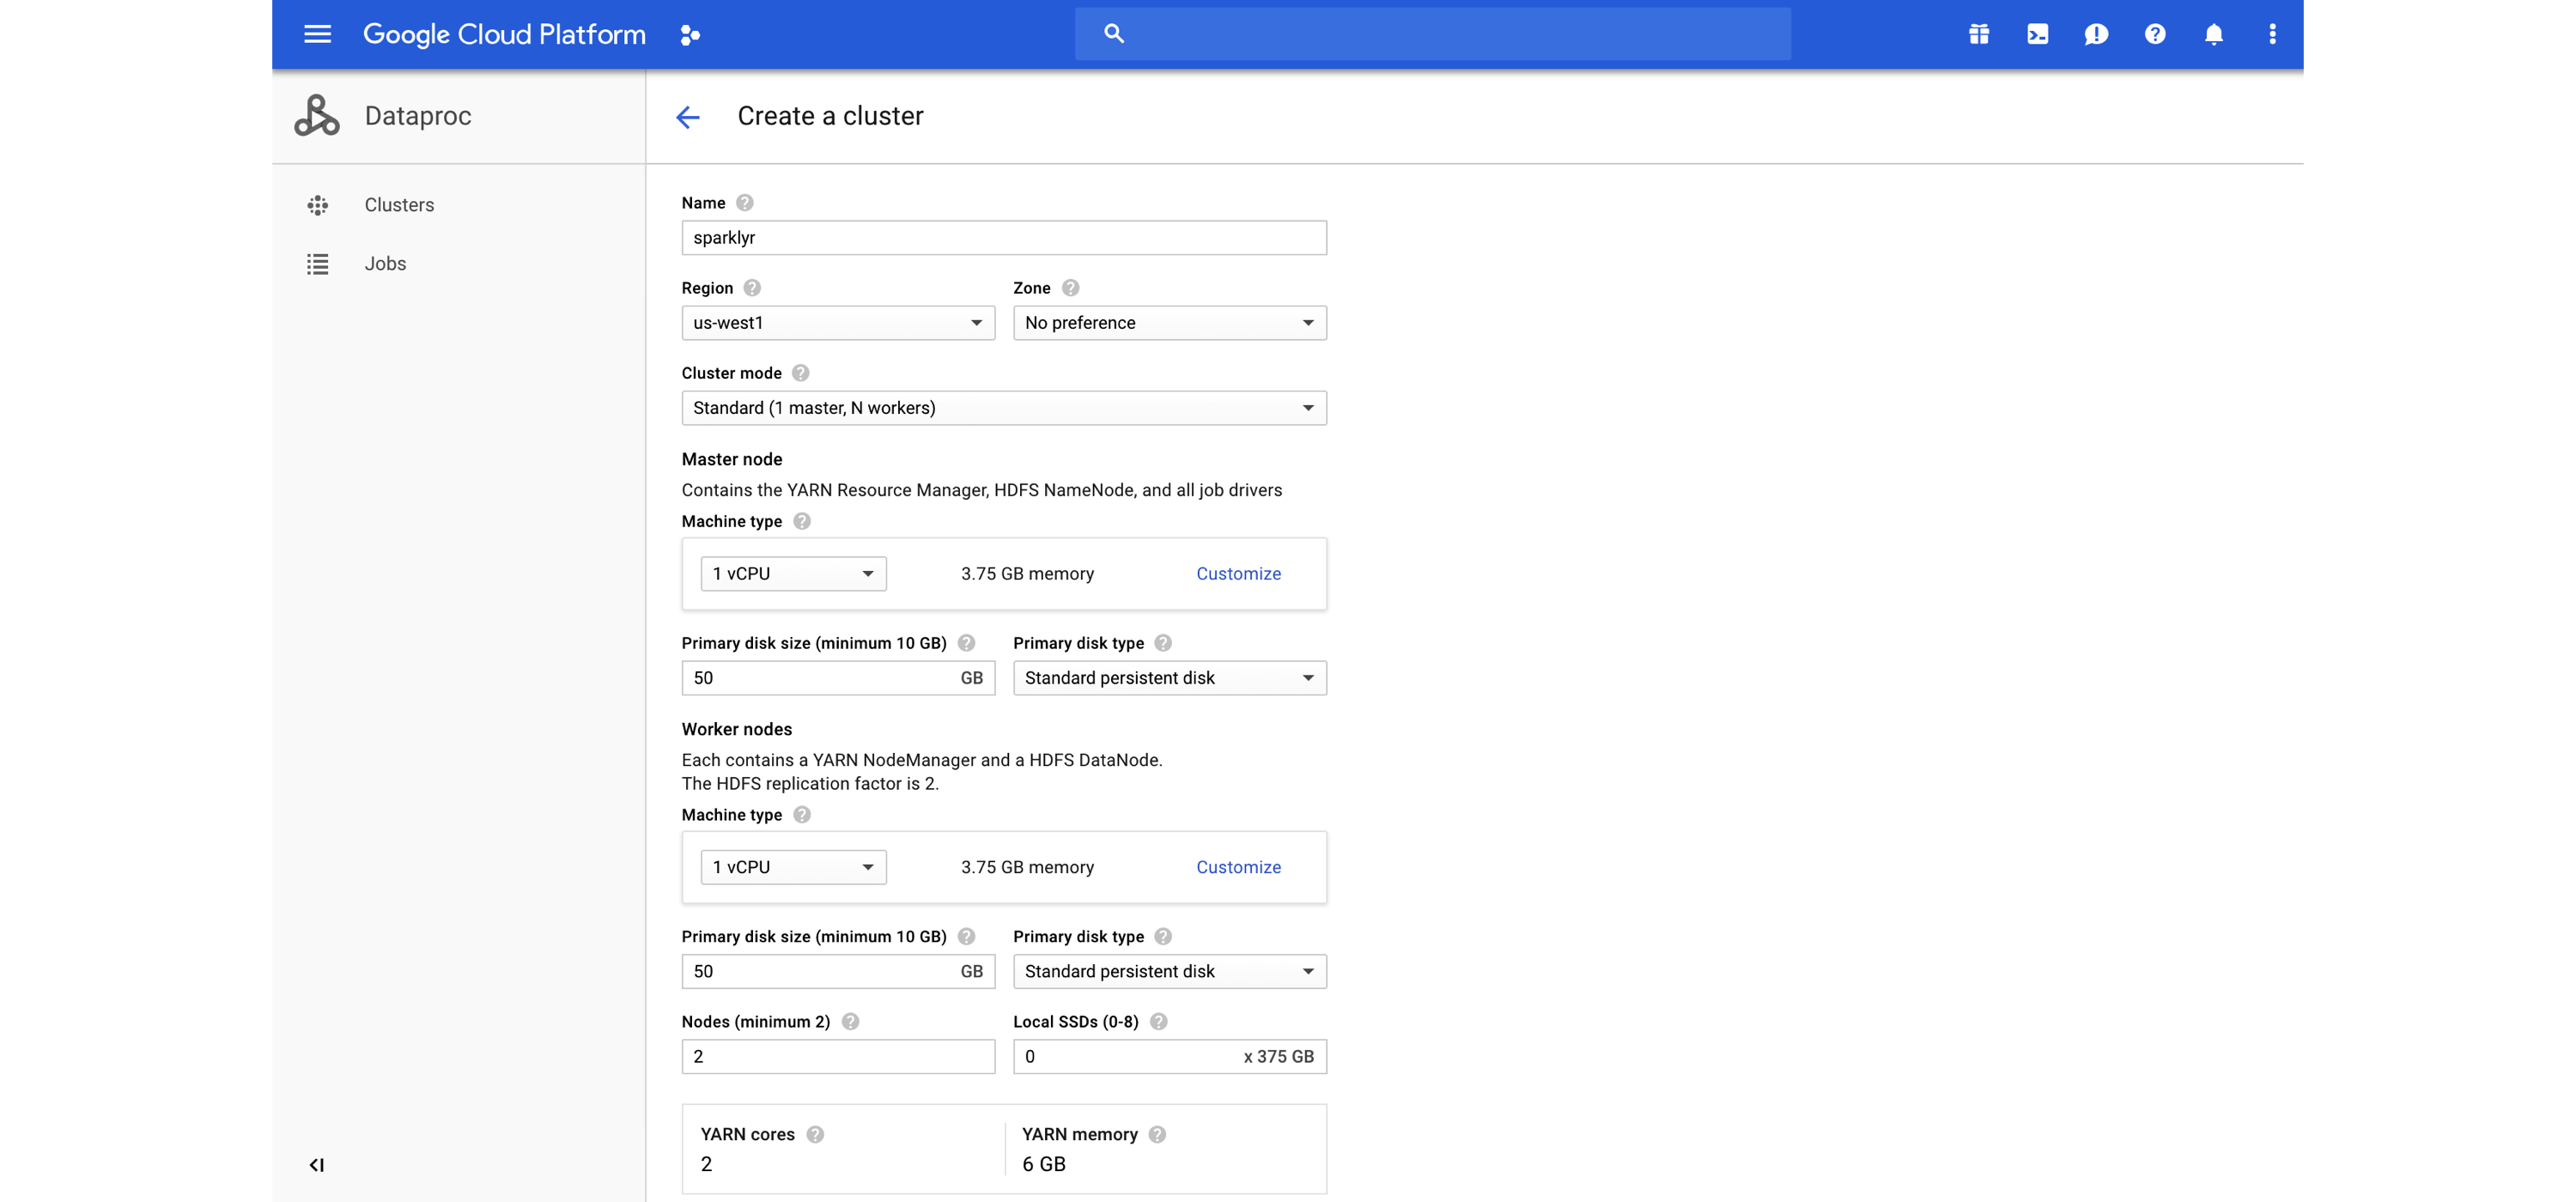
FIGURE 6.10: Launching a Dataproc cluster After you’ve created your cluster, ports can be forwarded to allow you to access this cluster from your machine—for instance, by launching Chrome to make use of this proxy and securely connect to the Dataproc cluster. Configuring this connection looks as follows: gcloud compute ssh sparklyr-m --project=<project> --zone=<region> -- -D 1080 \ -N "<path to chrome>" --proxy-server="socks5://localhost:1080" \ --user-data-dir="/tmp/sparklyr-m" http://sparklyr-m:8088 There are various tutorials available (cloud.google.com/dataproc/docs/tutorials), including a comprehensive tutorial to configure RStudio and sparklyr. You can find the latest pricing information at cloud.google.com/dataproc/pricing. In Table 6.4 notice that the cost is split between compute engine and a dataproc premium.
TABLE 6.4: Databricks procong information.
InstanceCPUsMemoryCompute.EngineDataproc.Premium
n1-standard-113.75GB$0.0475 USD/hr$0.010 USD/hr
n1-standard-8830GB$0.3800 USD/hr$0.080 USD/hr
n1-standard-6464244GB$3.0400 USD/hr$0.640 USD/hr

6.3.4 IBM

IBM cloud computing is a set of cloud computing services for business. IBM cloud includes Infrastructure as a Service (IaaS), Software as a Service (SaaS), and Platform as a Service (PaaS) offered through public, private, and hybrid cloud delivery models, in addition to the components that make up those clouds. From within IBM Cloud, open Watson Studio and create a Data Science project, add a Spark cluster under the project settings, and then, on the Launch IDE menu, start RStudio. Please note that, as of this writing, the provided version of sparklyr was not the latest version available in CRAN, since sparklyr was modified to run under the IBM Cloud. In any case, follow IBM’s documentation as an authoritative reference to run R and Spark on the IBM Cloud and particularly on how to upgrade sparklyr appropriately. Figure 6.11 captures IBM’s Cloud portal launching a Spark cluster. 
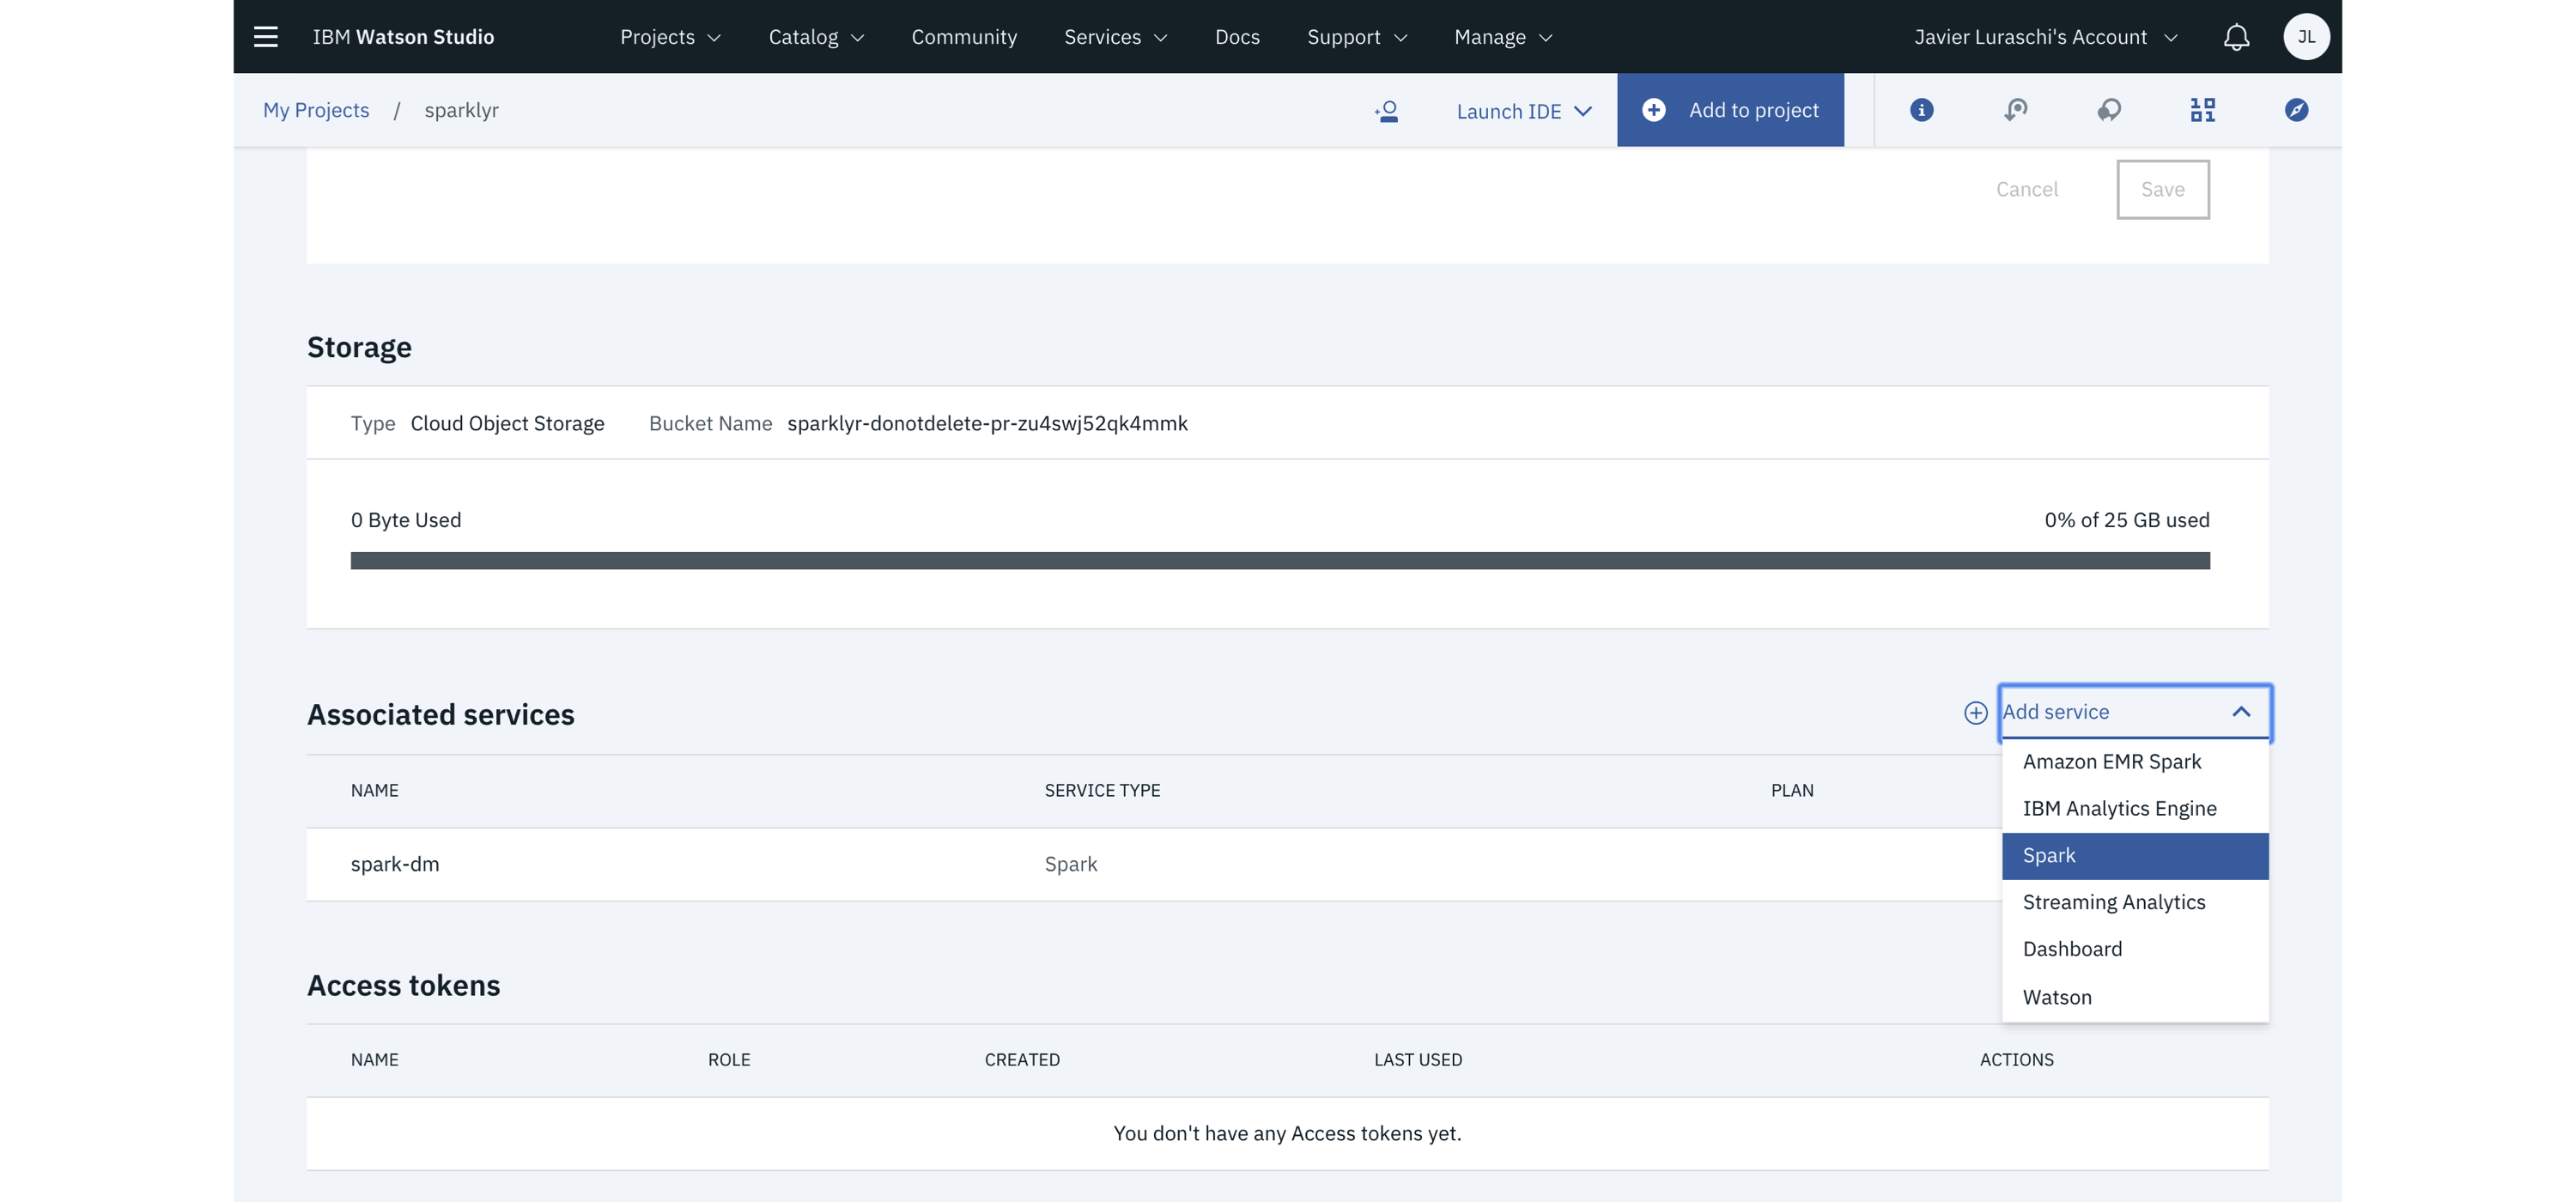
FIGURE 6.11: IBM Watson Studio launching Spark with R support The most up-to-date pricing information is available at ibm.com/cloud/pricing. In Table 6.5, compute cost was normalized using 31 days from the per-month costs.
TABLE 6.5: IBM Cloud pricing information
InstanceCPUsMemoryStorageCost
C1.1x1x2511GB25GB$0.033 USD/hr
C1.4x4x2544GB25GB$0.133 USD/hr
C1.32x32x253225GB25GB$0.962 USD/hr

6.3.5 Microsoft

Microsoft Azure is a cloud computing service created by Microsoft for building, testing, deploying, and managing applications and services through a global network of Microsoft-managed datacenters. It provides SaaS, PaaS, and IaaS and supports many different programming languages, tools, and frameworks, including both Microsoft-specific and third-party software and systems. From the Azure portal, the Azure HDInsight service provides support for on-demand Spark clusters. You can easily create HDInsight cluster with support for Spark and RStudio by selecting the ML Services cluster type. Note that the provided version of sparklyr might not be the latest version available in CRAN since the default package repository seems to be initialized using a Microsoft R Application Network (MRAN) snapshot, not directly from CRAN. Figure 6.12 shows the Azure portal launching a Spark cluster with support for R. 
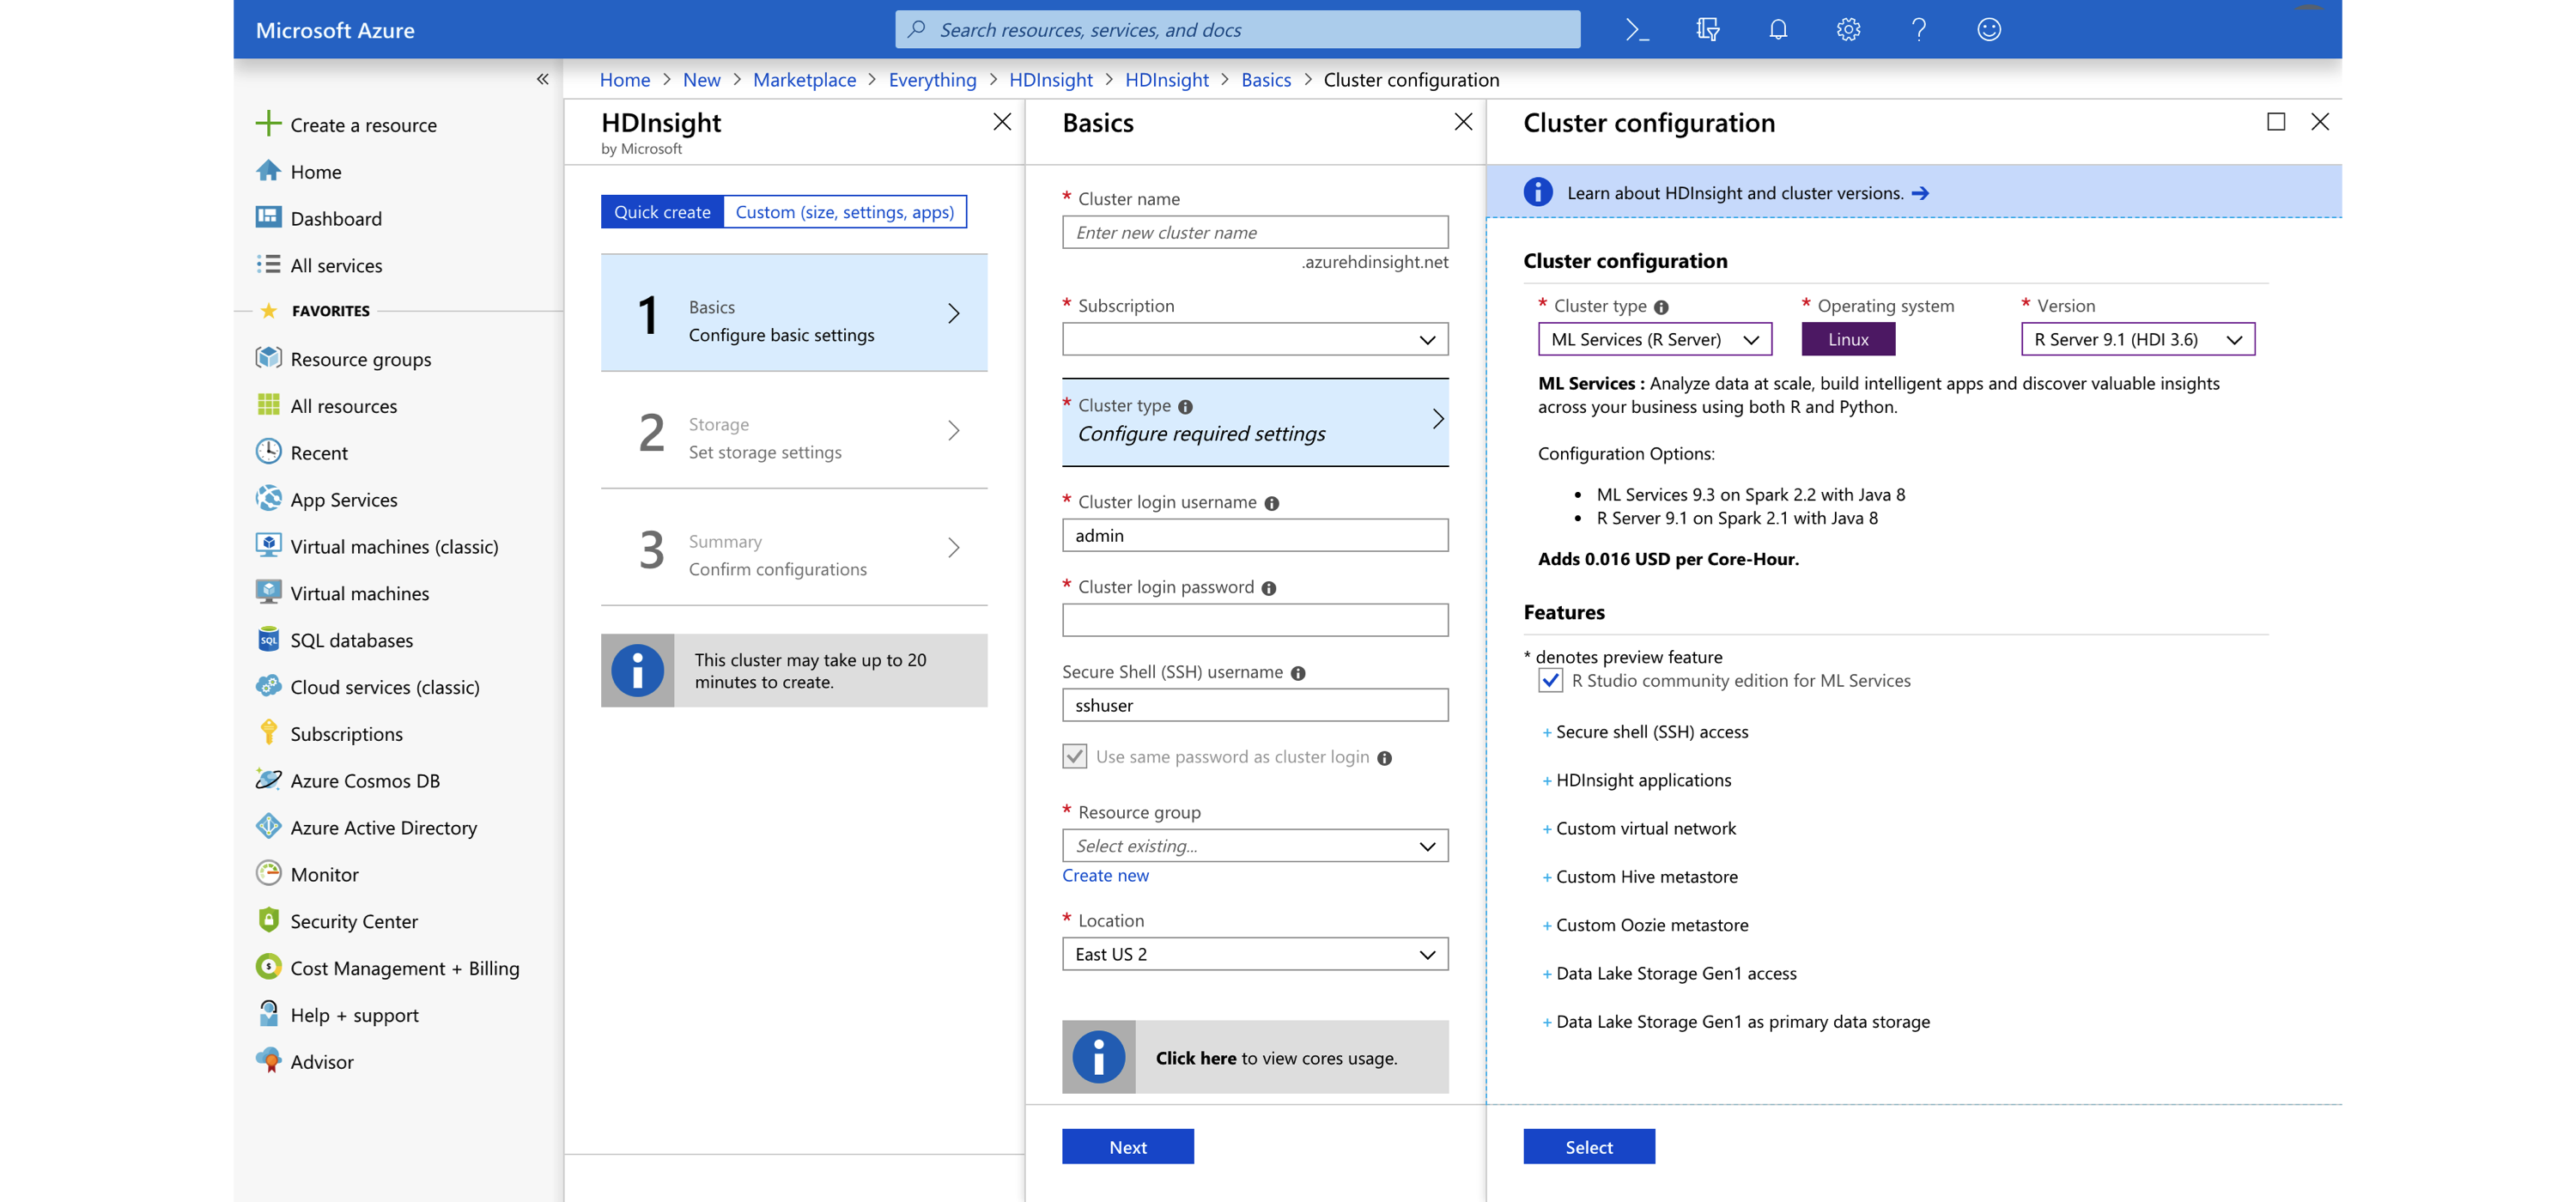
FIGURE 6.12: Creating an Azure HDInsight Spark cluster Up-to-date pricing for HDInsight is available at azure.microsoft.com/en-us/pricing/details/hdinsight; Table 6.6 lists the pricing as of this writing.
TABLE 6.6: Azure HDInsight pricing information
InstanceCPUsMemoryTotal.Cost
D1 v213.5 GB$0.074/hour
D4 v2828 GB$0.59/hour
G564448 GB$9.298/hour

6.3.6 Qubole

Qubole was founded in 2013 with a mission to close the data accessibility gap. Qubole delivers a self-service platform for big data analytics built on Amazon, Microsoft, Google, and Oracle Clouds. In Qubole, you can launch Spark clusters, which you can then use from Qubole notebooks or RStudio Server. Figure 6.13 shows a Qubole cluster initialized with RStudio and sparklyr. 
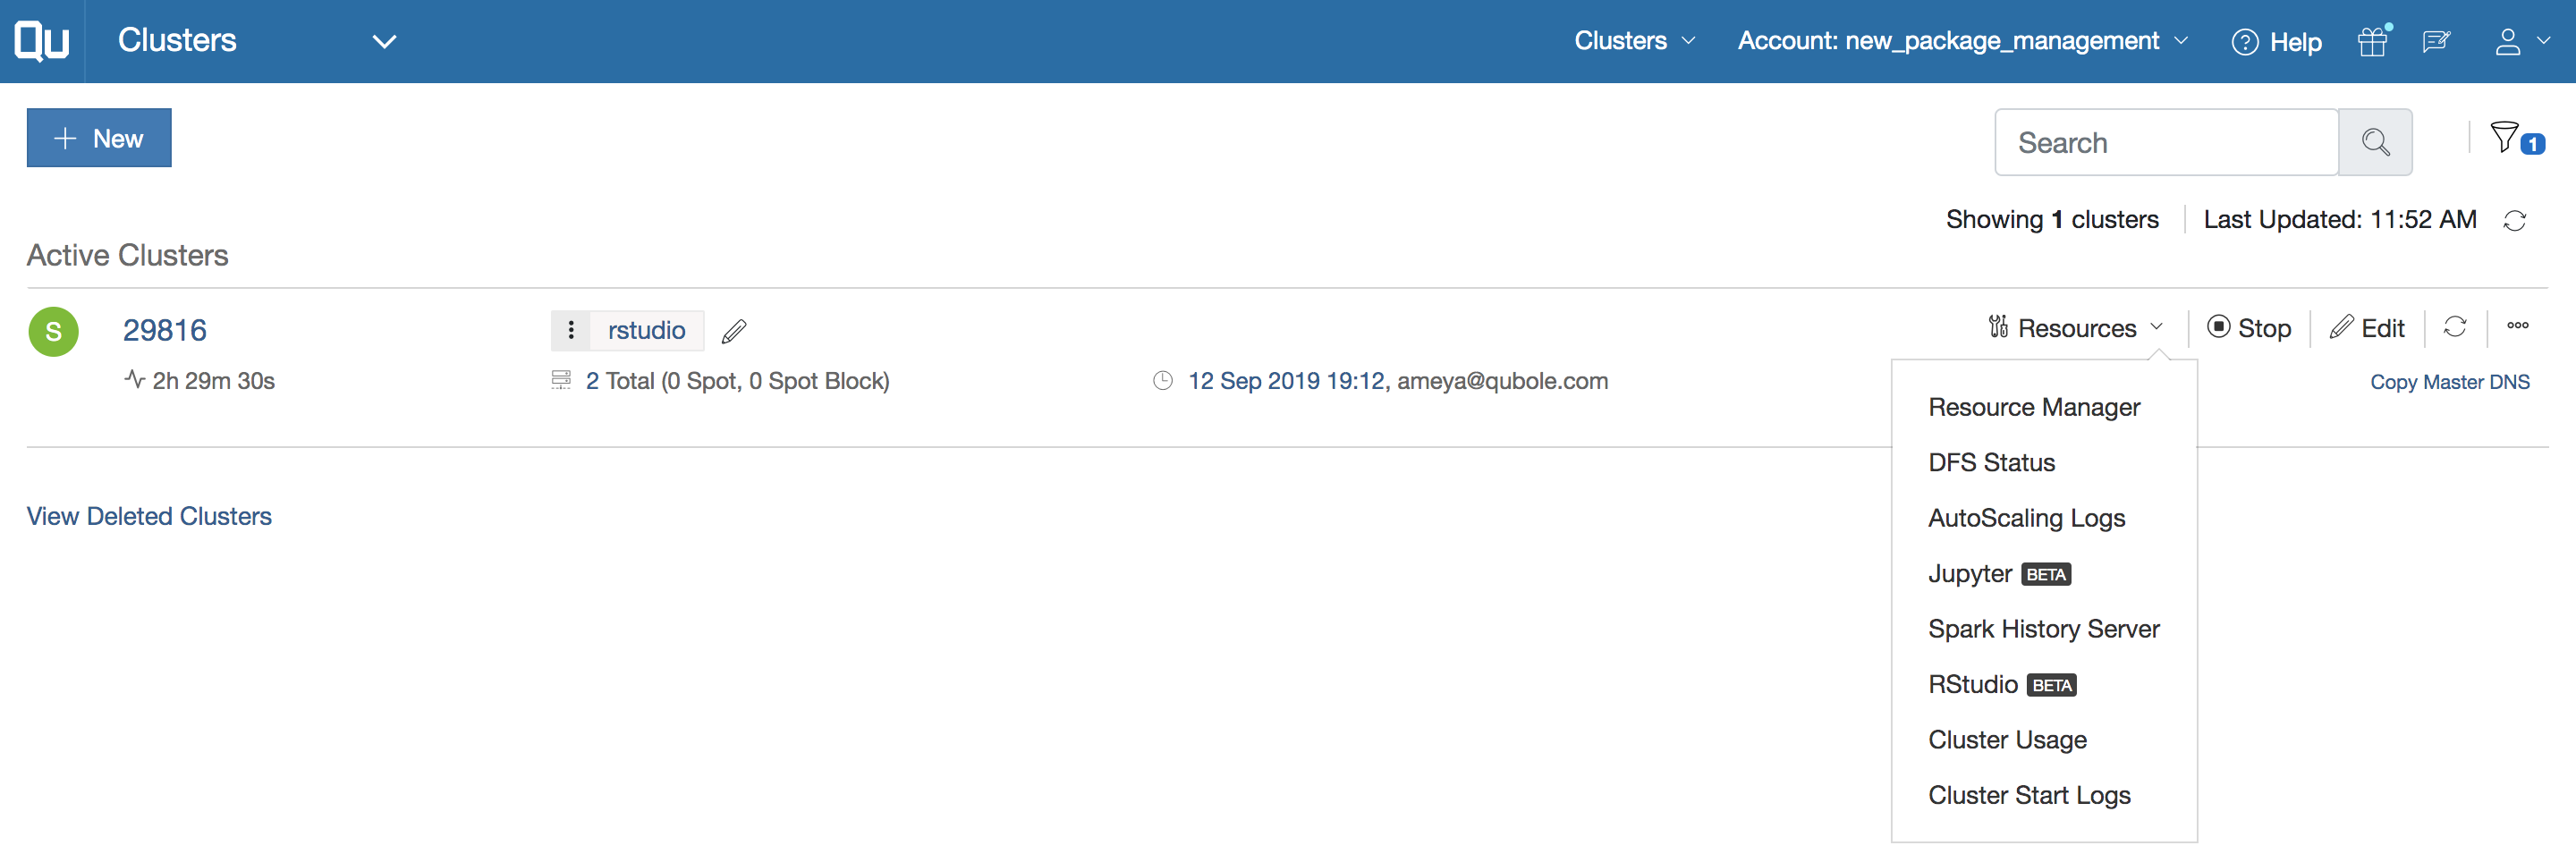
FIGURE 6.13: A Qubole cluster initialized with RStudio and sparklyr You can find the latest pricing information at Qubole's pricing page. Table 6.7 lists the price for Qubole’s current plan, as of this writing. Notice that pricing is based on cost of QCU/hr, which stands for “Qubole Compute Unit per hour,” and the Enterprise Edition requires an annual contract.
TABLE 6.7: Qubole pricing information
Test.DriveFull.Featured.TrialEnterprise.Edition
$0 USD$0 USD$0.14 USD/QCU

6.4 Kubernetes

Kubernetes is an open source container orchestration system for automating deployment, scaling, and management of containerized applications that was originally designed by Google and is now maintained by the Cloud Native Computing Foundation (CNCF). Kubernetes was originally based on Docker, while, like Mesos, it’s also based on Linux Cgroups. Kubernetes can execute many cluster applications and frameworks that you can highly customize by using container images with specific resources and libraries. This allows a single Kubernetes cluster to be used for many different purposes beyond data analysis, which in turn helps organizations manage their compute resources with ease. One trade-off from using custom images is that they add further configuration overhead but make Kubernetes clusters extremely flexible. Nevertheless, this flexibility has proven to be instrumental to easily administer cluster resources in many organizations and, as pointed out in Overview, Kubernetes is becoming a very popular cluster framework. Kubernetes is supported across all major cloud providers. They all provide extensive documentation as to how to launch, manage, and tear down Kubernetes clusters; Figure 6.14 shows the GCP console while creating a Kubernetes cluster. You can deploy Spark over any Kubernetes cluster, and you can use R to connect, analyze, model, and more. 
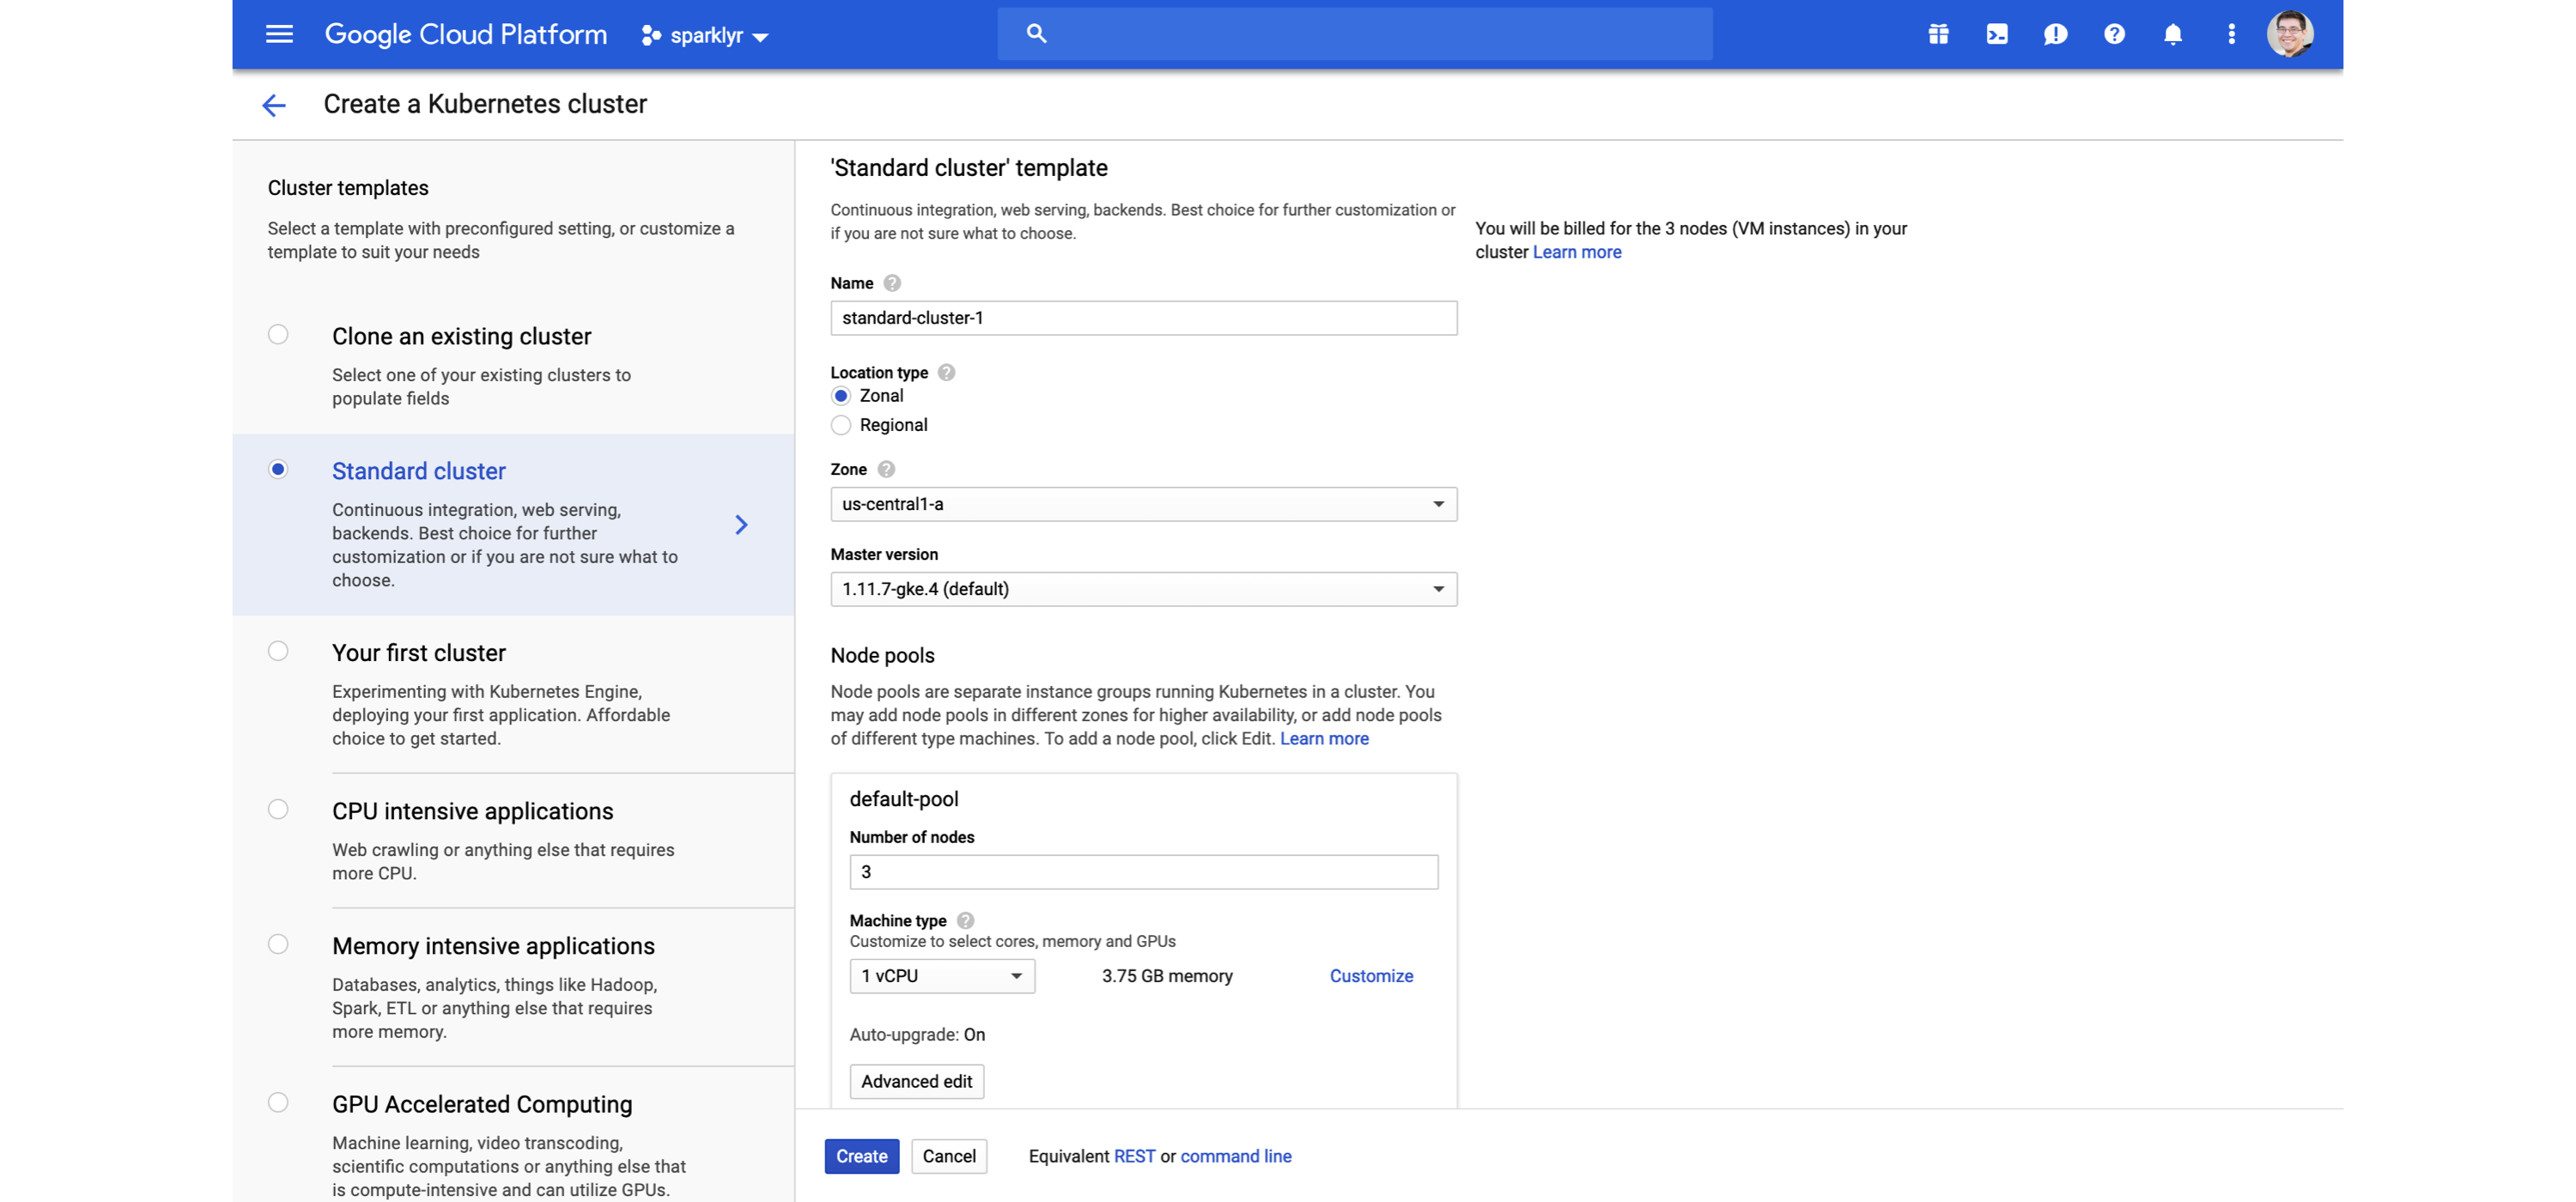
FIGURE 6.14: Creating a Kubernetes cluster for Spark and R using Google Cloud You can learn more at kubernetes.io, and read the Running Spark on Kubernetes guide from spark.apache.org. Strictly speaking, Kubernetes is a cluster technology, not a specific cluster architecture. However, Kubernetes represents a larger trend often referred to as a hybrid cloud. A hybrid cloud is a computing environment that makes use of on-premises and public cloud services with orchestration between the various platforms. It’s still too early to precisely categorize the leading technologies that will form a hybrid approach to cluster computing; although, as previously mentioned, Kubernetes is the leading one, many more are likely to form to complement or even replace existing technologies.

6.5 Tools

While using only R and Spark can be sufficient for some clusters, it is common to install complementary tools in your cluster to improve monitoring, SQL analysis, workflow coordination, and more, with applications like Ganglia, Hue, and Oozie, respectively. This section is not meant to cover all tools; rather, it mentions the ones that are commonly used.

6.5.1 RStudio

From reading Chapter 1, you are aware that RStudio is a well-known and free desktop development environment for R; therefore, it is likely that you are following the examples in this book using RStudio Desktop. However, you might not be aware that you can run RStudio as a web service within a Spark cluster. This version of RStudio is known as RStudio Server. You can see RStudio Server running in Figure 6.15. In the same way that the Spark UI runs in the cluster, you can install RStudio Server within the cluster. Then you can connect to RStudio Server and use RStudio in exactly the same way you use RStudio Desktop but with the ability to run code against the Spark cluster. As you can see in Figure 6.15, RStudio Server looks and feels just like RStudio Desktop, but adds support to run commands efficiently by being located within the cluster. 
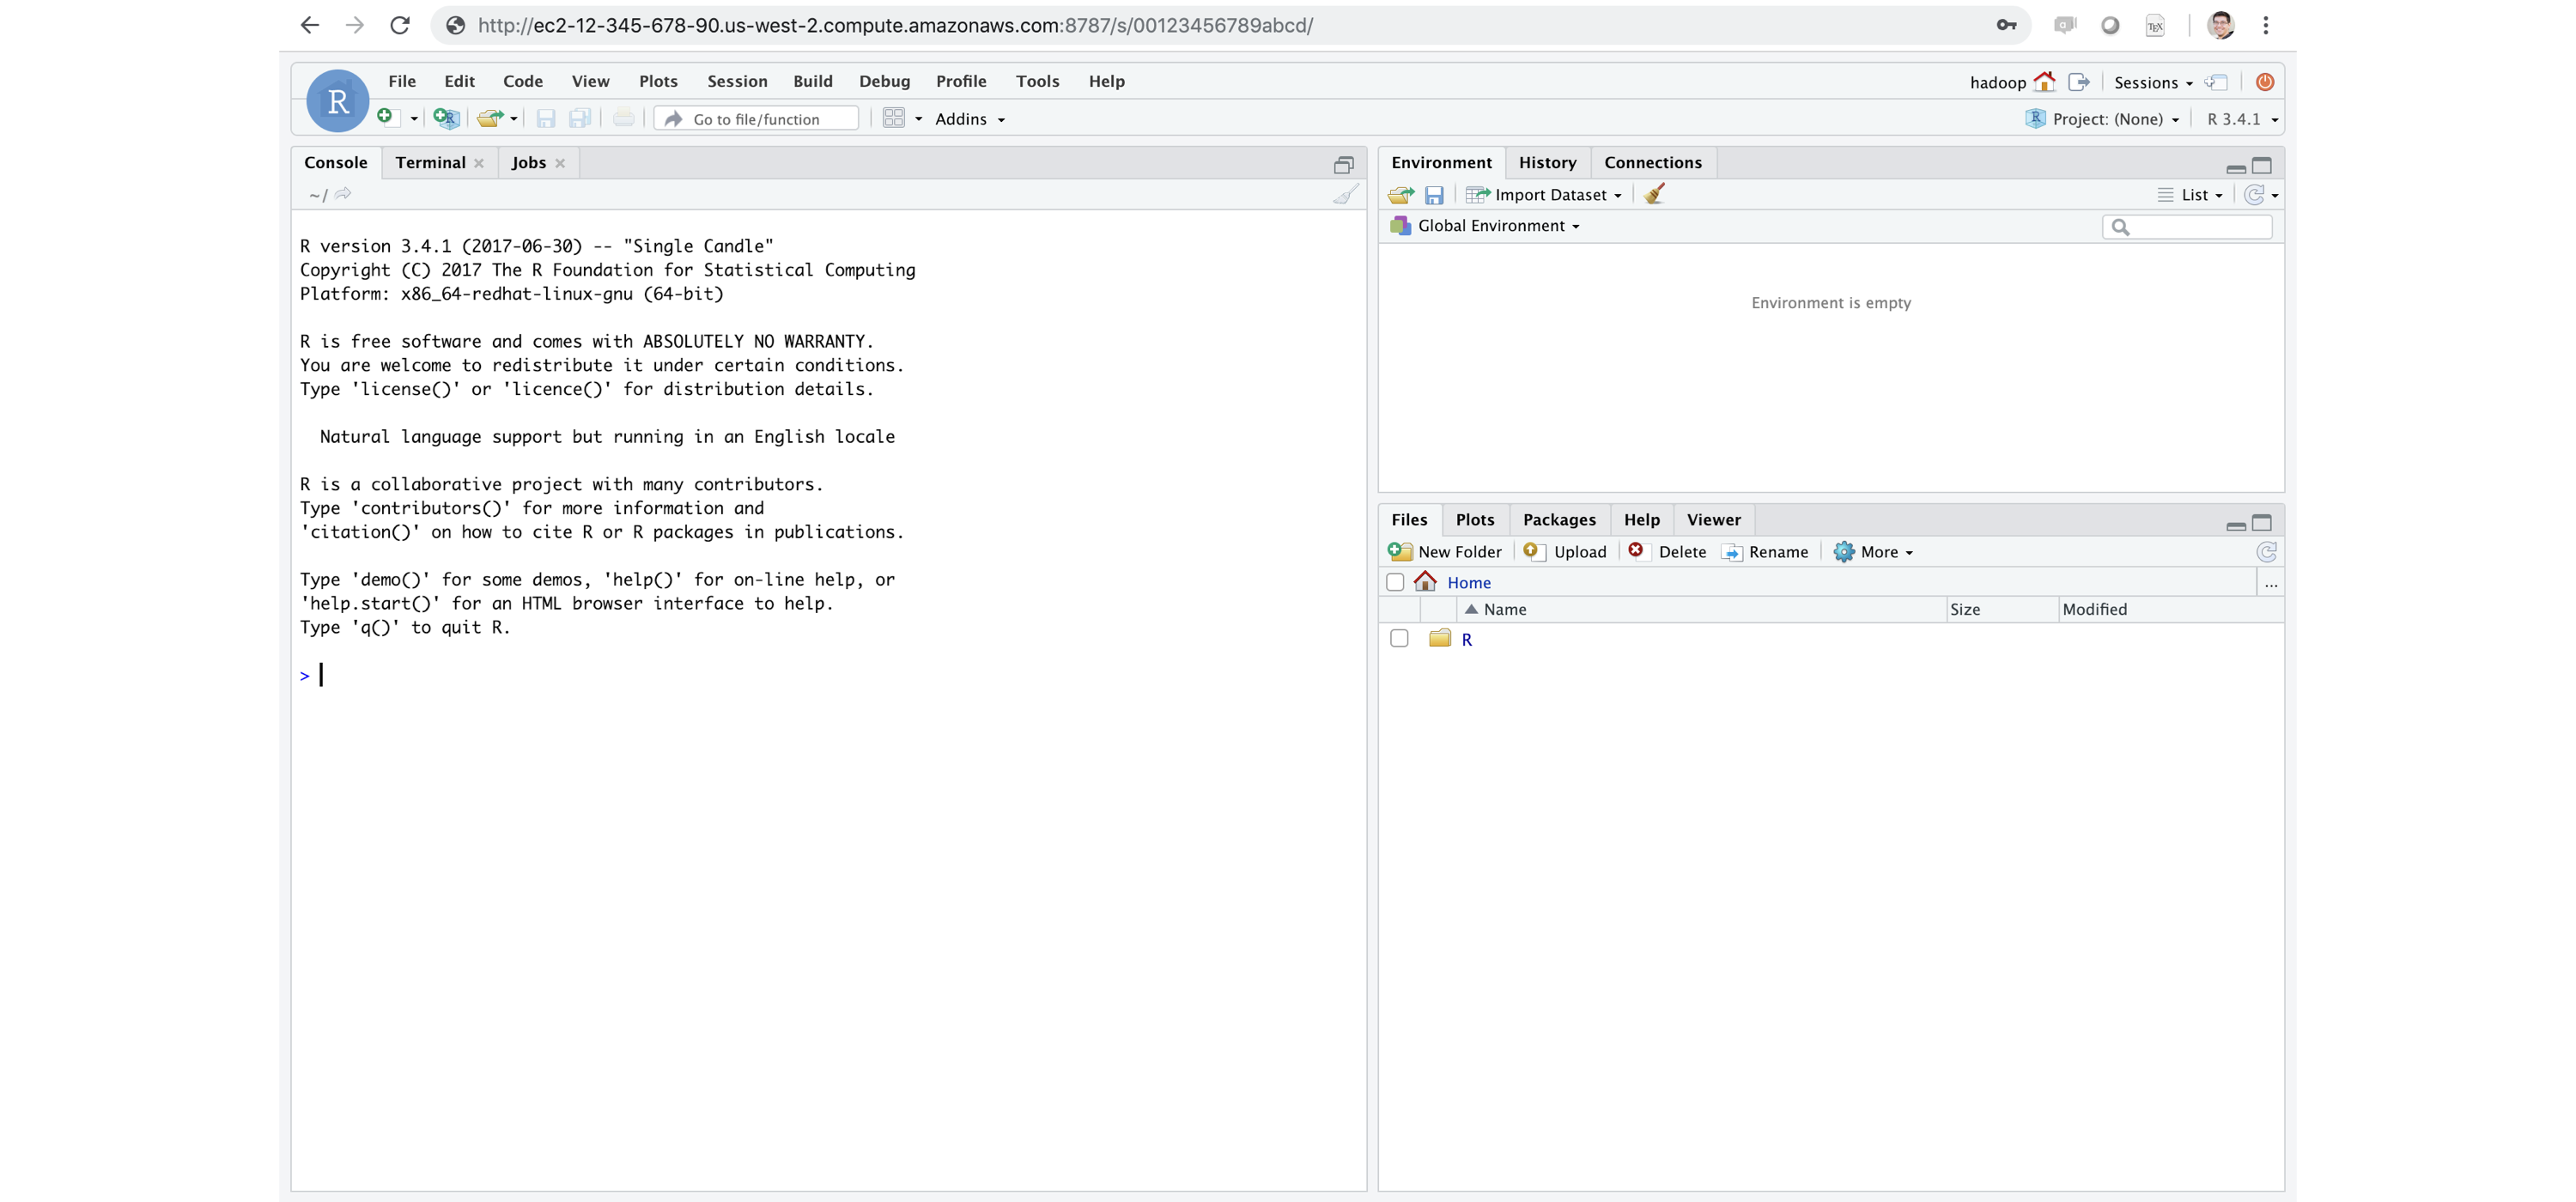
FIGURE 6.15: RStudio Server Pro running inside Apache Spark If you’re familiar with R, Shiny Server is a very popular tool for building interactive web applications from R. We recommended that you install Shiny directly in your Spark cluster. RStudio Server and Shiny Server are a free and open source; however, RStudio also provides professional products like RStudio Server, RStudio Server Pro, Shiny Server Pro, and RStudio Connect, which you can install within the cluster to support additional R workflows. While sparklyr does not require any additional tools, they provide significant productivity gains worth considering. You can learn more about them at rstudio.com/products/.

6.5.2 Jupyter

Project Jupyter exists to develop open source software, open standards, and services for interactive computing across dozens of programming languages. A Jupyter notebook provides support for various programming languages, including R. You can use sparklyr with Jupyter notebooks using the R Kernel. Figure 6.16 shows sparklyr running within a local Jupyter notebook. 
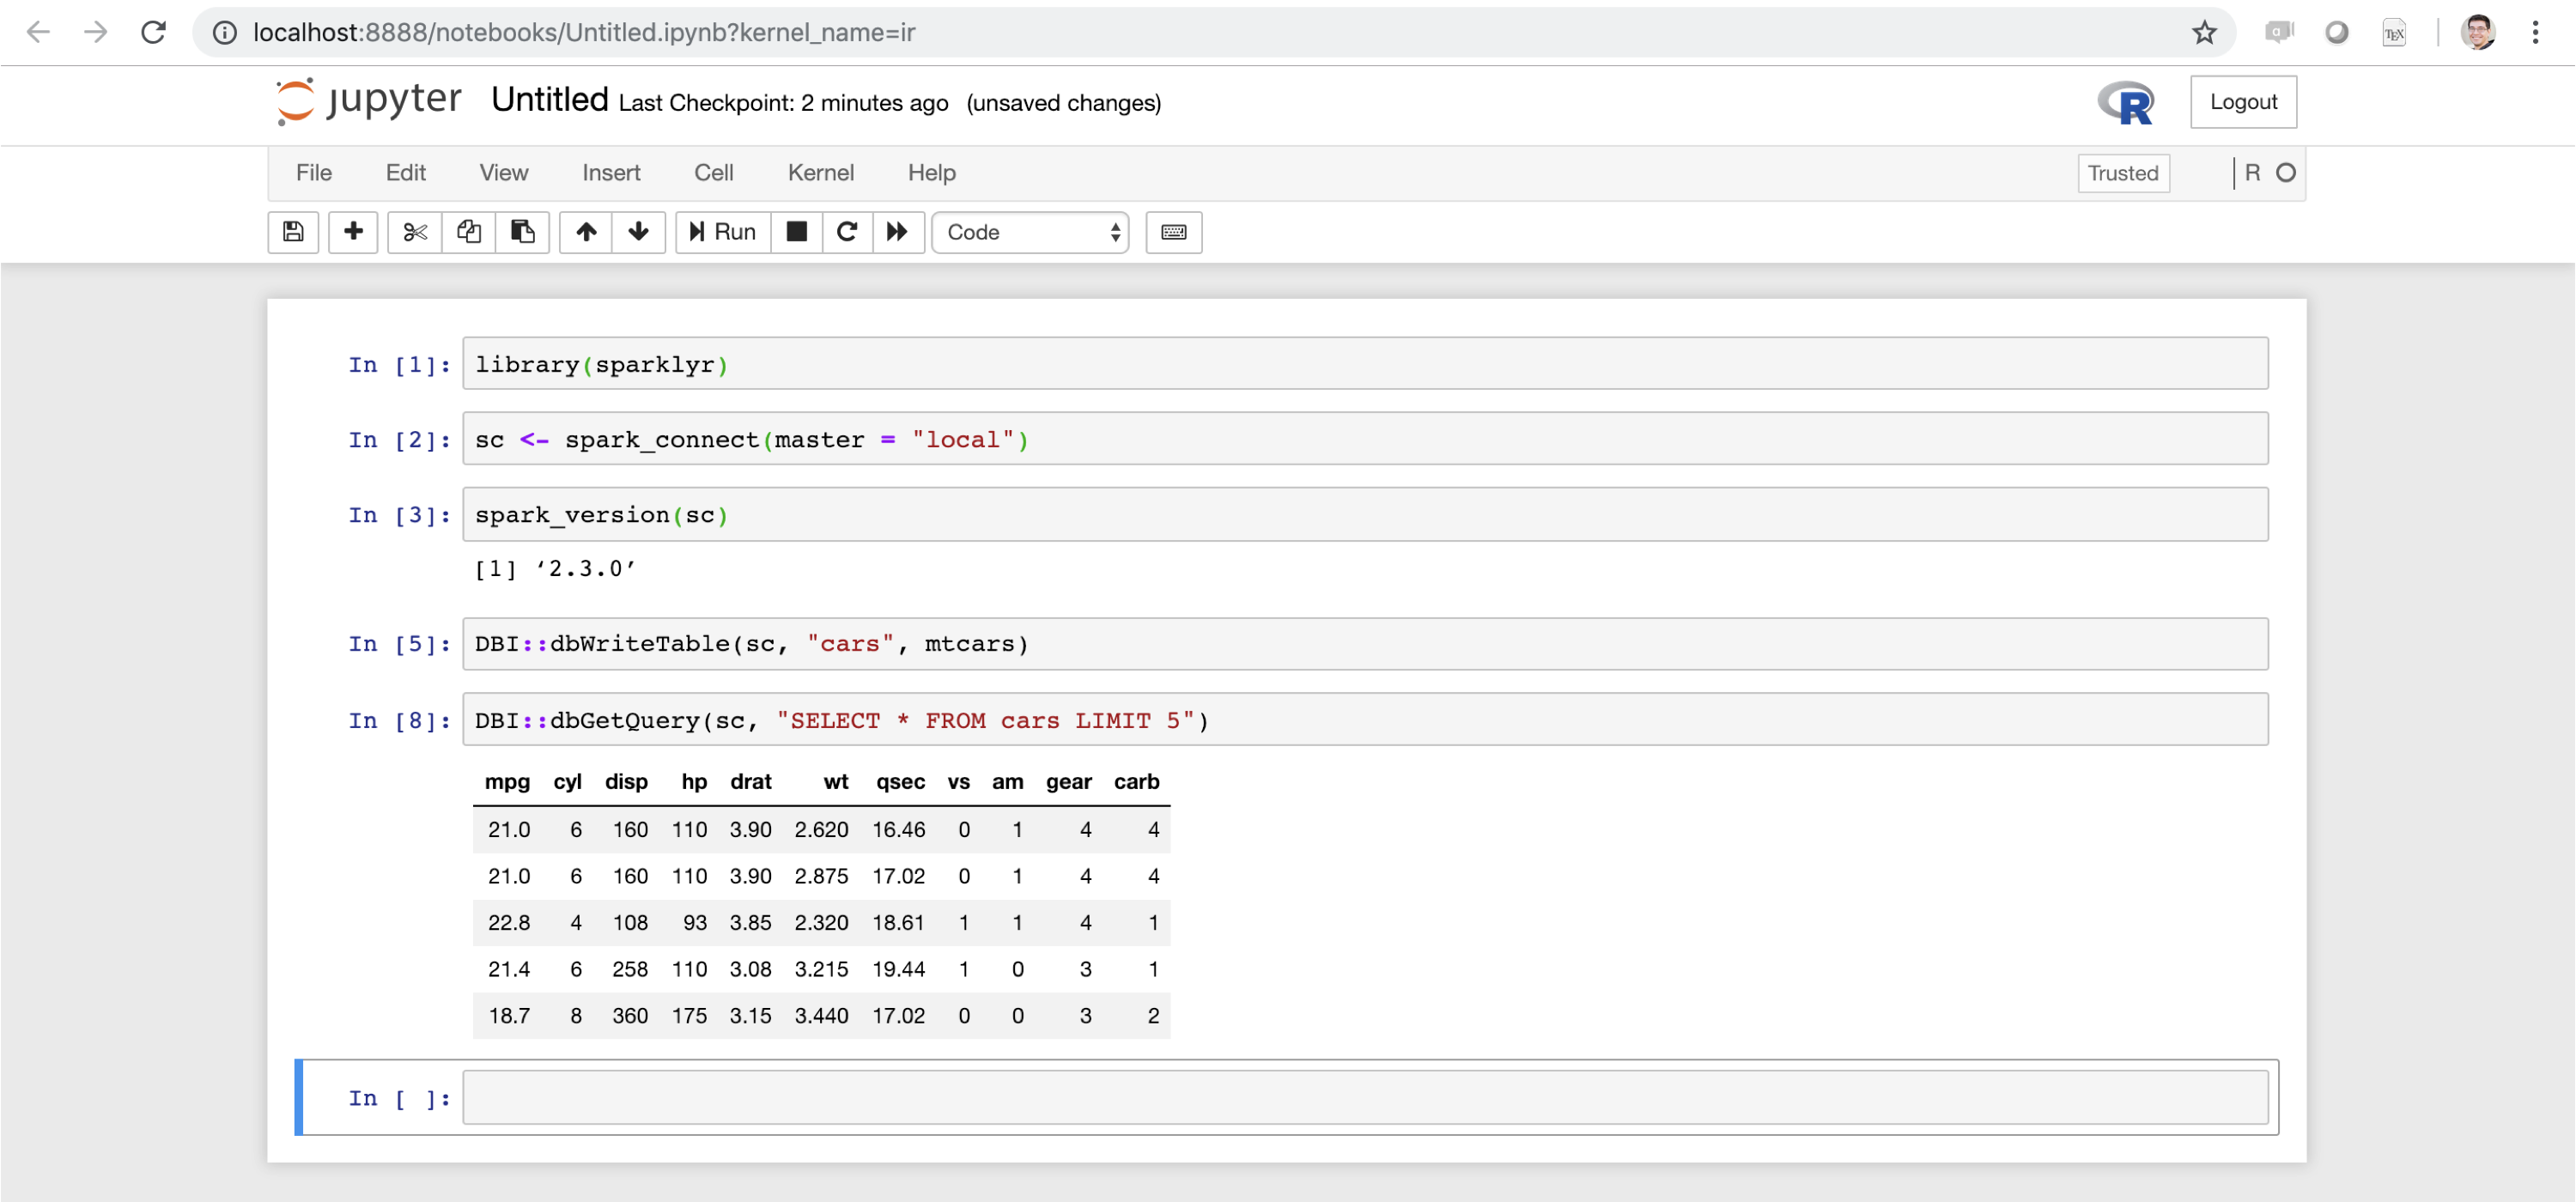
FIGURE 6.16: Jupyter notebook running sparklyr

6.5.3 Livy

Apache Livy is an incubation project in Apache providing support to use Spark clusters remotely through a web interface. It is ideal to connect directly into the Spark cluster; however, there are times where connecting directly to the cluster is not feasible. When facing those constraints, you can consider installing Livy in the cluster and secure it properly to enable remote use over web protocols. Be aware, though, that there is a significant performance overhead from using Livy in sparklyr. To help test Livy locally, sparklyr provides support to list, install, start, and stop a local Livy instance by executing livy_available_versions(): ## livy ## 1 0.2.0 ## 2 0.3.0 ## 3 0.4.0 ## 4 0.5.0 This lists the versions that you can install; we recommend installing the latest version and verifying it as follows: # Install default Livy version livy_install() # List installed Livy services livy_installed_versions() # Start the Livy service livy_service_start() You then can navigate to the local Livy session at http://localhost:8998. Chapter 7 will detail how to connect through Livy. After you’re connected, you can navigate to the Livy web application, as shown in Figure 6.17. 
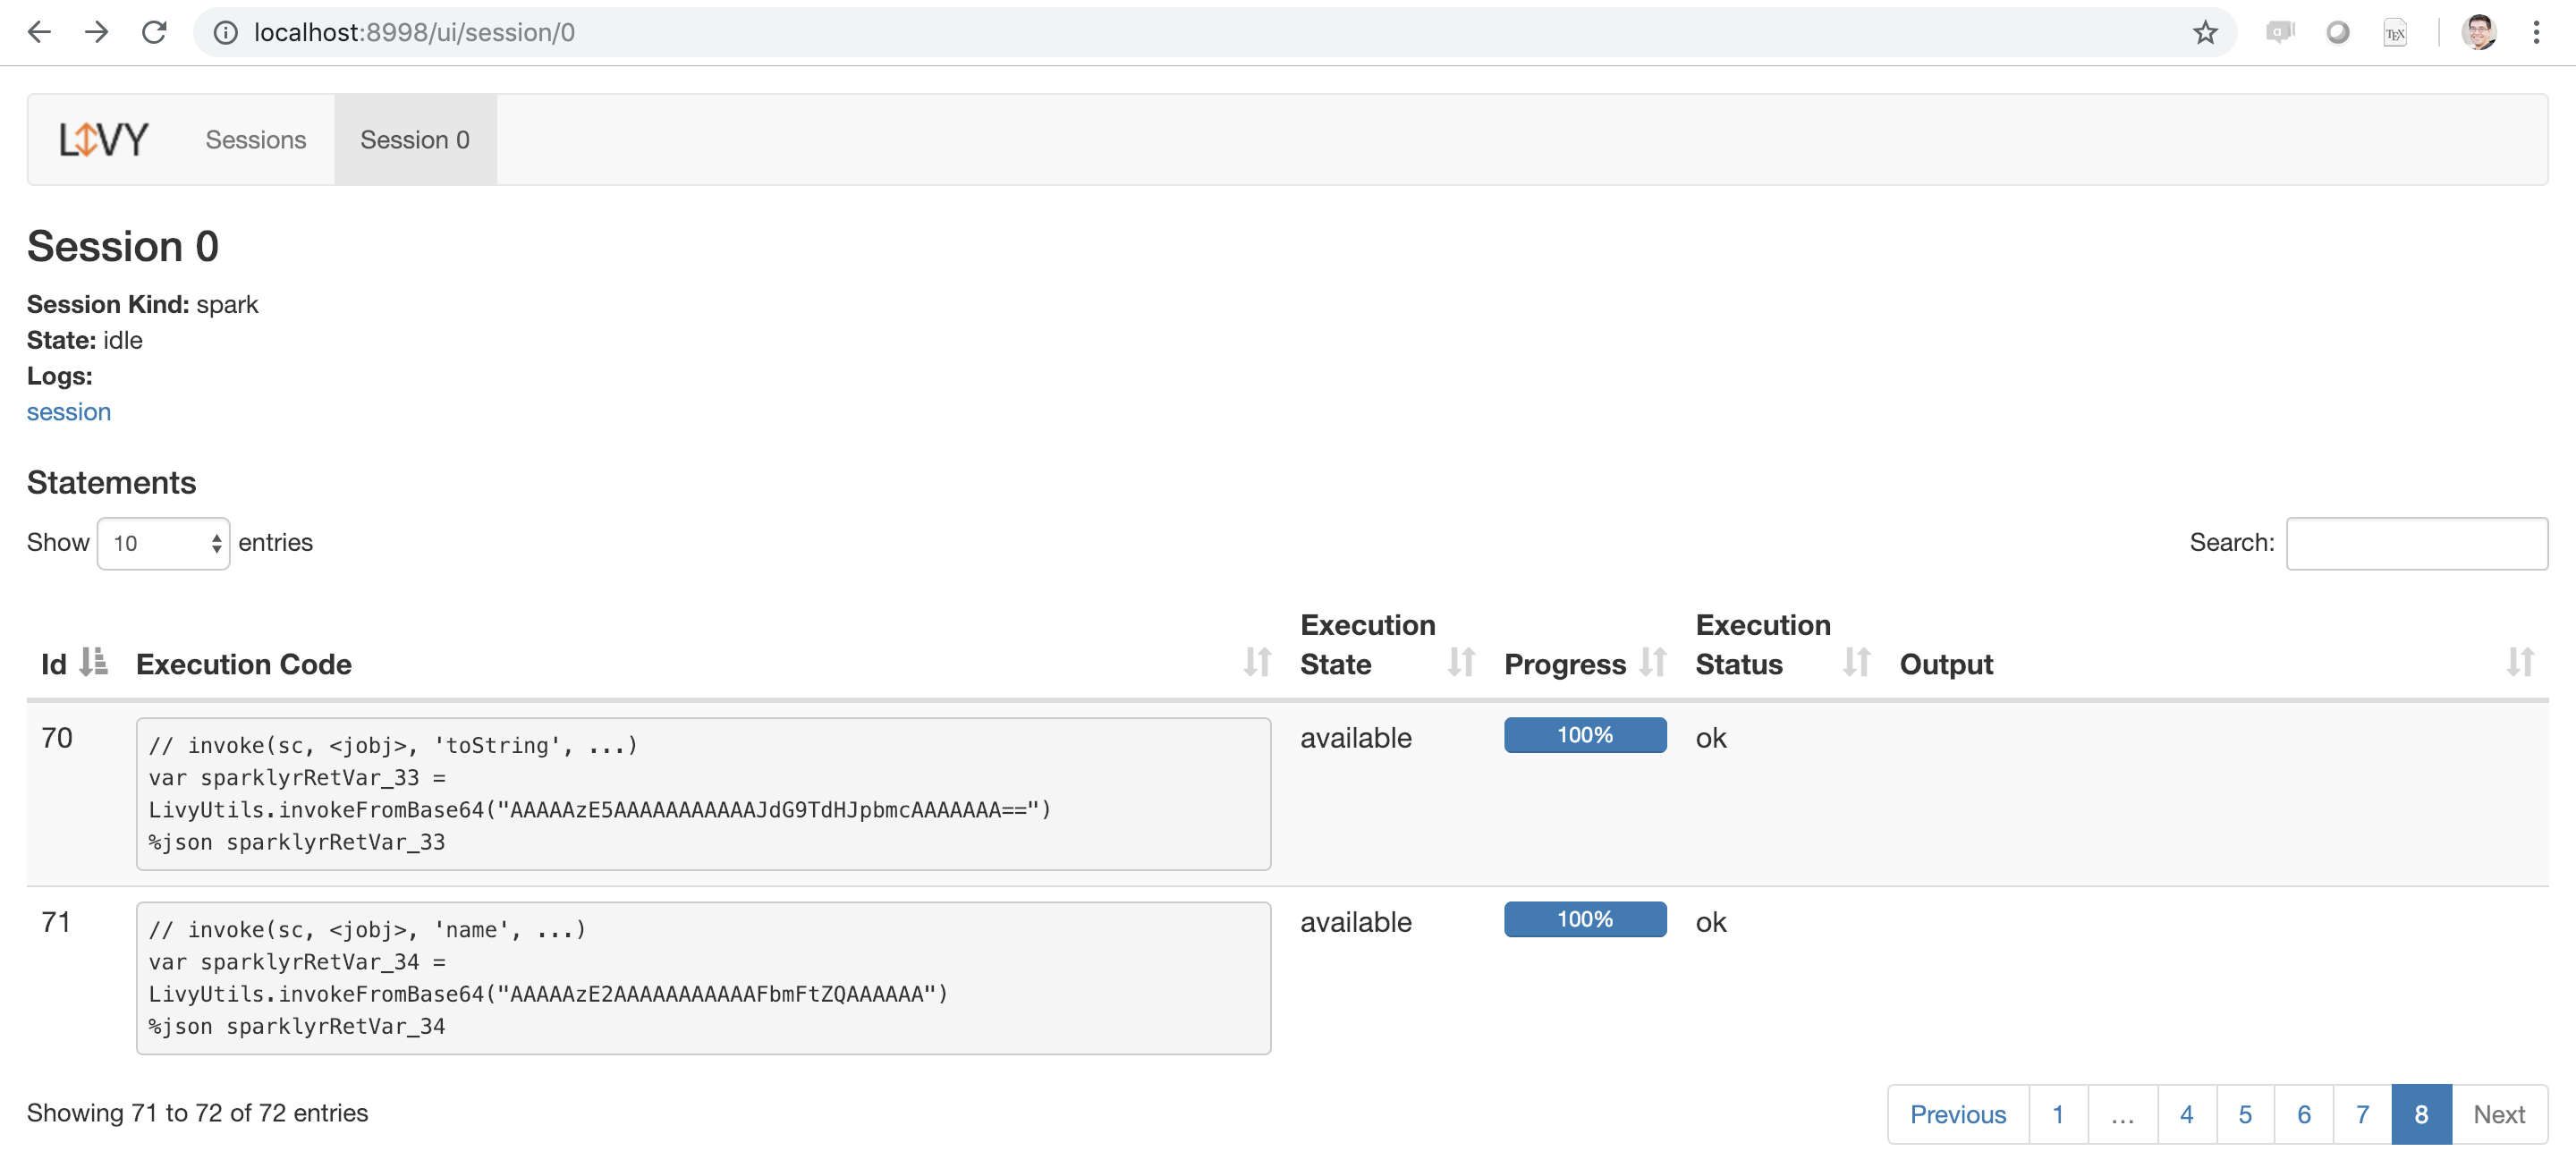
FIGURE 6.17: Apache Livy running as a local service Make sure you also stop the Livy service when working with local Livy instances (for proper Livy services running in a cluster, you won’t have to): # Stops the Livy service livy_service_stop()

6.6 Recap

This chapter explained the history and trade-offs of on-premises and cloud computing and presented Kubernetes as a promising framework to provide flexibility across on-premises or multiple cloud providers. It also introduced cluster managers (Spark Standalone, YARN, Mesos, and Kubernetes) as the software needed to run Spark as a cluster application. This chapter briefly mentioned on-premises cluster providers like Cloudera, Hortonworks, and MapR, as well as the major Spark cloud providers: Amazon, Databricks, IBM, Google, Microsoft, and Qubole. While this chapter provided a solid foundation to understand current cluster computing trends, tools, and service providers useful to perform data science at scale, it did not provide a comprehensive framework to help you decide which cluster technologies to choose. Instead, use this chapter as an overview and a starting point to seek out additional resources to help you find the cluster stack that best fits your organization needs. Chapter 7 will focus on understanding how to connect to existing clusters; therefore, it assumes a Spark cluster like those we presented in this chapter is already available to you.

Chapter 7 Connections

Chapter 6 presented the major cluster computing trends, cluster managers, distributions, and cloud service providers to help you choose the Spark cluster that best suits your needs. In contrast, this chapter presents the internal components of a Spark cluster and how to connect to a particular Spark cluster. When reading this chapter, don’t try to execute every line of code; this would be quite hard since you would need to prepare different Spark environments. Instead, if you already have a Spark cluster or if the previous chapter gets you motivated enough to sign up for an on-demand cluster, now is the time to learn how to connect to it. This chapter helps you connect to your cluster, which you should have already chosen by now. Without a cluster, we recommend that you learn the concepts and come back to execute code later on. In addition, this chapter provides various troubleshooting connection techniques. While we hope you won’t need to use them, this chapter prepares you to use them as effective techniques to resolve connectivity issues. While this chapter might feel a bit dry—connecting and troubleshooting connections is definitely not the most exciting part of large-scale computing—it introduces the components of a Spark cluster and how they interact, often known as the architecture of Apache Spark. This chapter, along with Chapters 8 and 9, will provide a detailed view of how Spark works, which will help you move toward becoming an intermediate Spark user who can truly understand the exciting world of distributed computing using Apache Spark.

7.1 Overview

The overall connection architecture for a Spark cluster is composed of three types of compute instances: the driver node, the worker nodes, and the cluster manager. A cluster manager is a service that allows Spark to be executed in the cluster; this was detailed in Clusters - Managers. The worker nodes (also referred to as executors) execute compute tasks over partitioned data and communicate intermediate results to other workers or back to the driver node. The driver node is tasked with delegating work to the worker nodes, but also with aggregating their results and controlling computation flow. For the most part, aggregation happens in the worker nodes; however, even after the nodes aggregate data, it is often the case that the driver node would need to collect the worker’s results. Therefore, the driver node usually has at least, but often much more, compute resources (memory, CPUs, local storage, etc.) as the worker node. Strictly speaking, the driver node and worker nodes are just names assigned to machines with particular roles, while the actual computation in the driver node is performed by the Spark context. The Spark context is the main entry point for Spark functionality since it’s tasked with scheduling tasks, managing storage, tracking execution status, specifying access configuration settings, canceling jobs, and so on. In the worker nodes, the actual computation is performed under a spark executor, which is a Spark component tasked with executing subtasks against a specific data partition. Figure 7.1 illustrates this concept, where the driver node orchestrates a worker’s work through the cluster manager. 
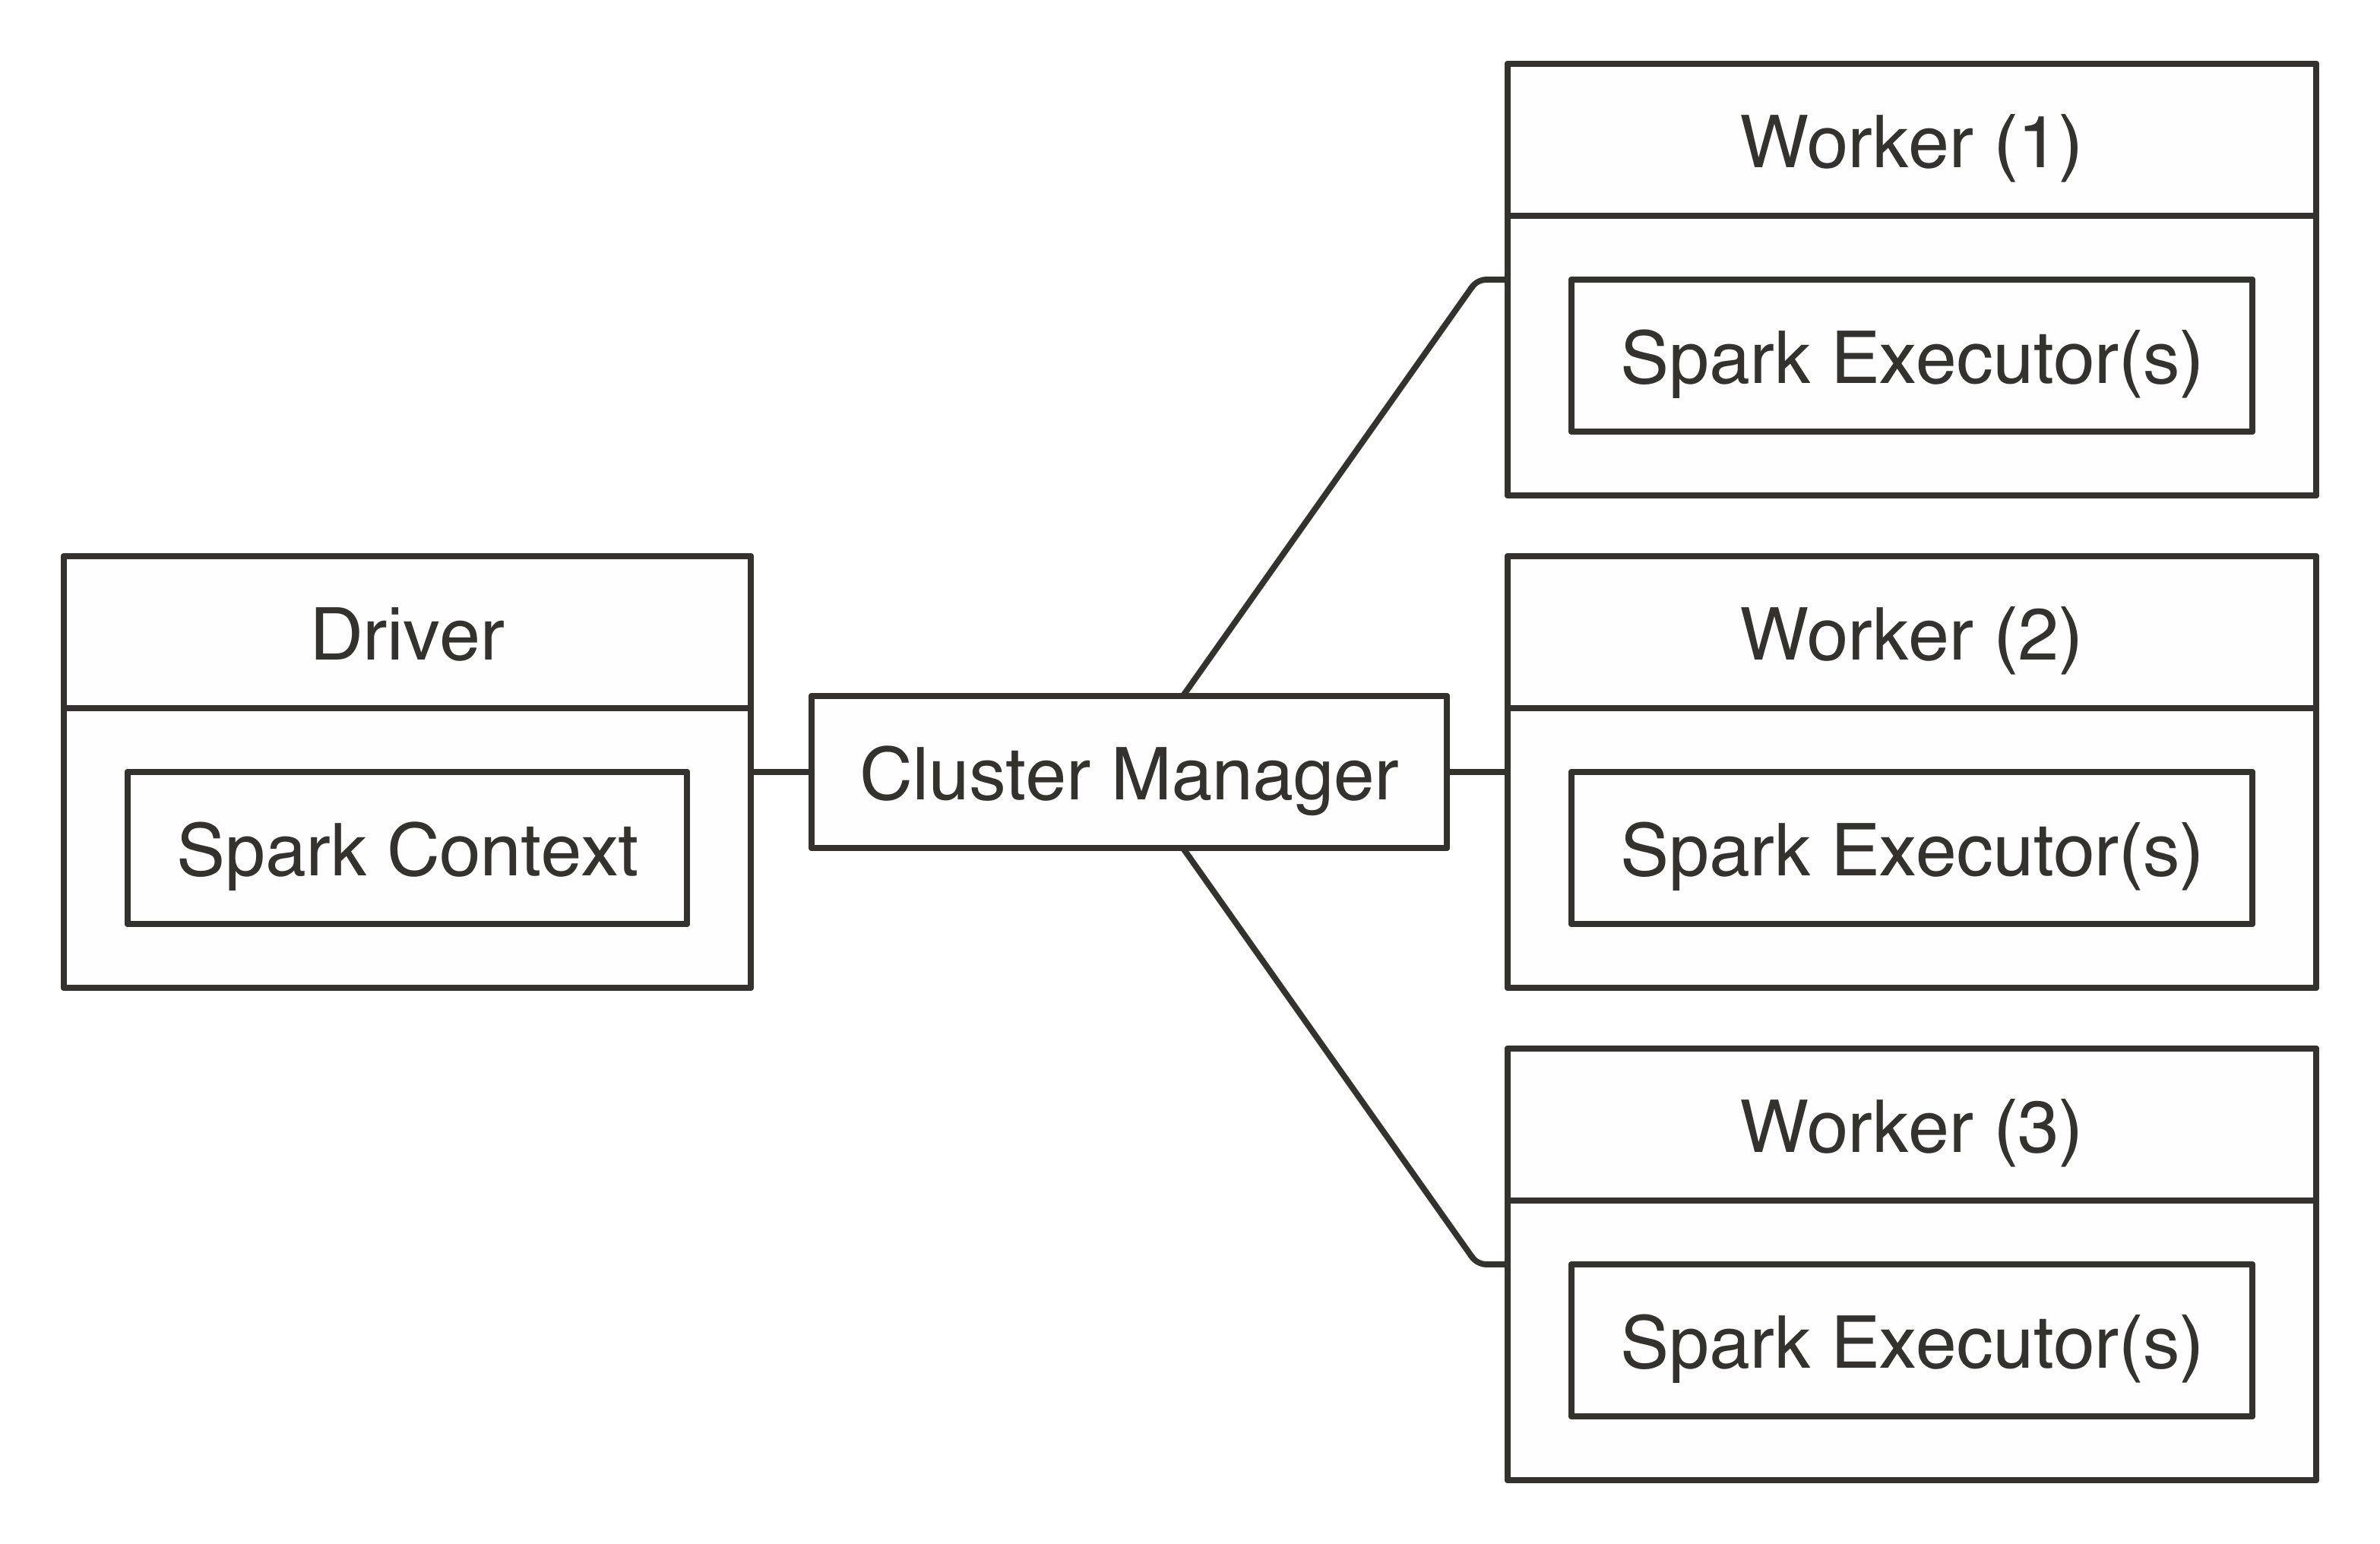
FIGURE 7.1: Apache Spark connection architecture If you already have a Spark cluster in your organization, you should request the connection information to this cluster from your cluster administrator, read their usage policies carefully, and follow their advice. Since a cluster can be shared among many users, you want to ensure that you request only the compute resources you need. We cover how to request resources in Chapter 9. Your system administrator will specify whether it’s an on-premises or cloud cluster, the cluster manager being used, supported connections, and supported tools. You can use this information to jump directly to Standalone, YARN, Mesos, Livy, or Kubernetes based on which is appropriate for your situation. Note: After you’ve used spark_connect() to connect, you can use all the techniques described in previous chapters using the sc connection; for instance, you can do data analysis or modeling with the same code previous chapters presented.

7.1.1 Edge Nodes

Computing clusters are configured to enable high bandwidth and fast network connectivity between nodes. To optimize network connectivity, the nodes in the cluster are configured to trust one another and to disable security features. This improves performance but requires you to close all external network communication, making the entire cluster secure as a whole except for a few cluster machines that are carefully configured to accept connections from outside the cluster; conceptually, these machines are located in the “edge” of the cluster and are known as edge nodes. Therefore, before connecting to Apache Spark, it is likely that you will first need to connect to an edge node in your cluster. There are two methods to connect:
Terminal
Using a computer terminal application, you can use a Secure Shell to establish a remote connection into the cluster; after you connect into the cluster, you can launch R and then use sparklyr. However, a terminal can be cumbersome for some tasks, like exploratory data analysis, so it’s often used only while configuring the cluster or troubleshooting issues.
Web Browser
While using sparklyr from a terminal is possible, it is usually more productive to install a web server in an edge node that provides access to run R with sparklyr from a web browser. Most likely, you will want to consider using RStudio or Jupyter rather than connecting from the terminal. Figure 7.2 explains these concepts visually. The left block is usually your web browser, and the right block is the edge node. Client and edge nodes communicate over HTTP when using a web browser or Secure Shell (SSH) when using the terminal. 
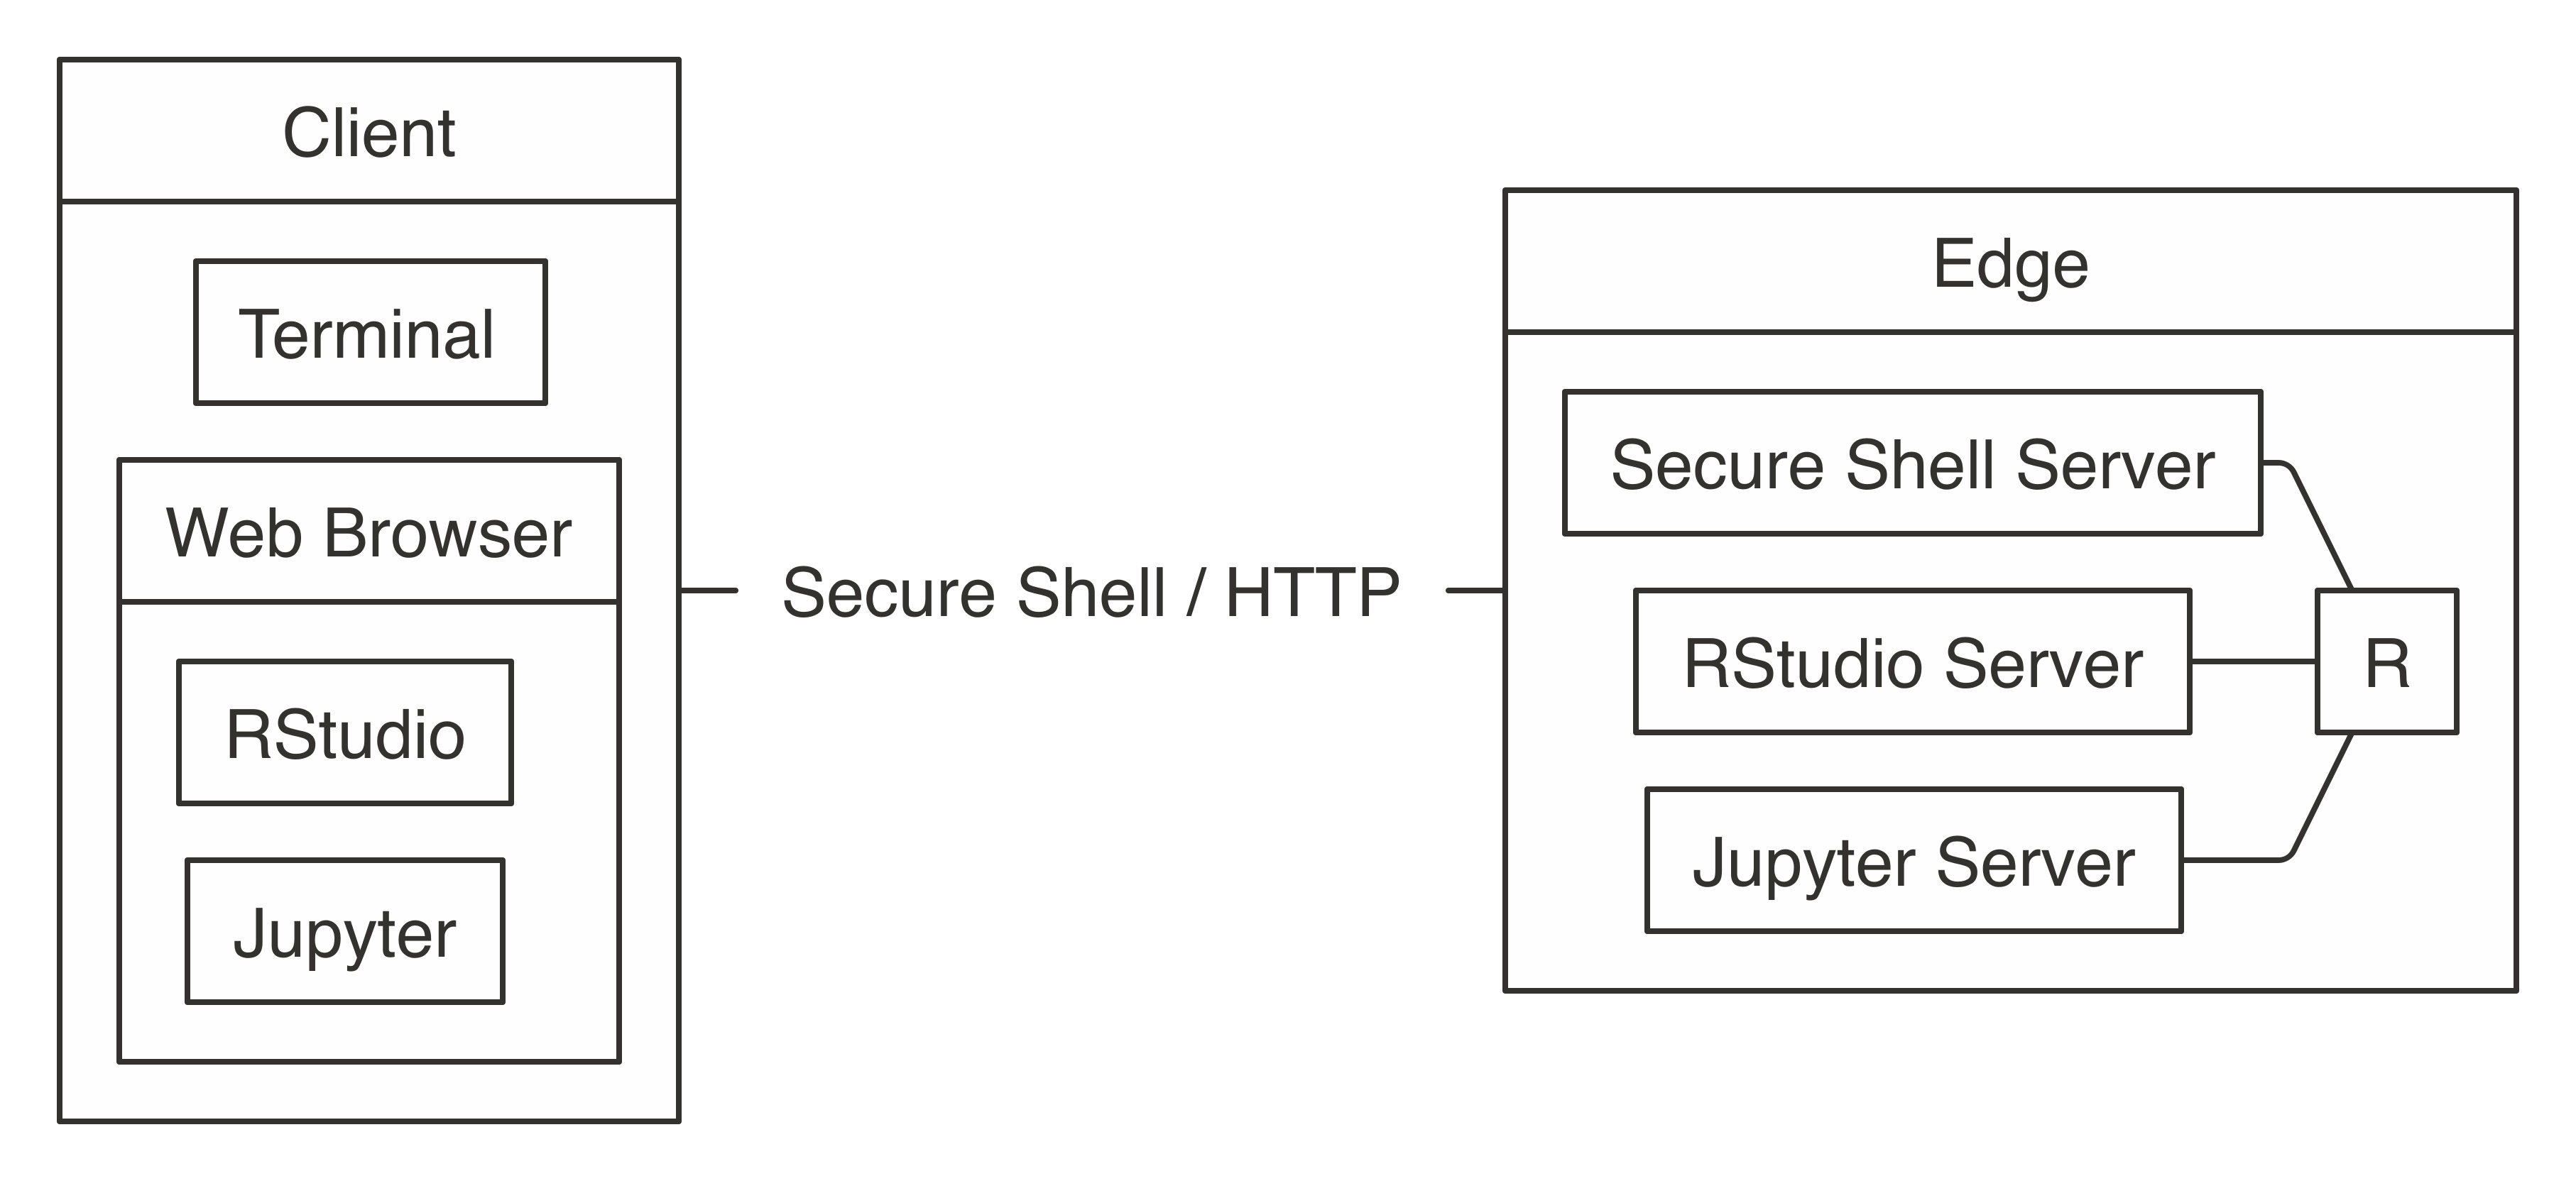
FIGURE 7.2: Connecting to Spark’s edge node

7.1.2 Spark Home

After you connect to an edge node, the next step is to determine where Spark is installed, a location known as the SPARK_HOME. In most cases, your cluster administrator will have already set the SPARK_HOME environment variable to the correct installation path. If not, you will need to get the correct SPARK_HOME path. You must specify the SPARK_HOME path as an environment variable or explicitly when running spark_connect() using the spark_home parameter. If your cluster provider or cluster administrator already provided SPARK_HOME for you, the following code should return a path instead of an empty string: Sys.getenv("SPARK_HOME") If this code returns an empty string, this would mean that the SPARK_HOME environment variable is not set in your cluster, so you will need to specify SPARK_HOME while using spark_connect(), as follows: sc <- spark_connect(master = "<master>", spark_home = "local/path/to/spark") In this example, master is set to the correct cluster manager master for Spark Standalone, YARN, Mesos, Kubernetes, or Livy.

7.2 Local

When you connect to Spark in local mode, Spark starts a single process that runs most of the cluster components like the Spark context and a single executor. This is ideal to learn Spark, work offline, troubleshoot issues, or test code before you run it over a large compute cluster. Figure 7.3 depicts a local connection to Spark. 
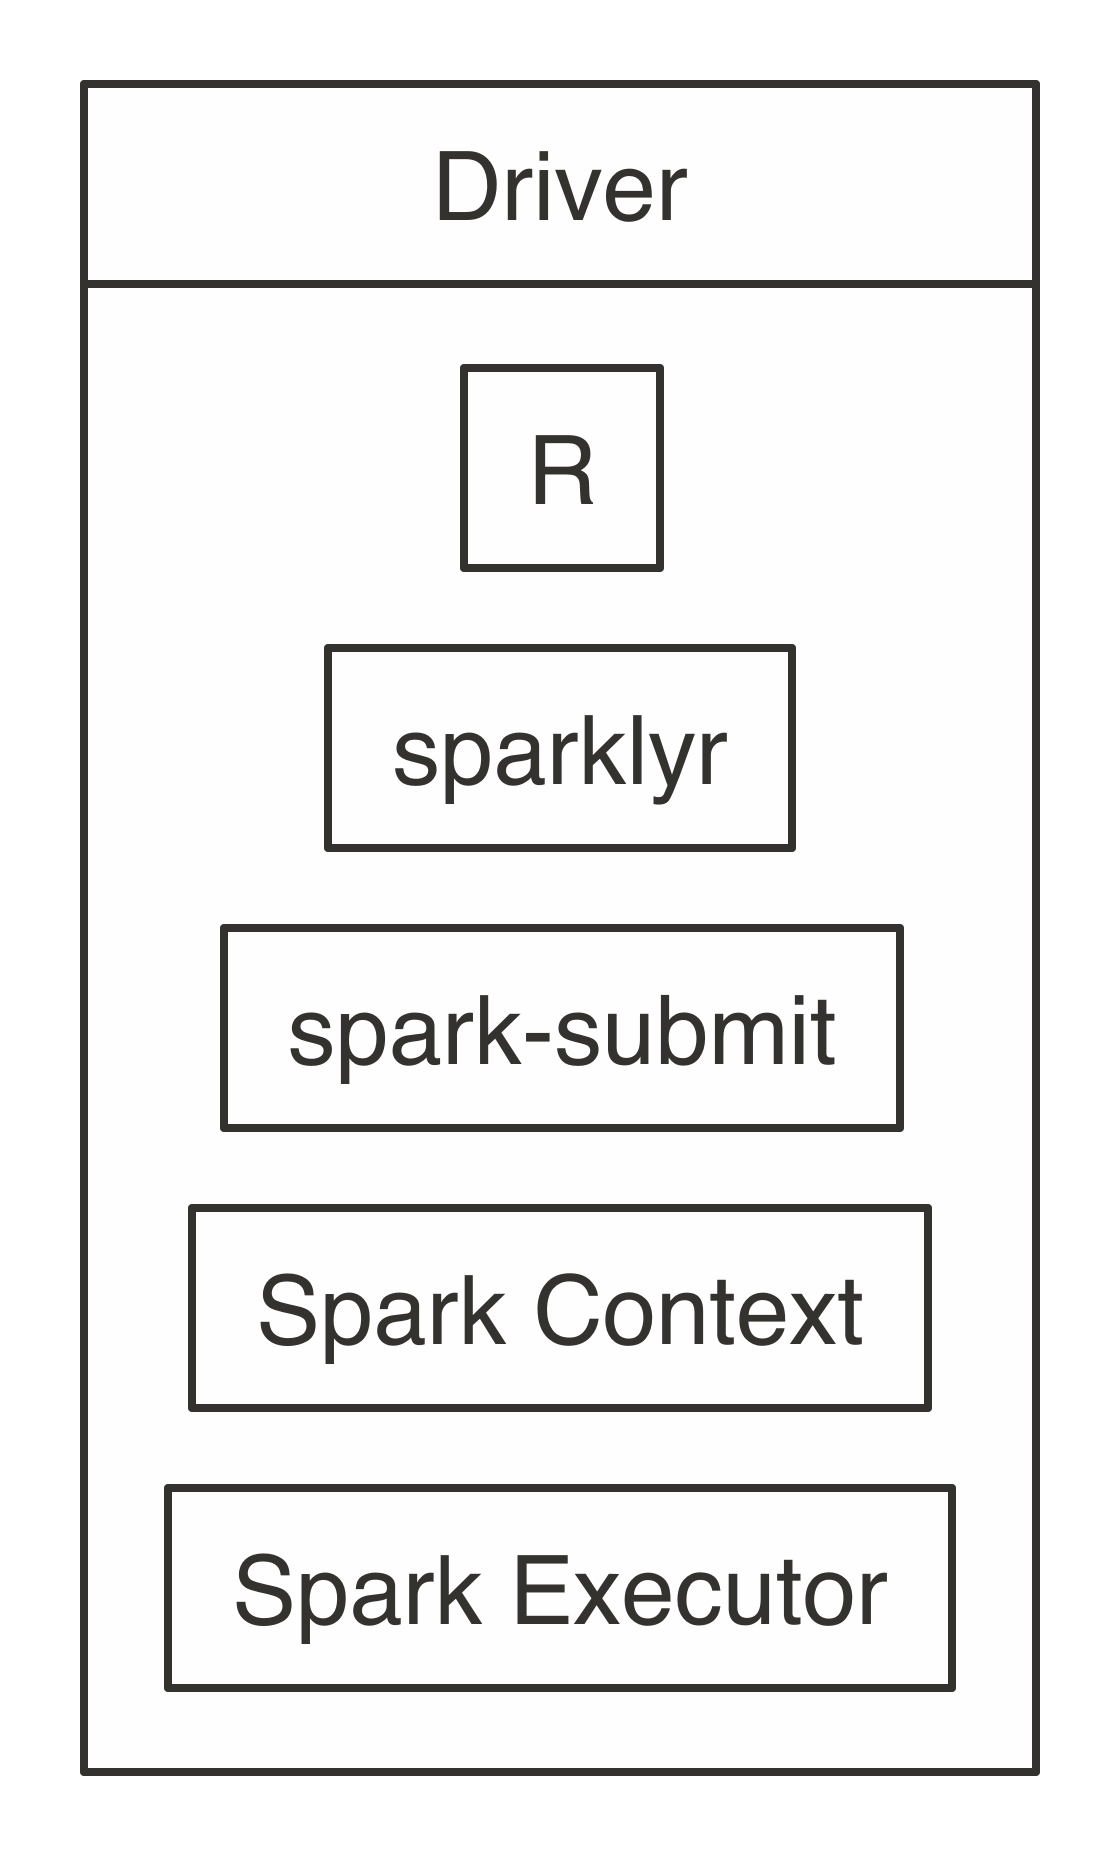
FIGURE 7.3: Local connection diagram Notice that there is neither a cluster manager nor worker process since, in local mode, everything runs inside the driver application. It’s also worth noting that sparklyr starts the Spark context through spark-submit, a script available in every Spark installation to enable users to submit custom applications to Spark. If you’re curious, <<contributing>> explains the internal processes that take place in sparklyr to submit this application and connect properly from R. To perform this local connection, we can use the following familiar code from previous chapters: # Connect to local Spark instance sc <- spark_connect(master = "local")

7.3 Standalone

Connecting to a Spark Standalone cluster requires the location of the cluster manager’s master instance, which you can find in the cluster manager web interface as described in the Clusters - Standalone section. You can find this location by looking for a URL starting with spark://. A connection in standalone mode starts from sparklyr, which launches spark-submit, which then submits the sparklyr application and creates the Spark Context, which requests executors from the Spark Standalone instance running under the given master address. Figure 7.4 illustrates this process, which is quite similar to the overall connection architecture from Figure 7.1 but with additional details that are particular to standalone clusters and sparklyr. 
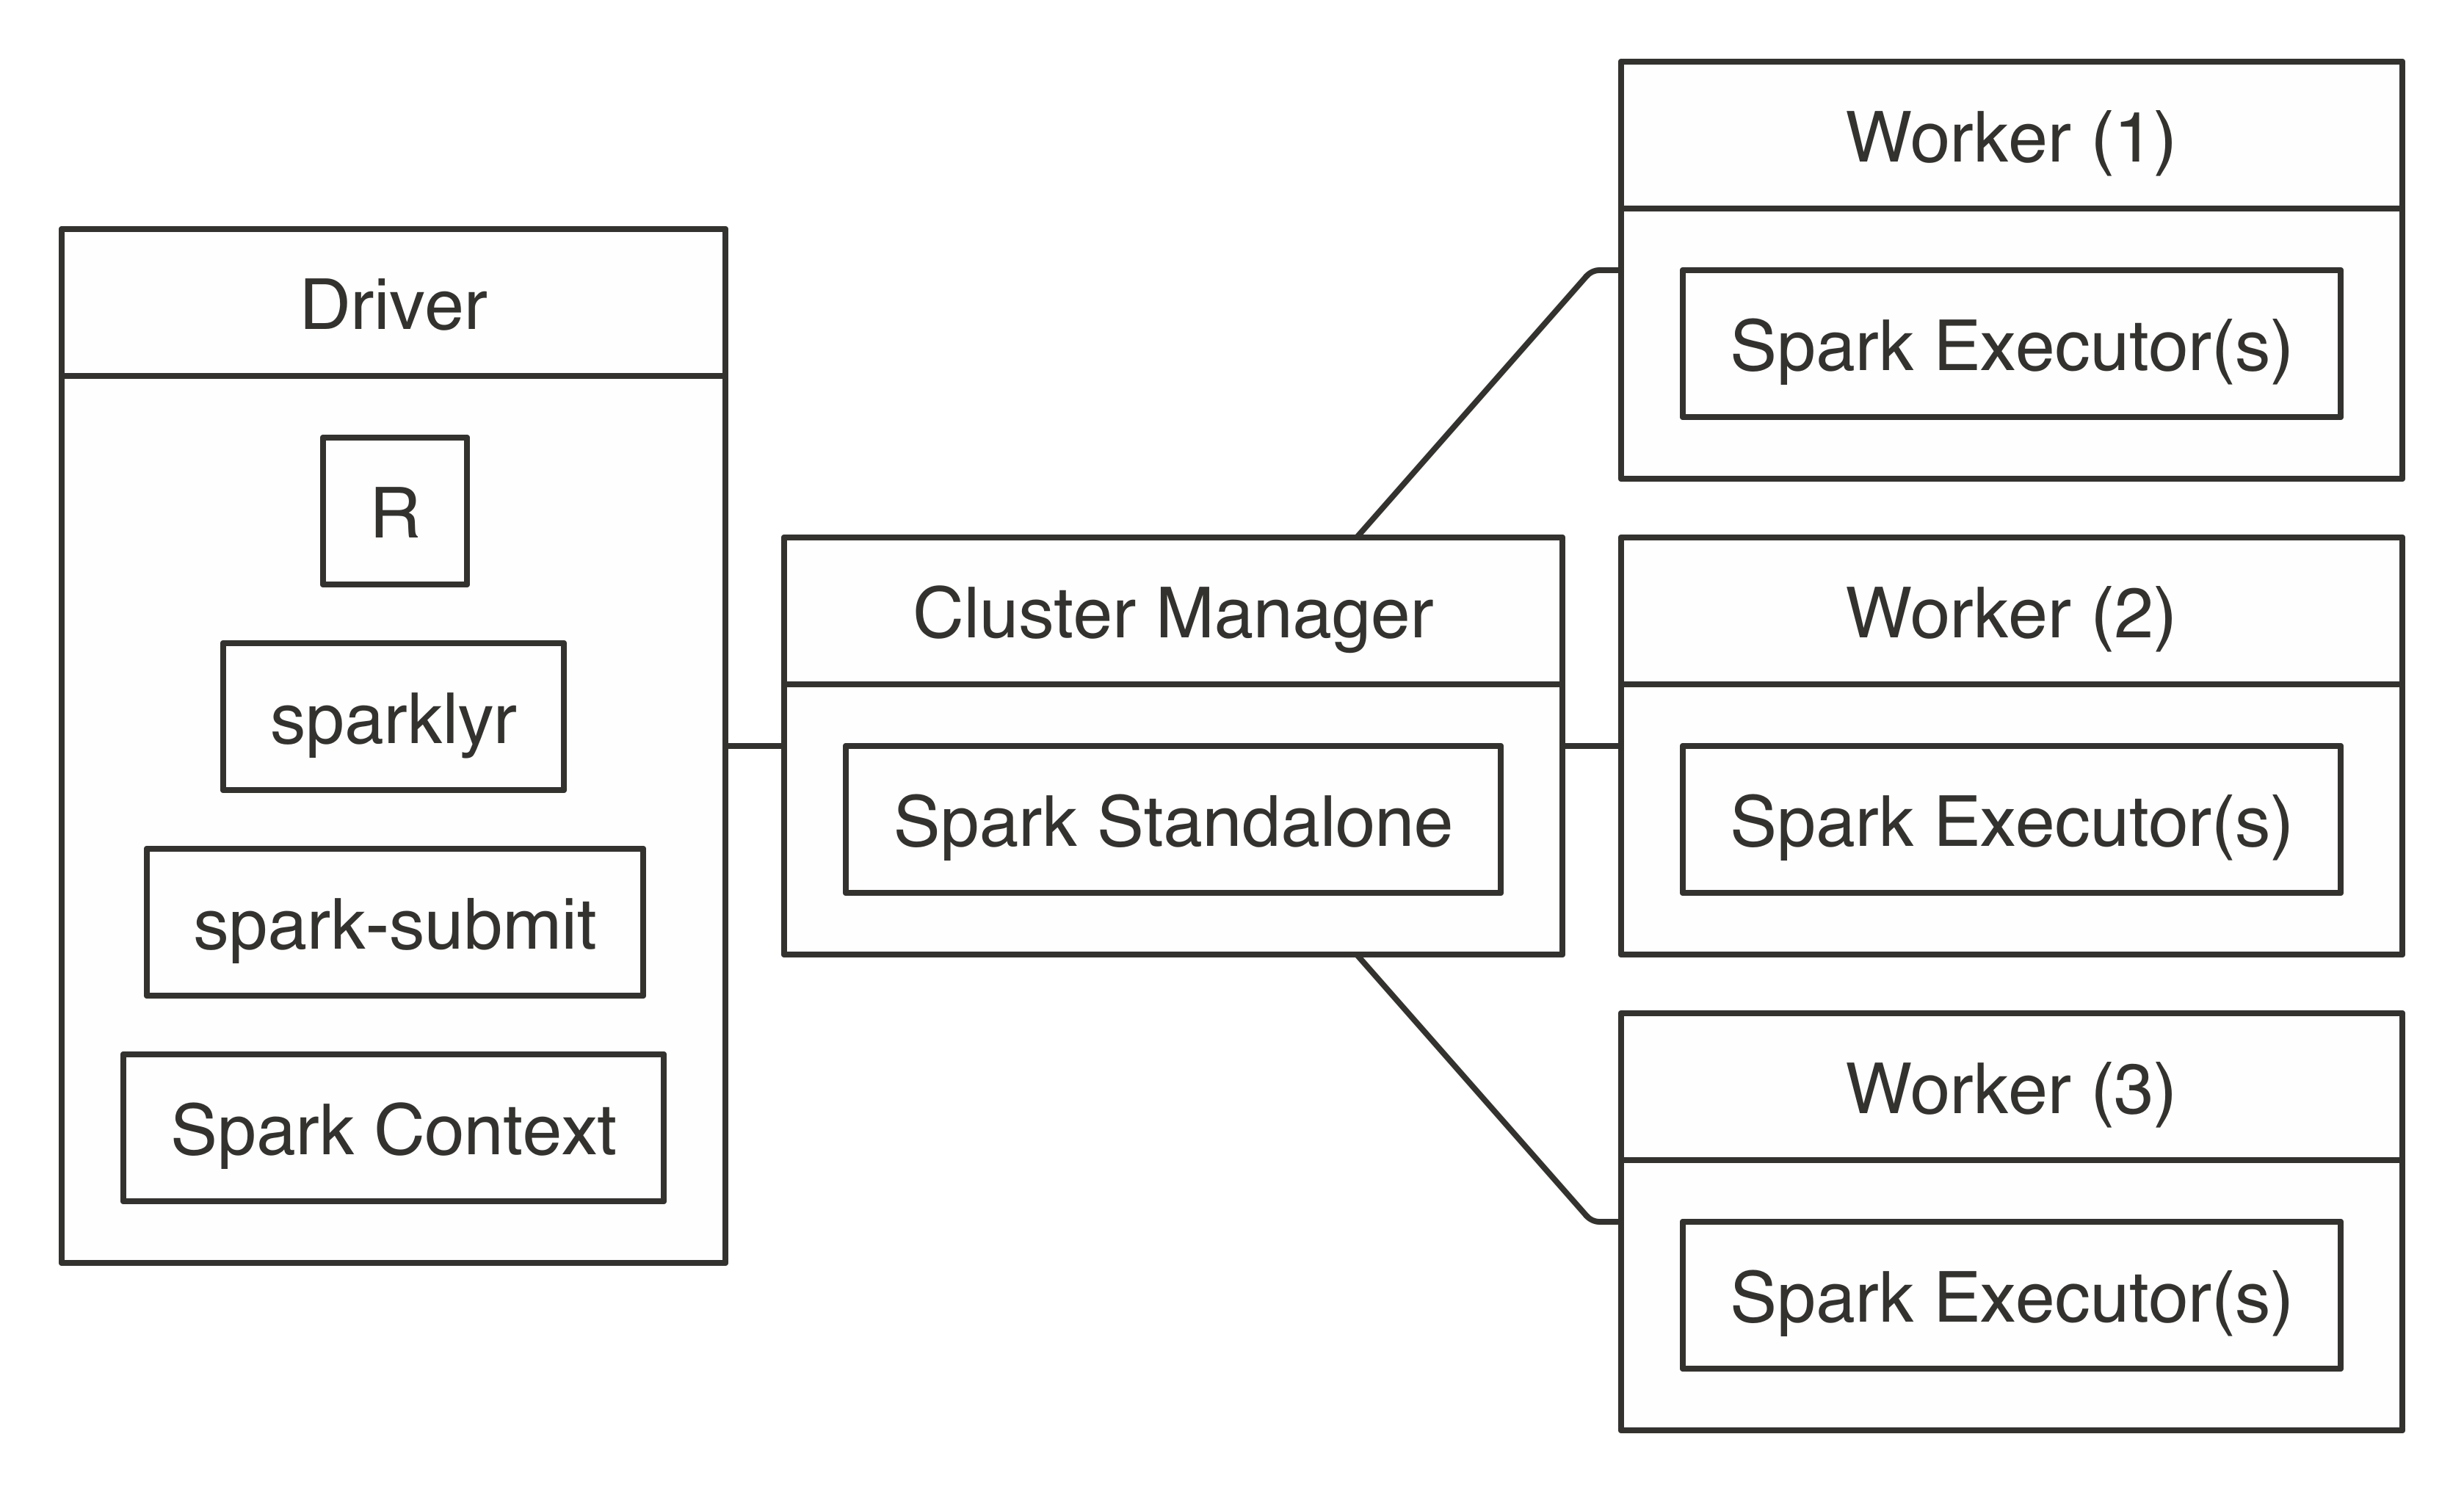
FIGURE 7.4: Spark Standalone connection diagram To connect, use master = "spark://hostname:port" in spark_connect() as follows: sc <- spark_connect(master = "spark://hostname:port")

7.4 Yarn

Hadoop YARN is the cluster manager from the Hadoop project. It’s the most common cluster manager that you are likely to find in clusters, which started out as Hadoop clusters; with Cloudera, Hortonworks, and MapR distributions as when using Amazon EMR. YARN supports two connection modes: YARN client and YARN cluster. However, YARN client mode is much more common than YARN cluster since it’s more efficient and easier to set up.

7.4.1 Yarn Client

When you connect in YARN client mode, the driver instance runs R, sparklyr, and the Spark context, which requests worker nodes from YARN to run Spark executors, as shown in Figure 7.5. 
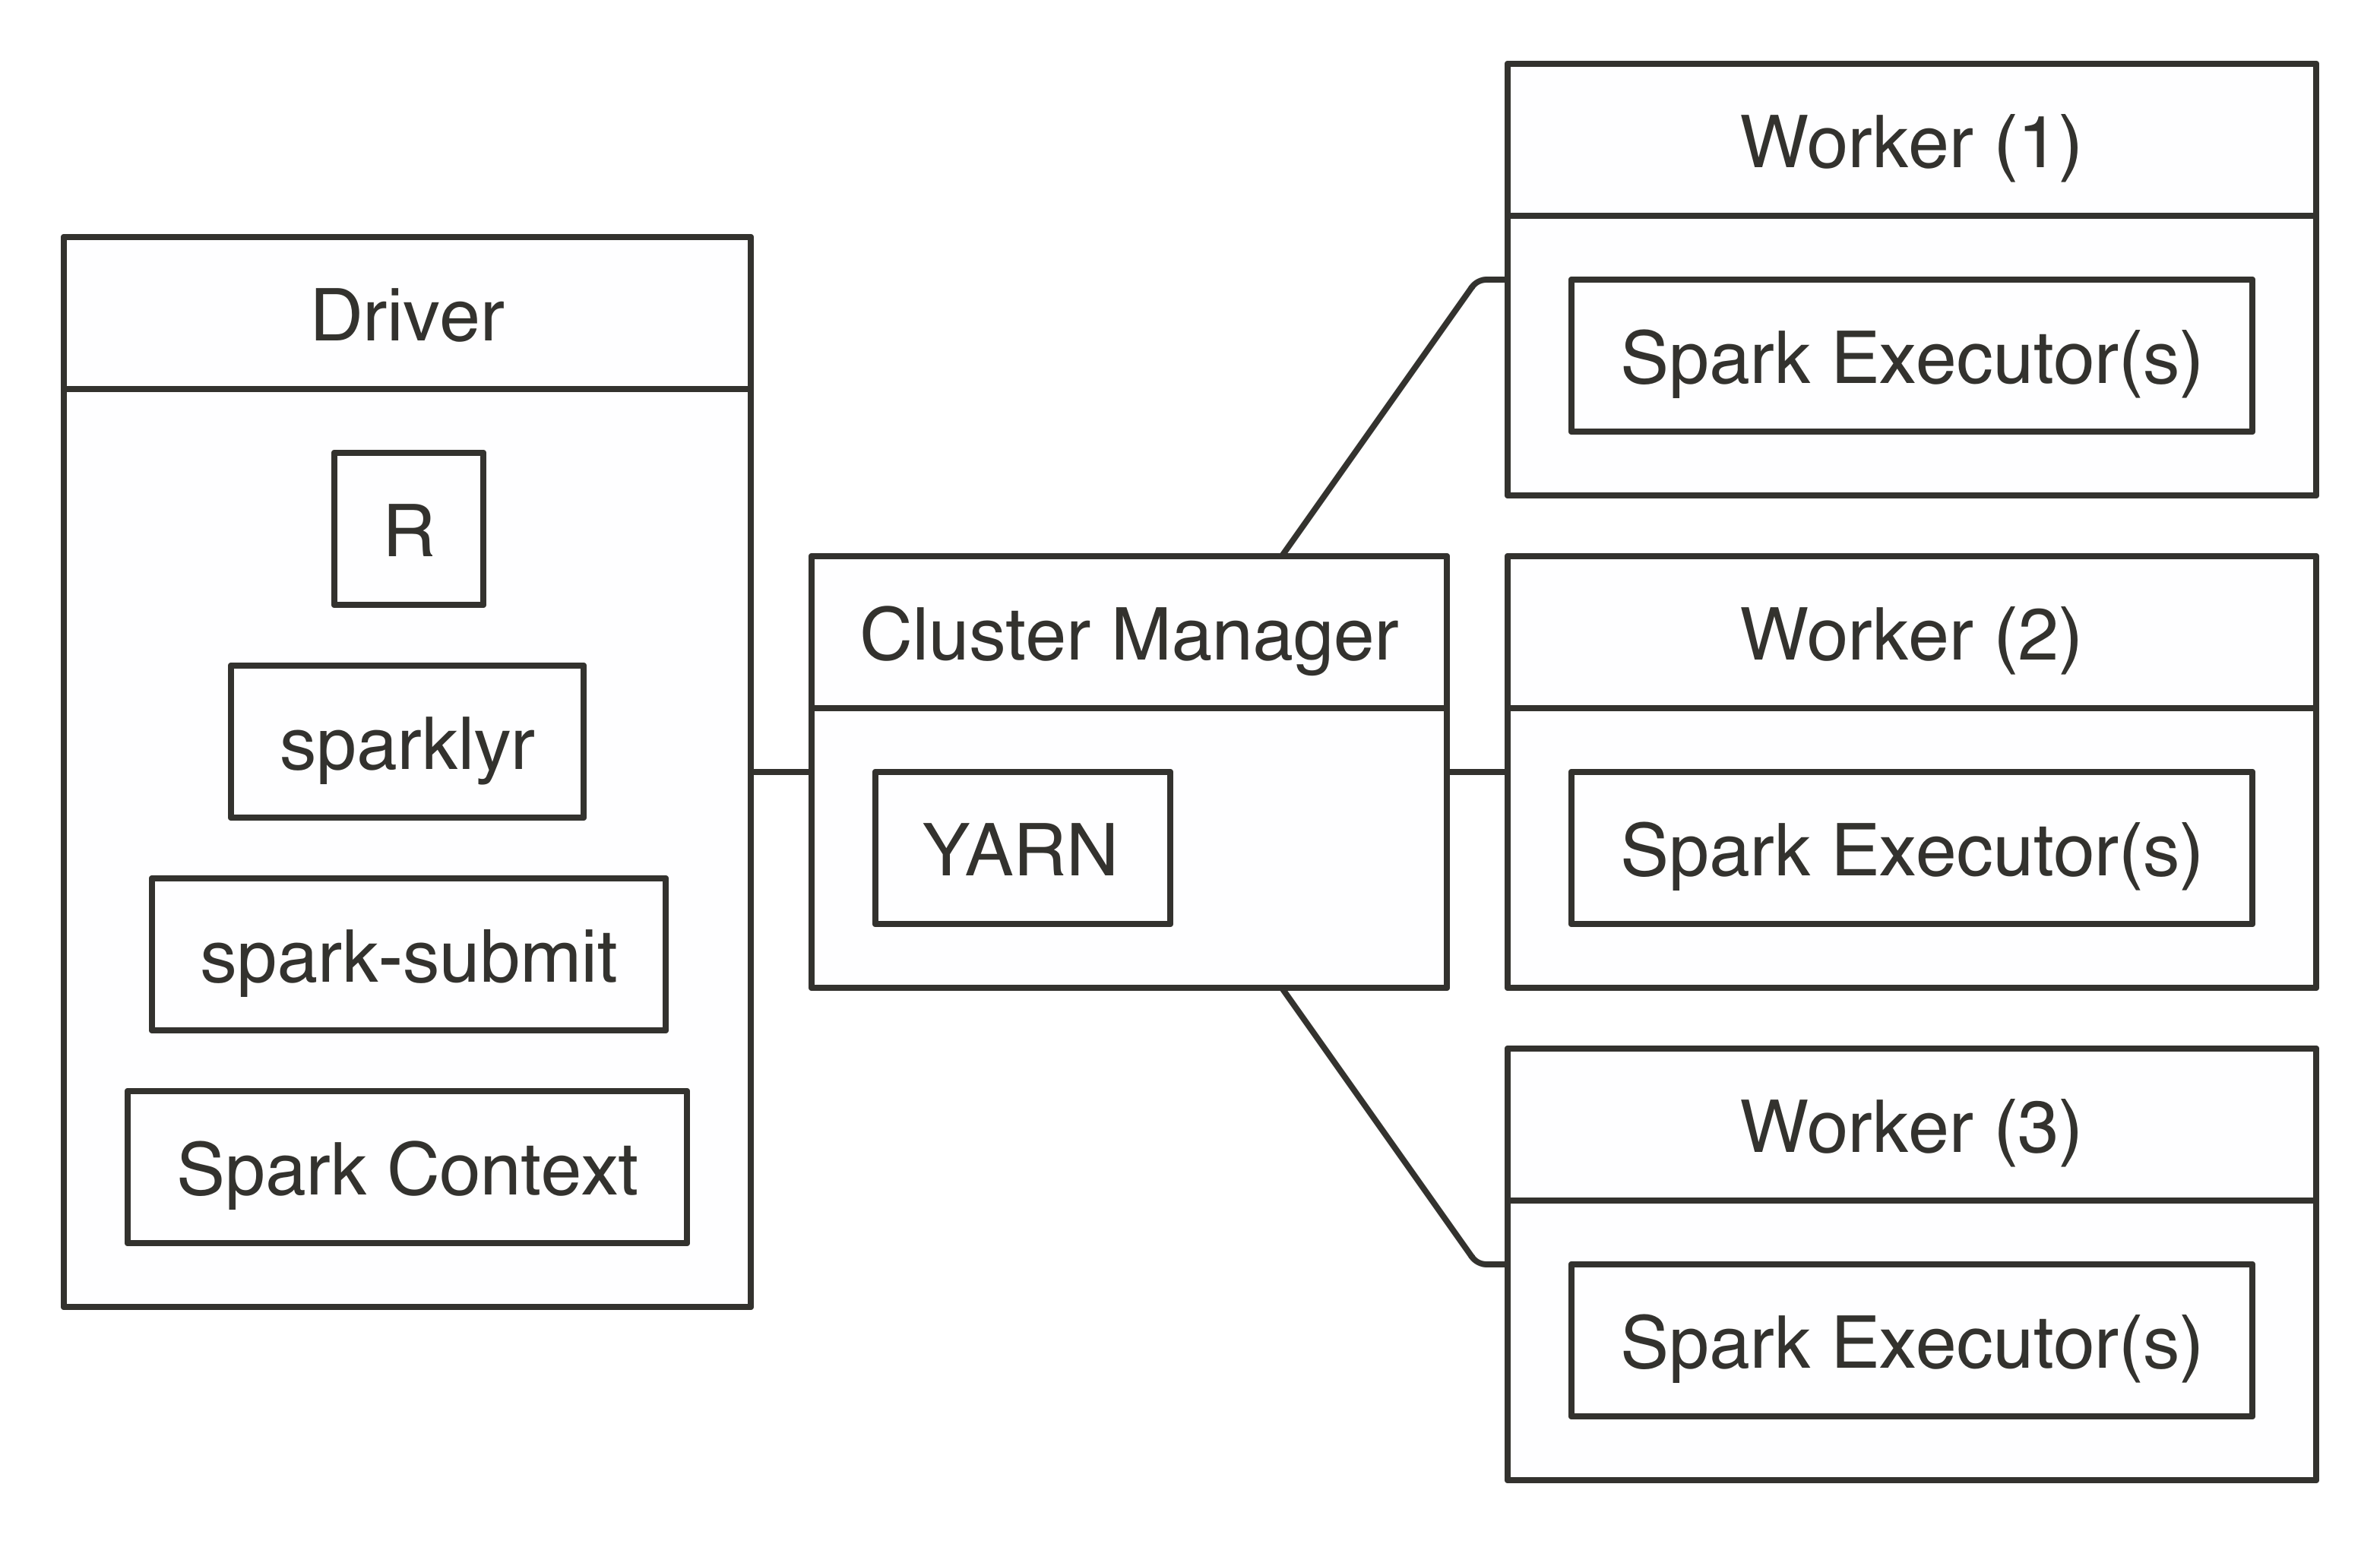
FIGURE 7.5: YARN client connection diagram To connect, you simply run with master = "yarn", as follows: sc <- spark_connect(master = "yarn") Behind the scenes, when you’re running YARN in client mode, the cluster manager will do what you would expect a cluster manager would do: it allocates resources from the cluster and assigns them to your Spark application, which the Spark context will manage for you. The important piece to notice in Figure 7.5 is that the Spark context resides in the same machine where you run R code; this is different when you’re running YARN in cluster mode.

7.4.2 Yarn Cluster

The main difference between running YARN in cluster mode and running YARN in client mode is that, in cluster mode, the driver node is not required to be the node where R and sparklyr were launched; instead, the driver node remains the designated driver node, which is usually a different node than the edge node where R is running. It can be helpful to consider using cluster mode when the edge node has too many concurrent users, when it is lacking computing resources, or when tools (like RStudio or Jupyter) need to be managed independently of other cluster resources. Figure 7.6 shows how the different components become decoupled when running in cluster mode. Notice there is still a line connecting the client with the cluster manager since, first of all, resources still need to be allocated from the cluster manager; however, after they’re allocated, the client communicates directly with the driver node, which communicates with the worker nodes. From Figure 7.6, you might think that cluster mode looks much more complicated than client mode—this would be a correct assessment; therefore, if possible, it’s best to avoid cluster mode due to its additional configuration overhead. 
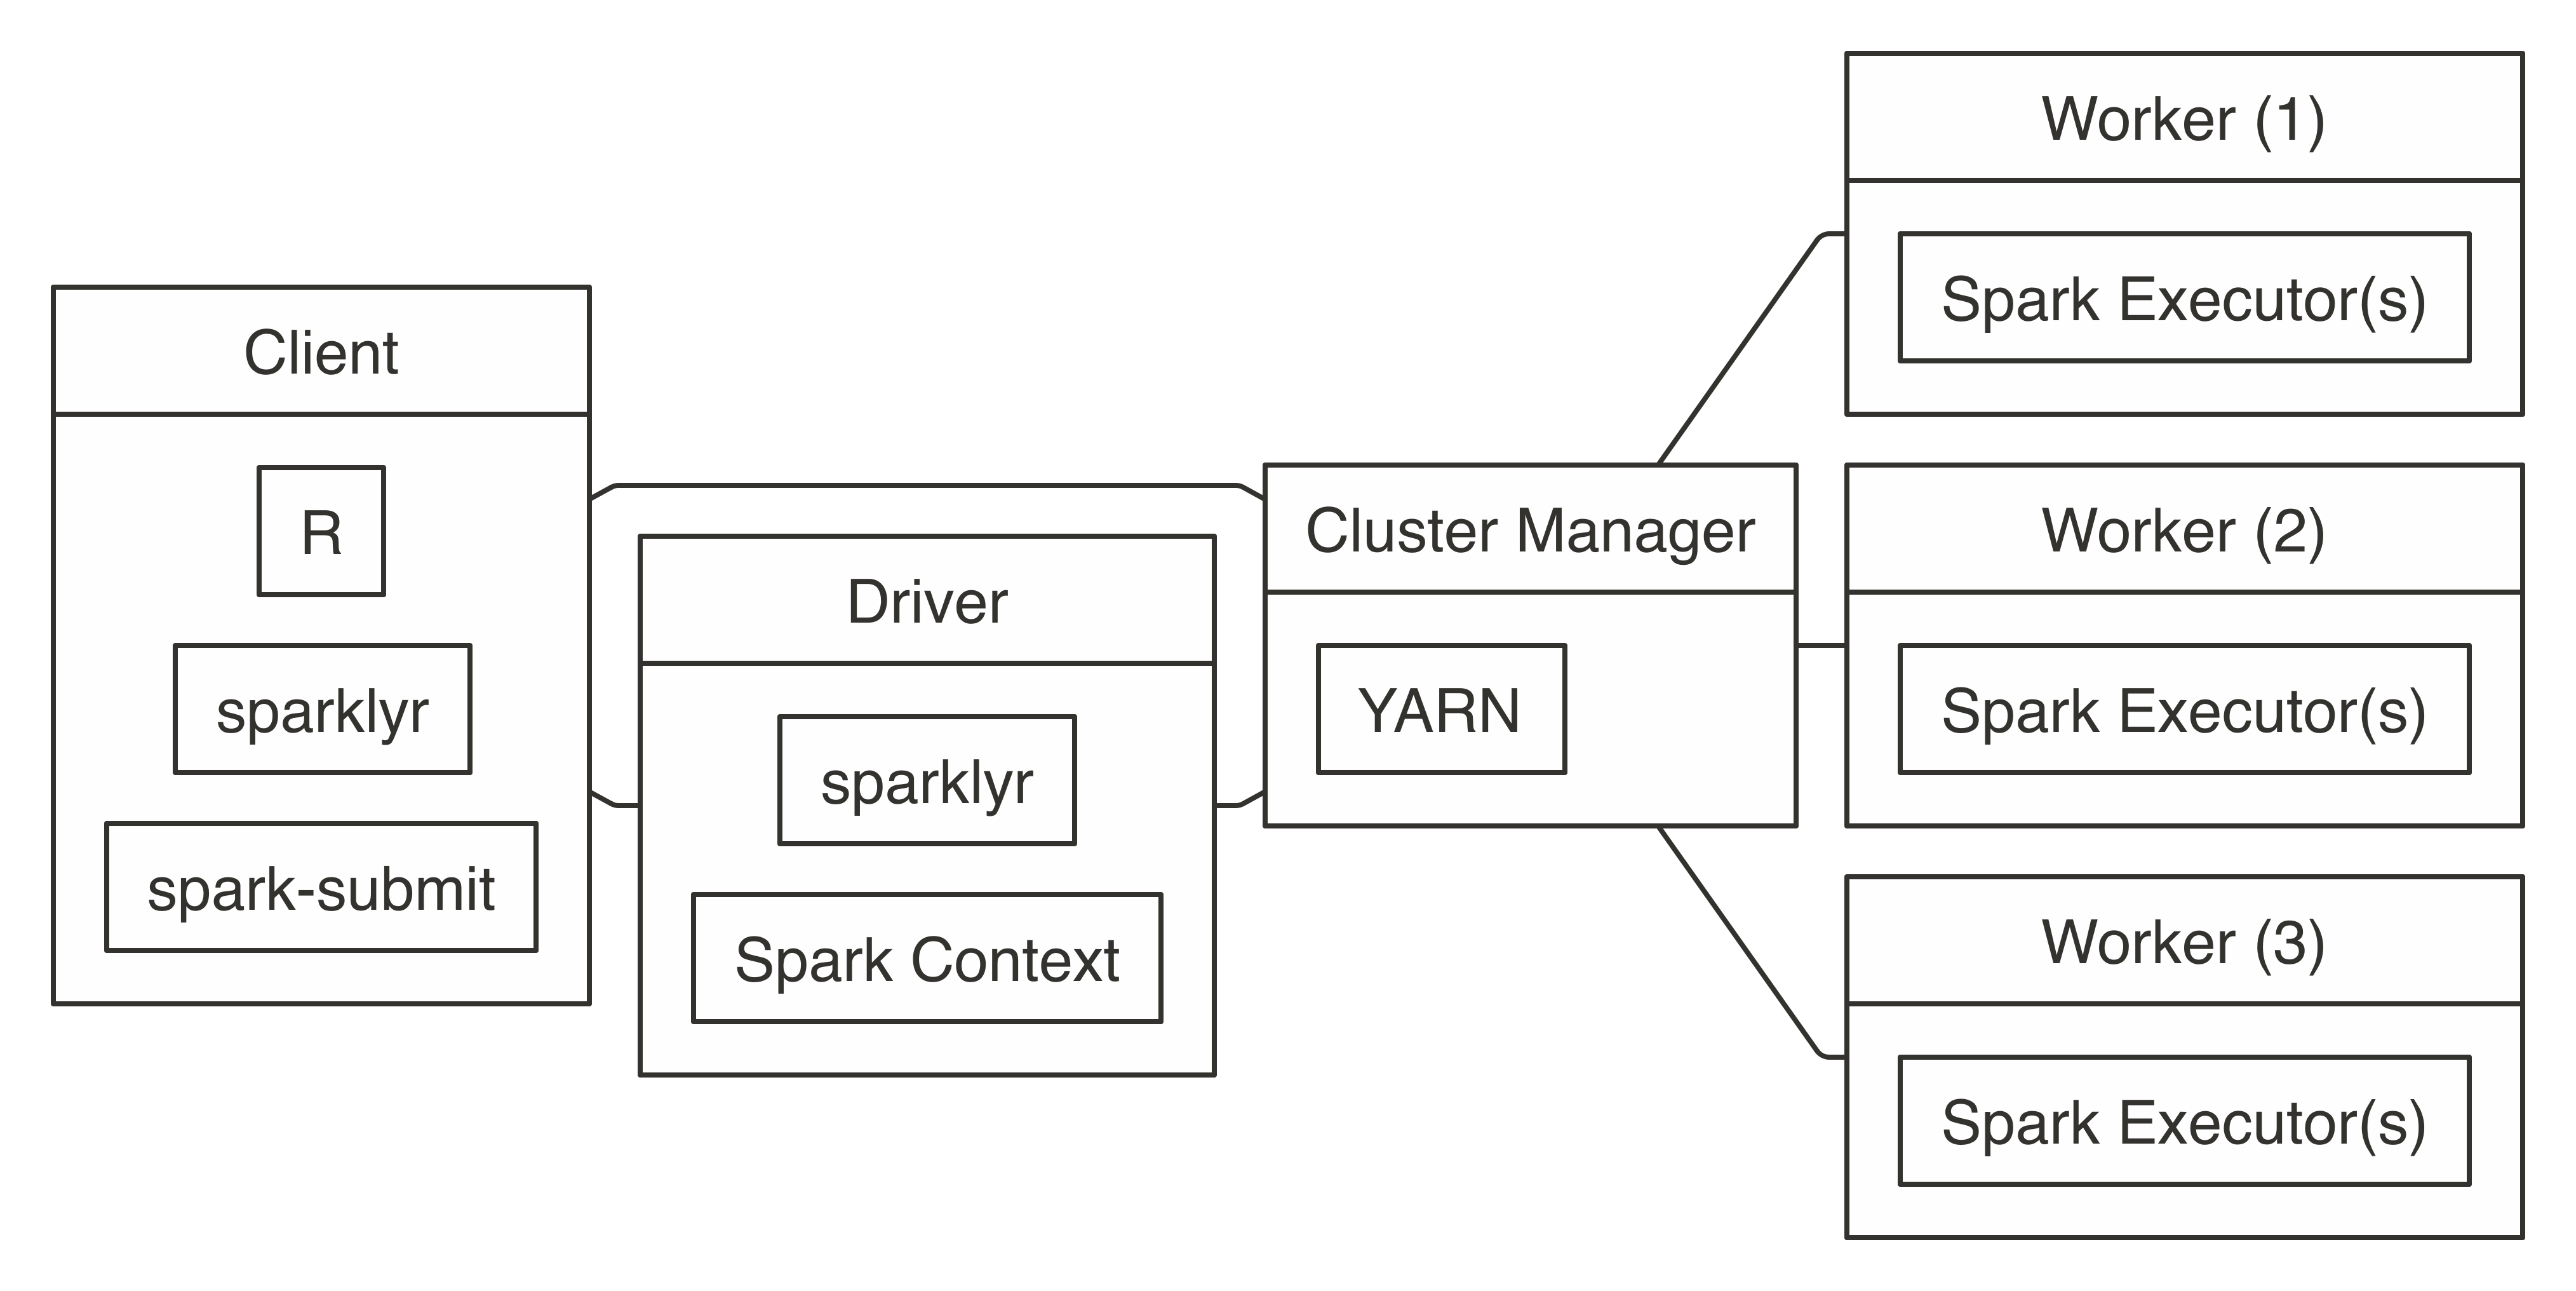
FIGURE 7.6: YARN cluster connection diagram To connect in YARN cluster mode, simply run the following: sc <- spark_connect(master = "yarn-cluster") Cluster mode assumes that the node running spark_connect() is properly configured, meaning that yarn-site.xml exists and the YARN_CONF_DIR environment variable is properly set. When using Hadoop as a file system, you will also need the HADOOP_CONF_DIR environment variable properly configured. In addition, you would need to ensure proper network connectivity between the client and the driver node—not just by having both machines reachable, but also by making sure that they have sufficient bandwidth between them. This configuration is usually provided by your system administrator and is not something that you would need to manually configure.

7.5 Livy

As opposed to other connection methods that require using an edge node in the cluster, Livy provides a web API that makes the Spark cluster accessible from outside the cluster and does not require a Spark installation in the client. After it’s connected through the web API, the Livy Service starts the Spark context by requesting resources from the cluster manager and distributing work as usual. Figure 7.7 illustrates a Livy connection; notice that the client connects remotely to the driver through a web API. 
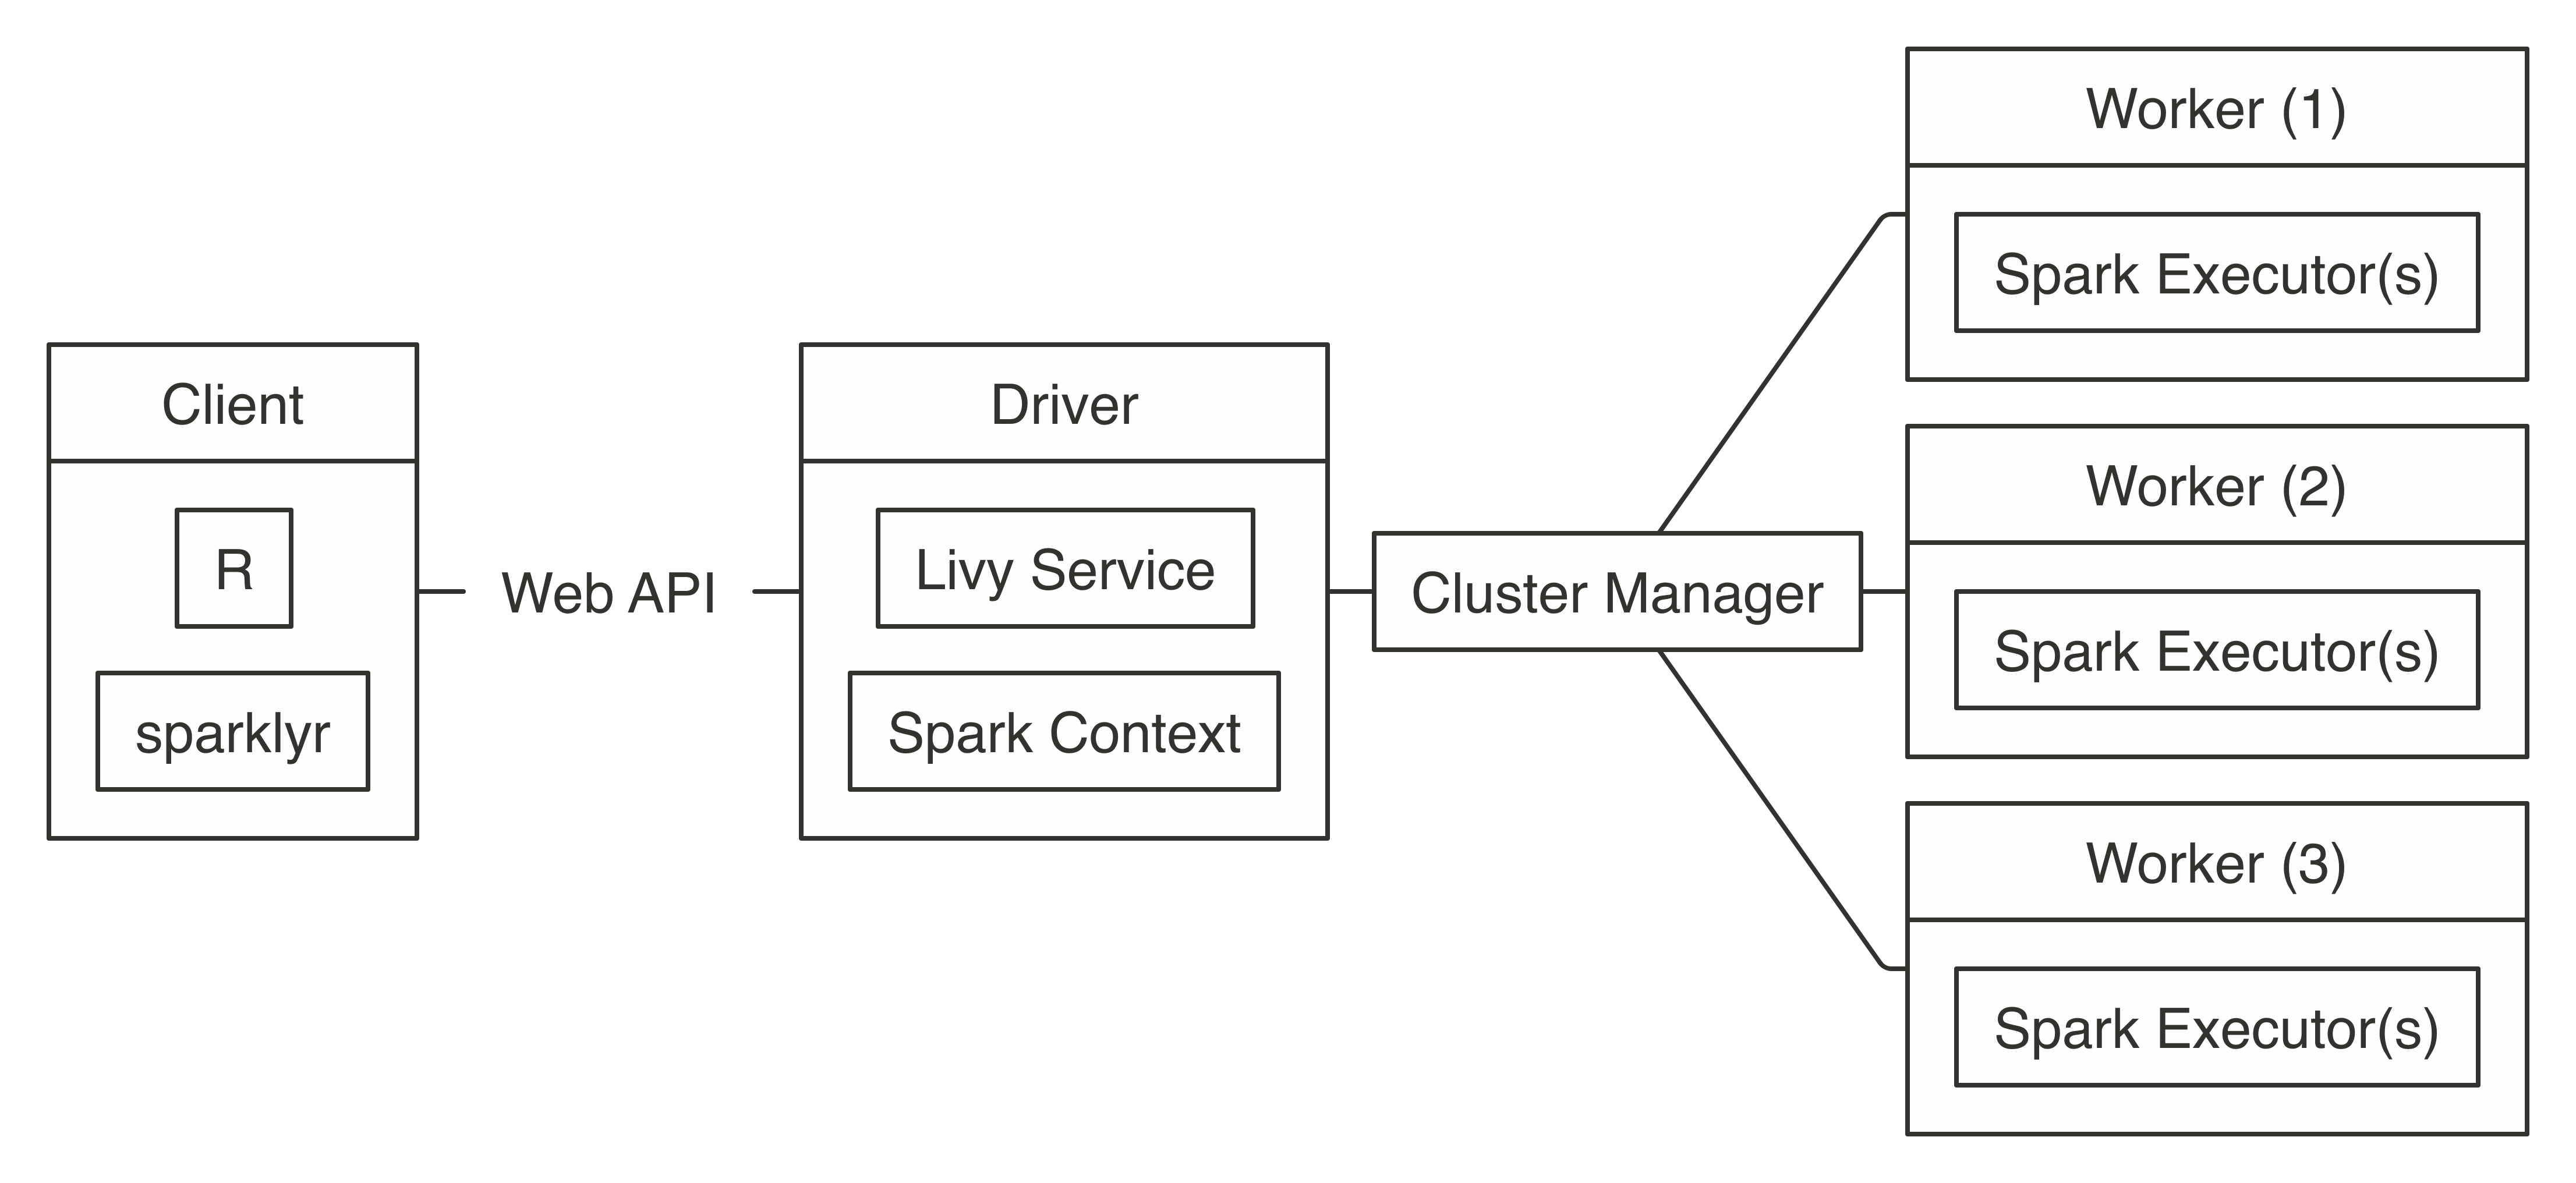
FIGURE 7.7: Livy connection diagram Connecting through Livy requires the URL to the Livy service, which should be similar to https://hostname:port/livy. Since remote connections are allowed, connections usually require, at the very least, basic authentication: sc <- spark_connect( master = "https://hostname:port/livy", method = "livy", config = livy_config( spark_version = "2.4.0", username = "<username>", password = "<password>" )) To try out Livy on your local machine, you can install and run a Livy service as described under the Clusters - Livy section and then connect as follows: sc <- spark_connect( master = "http://localhost:8998", method = "livy", version = "2.4.0") After you’re connected through Livy, you can make use of any sparklyr feature; however, Livy is not suitable for exploratory data analysis, since executing commands has a significant performance cost. That said, while running long-running computations, this overhead could be considered irrelevant. In general, you should prefer to avoid using Livy and work directly within an edge node in the cluster; when this is not feasible, using Livy could be a reasonable approach. Note: Specifying the Spark version through the spark_version parameter is optional; however, when the version is specified, performance is significantly improved by deploying precompiled Java binaries compatible with the given version. Therefore, it is a best practice to specify the Spark version when connecting to Spark using Livy.

7.6 Mesos

Similar to YARN, Mesos supports client mode and a cluster mode; however, sparklyr currently supports only client mode under Mesos. Therefore, the diagram shown in Figure 7.8 is equivalent to YARN client’s diagram with only the cluster manager changed from YARN to Mesos. 
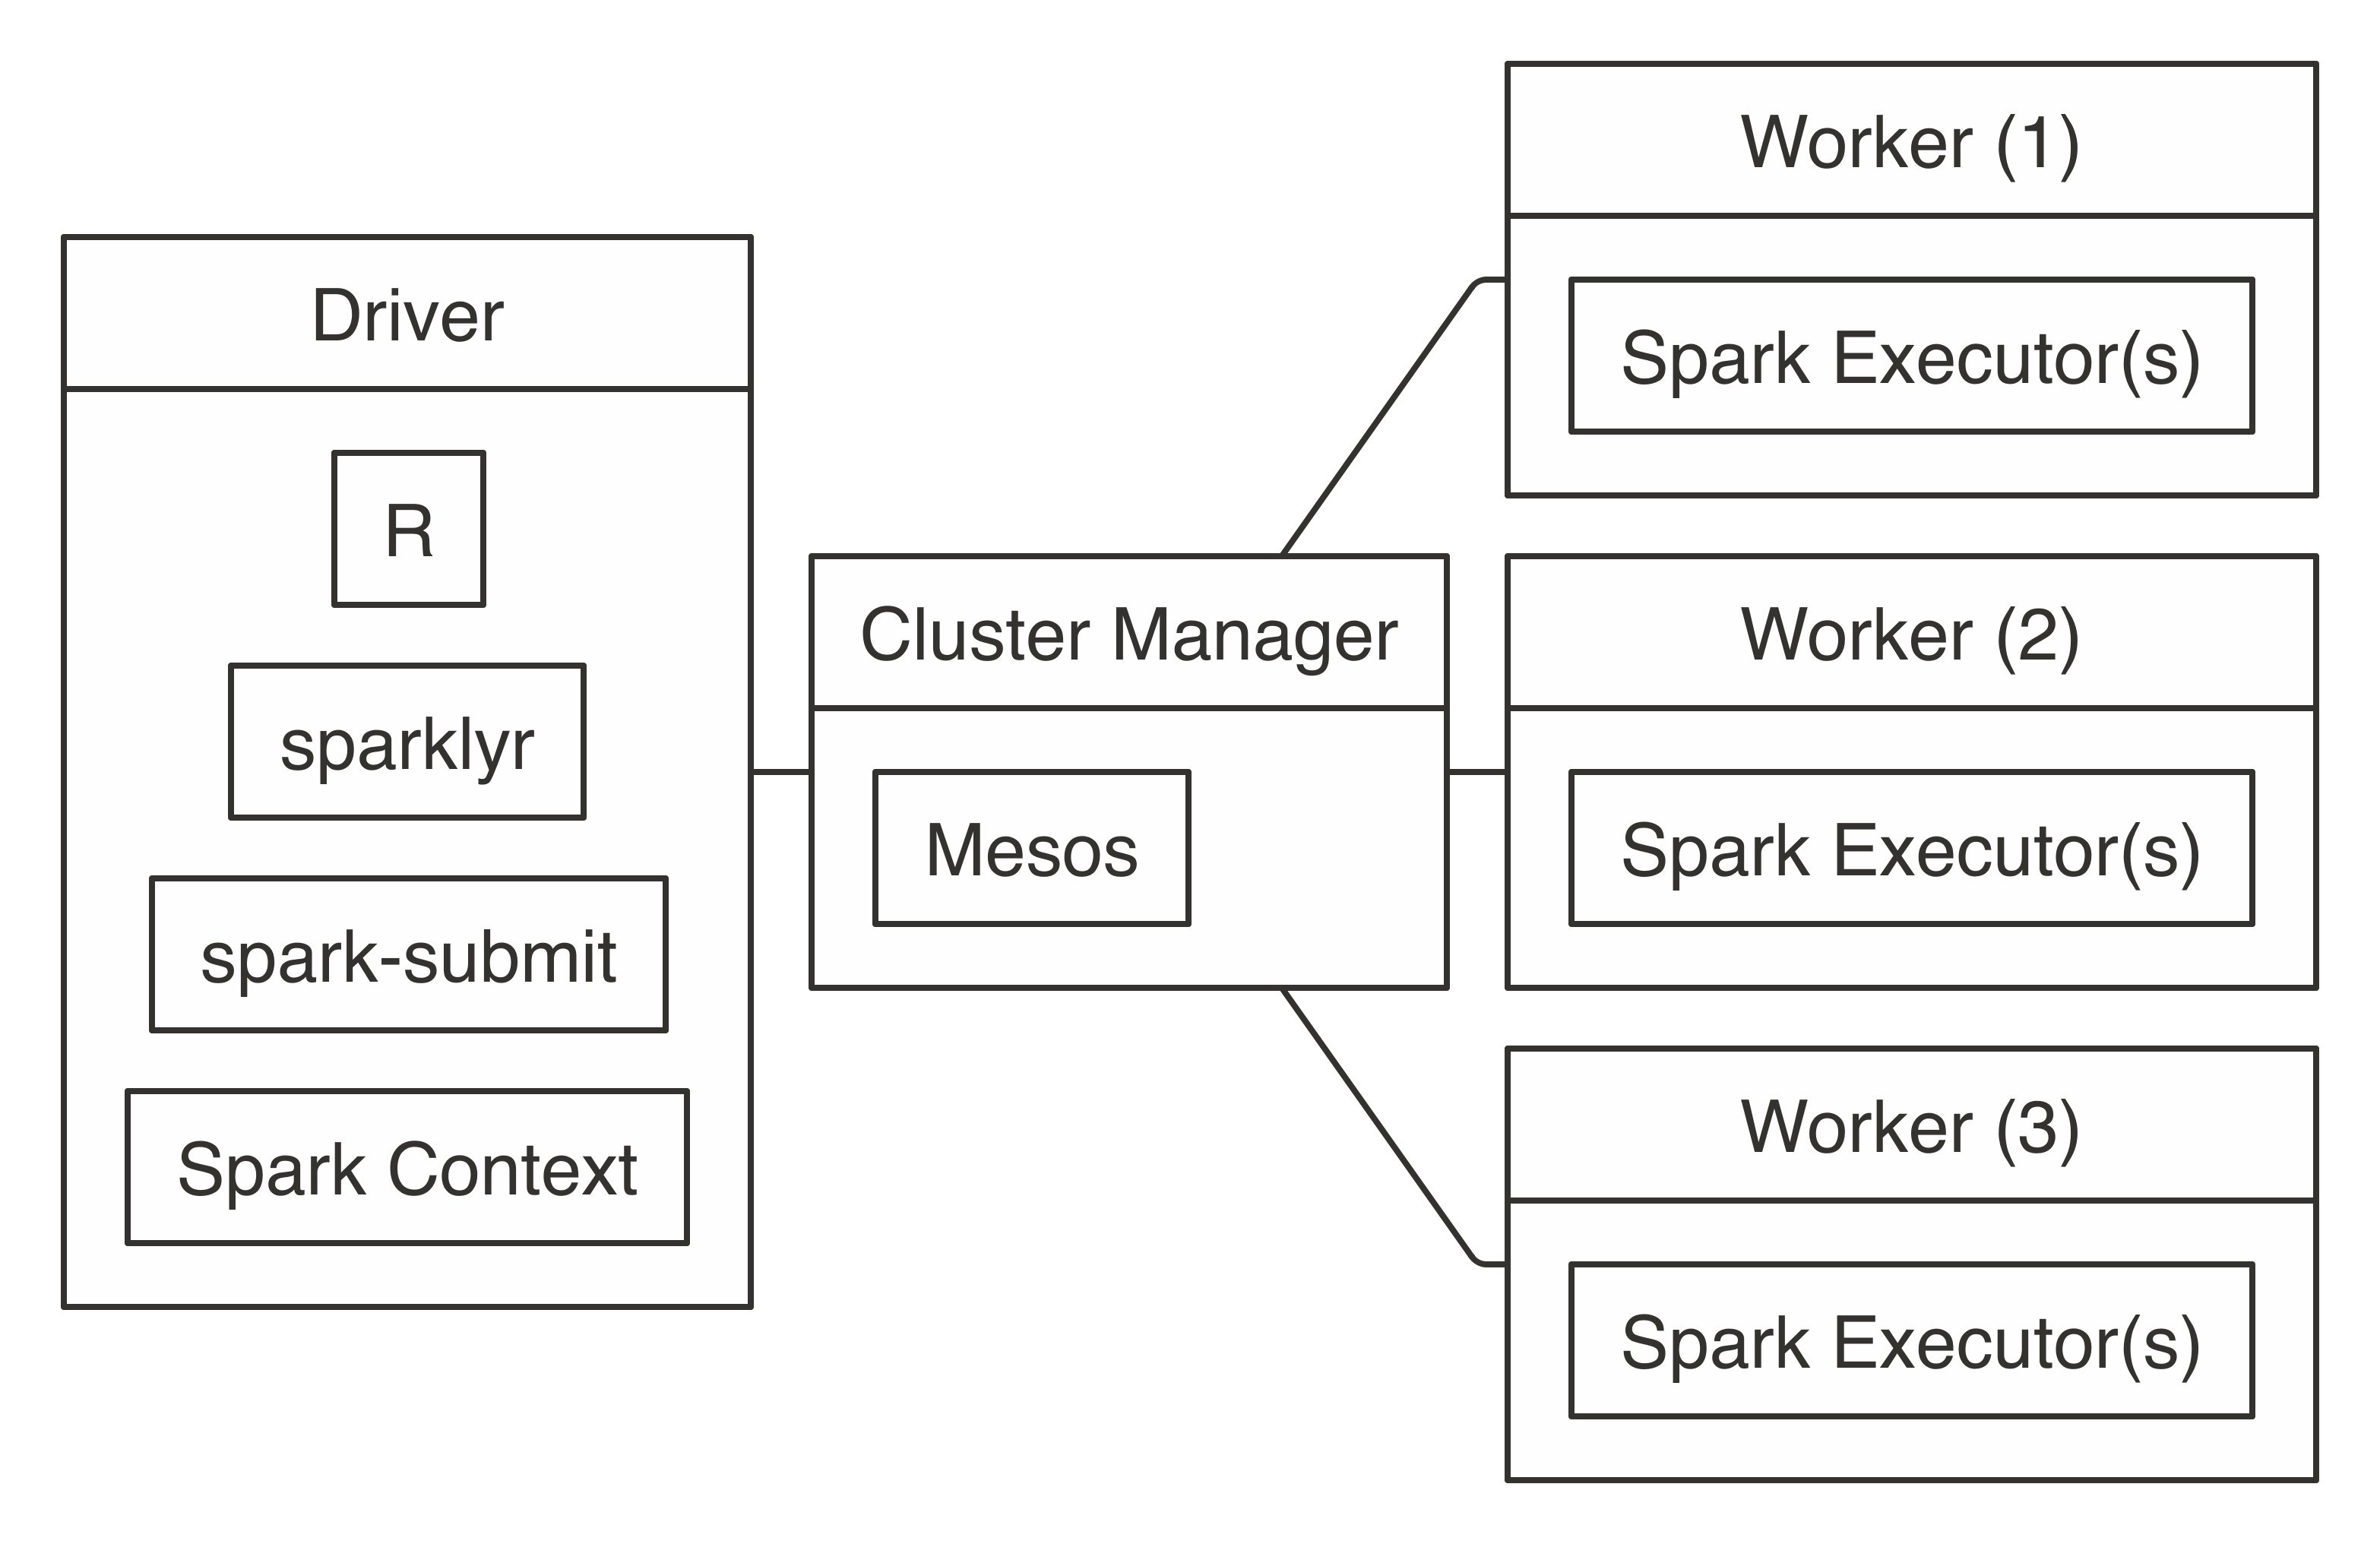
FIGURE 7.8: Mesos connection diagram Connecting requires the address to the Mesos master node, usually in the form of mesos://host:port or mesos://zk://host1:2181,host2:2181,host3:2181/mesos for Mesos using ZooKeeper: sc <- spark_connect(master = "mesos://host:port") The MESOS_NATIVE_JAVA_LIBRARY environment variable needs to be set by your system administrator or manually set when you are running Mesos on your local machine. For instance, in macOS, you can install and initialize Mesos from a terminal, followed by manually setting the mesos library and connecting with spark_connect(): brew install mesos /usr/local/Cellar/mesos/1.6.1/sbin/mesos-master --registry=in_memory --ip=127.0.0.1 MESOS_WORK_DIR=. /usr/local/Cellar/mesos/1.6.1/sbin/mesos-slave --master=127.0.0.1:5050 Sys.setenv(MESOS_NATIVE_JAVA_LIBRARY = "/usr/local/Cellar/mesos/1.6.1/lib/libmesos.dylib") sc <- spark_connect(master = "mesos://localhost:5050", spark_home = spark_home_dir())

7.7 Kubernetes

Kubernetes clusters do not support client modes like Mesos or YARN; instead, the connection model is similar to YARN cluster, where the driver node is assigned by Kubernetes, as illustrated in Figure 7.9. 
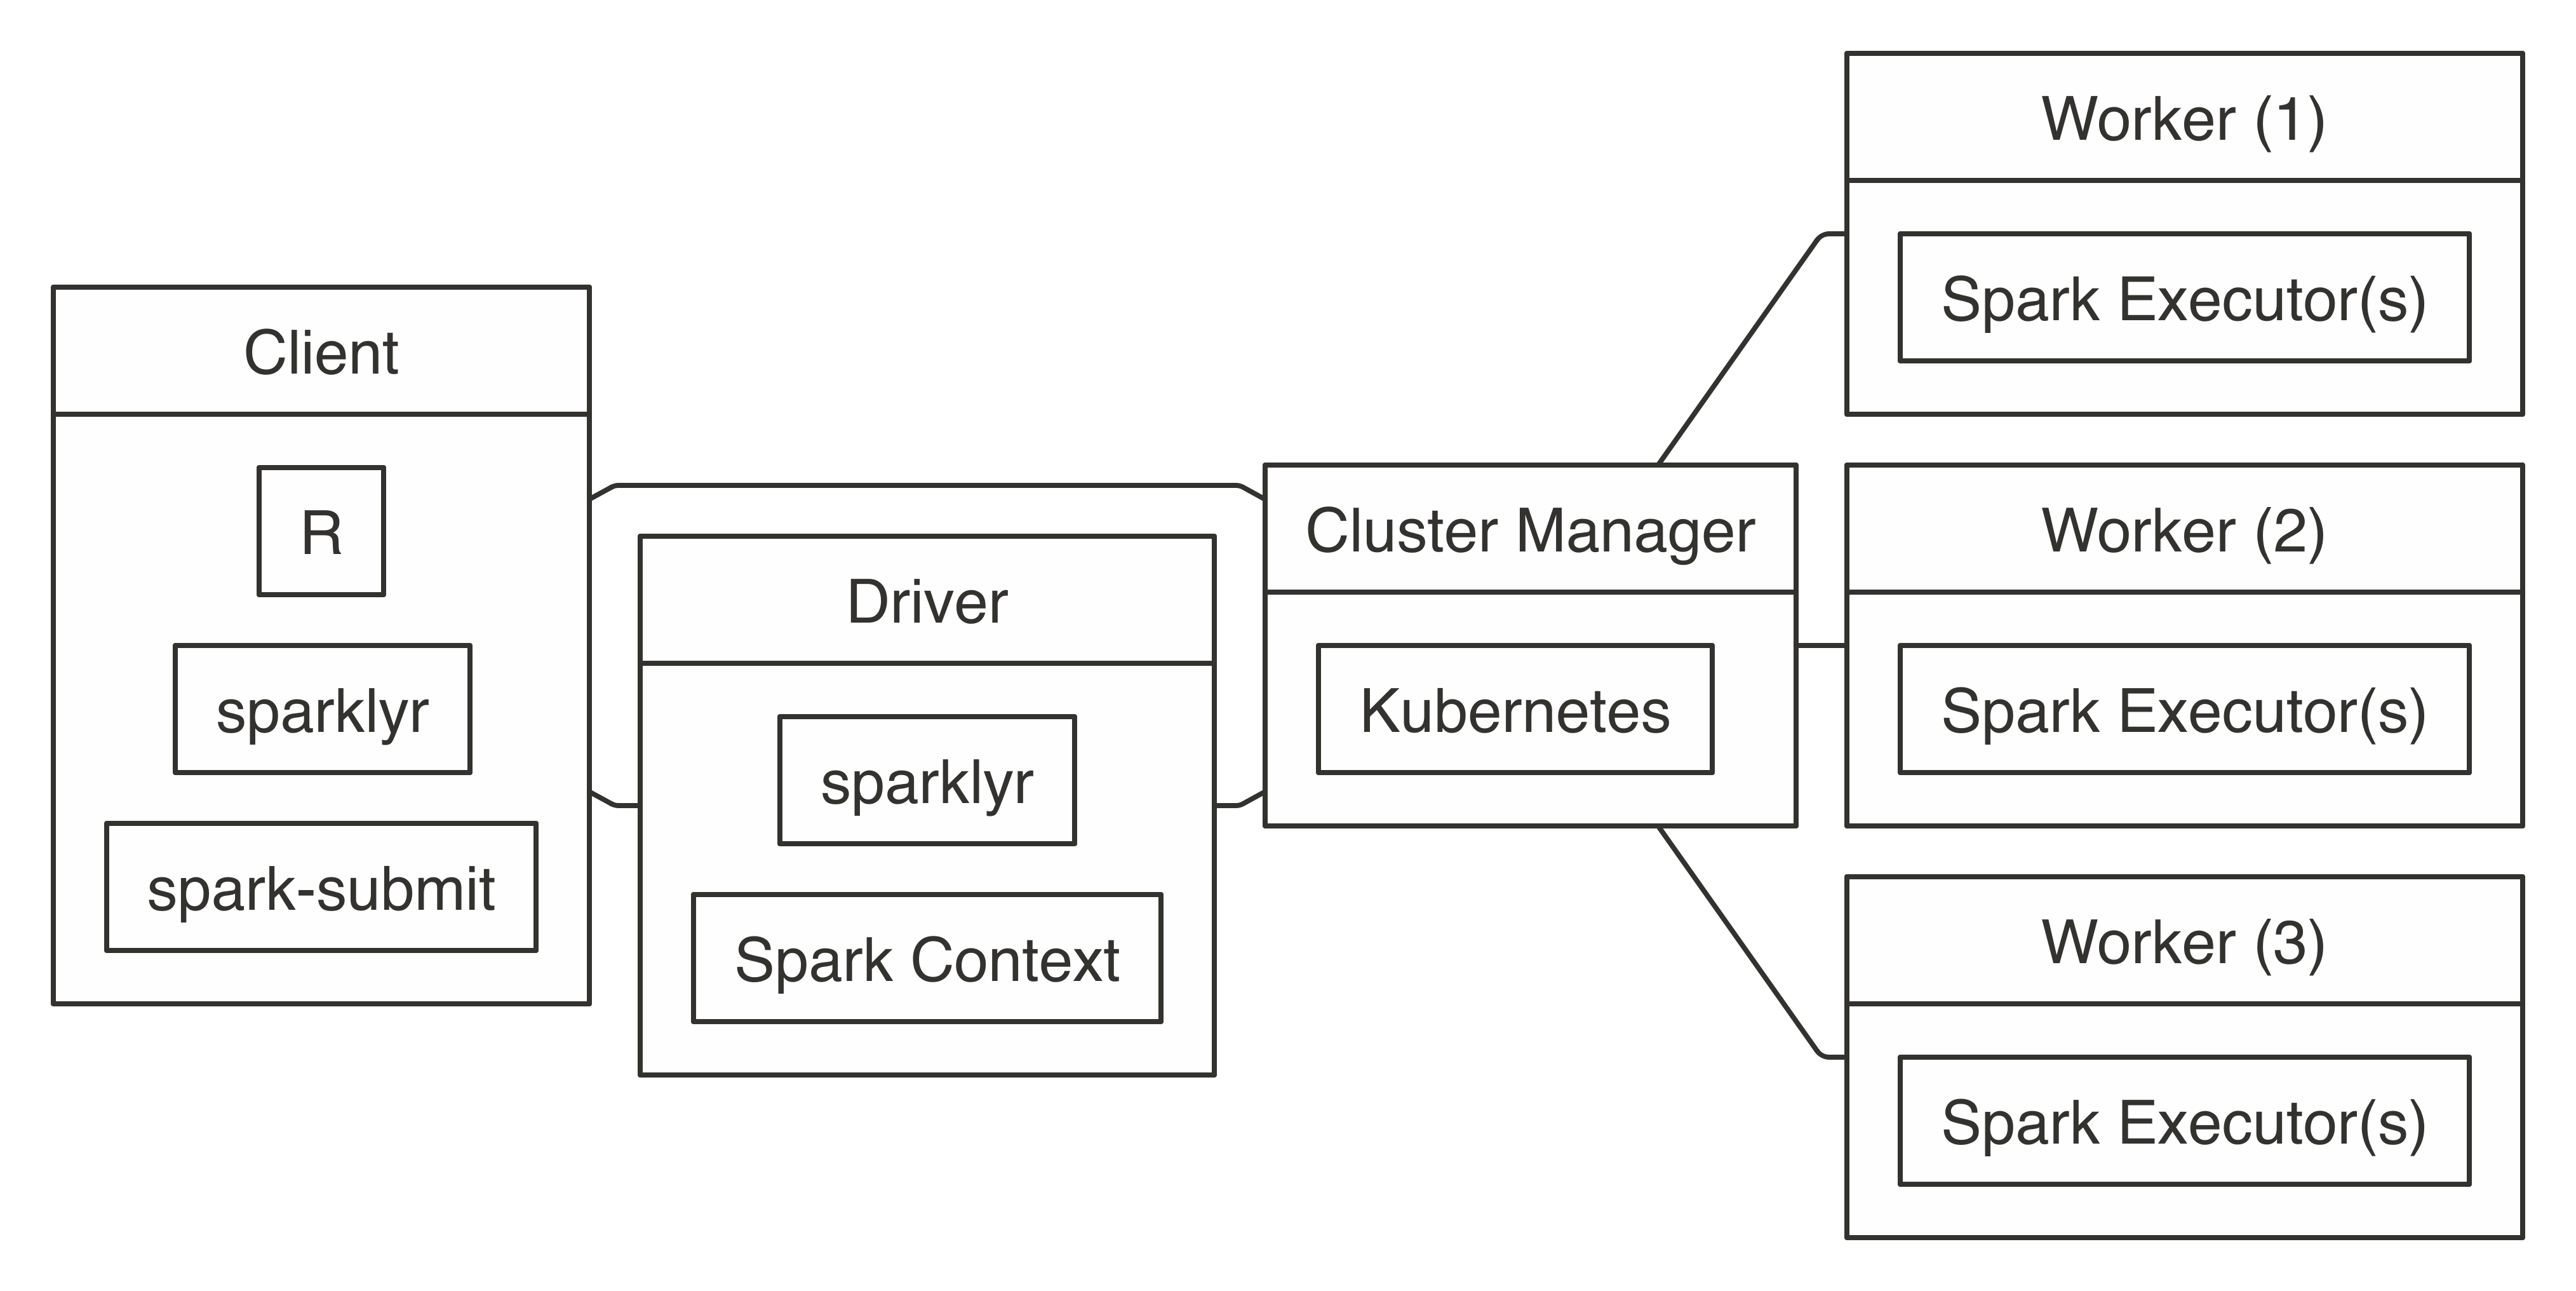
FIGURE 7.9: Kubernetes connection diagram To use Kubernetes, you will need to prepare a virtual machine with Spark installed and properly configured; however, it is beyond the scope of this book to present how to create one. Once created, connecting to Kubernetes works as follows: library(sparklyr) sc <- spark_connect(config = spark_config_kubernetes( "k8s://https://<apiserver-host>:<apiserver-port>", account = "default", image = "docker.io/owner/repo:version", version = "2.3.1")) If your computer is already configured to use a Kubernetes cluster, you can use the following command to find the apiserver-host and apiserver-port: system2("kubectl", "cluster-info")

7.8 Cloud

When you are working with cloud providers, there are a few connection differences. For instance, connecting from Databricks requires the following connection method: sc <- spark_connect(method = "databricks") Since Amazon EMR makes use of YARN, you can connect using master = "yarn": sc <- spark_connect(master = "yarn") Connecting to Spark when using IBM’s Watson Studio requires you to retrieve a configuration object through a load_spark_kernels() function that IBM provides: kernels <- load_spark_kernels() sc <- spark_connect(config = kernels[2]) In Microsoft Azure HDInsights and when using ML Services (R Server), a Spark connection is initialized as follows: library(RevoScaleR) cc <- rxSparkConnect(reset = TRUE, interop = "sparklyr") sc <- rxGetSparklyrConnection(cc) Connecting from Qubole requires using the qubole connection method: sc <- spark_connect(method = "qubole") Refer to your cloud provider’s documentation and support channels if you need help.

7.9 Batches

Most of the time, you use sparklyr interactively; that is, you explicitly connect with spark_connect() and then execute commands to analyze and model large-scale data. However, you can also automate processes by scheduling Spark jobs that use sparklyr. Spark does not provide tools to schedule data-processing tasks; instead, you would use other workflow management tools. This can be useful to transform data, prepare a model and score data overnight, or to make use of Spark by other systems. As an example, you can create a file named batch.R with the following contents: library(sparklyr) sc <- spark_connect(master = "local") sdf_len(sc, 10) %>% spark_write_csv("batch.csv") spark_disconnect(sc) You can then submit this application to Spark in batch mode using spark_submit(), the master parameter should be set to the appropriately. spark_submit(master = "local", "batch.R") You can also invoke spark-submit from the shell directly through the following: /spark-home-path/spark-submit --class sparklyr.Shell '/spark-jars-path/sparklyr-2.3-2.11.jar' 8880 12345 --batch /path/to/batch.R The last parameters represent the port number 8880 and the session number 12345, which you can set to any unique numeric identifier. You can use the following R code to get the correct paths: # Retrieve spark-home-path spark_home_dir() # Retrieve spark-jars-path system.file("java", package = "sparklyr") You can customize your script by passing additional command-line arguments to spark-submit and then read them back in R using commandArgs().

7.10 Tools

When connecting to a Spark cluster using tools like Jupyter and RStudio, you can run the same connection parameters presented in this chapter. However, since many cloud providers make use of a web proxy to secure Spark’s web interface, to use spark_web() or the RStudio Connections pane extension, you need to properly configure the sparklyr.web.spark setting, which you would then pass to spark_config() through the config parameter. For instance, when using Amazon EMR, you can configure sparklyr.web.spark and sparklyr.web.yarn by dynamically retrieving the YARN application and building the EMR proxy URL: domain <- "http://ec2-12-345-678-9.us-west-2.compute.amazonaws.com" config <- spark_config() config$sparklyr.web.spark <- ~paste0( domain, ":20888/proxy/", invoke(spark_context(sc), "applicationId")) config$sparklyr.web.yarn <- paste0(domain, ":8088") sc <- spark_connect(master = "yarn", config = config)

7.11 Multiple

It is common to connect once, and only once, to Spark. However, you can also open multiple connections to Spark by connecting to different clusters or by specifying the app_name parameter. This can be helpful to compare Spark versions or validate your analysis before submitting to the cluster. The following example opens connections to Spark 1.6.3, 2.3.0 and Spark Standalone: # Connect to local Spark 1.6.3 sc_16 <- spark_connect(master = "local", version = "1.6") # Connect to local Spark 2.3.0 sc_23 <- spark_connect(master = "local", version = "2.3", appName = "Spark23") # Connect to local Spark Standalone sc_standalone <- spark_connect(master = "spark://host:port") Finally, you can disconnect from each connection: spark_disconnect(sc_1_6_3) spark_disconnect(sc_2_3_0) spark_disconnect(sc_standalone) Alternatively, you can disconnect from all connections at once: spark_disconnect_all()

7.12 Troubleshooting

Last but not least, we introduce the following troubleshooting techniques: Logging, Spark Submit, and Windows. When in doubt about where to begin, start with the Windows section when using Windows systems, followed by Logging and finally Spark Submit. These techniques are useful when running spark_connect() fails with an error message.

7.12.1 Logging

The first technique to troubleshoot connections is to print Spark logs directly to the console to help you spot additional error messages: sc <- spark_connect(master = "local", log = "console") In addition, you can enable verbose logging by setting the sparklyr.verbose option to TRUE when connecting: sc <- spark_connect(master = "local", log = "console", config = list(sparklyr.verbose = TRUE))

7.12.2 Spark Submit

You can diagnose whether a connection issue is specific to R or Spark in general by running an example job through spark-submit and validating that no errors are thrown: # Find the spark directory using an environment variable spark_home <- Sys.getenv("SPARK_HOME") # Or by getting the local spark installation spark_home <- sparklyr::spark_home_dir() Then, execute the sample compute Pi example by replacing “local” with the correct master parameter that you are troubleshooting: # Launching a sample application to compute Pi system2( file.path(spark_home, "bin", "spark-submit"), c( "--master", "local", "--class", "org.apache.spark.examples.SparkPi", dir(file.path(spark_home, "examples", "jars"), pattern = "spark-examples", full.names = TRUE), 100), stderr = FALSE ) Pi is roughly 3.1415503141550314 If the preceding message is not displayed, you will need to investigate why your Spark cluster is not properly configured, which is beyond the scope of this book. As a start, rerun the Pi example but remove stderr = FALSE; this prints errors to the console, which you then can use to investigate what the problem might be. When using a cloud provider or a Spark distribution, you can contact their support team to help you troubleshoot this further; otherwise, Stack Overflow is a good place to start. If you do see the message, this means that your Spark cluster is properly configured but somehow R is not able to use Spark, so you need to troubleshoot in detail, as we will explain next.

7.12.2.1 Detailed

To troubleshoot the connection process in detail, you can manually replicate the two-step connection process, which is often very helpful to diagnose connection issues. First, spark-submit is triggered from R, which submits the application to Spark; second, R connects to the running Spark application. First, identify the Spark installation directory and the path to the correct sparklyr*.jar file by running the following: dir(system.file("java", package = "sparklyr"), pattern = "sparklyr", full.names = T) Ensure that you identify the correct version that matches your Spark cluster—for instance, sparklyr-2.1-2.11.jar for Spark 2.1. Then, from the terminal, run this: $SPARK_HOME/bin/spark-submit --class sparklyr.Shell $PATH_TO_SPARKLYR_JAR 8880 42 18/06/11 12:13:53 INFO sparklyr: Session (42) found port 8880 is available 18/06/11 12:13:53 INFO sparklyr: Gateway (42) is waiting for sparklyr client to connect to port 8880 The parameter 8880 represents the default port to use in sparklyr, while 42 is the session number, which is a cryptographically secure number generated by sparklyr, but for troubleshooting purposes can be as simple as 42. If this first connection step fails, it means that the cluster can’t accept the application. This usually means that there are not enough resources, or there are permission restrictions. The second step is to connect from R as follows (notice that there is a 60-second timeout, so you’ll need to run the R command after running the terminal command; if needed, you can configure this timeout as described in Chapter 9): library(sparklyr) sc <- spark_connect(master = "sparklyr://localhost:8880/42", version = "2.3") If this second connection step fails, it usually means that there is a connectivity problem between R and the driver node. You can try using a different connection port, for instance.

7.12.3 Windows

Connecting from Windows is, in most cases, as straightforward as connecting from Linux and macOS. However, there are a few common connection issues that you should be aware of:

7.13 Recap

This chapter presented an overview of Spark’s architecture, connection concepts, and examples to connect in local mode, standalone, YARN, Mesos, Kubernetes, and Livy. It also presented edge nodes and their role while connecting to Spark clusters. This should have provided you with enough information to successfully connect to any Apache Spark cluster. To troubleshoot connection problems beyond the techniques described in this chapter, we recommend that you search for the connection problem in Stack Overflow, the sparklyr issues GitHub page, and, if needed, open a new GitHub issue in sparklyr to assist further. In <<data>>, we cover how to use Spark to read and write from a variety of data sources and formats, which allows you to be more agile when adding new data sources for data analysis. What used to take days, weeks, or even months, you now can complete in hours by embracing data lakes.

Chapter 8 Data

With the knowledge acquired in previous chapters, you are now equipped to start doing analysis and modeling at scale! So far, however, we haven’t really explained much about how to read data into Spark. We’ve explored how to use copy_to() to upload small datasets or functions like spark_read_csv() or spark_write_csv() without explaining in detail how and why. So, you are about to learn how to read and write data using Spark. And, while this is important on its own, this chapter will also introduce you to the data lake—a repository of data stored in its natural or raw format that provides various benefits over existing storage architectures. For instance, you can easily integrate data from external systems without transforming it into a common format and without assuming those sources are as reliable as your internal data sources. In addition, we will also discuss how to extend Spark’s capabilities to work with data not accessible out of the box and make several recommendations focused on improving performance for reading and writing data. Reading large datasets often requires you to fine-tune your Spark cluster configuration, but that’s the topic of Chapter 9.

8.1 Overview

In Chapter 1, you learned that beyond big data and big compute, you can also use Spark to improve velocity, variety, and veracity in data tasks. While you can use the learnings of this chapter for any task requiring loading and storing data, it is particularly interesting to present this chapter in the context of dealing with a variety of data sources. To understand why, we should first take a quick detour to examine how data is currently processed in many organizations. For several years, it’s been a common practice to store large datasets in a relational database, a system first proposed in 1970 by Edgar F. Codd. You can think of a database as a collection of tables that are related to one another, where each table is carefully designed to hold specific data types and relationships to other tables. Most relational database systems use Structured Query Language (SQL) for querying and maintaining the database. Databases are still widely used today, with good reason: they store data reliably and consistently; in fact, your bank probably stores account balances in a database and that’s a good practice. However, databases have also been used to store information from other applications and systems. For instance, your bank might also store data produced by other banks, such as incoming checks. To accomplish this, the external data needs to be extracted from the external system, transformed into something that fits the current database, and finally be loaded into it. This is known as Extract, Transform, and Load (ETL), a general procedure for copying data from one or more sources into a destination system that represents the data differently from the source. The ETL process became popular in the 1970s. Aside from databases, data is often also loaded into a data warehouse, a system used for reporting and data analysis. The data is usually stored and indexed in a format that increases data analysis speed but that is often not suitable for modeling or running custom distributed code. The challenge is that changing databases and data warehouses is usually a long and delicate process, since data needs to be reindexed and the data from multiple data sources needs to be carefully transformed into single tables that are shared across data sources. Instead of trying to transform all data sources into a common format, you can embrace this variety of data sources in a data lake, a system or repository of data stored in its natural format (see Figure 8.1). Since data lakes make data available in its original format, there is no need to carefully transform it in advance; anyone can use it for analysis, which adds significant flexibility over ETL. You then can use Spark to unify data processing from data lakes, databases, and data warehouses through a single interface that is scalable across all of them. Some organizations also use Spark to replace their existing ETL process; however, this falls in the realm of data engineering, which is well beyond the scope of this book. We illustrate this with dotted lines in Figure 8.1. 
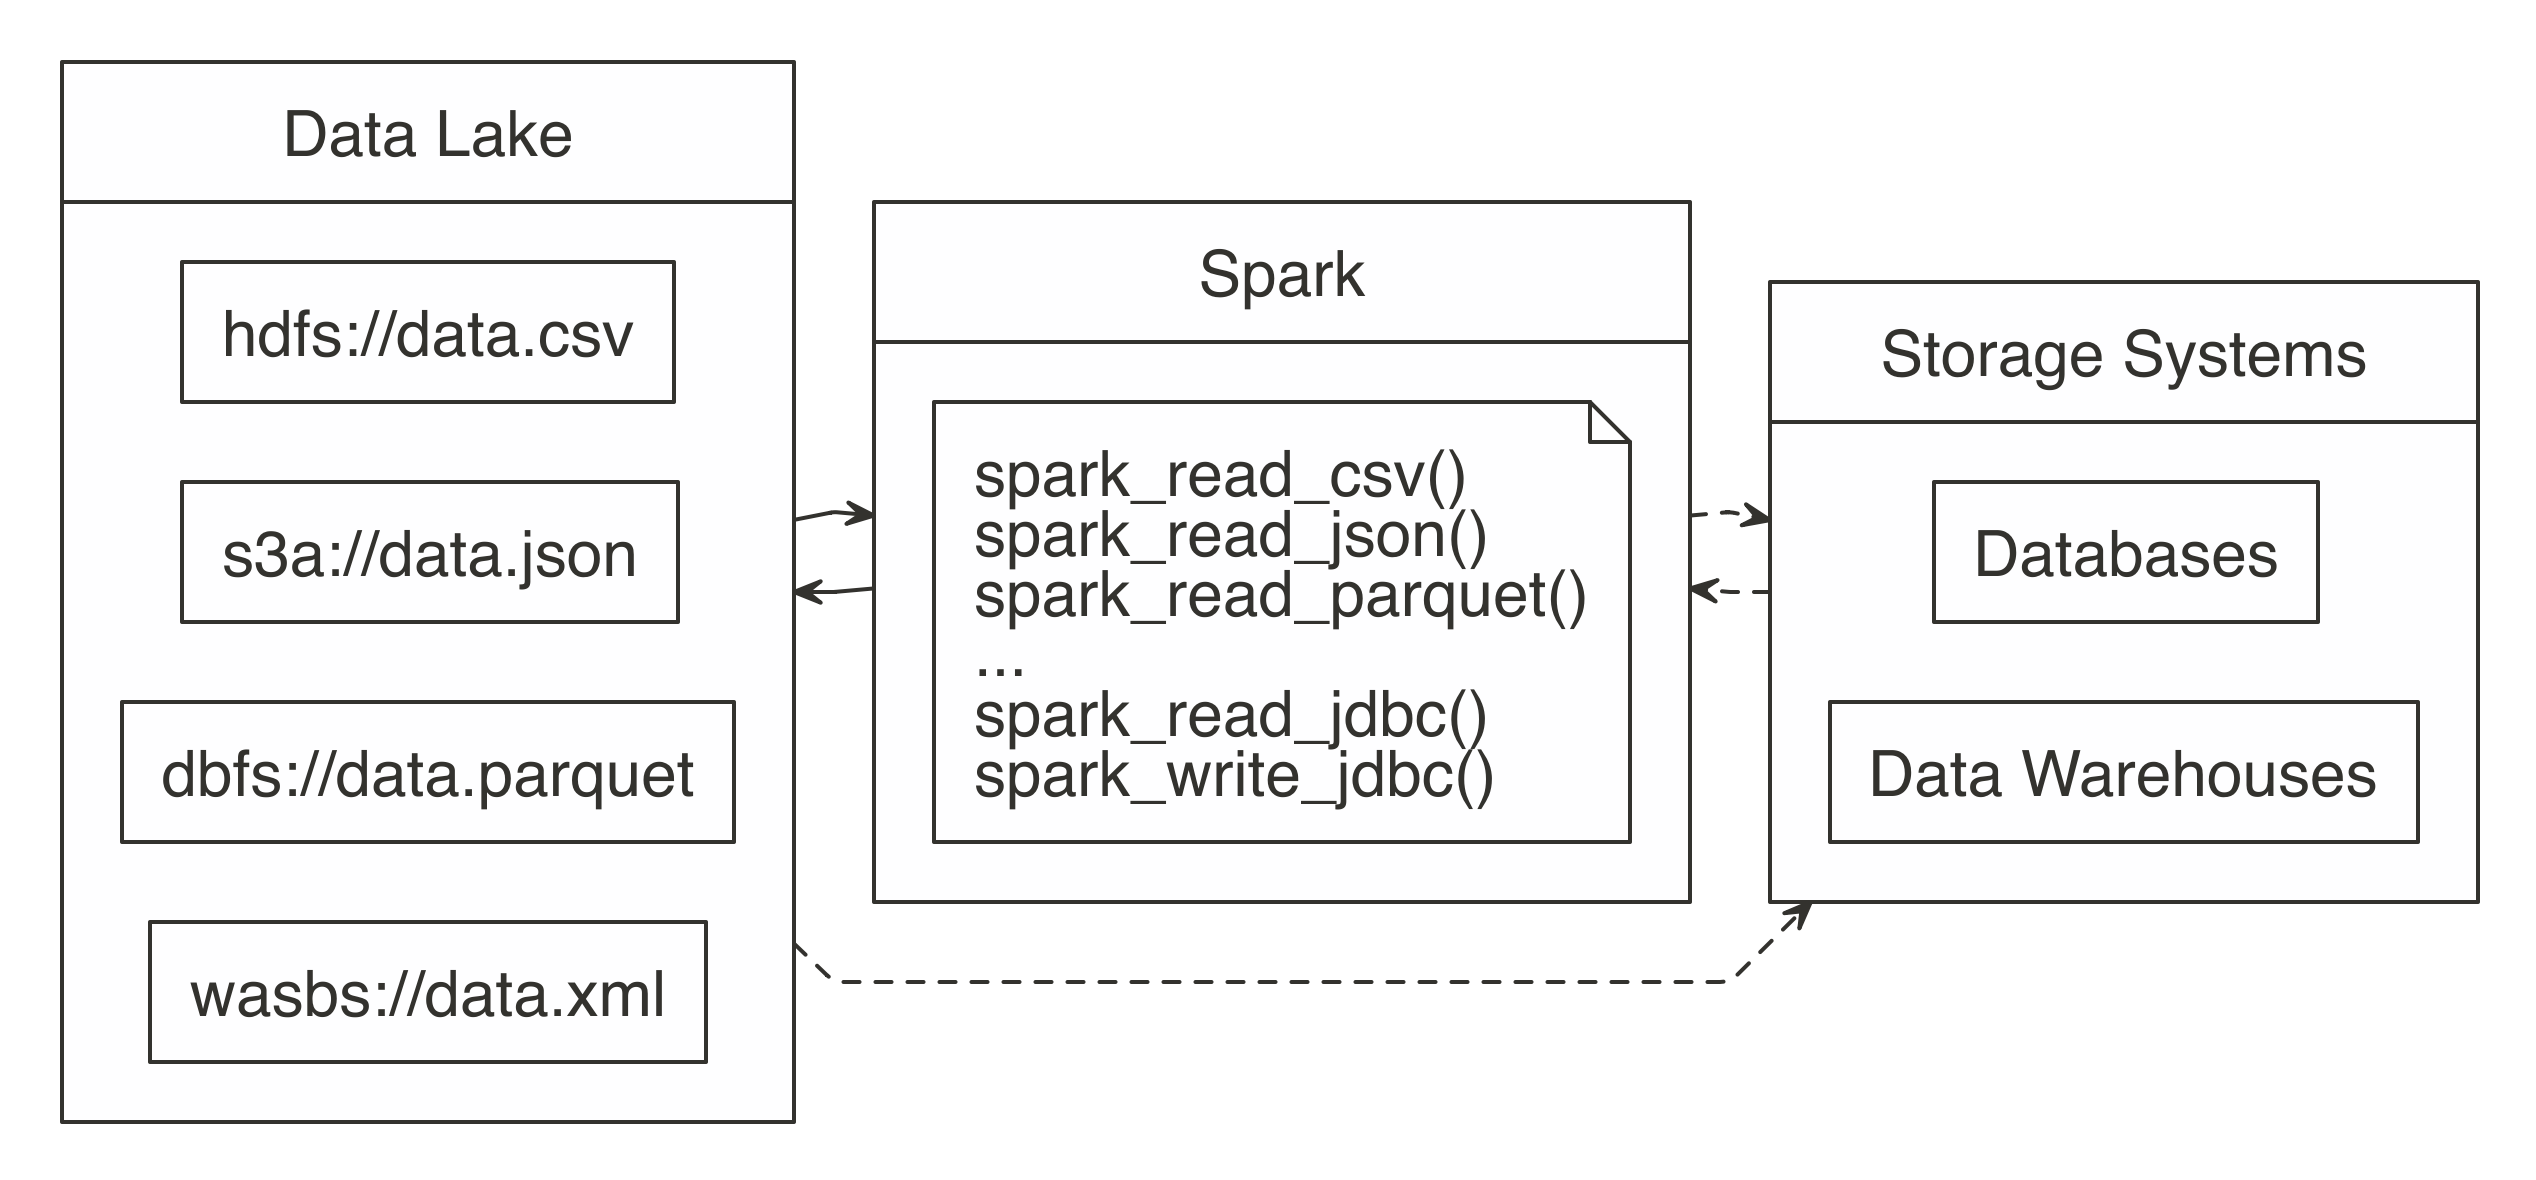
FIGURE 8.1: Spark processing raw data from a data lakes, databases, and data warehouses In order to support a broad variety of data source, Spark needs to be able to read and write data in several different file formats (CSV, JSON, Parquet, etc), access them while stored in several file systems (HDFS, S3, DBFS, etc) and, potentially, interoperate with other storage systems (databases, data warehouses, etc). We will get to all of that; but first, we will start by presenting how to read, write and copy data using Spark.

8.2 Reading Data

To support a broad variety of data sources, Spark needs to be able to read and write data in several different file formats (CSV, JSON, Parquet, and others), and access them while stored in several file systems (HDFS, S3, DBFS, and more) and, potentially, interoperate with other storage systems (databases, data warehouses, etc.). We will get to all of that, but first, we will start by presenting how to read, write, and copy data using Spark.

8.2.1 Paths

If you are new to Spark, it is highly recommended to review this section before you start working with large datasets. We will introduce several techniques that improve the speed and efficiency of reading data. Each subsection presents specific ways to take advantage of how Spark reads files, such as the ability to treat entire folders as datasets as well as being able to describe them to read datasets faster in Spark. letters <- data.frame(x = letters, y = 1:length(letters)) dir.create("data-csv") write.csv(letters[1:3, ], "data-csv/letters1.csv", row.names = FALSE) write.csv(letters[1:3, ], "data-csv/letters2.csv", row.names = FALSE) do.call("rbind", lapply(dir("data-csv", full.names = TRUE), read.csv)) x y 1 a 1 2 b 2 3 c 3 4 a 1 5 b 2 6 c 3 In Spark, there is the notion of a folder as a dataset. Instead of enumerating each file, simply pass the path containing all the files. Spark assumes that every file in that folder is part of the same dataset. This implies that the target folder should be used only for data purposes. This is especially important since storage systems like HDFS store files across multiple machines, but, conceptually, they are stored in the same folder; when Spark reads the files from this folder, it’s actually executing distributed code to read each file within each machine—no data is transferred between machines when distributed files are read: library(sparklyr) sc <- spark_connect(master = "local", version = "2.3") spark_read_csv(sc, "data-csv/") # Source: spark<datacsv> [?? x 2] x y <chr> <int> 1 a 1 2 b 2 3 c 3 4 d 4 5 e 5 6 a 1 7 b 2 8 c 3 9 d 4 10 e 5 The “folder as a table” idea is found in other open source technologies as well. Under the hood, Hive tables work the same way. When you query a Hive table, the mapping is done over multiple files within the same folder. The folder’s name usually matches the name of the table visible to the user. Next, we will present a technique that allows Spark to read files faster as well as to reduce read failures by describing the structure of a dataset in advance.

8.2.2 Schema

When reading data, Spark is able to determine the data source’s column names and column types, also known as the schema. However, guessing the schema comes at a cost; Spark needs to do an initial pass on the data to guess what it is. For a large dataset, this can add a significant amount of time to the data ingestion process, which can become costly even for medium-size datasets. For files that are read over and over again, the additional read time accumulates over time. To avoid this, Spark allows you to provide a column definition by providing a columns argument to describe your dataset. You can create this schema by sampling a small portion of the original file yourself: spec_with_r <- sapply(read.csv("data-csv/letters1.csv", nrows = 10), class) spec_with_r x y "factor" "integer" Or, you can set the column specification to a vector containing the column types explicitly. The vector’s values are named to match the field names: spec_explicit <- c(x = "character", y = "numeric") spec_explicit x y "character" "numeric" The accepted variable types are: integer, character, logical, double, numeric, factor, Date, and POSIXct. Then, when reading using spark_read_csv(), you can pass spec_with_r to the columns argument to match the names and types of the original file. This helps to improve performance since Spark will not need to determine the column types. spark_read_csv(sc, "data-csv/", columns = spec_with_r) # Source: spark<datacsv> [?? x 2] x y <chr> <int> 1 a 1 2 b 2 3 c 3 4 a 1 5 b 2 6 c 3 The following example shows how to set the field type to something different. However, the new field type needs to be a compatible type in the original dataset. For example, you cannot set a character field to numeric. If you use an incompatible type, the file read will fail with an error. Additionally, the following example also changes the names of the original fields: spec_compatible <- c(my_letter = "character", my_number = "character") spark_read_csv(sc, "data-csv/", columns = spec_compatible) # Source: spark<datacsv> [?? x 2] my_letter my_number <chr> <chr> 1 a 1 2 b 2 3 c 3 4 a 1 5 b 2 6 c 3 In Spark, malformed entries can cause errors during reading, particularly for non-character fields. To prevent such errors, we can use a file specification that imports them as characters and then use dplyr to coerce the field into the desired type. This subsection reviewed how we can read files faster and with fewer failures, which lets us start our analysis more quickly. Another way to accelerate our analysis is by loading less data into Spark memory, which we examine in the next section.

8.2.3 Memory

By default, when using Spark with R, when you read data, it is copied into Spark’s distributed memory, making data analysis and other operations very fast. There are cases, such as when the data is too big, for which loading all the data might not be practical or even necessary. For those cases, Spark can just “map” the files without copying data into memory. The mapping creates a sort of virtual table in Spark. The implication is that when a query runs against that table, Spark needs to read the data from the files at that time. Any consecutive reads after that will do the same. In effect, Spark becomes a pass-through for the data. The advantage of this method is that there is almost no up-front time cost to “reading” the file; the mapping is very fast. The downside is that running queries that actually extract data will take longer. This is controlled by the memory argument of the read functions. Setting it to FALSE prevents the data copy (the default is TRUE): mapped_csv <- spark_read_csv(sc, "data-csv/", memory = FALSE) There are good use cases for this method, one of which is when not all columns of a table are needed. For example, take a very large file that contains many columns. Assuming this is not the first time you interact with this data, you would know what columns are needed for the analysis. When you know which columns you need, the files can be read using memory = FALSE, and then the needed columns can be selected with dplyr. The resulting dplyr variable can then be cached into memory, using the compute() function. This will make Spark query the file(s), pull the selected fields, and copy only that data into memory. The result is an in-memory table that took comparatively less time to ingest: mapped_csv %>% dplyr::select(y) %>% dplyr::compute("test") The next section covers a short technique to make it easier to carry the original field names of imported data.

8.2.4 Columns

Spark 1.6 required that column names be sanitized, so R does that by default. There might be cases when you would like to keep the original names intact, or when working with Spark version 2.0 or above. To do that, set the sparklyr.sanitize.column.names option to FALSE: options(sparklyr.sanitize.column.names = FALSE) copy_to(sc, iris, overwrite = TRUE) # Source: table<iris> [?? x 5] # Database: spark_connection Sepal.Length Sepal.Width Petal.Length Petal.Width Species <dbl> <dbl> <dbl> <dbl> <chr> 1 5.1 3.5 1.4 0.2 setosa 2 4.9 3 1.4 0.2 setosa 3 4.7 3.2 1.3 0.2 setosa 4 4.6 3.1 1.5 0.2 setosa 5 5 3.6 1.4 0.2 setosa 6 5.4 3.9 1.7 0.4 setosa 7 4.6 3.4 1.4 0.3 setosa 8 5 3.4 1.5 0.2 setosa 9 4.4 2.9 1.4 0.2 setosa 10 4.9 3.1 1.5 0.1 setosa # ... with more rows With this review of how to read data into Spark, we move on to look at how we can write data from our Spark session.

8.3 Writing Data

Some projects require that new data generated in Spark be written back to a remote source. For example, the data could be new predicted values returned by a Spark model. The job processes the mass generation of predictions, but then the predictions need to be stored. This section focuses on how you should use Spark for moving the data from Spark into an external destination. Many new users start by downloading Spark data into R, and then upload it to a target, as illustrated in Figure 8.2. It works for smaller datasets, but it becomes inefficient for larger ones. The data typically grows in size to the point that it is no longer feasible for R to be the middle point. FIGURE 8.2: Incorrect use of Spark when writing large datasets All efforts should be made to have Spark connect to the target location. This way, reading, processing, and writing happens within the same Spark session. As Figure 8.3 shows, a better approach is to use Spark to read, process, and write to the target. This approach is able to scale as big as the Spark cluster allows, and prevents R from becoming a choke point. FIGURE 8.3: Correct use of Spark when writing large datasets Consider the following scenario: a Spark job just processed predictions for a large dataset, resulting in a considerable amount of predictions. Choosing a method to write results will depend on the technology infrastructure you are working on. More specifically, it will depend on Spark and the target running, or not, in the same cluster. Back to our scenario, we have a large dataset in Spark that needs to be saved. When Spark and the target are in the same cluster, copying the results is not a problem; the data transfer is between RAM and disk of the same cluster or efficiently shuffled through a high-bandwidth connection. But what to do if the target is not within the Spark cluster? There are two options, and choosing one will depend on the size of the data and network speed:
Spark transfer
In this case, Spark connects to the remote target location and copies the new data. If this is done within the same datacenter, or cloud provider, the data transfer could be fast enough to have Spark write the data directly.
External transfer and otherwise
Spark can write the results to disk and transfers them via a third-party application. Spark writes the results as files and then a separate job copies the files over. In the target location, you would use a separate process to transfer the data into the target location. It is best to recognize that Spark, R, and any other technology are tools. No tool can do everything, nor should be expected to. Next we will describe how to copy data into Spark or collect large datasets that don’t fit in-memory, this can be used to transfer data across clusters, or help initialize your distributed datasets.

8.4 Copy

Previous chapters used copy_to() as a handy helper to copy data into Spark; however, you can use copy_to() only to transfer in-memory datasets that are already loaded in memory. These datasets tend to be much smaller than the kind of datasets you would want to copy into Spark. For instance, suppose that we have a 3 GB dataset generated as follows: dir.create("largefile.txt") write.table(matrix(rnorm(10 * 10^6), ncol = 10), "largefile.txt/1", append = T, col.names = F, row.names = F) for (i in 2:30) file.copy("largefile.txt/1", paste("largefile.txt/", i)) If we had only 2 GB of memory in the driver node, we would not be able to load this 3 GB file into memory using copy_to(). Instead, when using the HDFS as storage in your cluster, you can use the hadoop command-line tool to copy files from disk into Spark from the terminal as follows. Notice that the following code works only in clusters using HDFS, not in local environments. hadoop fs -copyFromLocal largefile.txt largefile.txt You then can read the uploaded file, as described in the File Formats section; for text files, you would run: spark_read_text(sc, "largefile.txt", memory = FALSE) # Source: spark<largefile> [?? x 1] line <chr> 1 0.0982531064914565 -0.577567317599452 -1.66433938237253 -0.20095089489… 2 -1.08322304504007 1.05962389624635 1.1852771207729 -0.230934710049462 … 3 -0.398079835552421 0.293643382374479 0.727994248743204 -1.571547990532… 4 0.418899768227183 0.534037617828835 0.921680317620166 -1.6623094393911… 5 -0.204409401553028 -0.0376212693728992 -1.13012269711811 0.56149527218… 6 1.41192628218417 -0.580413572014808 0.727722566256326 0.5746066486689 … 7 -0.313975036262443 -0.0166426329807508 -0.188906975208319 -0.986203251… 8 -0.571574679637623 0.513472254005066 0.139050812059352 -0.822738334753… 9 1.39983023148955 -1.08723592838627 1.02517804413913 -0.412680186313667… 10 0.6318328148434 -1.08741784644221 -0.550575696474202 0.971967251067794… # … with more rows collect() has a similar limitation in that it can collect only datasets that fit your driver memory; however, if you had to extract a large dataset from Spark through the driver node, you could use specialized tools provided by the distributed storage. For HDFS, you would run the following: hadoop fs -copyToLocal largefile.txt largefile.txt Alternatively, you can also collect datasets that don’t fit in memory by providing a callback to collect(). A callback is just an R function that will be called over each Spark partition. You then can write this dataset to disk or push to other clusters over the network. You could use the following code to collect 3 GB even if the driver node collecting this dataset had less than 3 GB of memory. That said, as Chapter 3 explains, you should avoid collecting large datasets into a single machine since this creates a significant performance bottleneck. For conciseness, we will collect only the first million rows; feel free to remove head(10^6) if you have a few minutes to spare: dir.create("large") spark_read_text(sc, "largefile.txt", memory = FALSE) %>% head(10^6) %>% collect(callback = function(df, idx) { writeLines(df$line, paste0("large/large-", idx, ".txt")) }) Make sure you clean up these large files and empty your recycle bin as well: unlink("largefile.txt", recursive = TRUE) unlink("large", recursive = TRUE) In most cases, data will already be stored in the cluster, so you should not need to worry about copying large datasets; instead, you can usually focus on reading and writing different file formats, which we describe next.

8.5 File Formats

Out of the box, Spark is able to interact with several file formats, like CSV, JSON, LIBSVM, ORC, and Parquet. Table 8.1 maps the file format to the function you should use to read and write data in Spark.
TABLE 8.1: Spark functions to read and write file formats
FormatReadWrite
Comma separated values (CSV)spark_read_csv()spark_write_csv()
JavaScript Object Notation (JSON)spark_read_json()spark_write_json()
Library for Support Vector Machines (LIBSVM)spark_read_libsvm()spark_write_libsvm()
Optimized Row Columnar (ORC)spark_read_orc()spark_write_orc()
Apache Parquetspark_read_parquet()spark_write_parquet()
Textspark_read_text()spark_write_text()
The following sections will describe special considerations particular to each file format as well as some of the strengths and weaknesses of some popular file formats, starting with the well-known CSV file format.

8.5.1 CSV

The CSV format might be the most common file type in use today. It is defined by a text file separated by a given character, usually a comma. It should be pretty straightforward to read CSV files; however, it’s worth mentioning a couple techniques that can help you process CSVs that are not fully compliant with a well-formed CSV file. Spark offers the following modes for addressing parsing issues:
Permissive
Inserts NULL values for missing tokens
Drop Malformed
Drops lines that are malformed
Fail Fast
Aborts if it encounters any malformed line You can use these in sparklyr by passing them inside the options argument. The following example creates a file with a broken entry. It then shows how it can be read into Spark: ## Creates bad test file writeLines(c("bad", 1, 2, 3, "broken"), "bad.csv") spark_read_csv( sc, "bad3", "bad.csv", columns = list(foo = "integer"), options = list(mode = "DROPMALFORMED")) # Source: spark<bad3> [?? x 1] foo <int> 1 1 2 2 3 3 Spark provides an issue tracking column, which was hidden by default. To enable it, add _corrupt_record to the columns list. You can combine this with the use of the PERMISSIVE mode. All rows will be imported, invalid entries will receive an NA, and the issue will be tracked in the _corrupt_record column: spark_read_csv( sc, "bad2", "bad.csv", columns = list(foo = "integer", "_corrupt_record" = "character"), options = list(mode = "PERMISSIVE") ) # Source: spark<bad2> [?? x 2] foo `_corrupt_record` <int> <chr> 1 1 NA 2 2 NA 3 3 NA 4 NA broken Reading and storing data as CSVs is quite common and supported across most systems. For tabular datasets, it is still a popular option, but for datasets containing nested structures and nontabular data, JSON is usually preferred.

8.5.2 JSON

JSON is a file format originally derived from JavaScript that has grown to be language-independent and very popular due to its flexibility and ubiquitous support. Reading and writing JSON files is quite straightforward: writeLines("{'a':1, 'b': {'f1': 2, 'f3': 3}}", "data.json") simple_json <- spark_read_json(sc, "data.json") simple_json # Source: spark<data> [?? x 2] a b <dbl> <list> 1 1 <list [2]> However, when you deal with a dataset containing nested fields like the one from this example, it is worth pointing out how to extract nested fields. One approach is to use a JSON path, which is a domain-specific syntax commonly used to extract and query JSON files. You can use a combination of get_json_object() and to_json() to specify the JSON path you are interested in. To extract f1 you would run the following transformation: simple_json %>% dplyr::transmute(z = get_json_object(to_json(b), '$.f1')) # Source: spark<?> [?? x 3] a b z <dbl> <list> <chr> 1 1 <list [2]> 2 Another approach is to install sparkly.nested from CRAN with install.packages("sparklyr.nested") and then unnest nested data with sdf_unnest(): sparklyr.nested::sdf_unnest(simple_json, "b") # Source: spark<?> [?? x 3] a f1 f3 <dbl> <dbl> <dbl> 1 1 2 3 While JSON and CSVs are quite simple to use and versatile, they are not optimized for performance; however, other formats like ORC, AVRO, and Parquet are.

8.5.3 Parquet

Apache Parquet, Apache ORC, and Apache AVRO are all file formats designed with performance in mind. Parquet and ORC store data in columnar format, while AVRO is row-based. All of them are binary file formats, which reduces storage space and improves performance. This comes at the cost of making them a bit more difficult to read by external systems and libraries; however, this is usually not an issue when used as intermediate data storage within Spark. To illustrate this, Figure 8.4 plots the result of running a 1-million-row write-speed benchmark using the bench package; feel free to use your own benchmarks over meaningful datasets when deciding which format best fits your needs: numeric <- copy_to(sc, data.frame(nums = runif(10^6))) bench::mark( CSV = spark_write_csv(numeric, "data.csv", mode = "overwrite"), JSON = spark_write_json(numeric, "data.json", mode = "overwrite"), Parquet = spark_write_parquet(numeric, "data.parquet", mode = "overwrite"), ORC = spark_write_parquet(numeric, "data.orc", mode = "overwrite"), iterations = 20 ) %>% ggplot2::autoplot() 
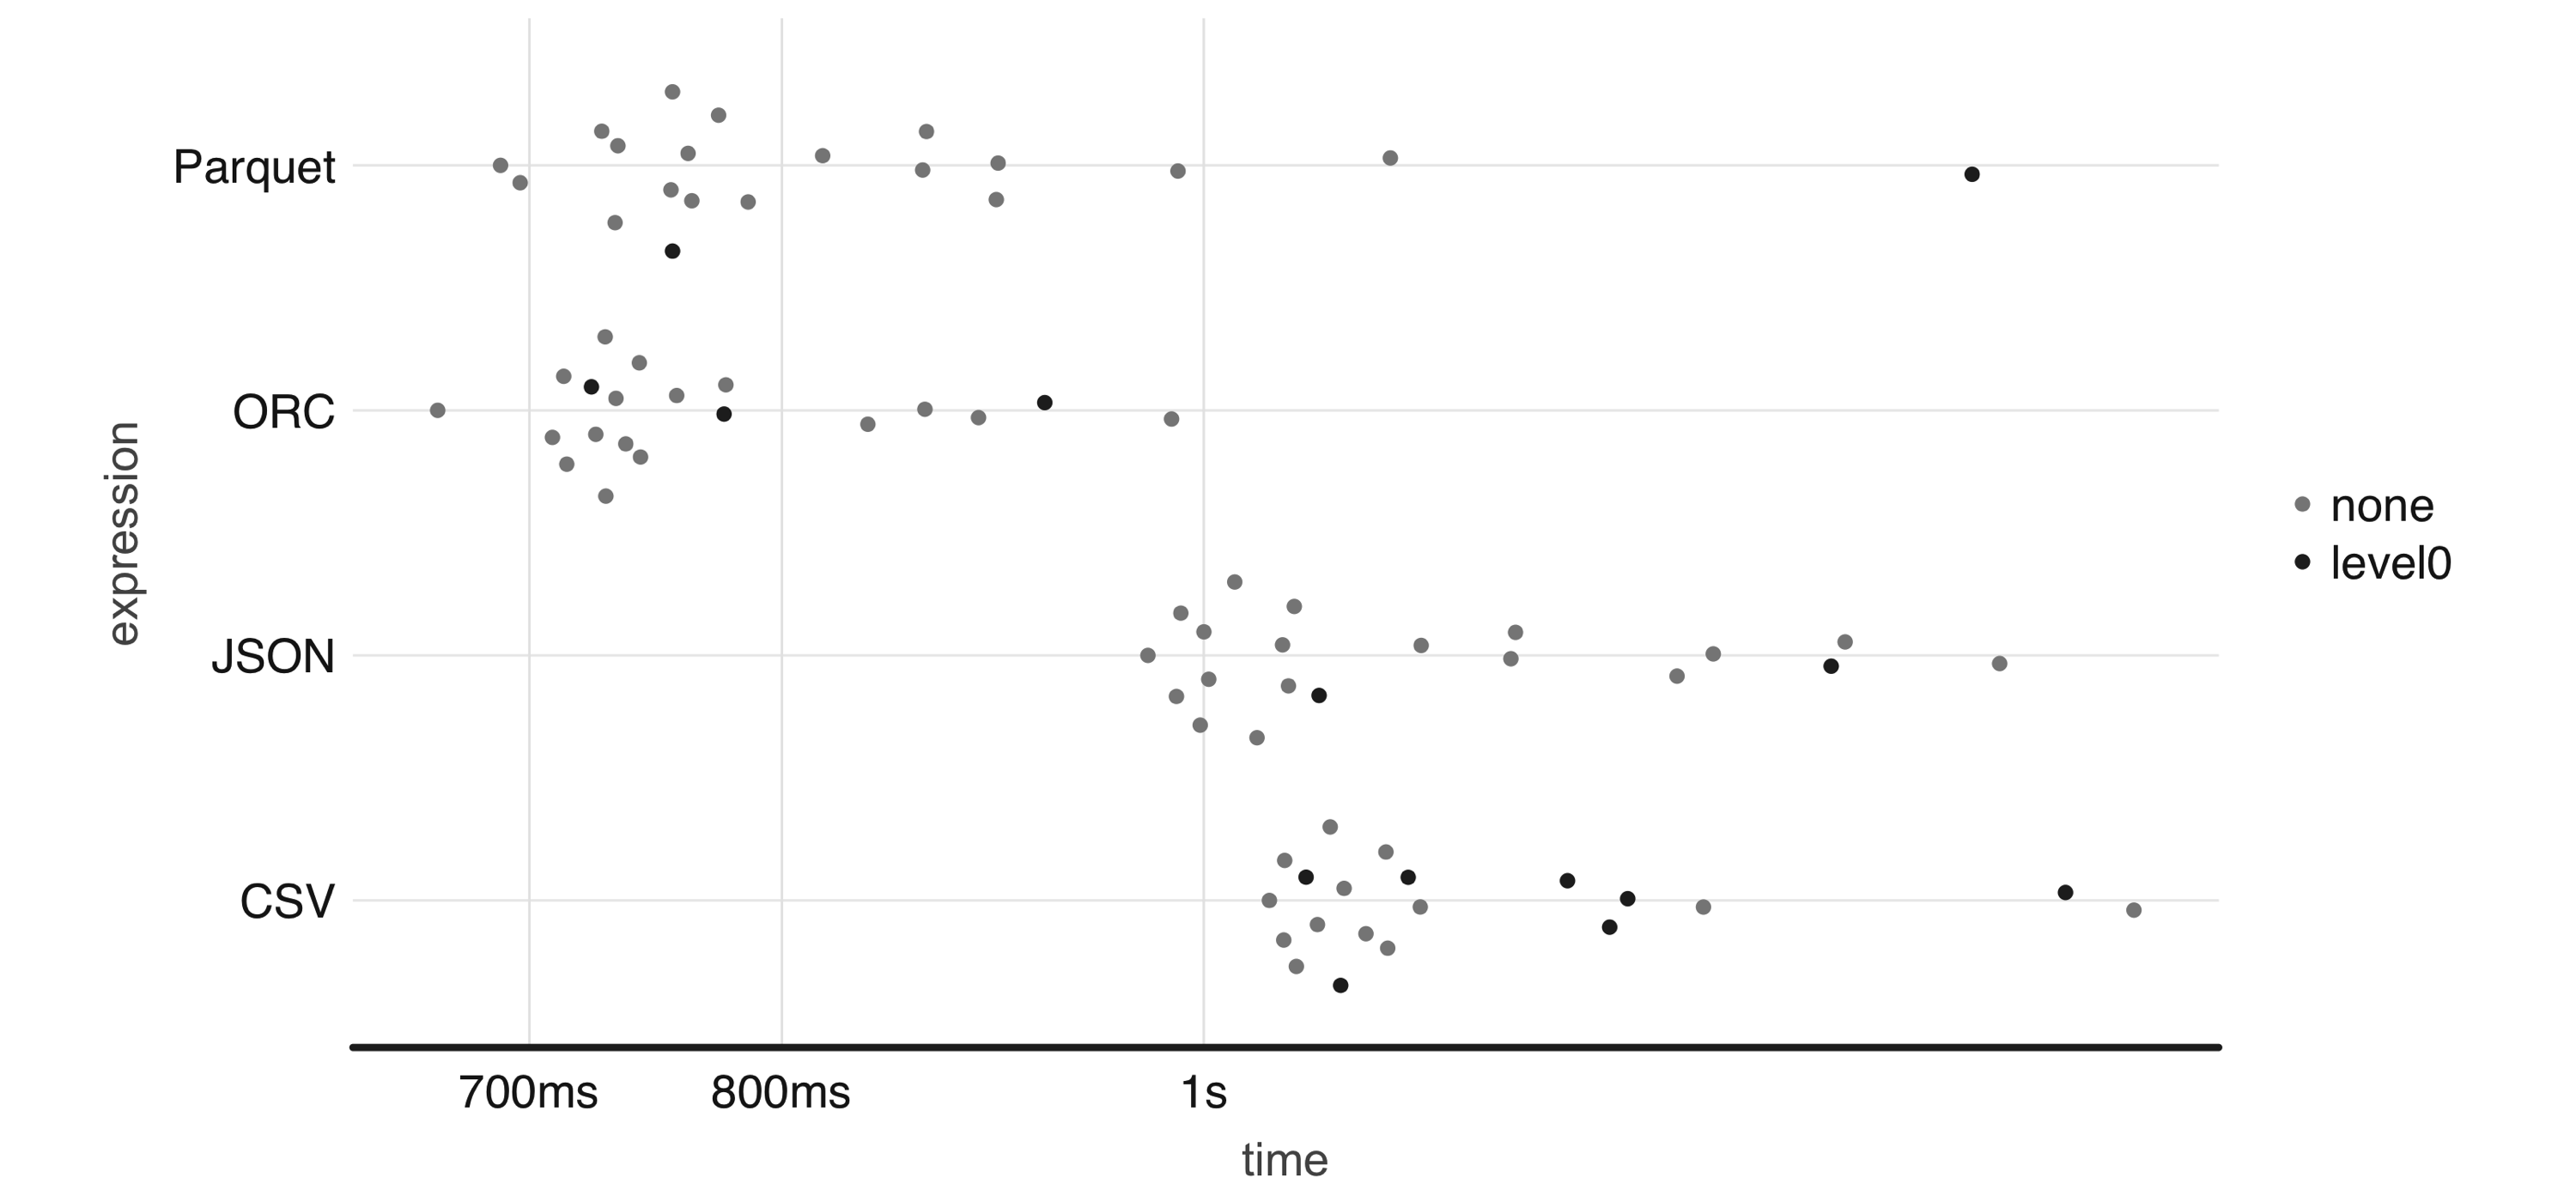
FIGURE 8.4: One-million-rows write benchmark between CSV, JSON, Parquet, and ORC From now on, be sure to disconnect from Spark whenever we present a new spark_connect() command: spark_disconnect(sc) This concludes the introduction to some of the out-of-the-box supported file formats, we will present next how to deal with formats that require external packages and customization.

8.5.4 Others

Spark is a very flexible computing platform. It can add functionality by using extension programs, called packages. You can access a new source type or file system by using the appropriate package. Packages need to be loaded into Spark at connection time. To load the package, Spark needs its location, which could be inside the cluster, in a file share, or the internet. In sparklyr, the package location is passed to spark_connect(). All packages should be listed in the sparklyr.connect.packages entry of the connection configuration. It is possible to access data source types that we didn’t previously list. Loading the appropriate default package for Spark is the first of two steps The second step is to actually read or write the data. The spark_read_source() and spark_write_source() functions do that. They are generic functions that can use the libraries imported by a default package. For instance, we can read XML files as follows: sc <- spark_connect(master = "local", version = "2.3", config = list( sparklyr.connect.packages = "com.databricks:spark-xml_2.11:0.5.0")) writeLines("<ROWS><ROW><text>Hello World</text></ROW>", "simple.xml") spark_read_source(sc, "simple_xml", "simple.xml", "xml") # Source: spark<data> [?? x 1] text <chr> 1 Hello World which you can also write back to XML with ease, as follows: tbl(sc, "simple_xml") %>% spark_write_source("xml", options = list(path = "data.xml")) In addition, there are a few extensions developed by the R community to load additional file formats, such as sparklyr.nested to assist with nested data, spark.sas7bdat to read data from SAS, sparkavro to read data in AVRO format, and sparkwarc to read WARC files, which use extensibility mechanisms introduced in Chapter 10. Chapter 11 presents techniques to use R packages to load additional file formats, and Chapter 13 presents techniques to use Java libraries to complement this further. But first, let’s explore how to retrieve and store files from several different file systems.

8.6 File Systems

Spark defaults to the file system on which it is currently running. In a YARN managed cluster, the default file system will be HDFS. An example path of /home/user/file.csv will be read from the cluster’s HDFS folders, not the Linux folders. The operating system’s file system will be accessed for other deployments, such as Standalone, and sparklyr’s local. The file system protocol can be changed when reading or writing. You do this via the path argument of the sparklyr function. For example, a full path of _file://home/user/file.csv_ forces the use of the local operating system’s file system. There are many other file system protocols, such as _dbfs://_ for Databricks’ file system, _s3a://_ for Amazon’s S3 service, _wasb://_ for Microsoft Azure storage, and _gs://_ for Google storage. Spark does not provide support for all them directly; instead, they are configured as needed. For instance, accessing the “s3a” protocol requires adding a package to the sparklyr.connect.packages configuration setting, while connecting and specifying appropriate credentials might require using the AWS_ACCESS_KEY_ID and AWS_SECRET_ACCESS_KEY environment variables. Sys.setenv(AWS_ACCESS_KEY_ID = my_key_id) Sys.setenv(AWS_SECRET_ACCESS_KEY = my_secret_key) sc <- spark_connect(master = "local", version = "2.3", config = list( sparklyr.connect.packages = "org.apache.hadoop:hadoop-aws:2.7.7")) my_file <- spark_read_csv(sc, "my-file", path = "s3a://my-bucket/my-file.csv") Accessing other file protocols requires loading different packages, although, in some cases, the vendor providing the Spark environment might load the package for you. Please refer to your vendor’s documentation to find out whether that is the case.

8.7 Storage Systems

A data lake and Spark usually go hand-in-hand, with optional access to storage systems like databases and data warehouses. Presenting all the different storage systems with appropriate examples would be quite time-consuming, so instead we present some of the commonly used storage systems. As a start, Apache Hive is a data warehouse software that facilitates reading, writing, and managing large datasets residing in distributed storage using SQL. In fact, Spark has components from Hive built directly into its sources. It is very common to have installations of Spark or Hive side-by-side, so we will start by presenting Hive, followed by Cassandra, and then close by looking at JDBC connections.

8.7.1 Hive

In YARN managed clusters, Spark provides a deeper integration with Apache Hive. Hive tables are easily accessible after opening a Spark connection. You can access a Hive table’s data using DBI by referencing the table in a SQL statement: sc <- spark_connect(master = "local", version = "2.3") spark_read_csv(sc, "test", "data-csv/", memory = FALSE) DBI::dbGetQuery(sc, "SELECT * FROM test limit 10") Another way to reference a table is with dplyr using the tbl() function, which retrieves a reference to the table: dplyr::tbl(sc, "test") It is important to reiterate that no data is imported into R; the tbl() function only creates a reference. You then can pipe more dplyr verbs following the tbl() command: dplyr::tbl(sc, "test") %>% dplyr::group_by(y) %>% dplyr::summarise(totals = sum(y)) Hive table references assume a default database source. Often, the needed table is in a different database within the metastore. To access it using SQL, prefix the database name to the table. Separate them using a period, as demonstrated here: DBI::dbSendQuery(sc, "SELECT * FROM databasename.table") In dplyr, the in_schema() function can be used. The function is used inside the tbl() call: tbl(sc, dbplyr::in_schema("databasename", "table")) You can also use the tbl_change_db() function to set the current session’s default database. Any subsequent call via DBI or dplyr will use the selected name as the default database: tbl_change_db(sc, "databasename") The following examples require additional Spark packages and databases which might be difficult to follow unless you happen to have a JDBC driver or Cassandra database accessible to you. spark_disconnect(sc) Next, we explore a less structured storage system, often referred to as a NoSQL database.

8.7.2 Cassandra

Apache Cassandra is a free and open source, distributed, wide-column store, NoSQL database management system designed to handle large amounts of data across many commodity servers. While there are many other database systems beyond Cassandra, taking a quick look at how Cassandra can be used from Spark will give you insight into how to make use of other database and storage systems like Solr, Redshift, Delta Lake, and others. The following example code shows how to use the datastax:spark-cassandra-connector package to read from Cassandra. The key is to use the org.apache.spark.sql.cassandra library as the source argument. It provides the mapping Spark can use to make sense of the data source. Unless you have a Cassandra database, skip executing the following statement: sc <- spark_connect(master = "local", version = "2.3", config = list( sparklyr.connect.packages = "datastax:spark-cassandra-connector:2.3.1-s_2.11")) spark_read_source( sc, name = "emp", source = "org.apache.spark.sql.cassandra", options = list(keyspace = "dev", table = "emp"), memory = FALSE) One of the most useful features of Spark when dealing with external databases and data warehouses is that Spark can push down computation to the database, a feature known as pushdown predicates. In a nutshell, pushdown predicates improve performance by asking remote databases smart questions. When you execute a query that contains the filter(age > 20) expression against a remote table referenced through spark_read_source() and not loaded in memory, rather than bringing the entire table into Spark, it will be passed to the remote database and only a subset of the remote table is retrieved. While it is ideal to find Spark packages that support the remote storage system, there will be times when a package is not available and you need to consider vendor JDBC drivers.

8.7.3 JDBC

When a Spark package is not available to provide connectivity, you can consider a JDBC connection. JDBC is an interface for the programming language Java, which defines how a client can access a database. It is quite easy to connect to a remote database with spark_read_jdbc(), and spark_write_jdbc(); as long as you have access to the appropriate JDBC driver, which at times is trivial and other times is quite an adventure. To keep this simple, we can briefly consider how a connection to a remote MySQL database could be accomplished. First, you would need to download the appropriate JDBC driver from MySQL’s developer portal and specify this additional driver as a sparklyr.shell.driver-class-path connection option. Since JDBC drivers are Java-based, the code is contained within a JAR (Java ARchive) file. As soon as you’re connected to Spark with the appropriate driver, you can use the jdbc:// protocol to access particular drivers and databases. Unless you are willing to download and configure MySQL on your own, skip executing the following statement: sc <- spark_connect(master = "local", version = "2.3", config = list( "sparklyr.shell.driver-class-path" = "~/Downloads/mysql-connector-java-5.1.41/mysql-connector-java-5.1.41-bin.jar" )) spark_read_jdbc(sc, "person_jdbc", options = list( url = "jdbc:mysql://localhost:3306/sparklyr", user = "root", password = "<password>", dbtable = "person")) If you are a customer of particular database vendors, making use of the vendor-provided resources is usually the best place to start looking for appropriate drivers.

8.8 Recap

This chapter expanded on how and why you should use Spark to connect and process a variety of data sources through a new data storage model known as data lakes—a storage pattern that provides more flexibility than standard ETL processes by enabling you to use raw datasets with, potentially, more information to enrich data analysis and modeling. We also presented best practices for reading, writing, and copying data into and from Spark. We then returned to exploring the components of a data lake: file formats and file systems, with the former representing how data is stored, and the latter where the data is stored. You then learned how to tackle file formats and storage systems that require additional Spark packages, reviewed some of the performance trade-offs across file formats, and learned the concepts required to make use of storage systems (databases and warehouses) in Spark. While reading and writing datasets should come naturally to you, you might still hit resource restrictions while reading and writing large datasets. To handle these situations, Chapter 9 shows you how Spark manages tasks and data across multiple machines, which in turn allows you to further improve the performance of your analysis and modeling tasks.

Chapter 9 Tuning

In previous chapters, we’ve assumed that computation within a Spark cluster works efficiently. While this is true in some cases, it is often necessary to have some knowledge of the operations Spark runs internally to fine-tune configuration settings that will make computations run efficiently. This chapter explains how Spark computes data over large datasets and provides details on how to optimize its operations. For instance, in this chapter you’ll learn how to request more compute nodes and increase the amount of memory, which, if you remember from Chapter 2, defaults to only 2 GB in local instances. You will learn how Spark unifies computation through partitioning, shuffling, and caching. As mentioned a few chapters back, this is the last chapter describing the internals of Spark; after you complete this chapter, we believe that you will have the intermediate Spark skills necessary to be productive at using Spark. In Chapters 10–12 we explore exciting techniques to deal with specific modeling, scaling, and computation problems. However, we must first understand how Spark performs internal computations, what pieces we can control, and why.

9.1 Overview

Spark performs distributed computation by configuring, partitioning, executing, shuffling, caching, and serializing data, tasks, and resources across multiple machines: To illustrate each concept, let’s create three partitions with unordered integers and then sort them using arrange(): data <- copy_to(sc, data.frame(id = c(4, 9, 1, 8, 2, 3, 5, 7, 6)), repartition = 3) data %>% arrange(id) %>% collect() Figure 9.1 shows how this sorting job would conceptually work across a cluster of machines. First, Spark would configure the cluster to use three worker machines. In this example, the numbers 1 through 9 are partitioned across three storage instances. Since the data is already partitioned, each worker node loads this implicit partition; for instance, 4, 9, and 1 are loaded in the first worker node. Afterward, a task is distributed to each worker to apply a transformation to each data partition in each worker node; this task is denoted by f(x). In this example, f(x) executes a sorting operation within a partition. Since Spark is general, execution over a partition can be as simple or complex as needed. The result is then shuffled to the correct machine to finish the sorting operation across the entire dataset, which completes a stage. A stage is a set of operations that Spark can execute without shuffling data between machines. After the data is sorted across the cluster, the sorted results can be optionally cached in memory to avoid rerunning this computation multiple times. Finally, a small subset of the results is serialized, through the network connecting the cluster machines, back to the driver node to print a preview of this sorting example. Notice that while Figure 9.1 describes a sorting operation, a similar approach applies to filtering or joining datasets and analyzing and modeling data at scale. Spark provides support to perform custom partitions, custom shuffling, and so on, but most of these lower-level operations are not exposed in sparklyr; instead, sparklyr makes those operations available through higher-level commands provided by data analysis tools like dplyr or DBI, modeling, and by using many extensions. For those few cases in which you might need to implement low-level operations, you can always use Spark’s Scala API through sparklyr extensions or run custom distributed R code. To effectively tune Spark, we will start by getting familiar with Spark’s computation graph and Spark’s event timeline. Both are accessible through Spark’s web interface. 
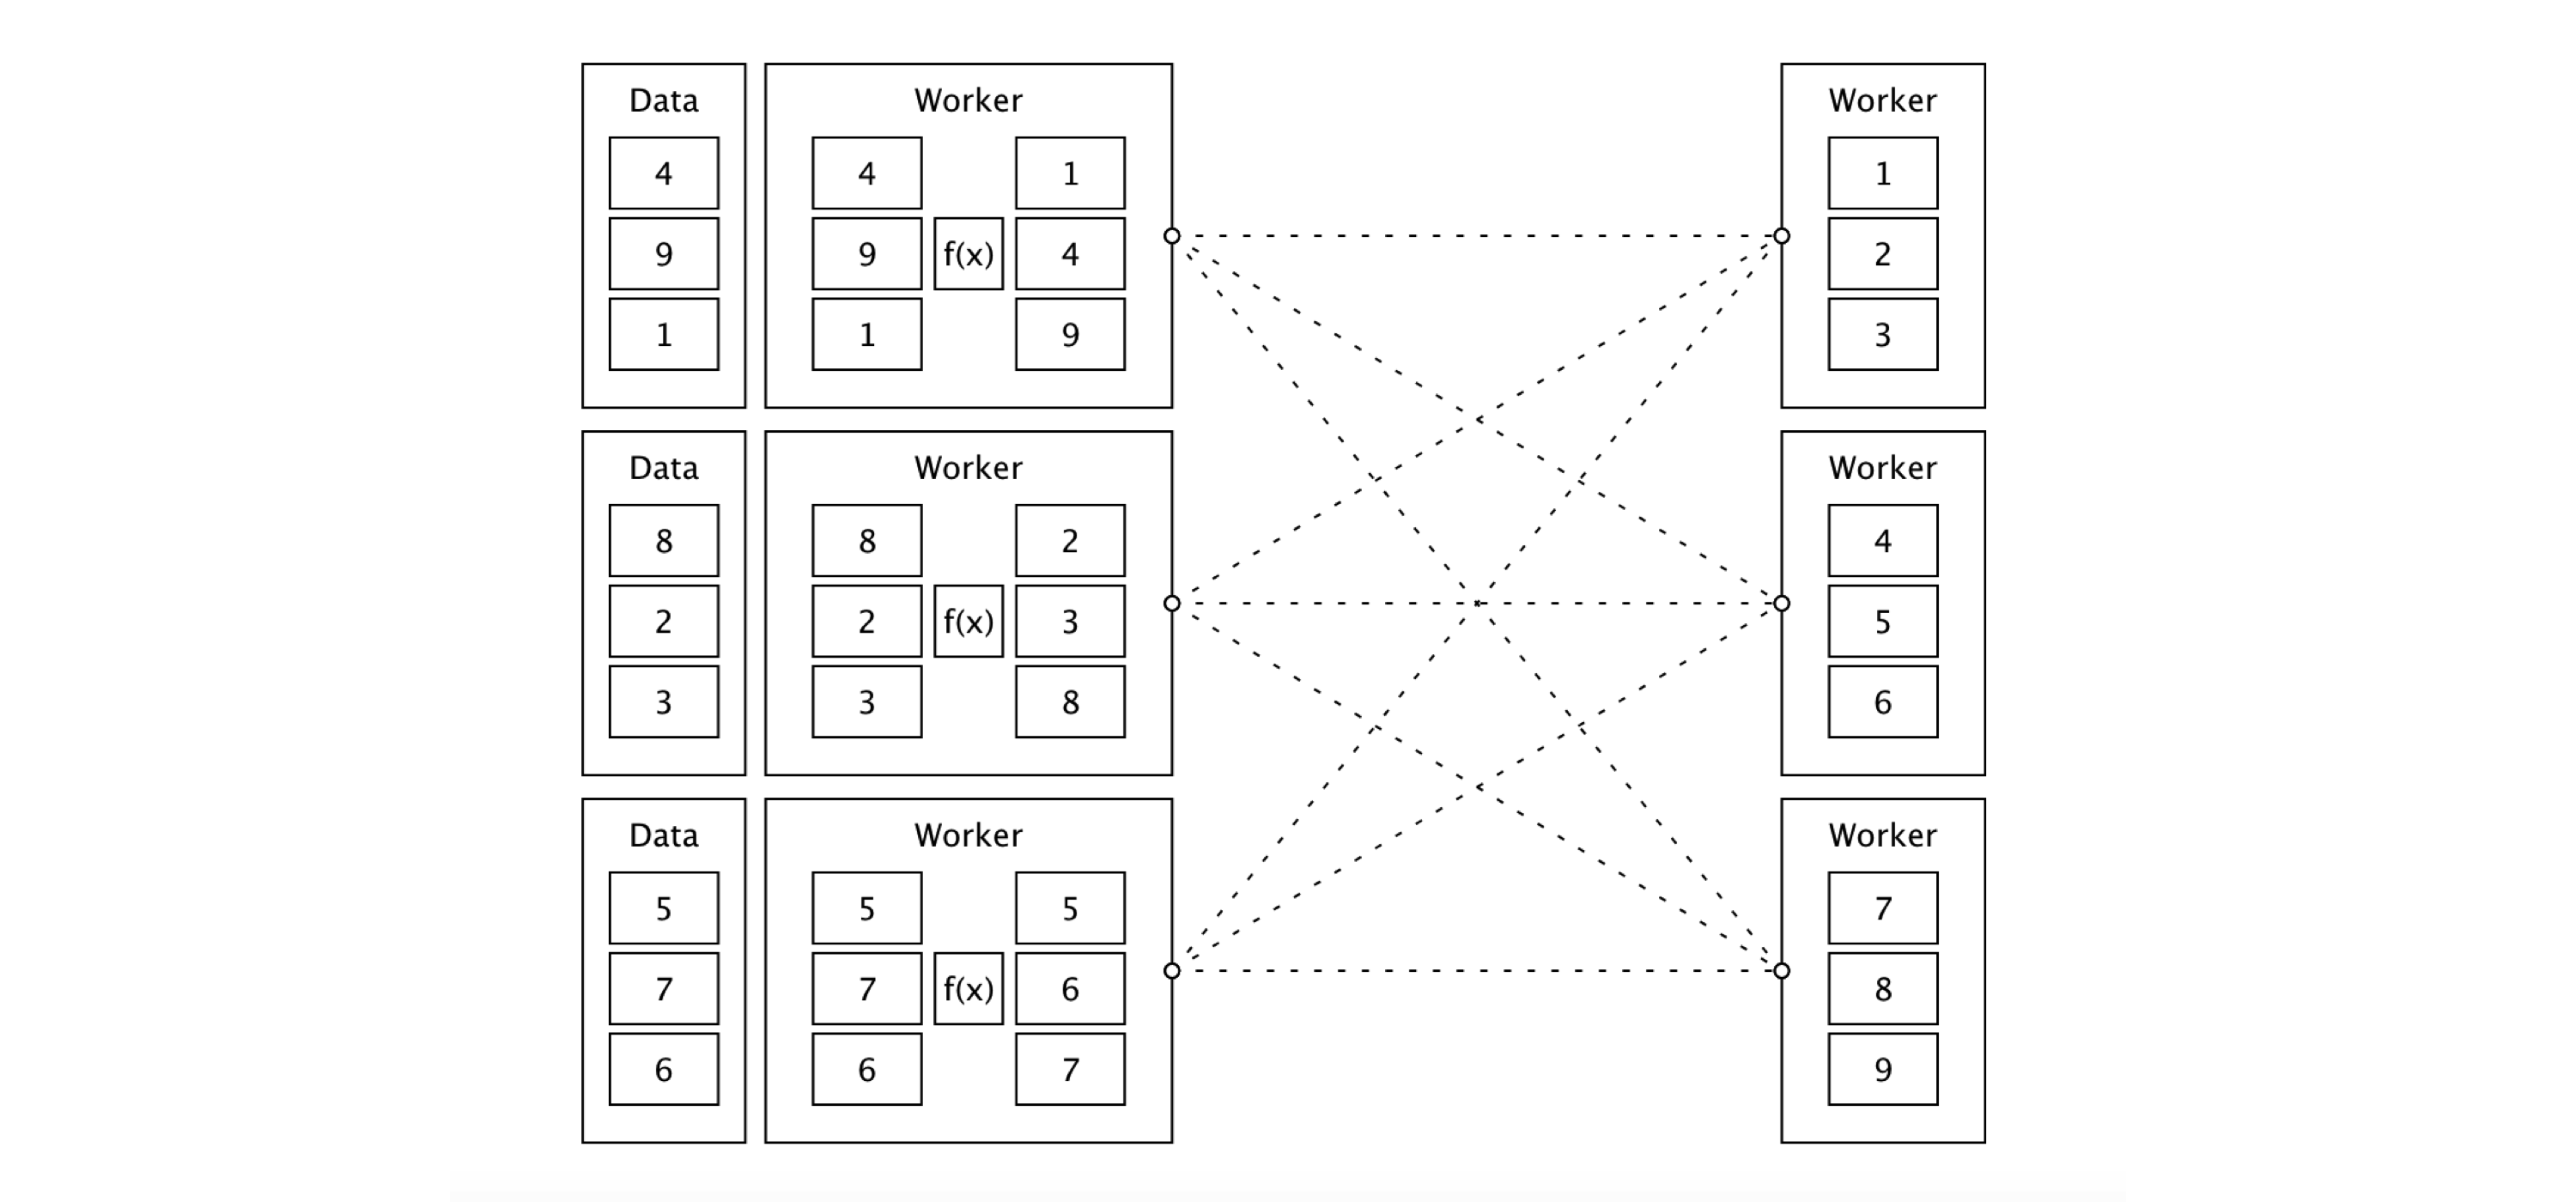
FIGURE 9.1: Sorting distributed data with Apache Spark

9.1.1 Graph

Spark describes all computation steps using a Directed Acyclic Graph (DAG), which means that all computations in Spark move computation forward without repeating previous steps, which helps Spark optimize computations effectively. The best way to understand Spark’s computation graph for a given operation—sorting for our example—is to open the last completed query on the SQL tab in Spark’s web interface. Figure 9.2 shows the resulting graph for this sorting operation, which contains the following operations:
WholeStageCodegen
This block specifies that the operations it contains were used to generate computer code that was efficiently translated to byte code. There is usually a small cost associated with translating operations into byte code, but this is a worthwhile price to pay since the operations then can be executed much faster from Spark. In general, you can ignore this block and focus on the operations that it contains.
InMemoryTableScan
This means that the original dataset data was stored in memory and traversed row by row once.
Exchange
Partitions were exchanged—that is, shuffled—across executors in your cluster.
Sort
Once the records arrived at the right executor, they were sorted in this final stage. 
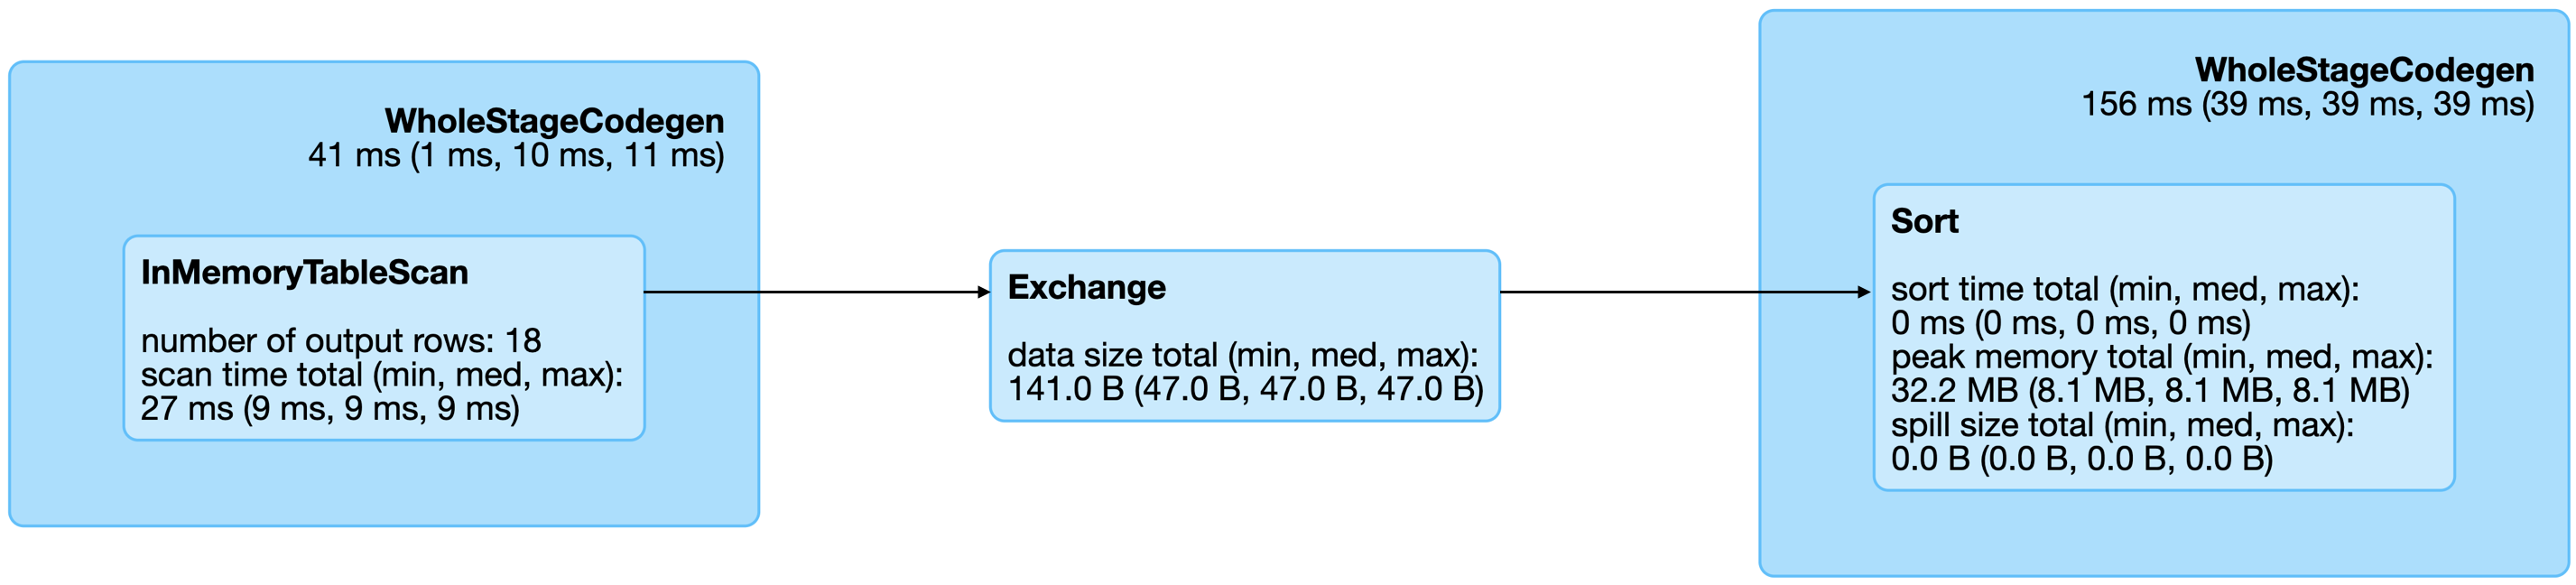
FIGURE 9.2: Spark graph for a sorting query From the query details, you then can open the last Spark job to arrive to the job details page, which you can expand by using “DAG Visualization” to create a graph similar to Figure 9.3. This graph shows a few additional details and the stages in this job. Notice that there are no arrows pointing back to previous steps, since Spark makes use of acyclic graphs. 
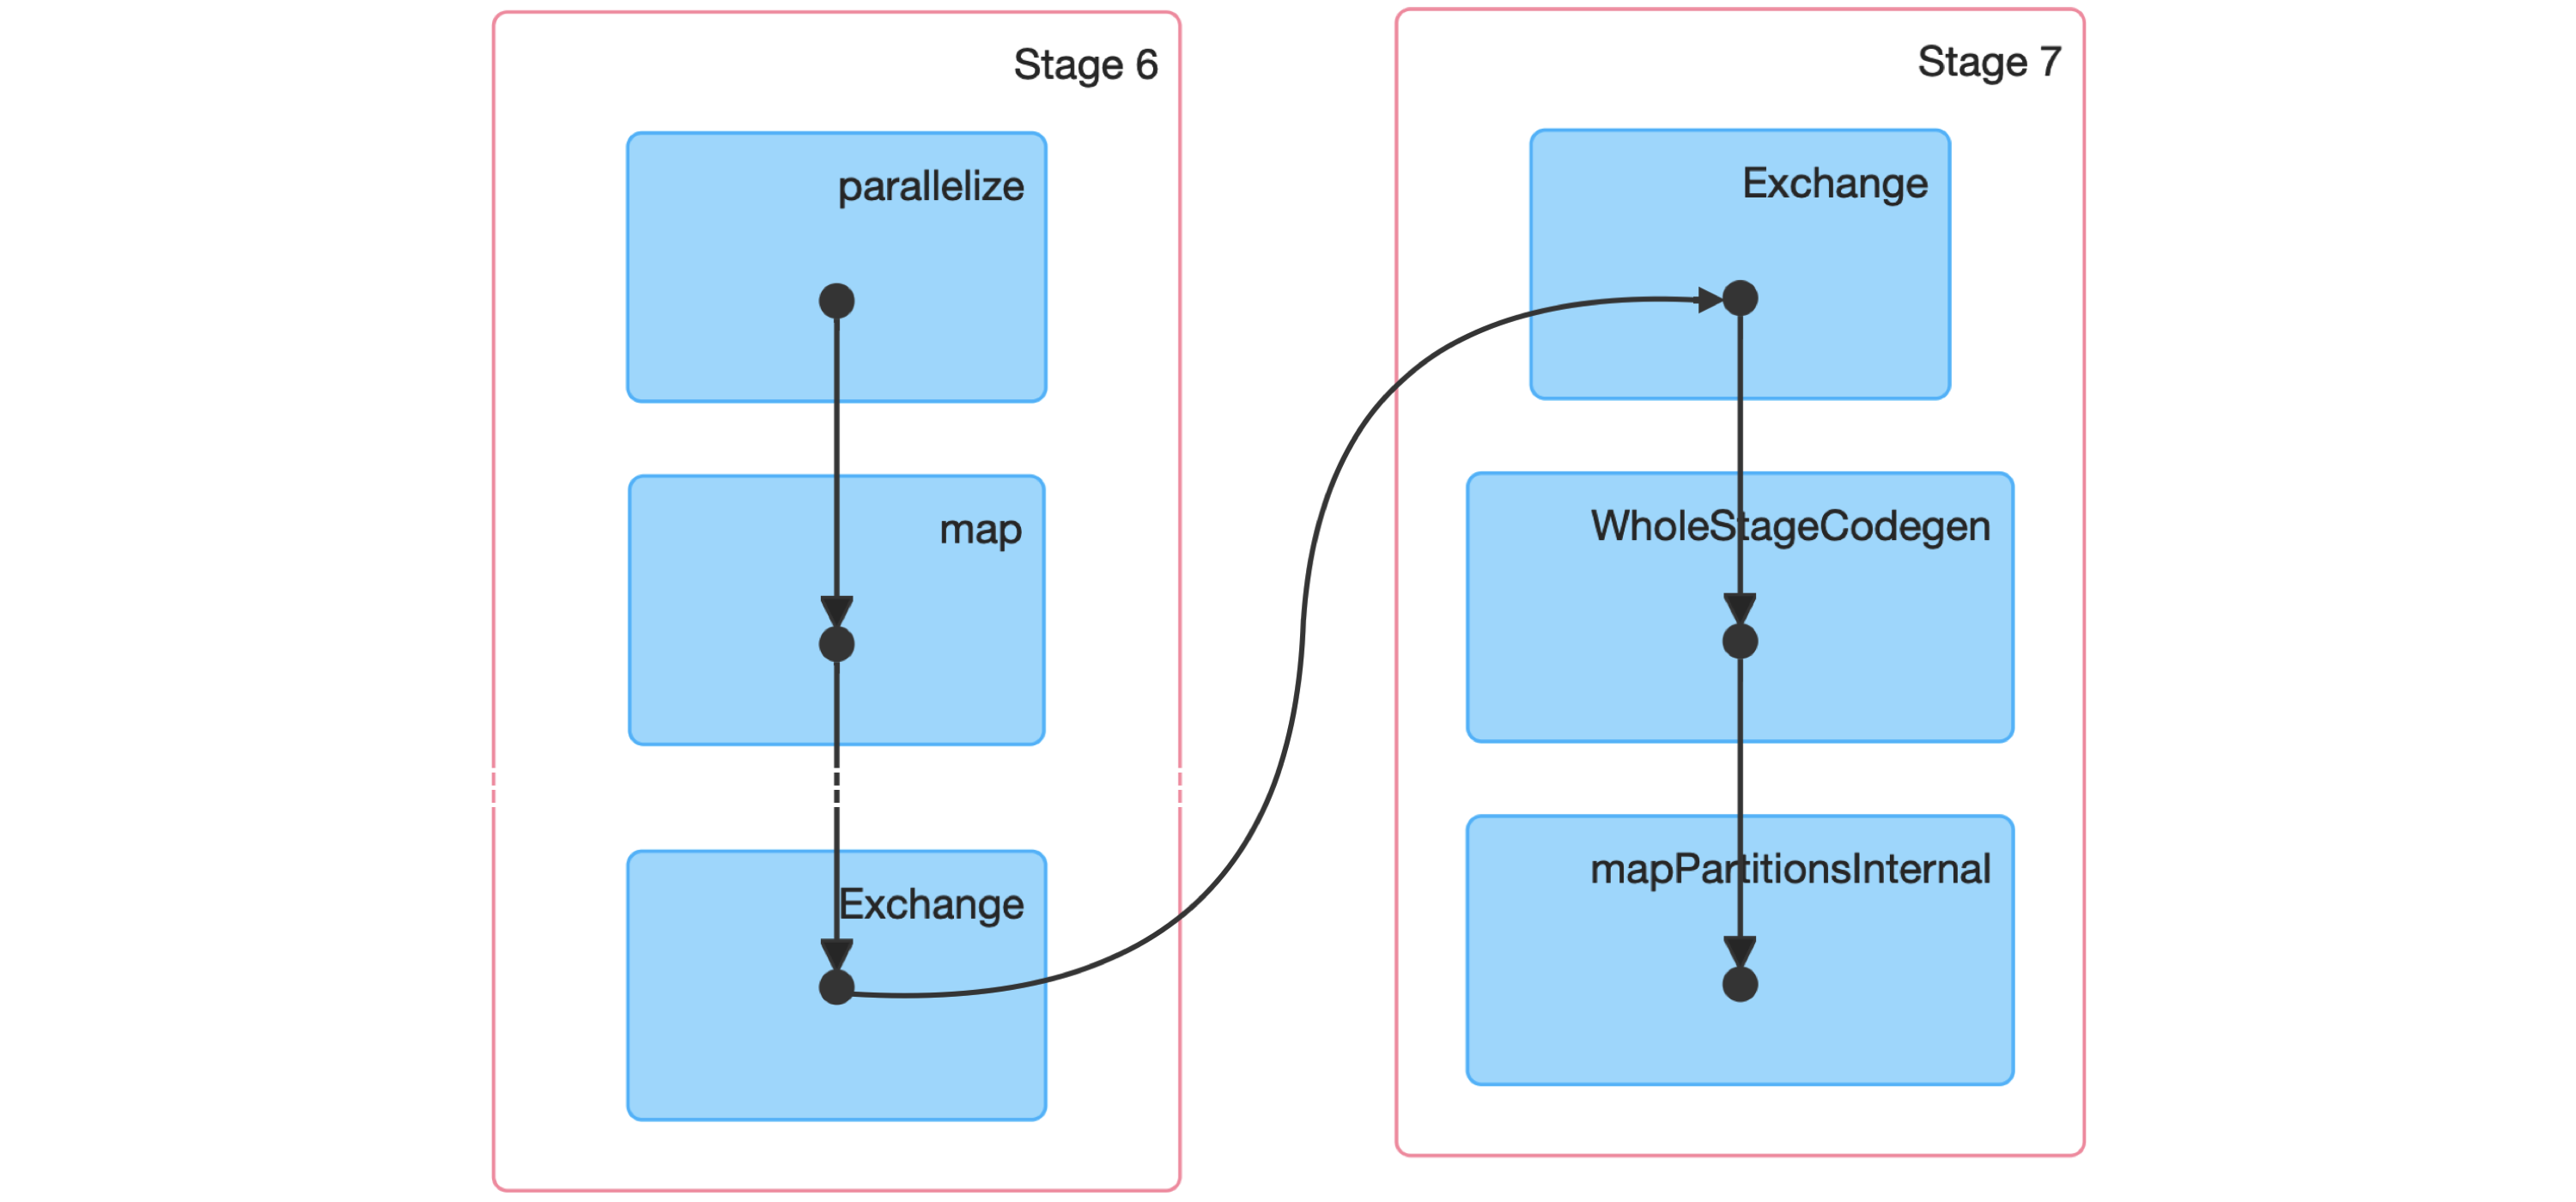
FIGURE 9.3: Spark graph for a sorting job Next, we dive into a Spark stage and explore its event timeline.

9.1.2 Timeline

The event timeline is a great summary of how Spark is spending computation cycles over each stage. Ideally, you want to see this timeline consisting of mostly CPU usage since other tasks can be considered overhead. You also want to see Spark using all the CPUs across all the cluster nodes available to you. Select the first stage in the current job and expand the event timeline, which should look similar to Figure 9.4. Notice that we explicitly requested three partitions, which are represented by three lanes in this visualization. FIGURE 9.4: Spark event timeline Since our machine is equipped with four CPUs, we can(((“parallel execution”))) parallelize this computation even further by explicitly repartitioning data using sdf_repartition(), with the result shown in Figure 9.5: data %>% sdf_repartition(4) %>% arrange(id) %>% collect() FIGURE 9.5: Spark event timeline with additional partitions Figure 9.5 now shows four execution lanes with most time spent under Executor Computing Time, which shows us that this particular operation is making better use of our compute resources. When you are working with clusters, requesting more compute nodes from your cluster should shorten computation time. In contrast, for timelines that show significant time spent shuffling, requesting more compute nodes might not shorten time and might actually make everything slower. There is no concrete set of rules to follow to optimize a stage; however, as you gain experience understanding this timeline over multiple operations, you will develop insights as to how to properly optimize Spark operations.

9.2 Configuring

When tuning a Spark application, the most common resources to configure are memory and cores, specifically:
Memory in driver
The amount of memory required in the driver node
Memory per worker
The amount of memory required in the worker nodes
Cores per worker
The number of CPUs required in the worker nodes
Number of workers
The number of workers required for this session Note: It is recommended to request significantly more memory for the driver than the memory available over each worker node. In most cases, you will want to request one core per worker. In local mode there are no workers, but we can still configure memory and cores to use through the following: # Initialize configuration with defaults config <- spark_config() # Memory config["sparklyr.shell.driver-memory"] <- "2g" # Cores config["sparklyr.connect.cores.local"] <- 2 # Connect to local cluster with custom configuration sc <- spark_connect(master = "local", config = config) When using the Spark Standalone and the Mesos cluster managers, all the available memory and cores are assigned by default; therefore, there are no additional configuration changes required, unless you want to restrict resources to allow multiple users to share this cluster. In this case, you can use total-executor-cores to restrict the total executors requested. The Spark Standalone and Spark on Mesos guides provide additional information on sharing clusters. When running under YARN Client, you would configure memory and cores as follows: # Memory in Driver config["sparklyr.shell.driver-memory"] <- "2g" # Memory per Worker config["spark.executor.memory"] <- "2G" # Cores per Worker config["sparklyr.shell.executor-cores"] <- 1 # Number of Workers config["sparklyr.shell.num-executors"] <- 3 When using YARN in cluster mode you can use sparklyr.shell.driver-cores to configure total cores requested in the driver node. The Spark on YARN guide provides additional configuration settings that can benefit you. There are a few types of configuration settings:
Connect
These settings are set as parameters to spark_connect(). They are common settings used while connecting.
Submit
These settings are set while sparklyr is being submitted to Spark through spark-submit; some are dependent on the cluster manager being used.
Runtime
These settings configure Spark when the Spark session is created. They are independent of the cluster manager and specific to Spark.
sparklyr
Use these to configure sparklyr behavior. These settings are independent of the cluster manager and particular to R. The following subsections present extensive lists of all the available settings. It is not required that you fully understand them all while tuning Spark, but skimming through them could prove useful in the future for troubleshooting issues. If you prefer, you can skip these subsections and use them instead as reference material as needed.

9.2.1 Connect Settings

You can use the parameters listed in Table 9.1 with spark_connect(). They configure high-level settings that define the connection method, Spark’s installation path, and the version of Spark to use.
TABLE 9.1: Parameters used when connecting to Spark
namevalue
masterSpark cluster url to connect to. Use “local” to connect to a local instance of Spark installed via ‘spark_install()’.
spark_homeThe path to a Spark installation. Defaults to the path provided by the SPARK_HOME environment variable. If SPARK_HOME is defined, it will always be used unless the version parameter is specified to force the use of a locally installed version.
methodThe method used to connect to Spark. Default connection method is “shell” to connect using spark-submit, use “livy” to perform remote connections using HTTP, “databricks” when using a Databricks cluster or “qubole” when using a Qubole cluster.
app_nameThe application name to be used while running in the Spark cluster.
versionThe version of Spark to use. Only applicable to “local” Spark connections.
configCustom configuration for the generated Spark connection. See spark_config for details.
You can configure additional settings by specifying a list in the config parameter. Let’s now take a look at what those settings can be.

9.2.2 Submit Settings

Some settings must be specified when spark-submit (the terminal application that launches Spark) is run. For instance, since spark-submit launches a driver node that runs as a Java instance, how much memory is allocated needs to be specified as a parameter to spark-submit. You can list all the available spark-submit parameters by running the following: spark_home_dir() %>% file.path("bin", "spark-submit") %>% system2() For readability, we’ve provided the output of this command in Table 9.2, replacing the spark-submit parameter with the appropriate spark_config() setting and removing the parameters that are not applicable or already presented in this chapter.
TABLE 9.2: Setting available to configure spark-submit
namevalue
sparklyr.shell.jarsSpecified as ‘jars’ parameter in ‘spark_connect()’.
sparklyr.shell.packagesComma-separated list of maven coordinates of jars to include on the driver and executor classpaths. Will search the local maven repo, then maven central and any additional remote repositories given by ‘sparklyr.shell.repositories’. The format for the coordinates should be groupId:artifactId:version.
sparklyr.shell.exclude-packagesComma-separated list of groupId:artifactId, to exclude while resolving the dependencies provided in ‘sparklyr.shell.packages’ to avoid dependency conflicts.
sparklyr.shell.repositoriesComma-separated list of additional remote repositories to search for the maven coordinates given with ‘sparklyr.shell.packages’
sparklyr.shell.filesComma-separated list of files to be placed in the working directory of each executor. File paths of these files in executors can be accessed via SparkFiles.get(fileName).
sparklyr.shell.confArbitrary Spark configuration property set as PROP=VALUE.
sparklyr.shell.properties-filePath to a file from which to load extra properties. If not specified, this will look for conf/spark-defaults.conf.
sparklyr.shell.driver-java-optionsExtra Java options to pass to the driver.
sparklyr.shell.driver-library-pathExtra library path entries to pass to the driver.
sparklyr.shell.driver-class-pathExtra class path entries to pass to the driver. Note that jars added with ‘sparklyr.shell.jars’ are automatically included in the classpath.
sparklyr.shell.proxy-userUser to impersonate when submitting the application. This argument does not work with ‘sparklyr.shell.principal’ / ‘sparklyr.shell.keytab’.
sparklyr.shell.verbosePrint additional debug output.
The remaining settings, shown in Table 9.3, are specific to YARN.
TABLE 9.3: Settings avalable to configure spark-submit when using YARN
namevalue
sparklyr.shell.queueThe YARN queue to submit to (Default: “default”).
sparklyr.shell.archivesComma separated list of archives to be extracted into the working directory of each executor.
sparklyr.shell.principalPrincipal to be used to login to KDC, while running on secure HDFS.
sparklyr.shell.keytabThe full path to the file that contains the keytab for the principal specified above. This keytab will be copied to the node running the Application Master via the Secure Distributed Cache, for renewing the login tickets and the delegation tokens periodically.
In general, any spark-submit setting is configured through sparklyr.shell.X, where X is the name of the spark-submit parameter without the -- prefix.

9.2.3 Runtime Settings

As mentioned, some Spark settings configure the session runtime. The runtime settings are a superset of the submit settings given that it is usually helpful to retrieve the current configuration even if a setting can’t be changed. To list the Spark settings set in your current Spark session, you can run the following: spark_session_config(sc) Table 9.4 describes the runtime settings.
TABLE 9.4: Setting available to configure the Spark session
namevalue
spark.masterlocal[4]
spark.sql.shuffle.partitions4
spark.driver.port62314
spark.submit.deployModeclient
spark.executor.iddriver
spark.jars/Library/…/sparklyr/java/sparklyr-2.3-2.11.jar
spark.app.idlocal-1545518234395
spark.env.SPARK_LOCAL_IP127.0.0.1
spark.sql.catalogImplementationhive
spark.spark.port.maxRetries128
spark.app.namesparklyr
spark.home/Users/…/spark/spark-2.3.2-bin-hadoop2.7
spark.driver.hostlocalhost
However, there are many more configuration settings available in Spark, as described in the Spark Configuration guide. It’s beyond the scope of this book to describe them all, so, if possible, take some time to identify the ones that might be of interest to your particular use cases.

9.2.4 sparklyr Settings

Apart from Spark settings, there are a few settings particular to sparklyr. You usually don’t use these settings while tuning Spark; instead, they are helpful while troubleshooting Spark from R. For instance, you can use sparklyr.log.console = TRUE to output the Spark logs into the R console; this is ideal while troubleshooting but too noisy otherwise. Here’s how to list the settings (results are presented in Table 9.5): spark_config_settings()
TABLE 9.5: Settings available to configure the sparklyr package
namedescription
sparklyr.apply.packagesConfigures default value for packages parameter in spark_apply().
sparklyr.apply.rlangExperimental feature. Turns on improved serialization for spark_apply().
sparklyr.apply.serializerConfigures the version spark_apply() uses to serialize the closure.
sparklyr.apply.schema.inferNumber of rows collected to infer schema when column types specified in spark_apply().
sparklyr.arrowUse Apache Arrow to serialize data?
sparklyr.backend.intervalTotal seconds sparklyr will check on a backend operation.
sparklyr.backend.timeoutTotal seconds before sparklyr will give up waiting for a backend operation to complete.
sparklyr.collect.batchTotal rows to collect when using batch collection, defaults to 100,000.
sparklyr.cancellableCancel spark jobs when the R session is interrupted?
sparklyr.connect.aftersubmitR function to call after spark-submit executes.
sparklyr.connect.app.jarThe path to the sparklyr jar used in spark_connect().
sparklyr.connect.cores.localNumber of cores to use in spark_connect(master = “local”), defaults to parallel::detectCores().
sparklyr.connect.csv.embeddedRegular expression to match against versions of Spark that require package extension to support CSVs.
sparklyr.connect.csv.scala11Use Scala 2.11 jars when using embedded CSV jars in Spark 1.6.X.
sparklyr.connect.jarsAdditional JARs to include while submitting application to Spark.
sparklyr.connect.masterThe cluster master as spark_connect() master parameter, notice that the ‘spark.master’ setting is usually preferred.
sparklyr.connect.packagesSpark packages to include when connecting to Spark.
sparklyr.connect.ondisconnectR function to call after spark_disconnect().
sparklyr.connect.sparksubmitCommand executed instead of spark-submit when connecting.
sparklyr.connect.timeoutTotal seconds before giving up connecting to the sparklyr gateway while initializing.
sparklyr.dplyr.period.splitsShould ‘dplyr’ split column names into database and table?
sparklyr.extensions.catalogCatalog PATH where extension JARs are located. Defaults to ‘TRUE’, ‘FALSE’ to disable.
sparklyr.gateway.addressThe address of the driver machine.
sparklyr.gateway.config.retriesNumber of retries to retrieve port and address from config, useful when using functions to query port or address in kubernetes.
sparklyr.gateway.intervalTotal of seconds sparkyr will check on a gateway connection.
sparklyr.gateway.portThe port the sparklyr gateway uses in the driver machine, defaults to 8880.
sparklyr.gateway.remoteShould the sparklyr gateway allow remote connections? This is required in yarn cluster, etc.
sparklyr.gateway.routingShould the sparklyr gateway service route to other sessions? Consider disabling in kubernetes.
sparklyr.gateway.serviceShould the sparklyr gateway be run as a service without shutting down when the last connection disconnects?
sparklyr.gateway.timeoutTotal seconds before giving up connecting to the sparklyr gateway after initialization.
sparklyr.gateway.waitTotal seconds to wait before retrying to contact the sparklyr gateway.
sparklyr.livy.authAuthentication method for Livy connections.
sparklyr.livy.headersAdditional HTTP headers for Livy connections.
sparklyr.livy.sourcesShould sparklyr sources be sourced when connecting? If false, manually register sparklyr jars.
sparklyr.log.invokeShould every call to invoke() be printed in the console? Can be set to ‘callstack’ to log call stack.
sparklyr.log.consoleShould driver logs be printed in the console?
sparklyr.progressShould job progress be reported to RStudio?
sparklyr.progress.intervalTotal of seconds to wait before attempting to retrieve job progress in Spark.
sparklyr.sanitize.column.namesShould partially unsupported column names be cleaned up?
sparklyr.stream.collect.timeoutTotal seconds before stopping collecting a stream sample in sdf_collect_stream().
sparklyr.stream.validate.timeoutTotal seconds before stopping to check if stream has errors while being created.
sparklyr.verboseUse verbose logging across all sparklyr operations?
sparklyr.verbose.naUse verbose logging when dealing with NAs?
sparklyr.verbose.sanitizeUse verbose logging while sanitizing columns and other objects?
sparklyr.web.sparkThe URL to Spark’s web interface.
sparklyr.web.yarnThe URL to YARN’s web interface.
sparklyr.worker.gateway.addressThe address of the worker machine, most likely localhost.
sparklyr.worker.gateway.portThe port the sparklyr gateway uses in the driver machine.
sparklyr.yarn.cluster.accepted.timeoutTotal seconds before giving up waiting for cluster resources in yarn cluster mode.
sparklyr.yarn.cluster.hostaddress.timeoutTotal seconds before giving up waiting for the cluster to assign a host address in yarn cluster mode.
sparklyr.yarn.cluster.lookup.bynameShould the current user name be used to filter yarn cluster jobs while searching for submitted one?
sparklyr.yarn.cluster.lookup.prefixApplication name prefix used to filter yarn cluster jobs while searching for submitted one.
sparklyr.yarn.cluster.lookup.usernameThe user name used to filter yarn cluster jobs while searching for submitted one.
sparklyr.yarn.cluster.start.timeoutTotal seconds before giving up waiting for yarn cluster application to get registered.

9.3 Partitioning

As mentioned in Chapter 1, MapReduce and Spark were designed with the purpose of performing computations against data stored across many machines. The subset of the data available for computation over each compute instance is known as a partition. By default, Spark computes over each existing implicit partition since it’s more effective to run computations where the data is already located. However, there are cases for which you will want to set an explicit partition to help Spark make more efficient use of your cluster resources.

9.3.1 Implicit Partitions

As Chapter 8 explained, Spark can read data stored in many formats and different storage systems; however, since shuffling data is an expensive operation, Spark executes tasks reusing the partitions in the storage system. Therefore, these partitions are implicit to Spark since they are already well defined and expensive to rearrange. There is always an implicit partition for every computation in Spark defined by the distributed storage system, even for operations which you wouldn’t expect that create partitions, like copy_to(). You can explore the number of partitions a computation will require by using sdf_num_partitions(): sdf_len(sc, 10) %>% sdf_num_partitions() [1] 2 While in most cases the default partitions work just fine, there are cases for which you will need to be explicit about the partitions you choose.

9.3.2 Explicit Partitions

There will be times when you have many more or far fewer compute instances than data partitions. In both cases, it can help to repartition data to match your cluster resources. Various data functions, like spark_read_csv(), already support a repartition parameter to request that Spark repartition data appropriately. For instance, we can create a sequence of 10 numbers partitioned by 10 as follows: sdf_len(sc, 10, repartition = 10) %>% sdf_num_partitions() [1] 10 For datasets that are already partitioned, we can also use sdf_repartition(): sdf_len(sc, 10, repartition = 10) %>% sdf_repartition(4) %>% sdf_num_partitions() [1] 4 The number of partitions usually significantly changes the speed and resources being used; for instance, the following example calculates the mean over 10 million rows with different partition sizes: library(microbenchmark) library(ggplot2) microbenchmark( "1 Partition(s)" = sdf_len(sc, 10^7, repartition = 1) %>% summarise(mean(id)) %>% collect(), "2 Partition(s)" = sdf_len(sc, 10^7, repartition = 2) %>% summarise(mean(id)) %>% collect(), times = 10 ) %>% autoplot() + theme_light() Figure 9.6 shows that sorting data with two partitions is almost twice as fast. This is because two CPUs can be used to execute this operation. However, it is not necessarily the case that higher partitions produce faster computation; instead, partitioning data is particular to your computing cluster and the data analysis operations being performed. 
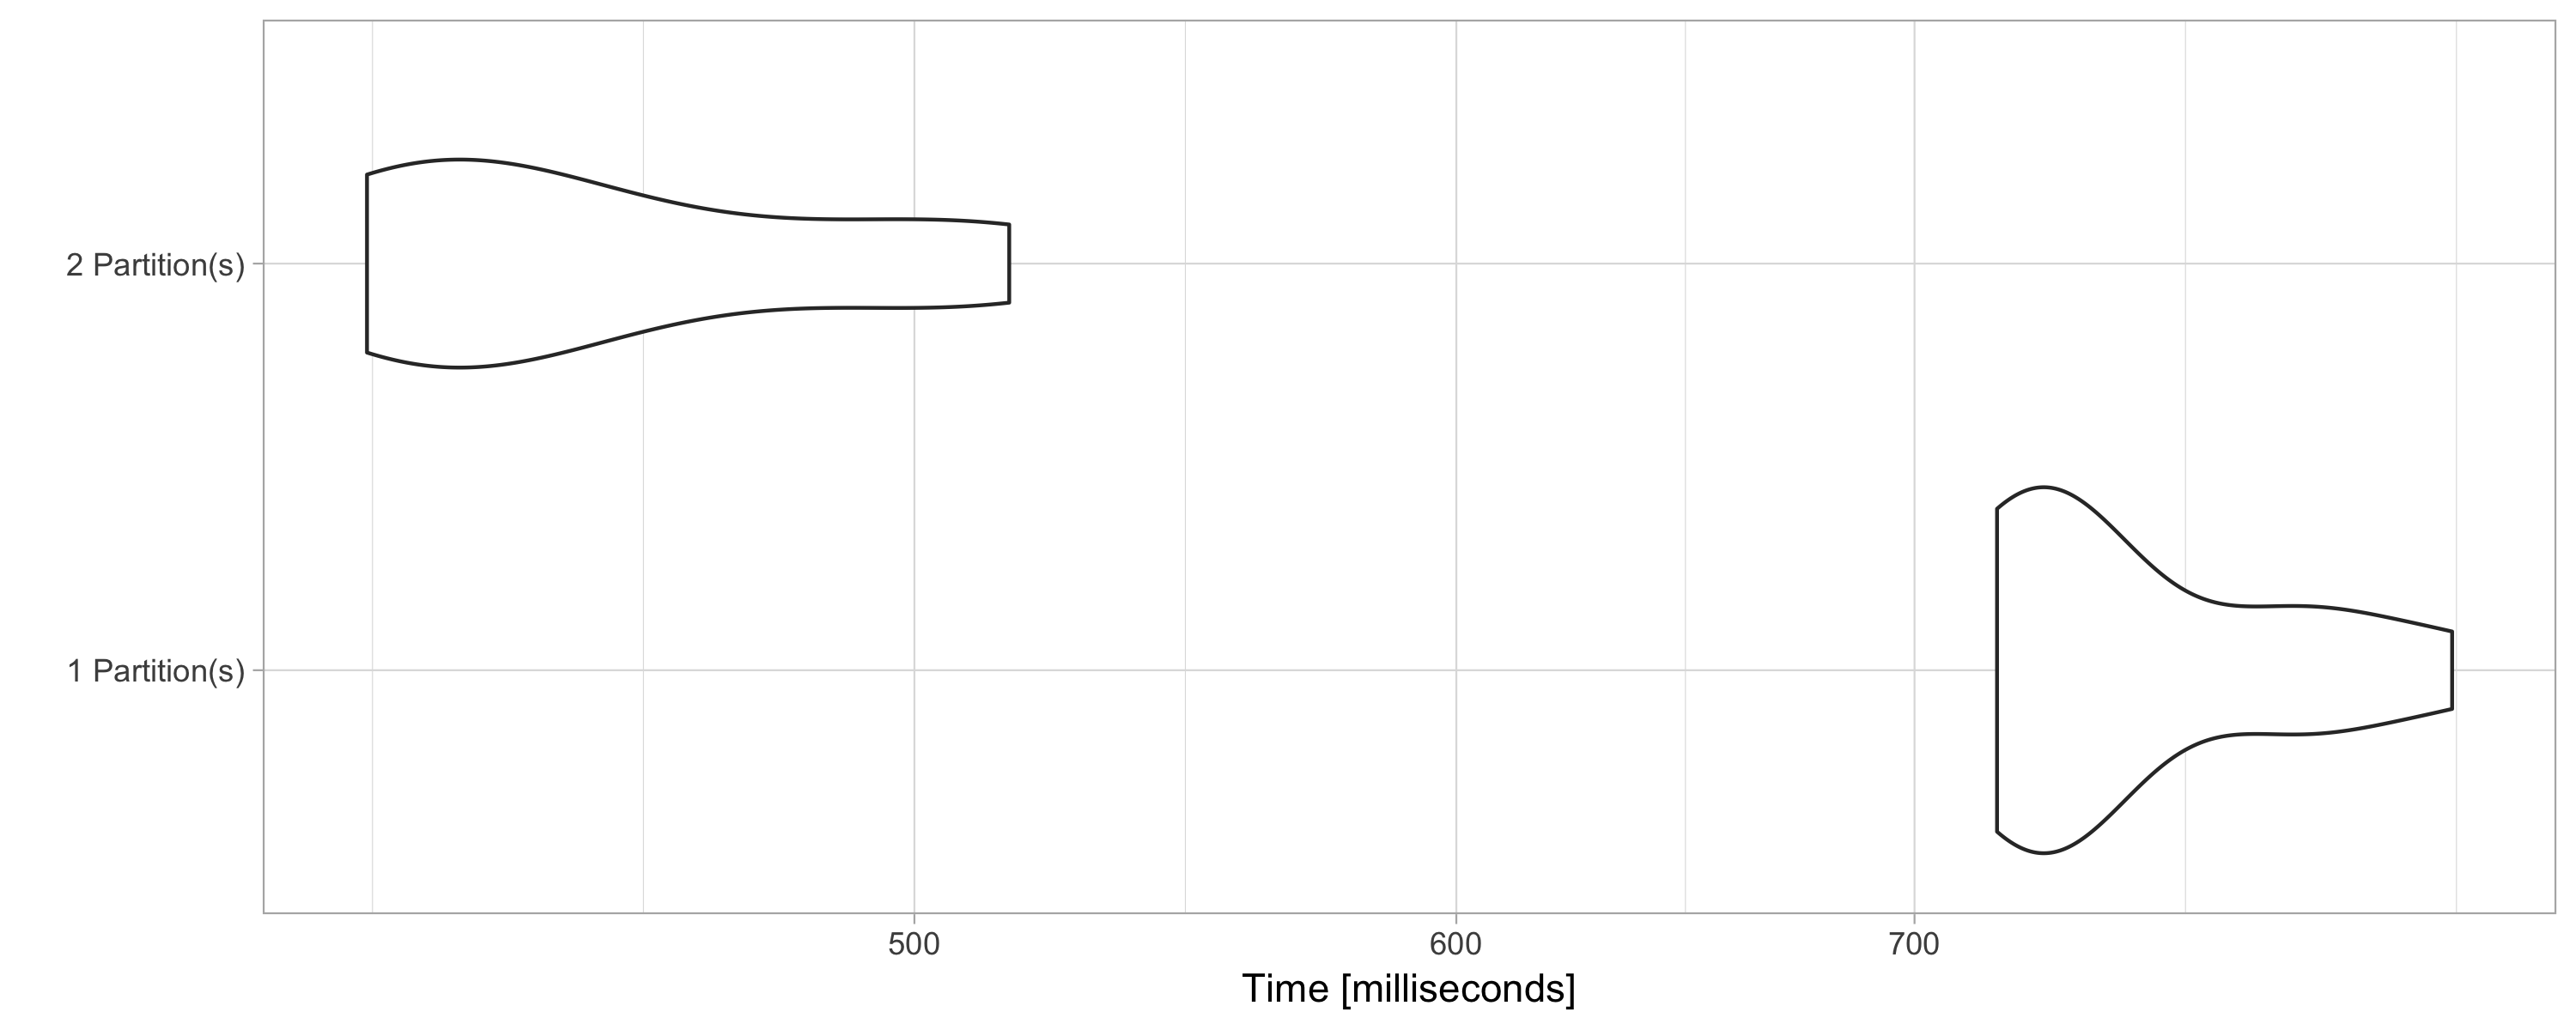
FIGURE 9.6: Computation speed with additional explicit partitions

9.4 Caching

Recall from Chapter 1 that Spark was designed to be faster than its predecessors by using memory instead of disk to store data. This is formally known as a Spark resilient distributed dataset (RDD). An RDD distributes copies of the same data across many machines, such that if one machine fails, others can complete the task—hence, the term “resilient.” Resiliency is important in distributed systems since, while things will usually work in one machine, when running over thousands of machines the likelihood of something failing is much higher. When a failure happens, it is preferable to be fault tolerant to avoid losing the work of all the other machines. RDDs accomplish this by tracking data lineage information to rebuild lost data automatically on failure. In sparklyr, you can control when an RDD is loaded or unloaded from memory using tbl_cache() and tbl_uncache(). Most sparklyr operations that retrieve a Spark DataFrame cache the results in memory. For instance, running spark_read_parquet() or copy_to() will provide a Spark DataFrame that is already cached in memory. As a Spark DataFrame, this object can be used in most sparklyr functions, including data analysis with dplyr or machine learning: library(sparklyr) sc <- spark_connect(master = "local") iris_tbl <- copy_to(sc, iris, overwrite = TRUE) You can inspect which tables are cached by navigating to the Spark UI using spark_web(sc), clicking the Storage tab, and then clicking on a specific RDD, as illustrated in Figure 9.7. 
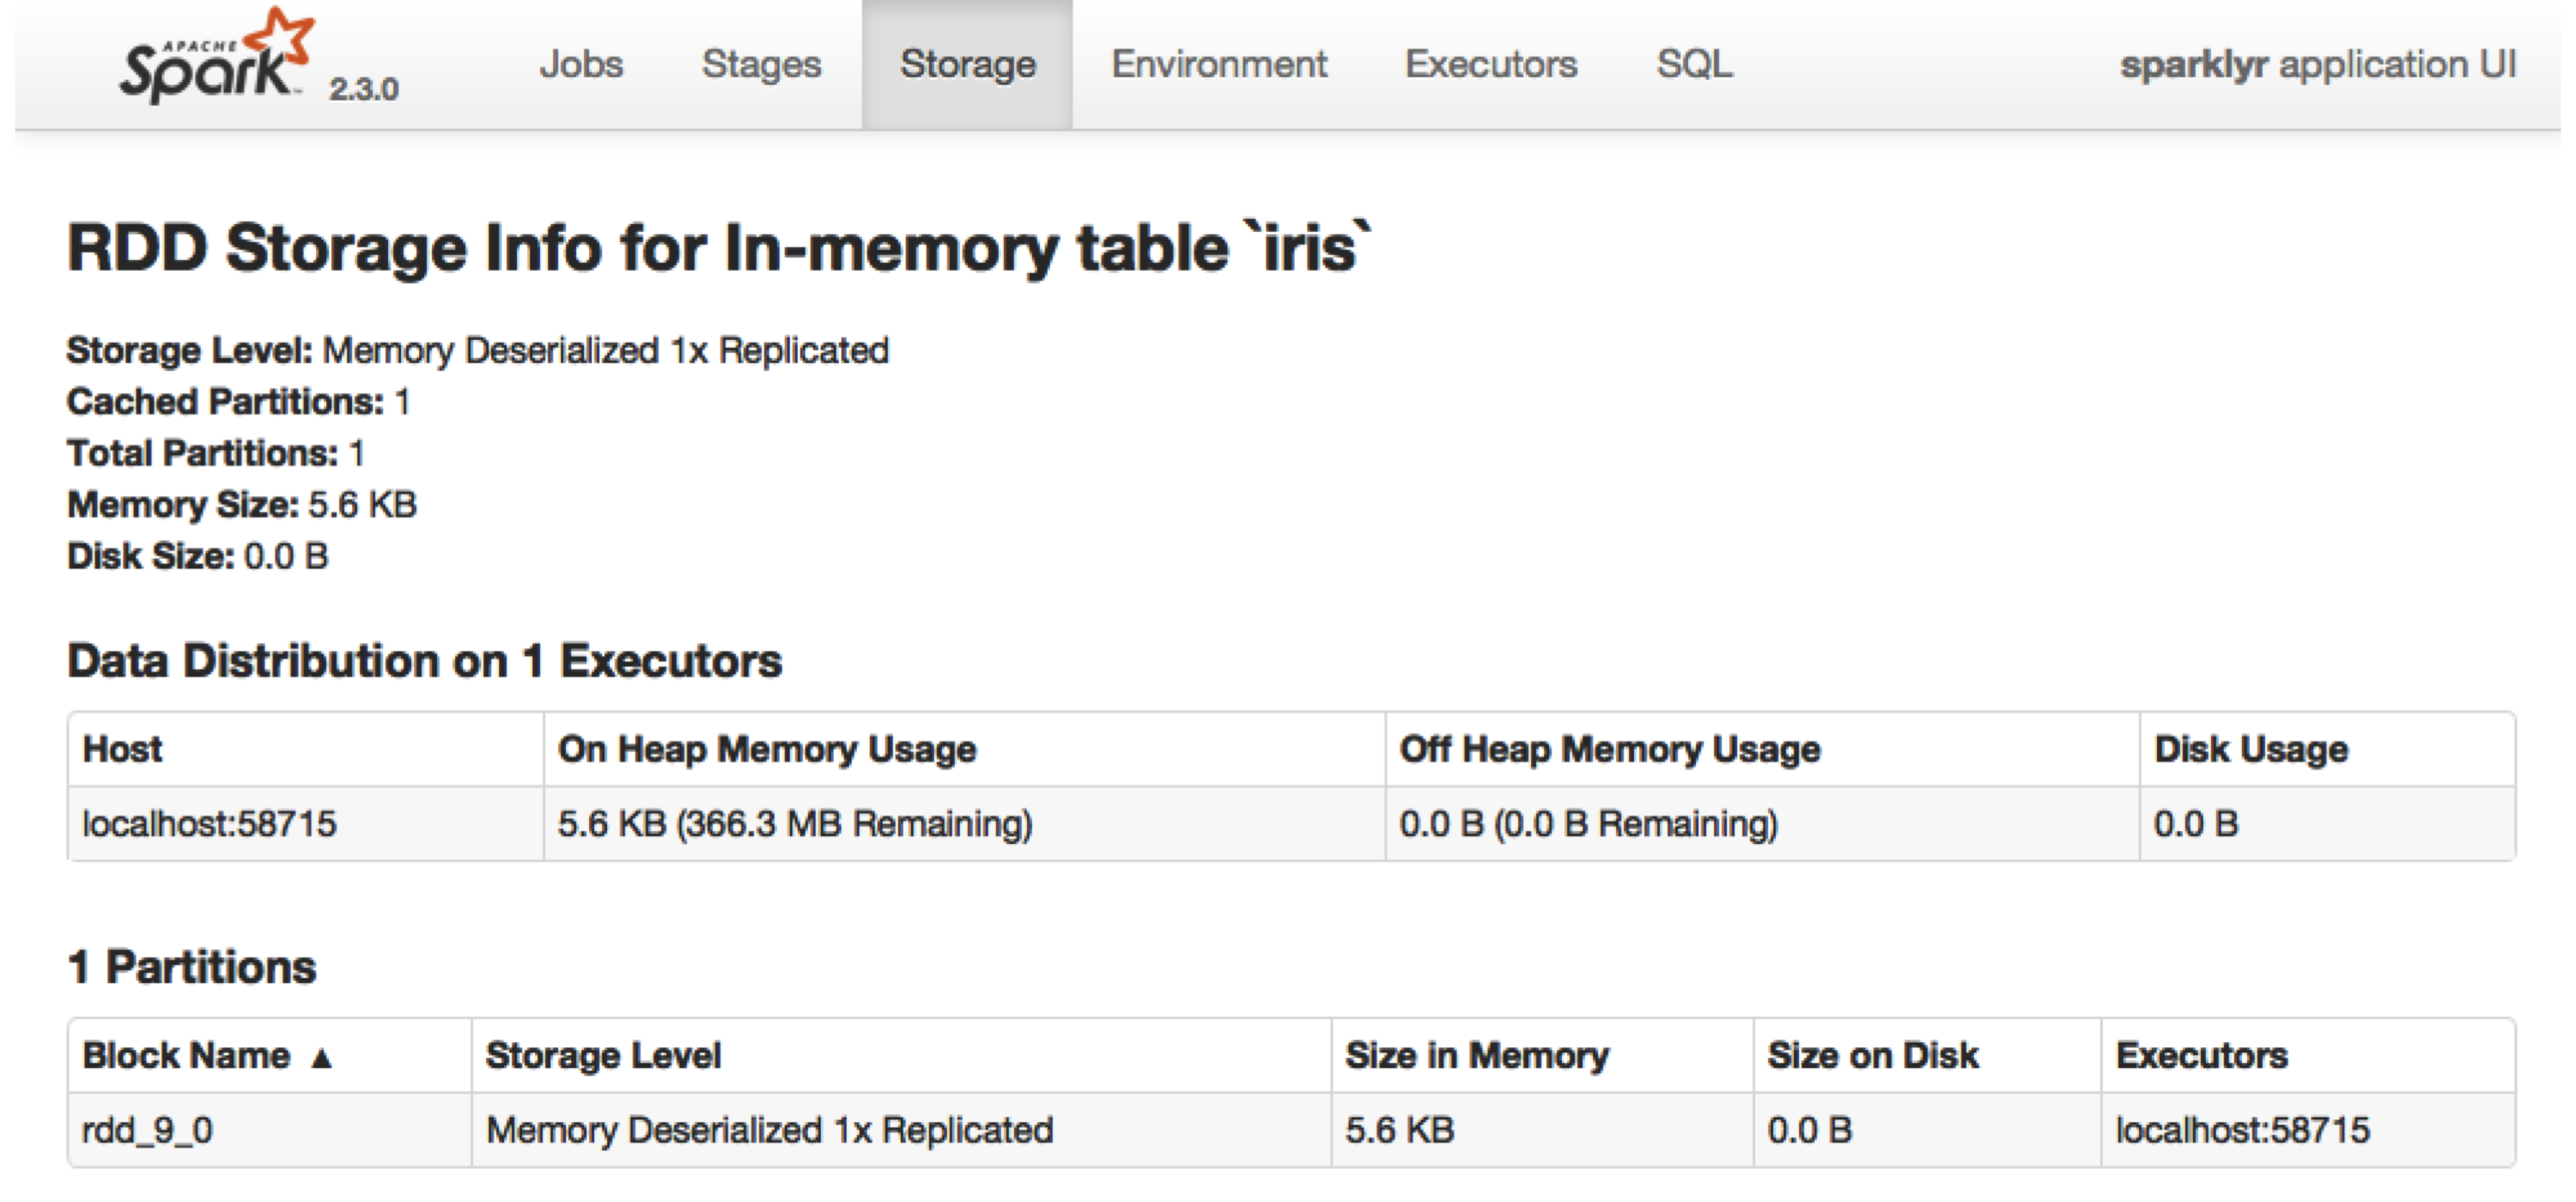
FIGURE 9.7: Cached RDD in the Spark web interface Data loaded in memory will be released when the R session terminates, either explicitly or implicitly, with a restart or disconnection; however, to free up resources, you can use tbl_uncache(): tbl_uncache(sc, "iris")

9.4.1 Checkpointing

Checkpointing is a slightly different type of caching; while it also saves data, it will additionally break the graph computation lineage. For example, if a cached partition is lost, it can be computed from the computation graph, which is not possible with checkpointing since the source of computation is lost. When performing operations which create expensive computation graphs, it can make sense to checkpoint to save and break the computation lineage in order to help Spark reduce graph computation resources; otherwise, Spark might try to optimize a computation graph that is really not useful to optimize. You can checkpoint explicitly by saving to CSV, Parquet, and other file formats. Or, let Spark checkpoint this for you by using sdf_checkpoint() in sparklyr, as follows: # set checkpoint path spark_set_checkpoint_dir(sc, getwd()) # checkpoint the iris dataset iris_tbl %>% sdf_checkpoint() Notice that checkpointing truncates the computation lineage graph, which can speed up performance if the same intermediate result is used multiple times.

9.4.2 Memory

Memory in Spark is categorized into reserved, user, execution, or storage:
Reserved
Reserved memory is the memory Spark needs to function and therefore is overhead that is required and should not be configured. This value defaults to 300 MB.
User
User memory is the memory used to execute custom code. sparklyr makes use of this memory only indirectly when executing dplyr expressions or modeling a dataset.
Execution
Execution memory is used to execute code by Spark, mostly to process the results from the partition and perform shuffling.
Storage
Storage memory is used to cache RDDs—for instance, when using compute() in sparklyr. As part of tuning execution, you can consider tweaking the amount of memory allocated for user, execution, and storage by creating a Spark connection with different values than the defaults provided in Spark: config <- spark_config() # define memory available for storage and execution config$spark.memory.fraction <- 0.75 # define memory available for storage config$spark.memory.storageFraction <- 0.5 For instance, if you want to use Spark to store large amounts of data in memory with the purpose of quickly filtering and retrieving subsets, you can expect Spark to use little execution or user memory. Therefore, to maximize storage memory, you can tune Spark as follows: config <- spark_config() # define memory available for storage and execution config$spark.memory.fraction <- 0.90 # define memory available for storage config$spark.memory.storageFraction <- 0.90 However, note that Spark will borrow execution memory from storage and vice versa if needed and if possible; therefore, in practice, there should be little need to tune the memory settings.

9.5 Shuffling

Shuffling is the operation that redistributes data across machines; it is usually expensive and therefore something you should try to minimize. You can easily identify whether significant time is being spent shuffling by looking at the event timeline. It is possible to reduce shuffling by reframing data analysis questions or hinting Spark appropriately. This would be relevant, for instance, when joining DataFrames that differ in size significantly; that is, one set is orders of magnitude smaller than the other one. You can consider using sdf_broadcast() to mark a DataFrame as small enough for use in broadcast joins, meaning it pushes one of the smaller DataFrames to each of the worker nodes to reduce shuffling the bigger DataFrame. Here’s one example for sdf_broadcast(): sdf_len(sc, 10000) %>% sdf_broadcast() %>% left_join(sdf_len(sc, 100))

9.6 Serialization

Serialization is the process of translating data and tasks into a format that can be transmitted between machines and reconstructed on the receiving end. It is not that common to need to adjust serialization when tuning Spark; however, it is worth mentioning that there are alternative serialization modules like the Kryo Serializer that can provide performance improvements over the default Java Serializer. You can turn on the Kryo Serializer in sparklyr through the following: config <- spark_config() config$spark.serializer <- "org.apache.spark.serializer.KryoSerializer" sc <- spark_connect(master = "local", config = config)

9.7 Configuration Files

Configuring the spark_config() settings before connecting is the most common approach while tuning Spark. However, after you identify the parameters in your connection, you should consider switching to use a configuration file since it will remove the clutter in your connection code and also allow you to share the configuration settings across projects and coworkers. For instance, instead of connecting to Spark like this: config <- spark_config() config["sparklyr.shell.driver-memory"] <- "2G" sc <- spark_connect(master = "local", config = config) you can define a config.yml file with the desired settings. This file should be located in the current working directory or in parent directories. For example, you can create the following config.yml file to modify the default driver memory: default: sparklyr.shell.driver-memory: 2G Then, connecting with the same configuration settings becomes much cleaner by using instead: sc <- spark_connect(master = "local") You can also specify an alternate configuration filename or location by setting the file parameter in spark_config(). One additional benefit from using configuration files is that a system administrator can change the default configuration by changing the value of the R_CONFIG_ACTIVE environment variable. See the GitHub rstudio/config repo for additional information.

9.8 Recap

This chapter provided a broad overview of Spark internals and detailed configuration settings to help you speed up computation and enable high computation loads. It provided the foundations to understand bottlenecks and guidance on common configuration considerations. However, fine-tuning Spark is a broad topic that would require many more chapters to cover extensively. Therefore, while troubleshooting Spark’s performance and scalability, searching the web, and consulting online communities, it is often necessary to fine-tune your particular environment as well. Chapter 10 introduces the ecosystem of Spark extensions that are available in R. Most extensions are highly specialized, but they will prove to be extremely useful in specific cases and for readers with particular needs. For instance, they can process nested data, perform graph analysis, and use different modeling libraries like rsparkling from H20. In addition, the next few chapters introduce many advanced data analysis and modeling topics that are required to master large-scale computing in R.

Chapter 10 Extensions

In Chapter 9, you learned how Spark processes data at large scale by allowing users to configure the cluster resources, partition data implicitly or explicitly, execute commands across distributed compute nodes, shuffle data across them when needed, cache data to improve performance, and serialize data efficiently over the network. You also learned how to configure the different Spark settings used while connecting, submitting a job, and running an application, as well as particular settings applicable only to R and R extensions that we present in this chapter. Chapters 3-4, and 8 provided a foundation to read and understand most datasets. However, the functionality that was presented was scoped to Spark’s built-in features and tabular datasets. This chapter goes beyond tabular data and explores how to analyze and model networks of interconnected objects through graph processing, analyze genomics datasets, prepare data for deep learning, analyze geographic datasets, and use advanced modeling libraries like H2O and XGBoost over large-scale datasets. The combination of all the content presented in the previous chapters should take care of most of your large-scale computing needs. However, for those few use cases for which functionality is still lacking, the following chapters provide tools to extend Spark yourself—through custom R transformation, custom Scala code, or a recent new execution mode in Spark that enables analyzing real-time datasets. However, before reinventing the wheel, let’s examine some of the extensions available in Spark.

10.1 Overview

In Chapter 1, we presented the R community as a vibrant group of individuals collaborating with each other in many ways—for example, moving open science forward by creating R packages that you can install from CRAN. In a similar way, but at a much smaller scale, the R community has contributed extensions that increase the functionality initially supported in Spark and R. Spark itself also provides support for creating Spark extensions and, in fact, many R extensions make use of Spark extensions. Extensions are constantly being created, so this section will be outdated at some given point in time. In addition, we might not even be aware of many Spark and R extensions. However, at the very least we can track the extensions that are available in CRAN by looking at the “reverse imports” for sparklyr in CRAN. Extensions and R packages published in CRAN tend to be the most stable since when a package is published in CRAN, it goes through a review process that increases the overall quality of a contribution. While we wish we could present all the extensions, we’ve instead scoped this chapter to the extensions that should be the most interesting to you. You can find additional extensions at the github.com/r-spark organization or by searching repositories on GitHub with the sparklyr tag.
rsparkling
The rsparkling extensions allows you to use H2O and Spark from R. This extension is what we would consider advanced modeling in Spark. While Spark’s built-in modeling library, Spark MLlib, is quite useful in many cases; H2O’s modeling capabilities can compute additional statistical metrics and can provide performance and scalability improvements over Spark MLlib. We, ourselves, have not performed detailed comparisons nor benchmarks between MLlib and H2O; so this is something you will have to research on your own to create a complete picture of when to use H2O’s capabilities.
graphframes
The graphframes extensions adds support to process graphs in Spark. A graph is a structure that describes a set of objects in which some pairs of the objects are in some sense related. As you learned in Chapter 1, ranking web pages was an early motivation to develop precursors to Spark powered by MapReduce; web pages happen to form a graph if you consider a link between pages as the relationship between each pair of pages. Computing operations likes PageRank over graphs can be quite useful in web search and social networks, for example.
sparktf
The sparktf extension provides support to write TensorFlow records in Spark. TensorFlow is one of the leading deep learning frameworks, and it is often used with large amounts of numerical data represented as TensorFlow records, a file format optimized for TensorFlow. Spark is often used to process unstructured and large-scale datasets into smaller numerical datasets that can easily fit into a GPU. You can use this extension to save datasets in the TensorFlow record file format.
xgboost
The xgboost extension brings the well-known XGBoost modeling library to the world of large-scale computing. XGBoost is a scalable, portable, and distributed library for gradient boosting. It became well known in the machine learning competition circles after its use in the winning solution of the Higgs Boson Machine Learning Challenge and has remained popular in other Kaggle competitions since then.
variantspark
The variantspark extension provides an interface to use Variant Spark, a scalable toolkit for genome-wide association studies (GWAS). It currently provides functionality to build random forest models, estimating variable importance, and reading variant call format (VCF) files. While there are other random forest implementations in Spark, most of them are not optimized to deal with GWAS datasets, which usually come with thousands of samples and millions of pass:[variables].
geospark
The geospark extension enables us to load and query large-scale geographic datasets. Usually datasets containing latitude and longitude points or complex areas are defined in the well-known text (WKT) format, a text markup language for representing vector geometry objects on a map. Before you learn how and when to use each extension, we should first briefly explain how you can use extensions with R and Spark. First, a Spark extension is just an R package that happens to be aware of Spark. As with any other R package, you will first need to install the extension. After you’ve installed it, it is important to know that you will need to reconnect to Spark before the extension can be used. So, in general, here’s the pattern you should follow: library(sparkextension) library(sparklyr) sc <- spark_connect(master = "<master>") Notice that sparklyr is loaded after the extension to allow the extension to register properly. If you had to install and load a new extension, you would first need to disconnect using spark_disconnect(sc), restart your R session, and repeat the preceding steps with the new extension. It’s not difficult to install and use Spark extensions from R; however, each extension can be a world of its own, so most of the time you will need to spend time understanding what the extension is, when to use it, and how to use it properly. The first extension you will learn about is the rsparkling extension, which enables you to use H2O in Spark with R.

10.2 H2O

H2O, created by H2O.ai, is open source software for large-scale modeling that allows you to fit thousands of potential models as part of discovering patterns in data. You can consider using H2O to complement or replace Spark’s default modeling algorithms. It is common to use Spark’s default modeling algorithms and transition to H2O when Spark’s algorithms fall short or when advanced functionality (like additional modeling metrics or automatic model selection) is desired. We can’t do justice to H2O’s great modeling capabilities in a single paragraph; explaining H2O properly would require a book in and of itself. Instead, we would like to recommend reading Darren Cook’s Practical Machine Learning with H2O (O’Reilly) to explore in-depth H2O’s modeling algorithms and features. In the meantime, you can use this section as a brief guide to get started using H2O in Spark with R. To use H2O with Spark, it is important to know that there are four components involved: H2O, Sparkling Water, rsparkling, and Spark. Sparkling Water allows users to combine the fast, scalable machine learning algorithms of H2O with the capabilities of Spark. You can think of Sparkling Water as a component bridging Spark with H2O and rsparkling as the R frontend for Sparkling Water, as depicted in Figure 10.1. 
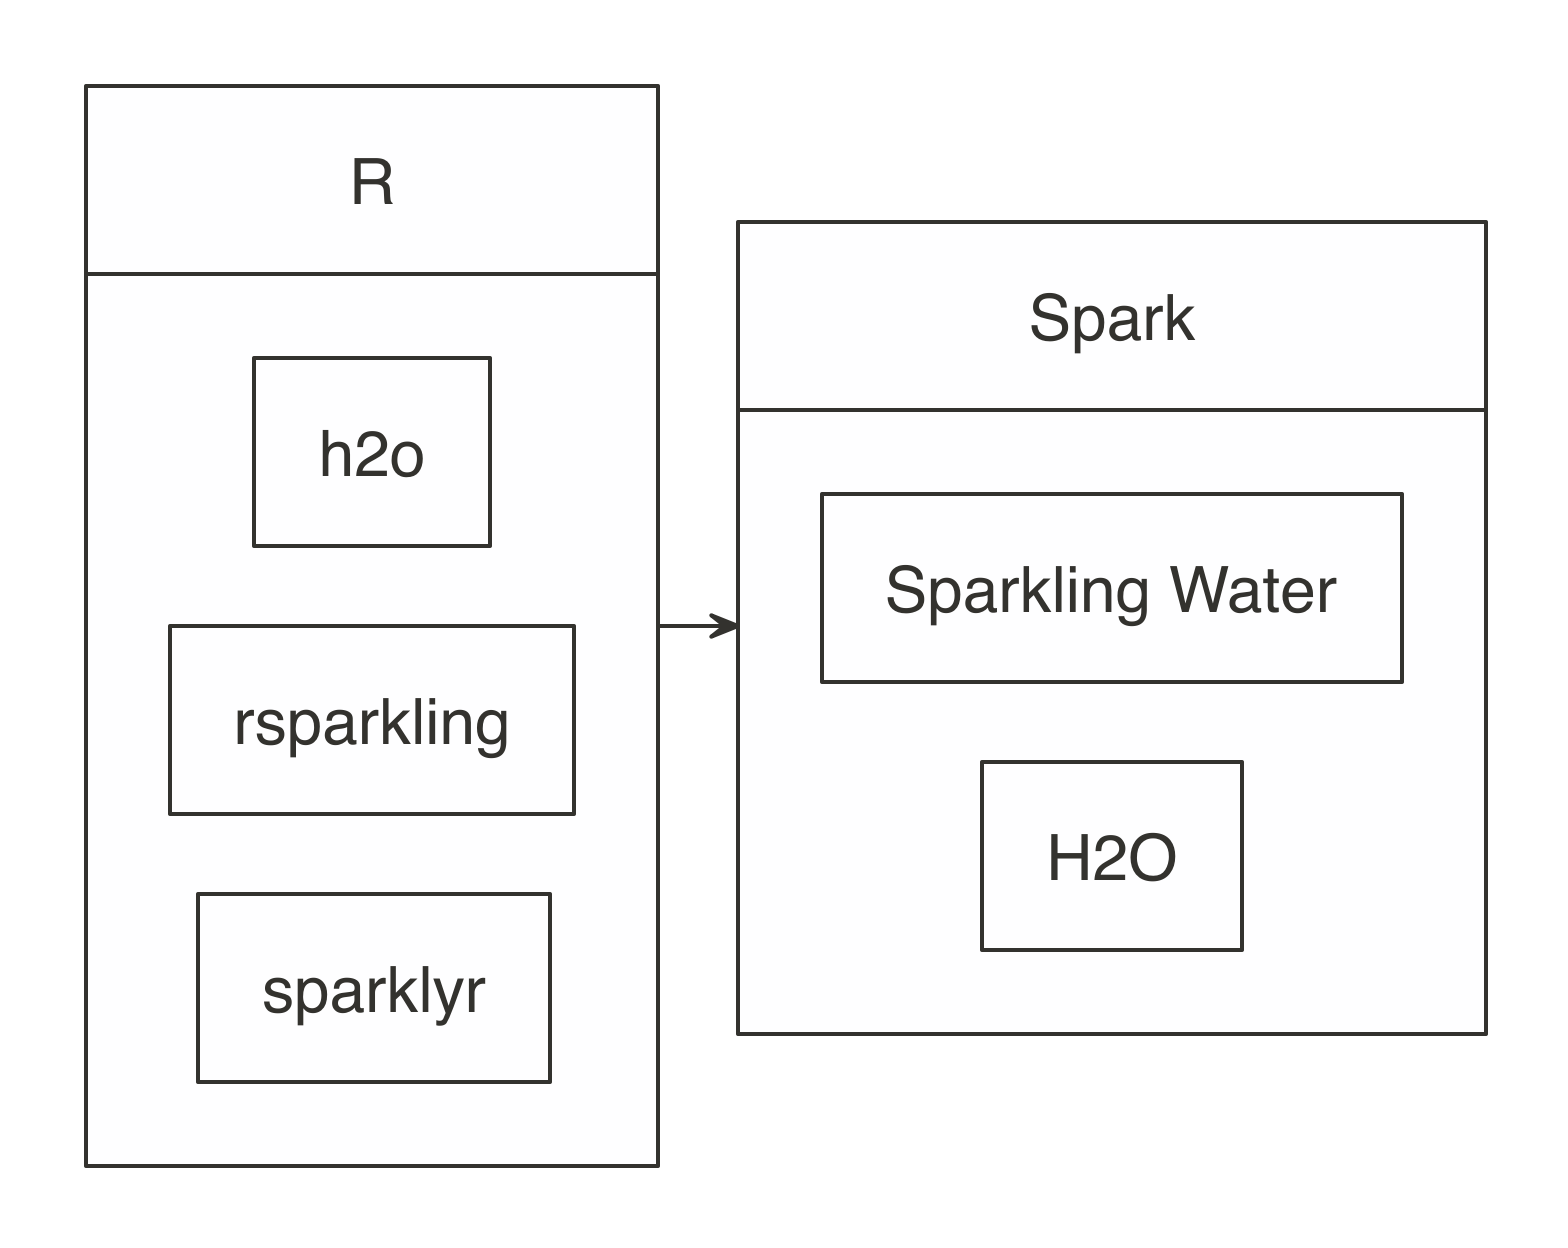
FIGURE 10.1: H2O components with Spark and R First, install rsparkling and h2o as specified on the rsparkling documentation site. install.packages("h2o", type = "source", repos = "http://h2o-release.s3.amazonaws.com/h2o/rel-yates/5/R") install.packages("rsparkling", type = "source", repos = "http://h2o-release.s3.amazonaws.com/sparkling-water/rel-2.3/31/R") It is important to note that you need to use compatible versions of Spark, Sparkling Water, and H2O as specified in their documentation; we present instructions for Spark 2.3, but using different Spark versions will require you to install different versions. So let’s start by checking the version of H2O by running the following: packageVersion("h2o") ## [1] '3.26.0.2' packageVersion("rsparkling") ## [1] '0.2.18' We then can connect with the supported Spark versions as follows (you will have to adjust the master parameter for your particular cluster): library(rsparkling) library(sparklyr) library(h2o) sc <- spark_connect(master = "local", version = "2.3", config = list(sparklyr.connect.timeout = 3 * 60)) cars <- copy_to(sc, mtcars) H2O provides a web interface that can help you monitor training and access much of H2O’s functionality. You can access the web interface (called H2O Flow) through h2o_flow(sc), as shown in Figure 10.2. When using H2O, you will have to convert your Spark DataFrame into and H2O DataFrame through as_h2o_frame: cars_h2o <- as_h2o_frame(sc, cars) cars_h2o mpg cyl disp hp drat wt qsec vs am gear carb 1 21.0 6 160 110 3.90 2.620 16.46 0 1 4 4 2 21.0 6 160 110 3.90 2.875 17.02 0 1 4 4 3 22.8 4 108 93 3.85 2.320 18.61 1 1 4 1 4 21.4 6 258 110 3.08 3.215 19.44 1 0 3 1 5 18.7 8 360 175 3.15 3.440 17.02 0 0 3 2 6 18.1 6 225 105 2.76 3.460 20.22 1 0 3 1 [32 rows x 11 columns] 
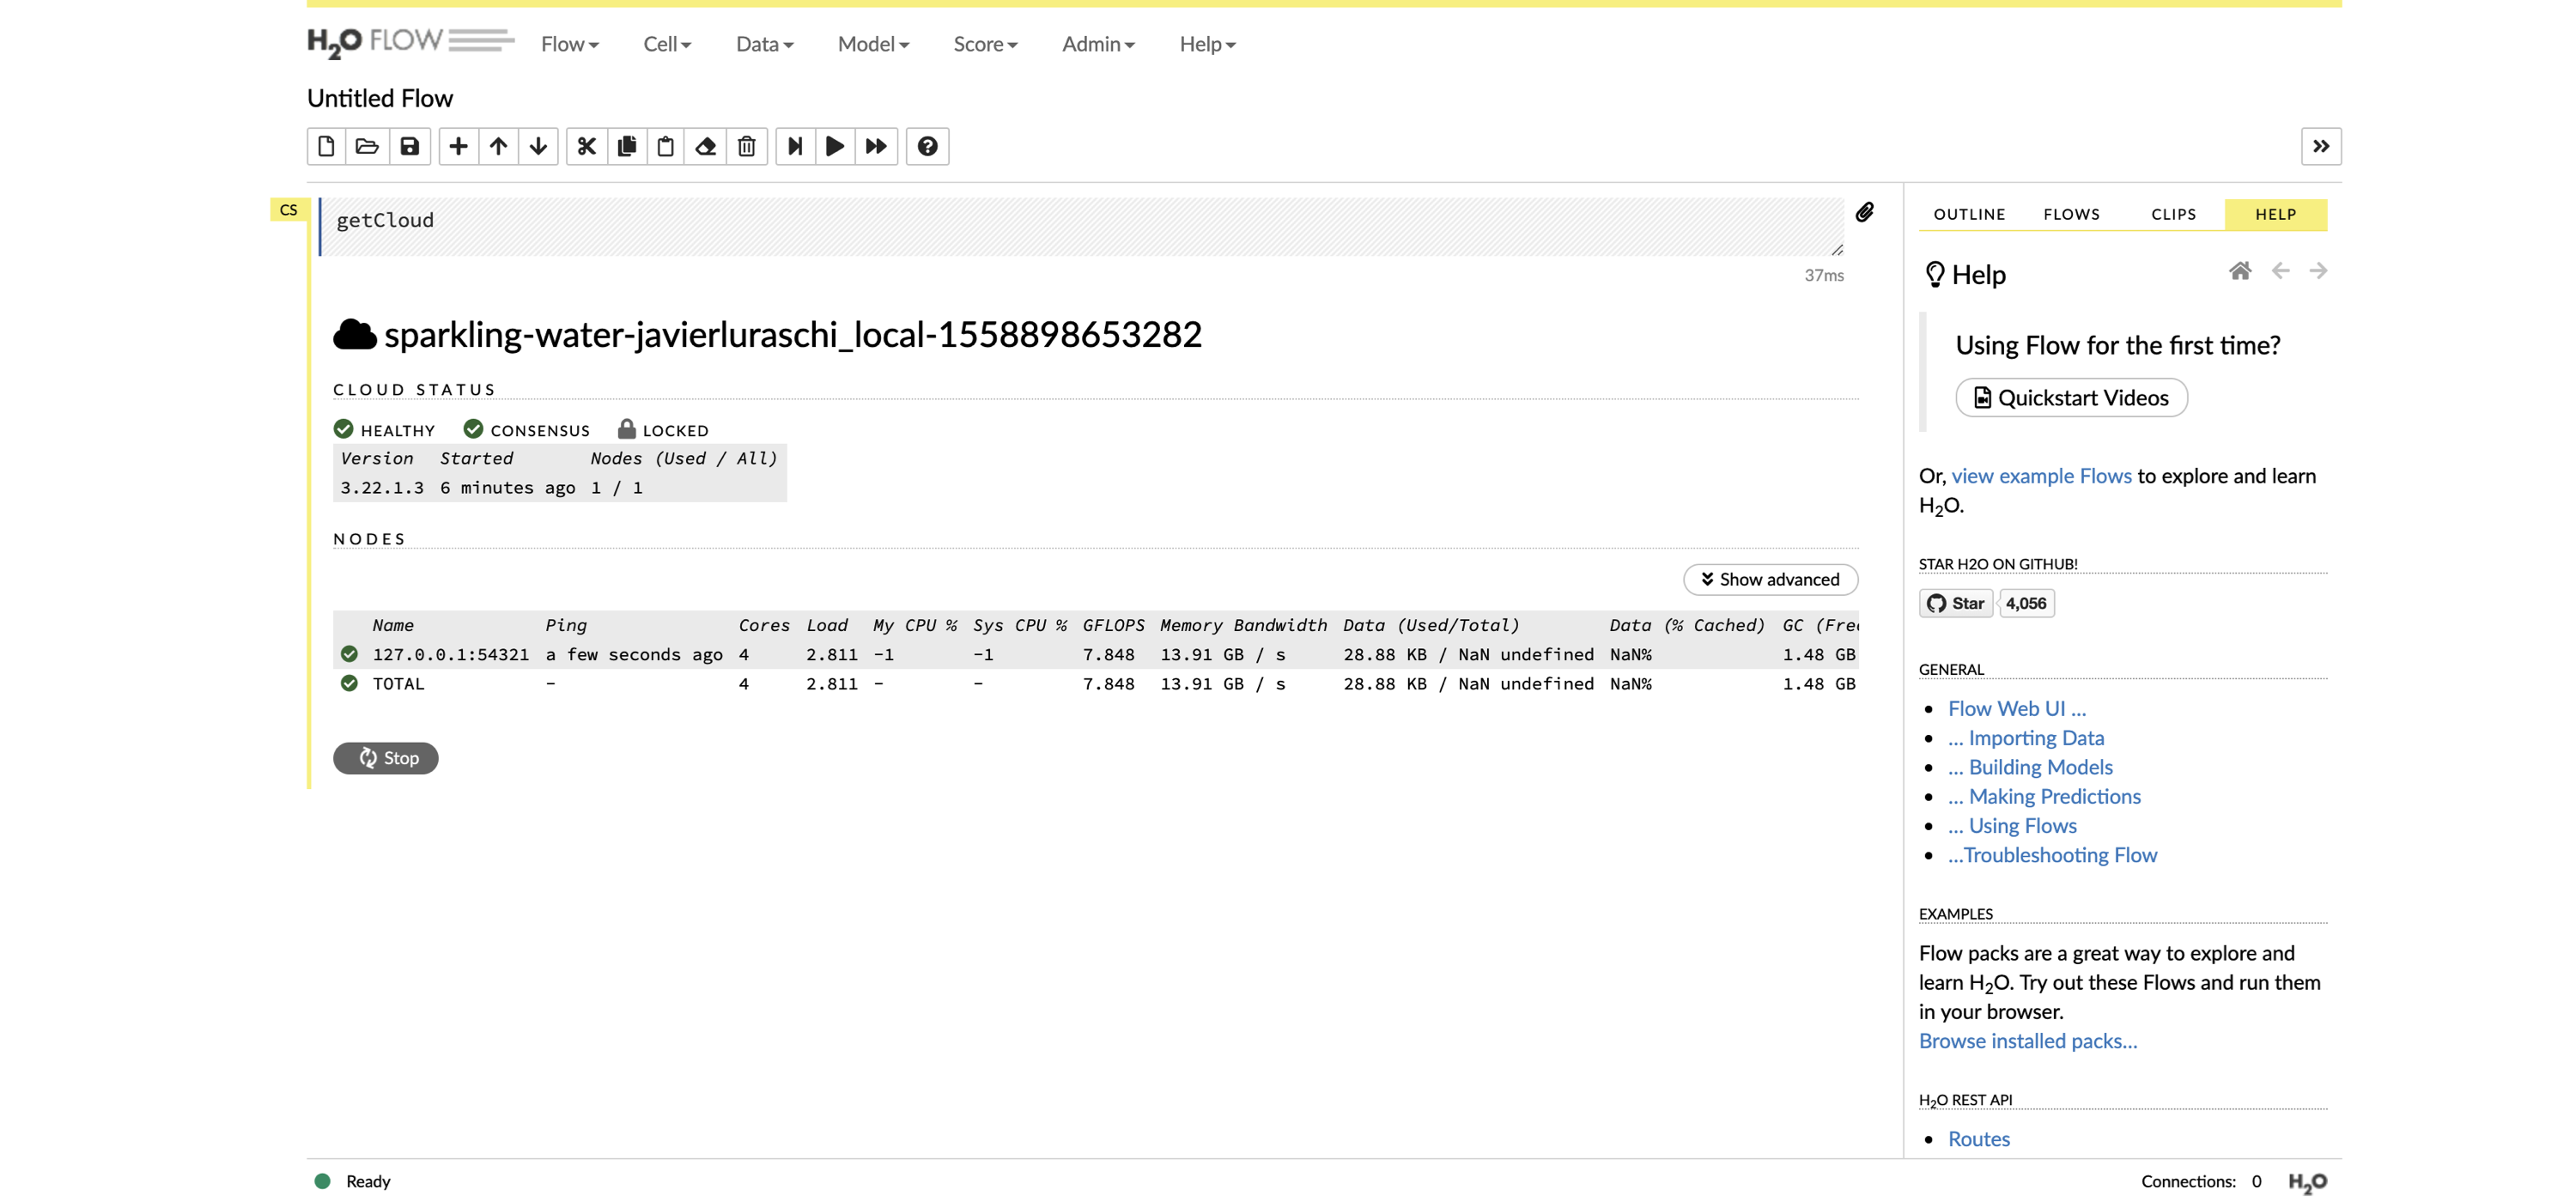
FIGURE 10.2: The H2O Flow interface using Spark with R Then, you can use many of the modeling functions available in the h2o package with ease. For instance, we can fit a generalized linear model with ease: model <- h2o.glm(x = c("wt", "cyl"), y = "mpg", training_frame = cars_h2o, lambda_search = TRUE) H2O provides additional metrics not necessarily available in Spark’s modeling algorithms. The model that we just fit, Residual Deviance, is provided in the model, while this would not be a standard metric when using Spark MLlib. model ... MSE: 6.017684 RMSE: 2.453097 MAE: 1.940985 RMSLE: 0.1114801 Mean Residual Deviance : 6.017684 R^2 : 0.8289895 Null Deviance :1126.047 Null D.o.F. :31 Residual Deviance :192.5659 Residual D.o.F. :29 AIC :156.2425 Then, you can run prediction over the generalized linear model (GLM). A similar approach would work for many other models available in H2O: predictions <- as_h2o_frame(sc, copy_to(sc, data.frame(wt = 2, cyl = 6))) h2o.predict(model, predictions) predict 1 24.05984 [1 row x 1 column] You can also use H2O to perform automatic training and tuning of many models, meaning that H2O can choose which model to use for you using AutoML: automl <- h2o.automl(x = c("wt", "cyl"), y = "mpg", training_frame = cars_h2o, max_models = 20, seed = 1) For this particular dataset, H2O determines that a deep learning model is a better fit than a GLM. Specifically, H2O’s AutoML explored using XGBoost, deep learning, GLM, and a Stacked Ensemble model: automl@leaderboard model_id mean_residual_dev… rmse mse mae rmsle 1 DeepLearning_… 6.541322 2.557601 6.541322 2.192295 0.1242028 2 XGBoost_grid_1… 6.958945 2.637981 6.958945 2.129421 0.1347795 3 XGBoost_grid_1_… 6.969577 2.639996 6.969577 2.178845 0.1336290 4 XGBoost_grid_1_… 7.266691 2.695680 7.266691 2.167930 0.1331849 5 StackedEnsemble… 7.304556 2.702694 7.304556 1.938982 0.1304792 6 XGBoost_3_… 7.313948 2.704431 7.313948 2.088791 0.1348819 Rather than using the leaderboard, you can focus on the best model through automl@leader; for example, you can glance at the particular parameters from this deep learning model as follows: tibble::tibble(parameter = names(automl@leader@parameters), value = as.character(automl@leader@parameters)) # A tibble: 20 x 2 parameter values <chr> <chr> 1 model_id DeepLearning_grid_1_AutoML… 2 training_frame automl_training_frame_rdd… 3 nfolds 5 4 keep_cross_validation_models FALSE 5 keep_cross_validation_predictions TRUE 6 fold_assignment Modulo 7 overwrite_with_best_model FALSE 8 activation RectifierWithDropout 9 hidden 200 10 epochs 10003.6618461538 11 seed 1 12 rho 0.95 13 epsilon 1e-06 14 input_dropout_ratio 0.2 15 hidden_dropout_ratios 0.4 16 stopping_rounds 0 17 stopping_metric deviance 18 stopping_tolerance 0.05 19 x c("cyl", "wt") 20 y mpg You can then predict using the leader as follows: h2o.predict(automl@leader, predictions) predict 1 30.74639 [1 row x 1 column] Many additional examples are available, and you can also request help from the official GitHub repository for the rsparkling package. The next extension, graphframes, allows you to process large-scale relational datasets. Before you start using it, make sure to disconnect with spark_disconnect(sc) and restart your R session since using a different extension requires you to reconnect to Spark and reload sparklyr.

10.3 Graphs

The first paper in the history of graph theory was written by Leonhard Euler on the Seven Bridges of Königsberg in 1736. The problem was to devise a walk through the city that would cross each bridge once and only once. Figure 10.3 presents the original diagram. FIGURE 10.3: The Seven Bridges of Königsberg from the Euler archive Today, a graph is defined as an ordered pair \(G=(V,E)\), with \(V\) a set of vertices (nodes or points) and \(E \subseteq \{\{x, y\} | (x, y) ∈ \mathrm{V}^2 \land x \ne y\}\) a set of edges (links or lines), which are either an unordered pair for undirected graphs or an ordered pair for directed graphs. The former describes links where the direction does not matter, and the latter describes links where it does. As a simple example, we can use the highschool dataset from the ggraph package, which tracks friendship among high school boys. In this dataset, the vertices are the students and the edges describe pairs of students who happen to be friends in a particular year: install.packages("ggraph") install.packages("igraph") ggraph::highschool # A tibble: 506 x 3 from to year <dbl> <dbl> <dbl> 1 1 14 1957 2 1 15 1957 3 1 21 1957 4 1 54 1957 5 1 55 1957 6 2 21 1957 7 2 22 1957 8 3 9 1957 9 3 15 1957 10 4 5 1957 # … with 496 more rows While the high school dataset can easily be processed in R, even medium-size graph datasets can be difficult to process without distributing this work across a cluster of machines, for which Spark is well suited. Spark supports processing graphs through the graphframes extension, which in turn uses the GraphX Spark component. GraphX is Apache Spark’s API for graphs and graph-parallel computation. It’s comparable in performance to the fastest specialized graph-processing systems and provides a growing library of graph algorithms. A graph in Spark is also represented as a DataFrame of edges and vertices; however, our format is slightly different since we will need to construct a DataFrame for vertices. Let’s first install the graphframes extension: install.packages("graphframes") Next, we need to connect, copying the highschool dataset and transforming the graph to the format that this extension expects. Here, we scope this dataset to the friendships of the year 1957: library(graphframes) library(sparklyr) library(dplyr) sc <- spark_connect(master = "local", version = "2.3") highschool_tbl <- copy_to(sc, ggraph::highschool, "highschool") %>% filter(year == 1957) %>% transmute(from = as.character(as.integer(from)), to = as.character(as.integer(to))) from_tbl <- highschool_tbl %>% distinct(from) %>% transmute(id = from) to_tbl <- highschool_tbl %>% distinct(to) %>% transmute(id = to) vertices_tbl <- distinct(sdf_bind_rows(from_tbl, to_tbl)) edges_tbl <- highschool_tbl %>% transmute(src = from, dst = to) The vertices_tbl table is expected to have a single id column: vertices_tbl # Source: spark<?> [?? x 1] id <chr> 1 1 2 34 3 37 4 43 5 44 6 45 7 56 8 57 9 65 10 71 # … with more rows And the edges_tbl is expected to have src and dst columns: edges_tbl # Source: spark<?> [?? x 2] src dst <chr> <chr> 1 1 14 2 1 15 3 1 21 4 1 54 5 1 55 6 2 21 7 2 22 8 3 9 9 3 15 10 4 5 # … with more rows You can now create a GraphFrame: graph <- gf_graphframe(vertices_tbl, edges_tbl) We now can use this graph to start analyzing this dataset. For instance, we’ll find out how many friends on average every boy has, which is referred to as the degree or valency of a vertex: gf_degrees(graph) %>% summarise(friends = mean(degree)) # Source: spark<?> [?? x 1] friends <dbl> 1 6.94 We then can find what the shortest path to some specific vertex (a boy for this dataset). Since the data is anonymized, we can just pick the boy identified as 33 and find how many degrees of separation exist between them: gf_shortest_paths(graph, 33) %>% filter(size(distances) > 0) %>% mutate(distance = explode(map_values(distances))) %>% select(id, distance) # Source: spark<?> [?? x 2] id distance <chr> <int> 1 19 5 2 5 4 3 27 6 4 4 4 5 11 6 6 23 4 7 36 1 8 26 2 9 33 0 10 18 5 # … with more rows Finally, we can also compute PageRank over this graph, which was presented in Chapter 1’s discussion of Google’s page ranking algorithm: gf_graphframe(vertices_tbl, edges_tbl) %>% gf_pagerank(reset_prob = 0.15, max_iter = 10L) GraphFrame Vertices: Database: spark_connection $ id <dbl> 12, 12, 14, 14, 27, 27, 55, 55, 64, 64, 41, 41, 47, 47, 6… $ pagerank <dbl> 0.3573460, 0.3573460, 0.3893665, 0.3893665, 0.2362396, 0.… Edges: Database: spark_connection $ src <dbl> 7, 7, 7, 7, 7, 7, 7, 7, 7, 7, 7, 7, 7, 7, 7, 7, 12, 12, 12,… $ dst <dbl> 17, 17, 17, 17, 17, 17, 17, 17, 17, 17, 17, 17, 17, 17, 17,… $ weight <dbl> 0.25000000, 0.25000000, 0.25000000, 0.25000000, 0.25000000,… To give you some insights into this dataset, Figure 10.4 plots this chart using the ggraph and highlights the highest PageRank scores for the following dataset: highschool_tbl %>% igraph::graph_from_data_frame(directed = FALSE) %>% ggraph(layout = 'kk') + geom_edge_link(alpha = 0.2, arrow = arrow(length = unit(2, 'mm')), end_cap = circle(2, 'mm'), start_cap = circle(2, 'mm')) + geom_node_point(size = 2, alpha = 0.4) 
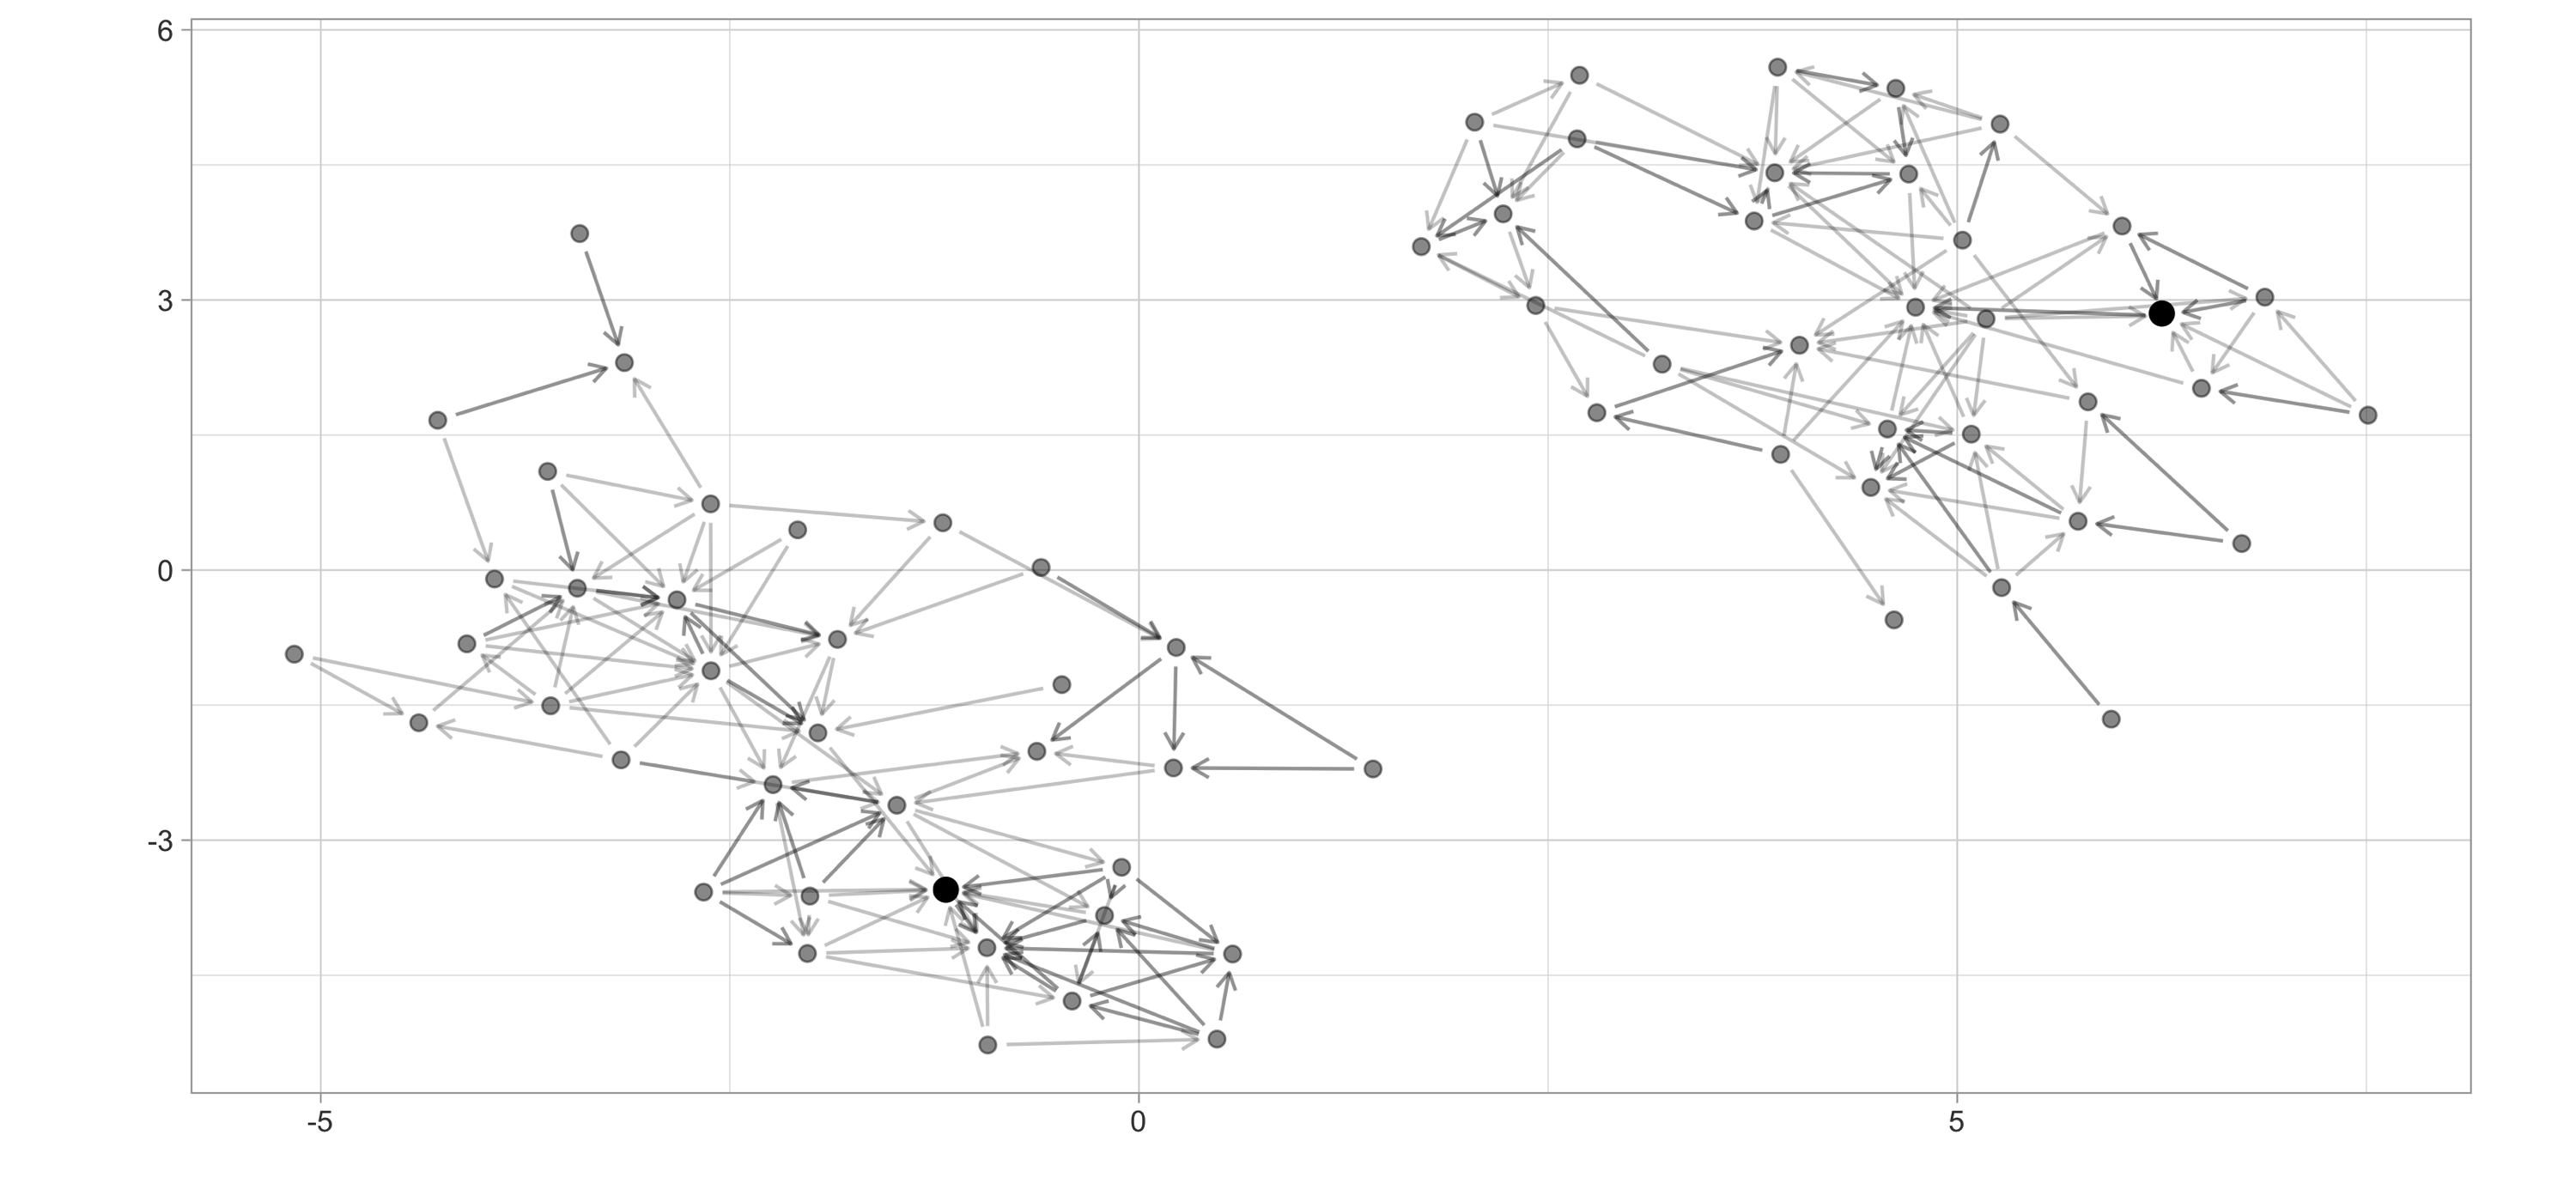
FIGURE 10.4: High school ggraph dataset with highest PageRank highlighted There are many more graph algorithms provided in graphframes—for example, breadth-first search, connected components, label propagation for detecting communities, strongly connected components, and triangle count. For questions on this extension refer to the official GitHub repository. We now present a popular gradient-boosting framework—make sure to disconnect and restart before trying the next extension.

10.4 XGBoost

A decision tree is a flowchart-like structure in which each internal node represents a test on an attribute, each branch represents the outcome of the test, and each leaf node represents a class label. For example, Figure 10.5 shows a decision tree that could help classify whether an employee is likely to leave given a set of factors like job satisfaction and overtime. When a decision tree is used to predict continuous variables instead of discrete outcomes—say, how likely someone is to leave a company—it is referred to as a regression tree. 
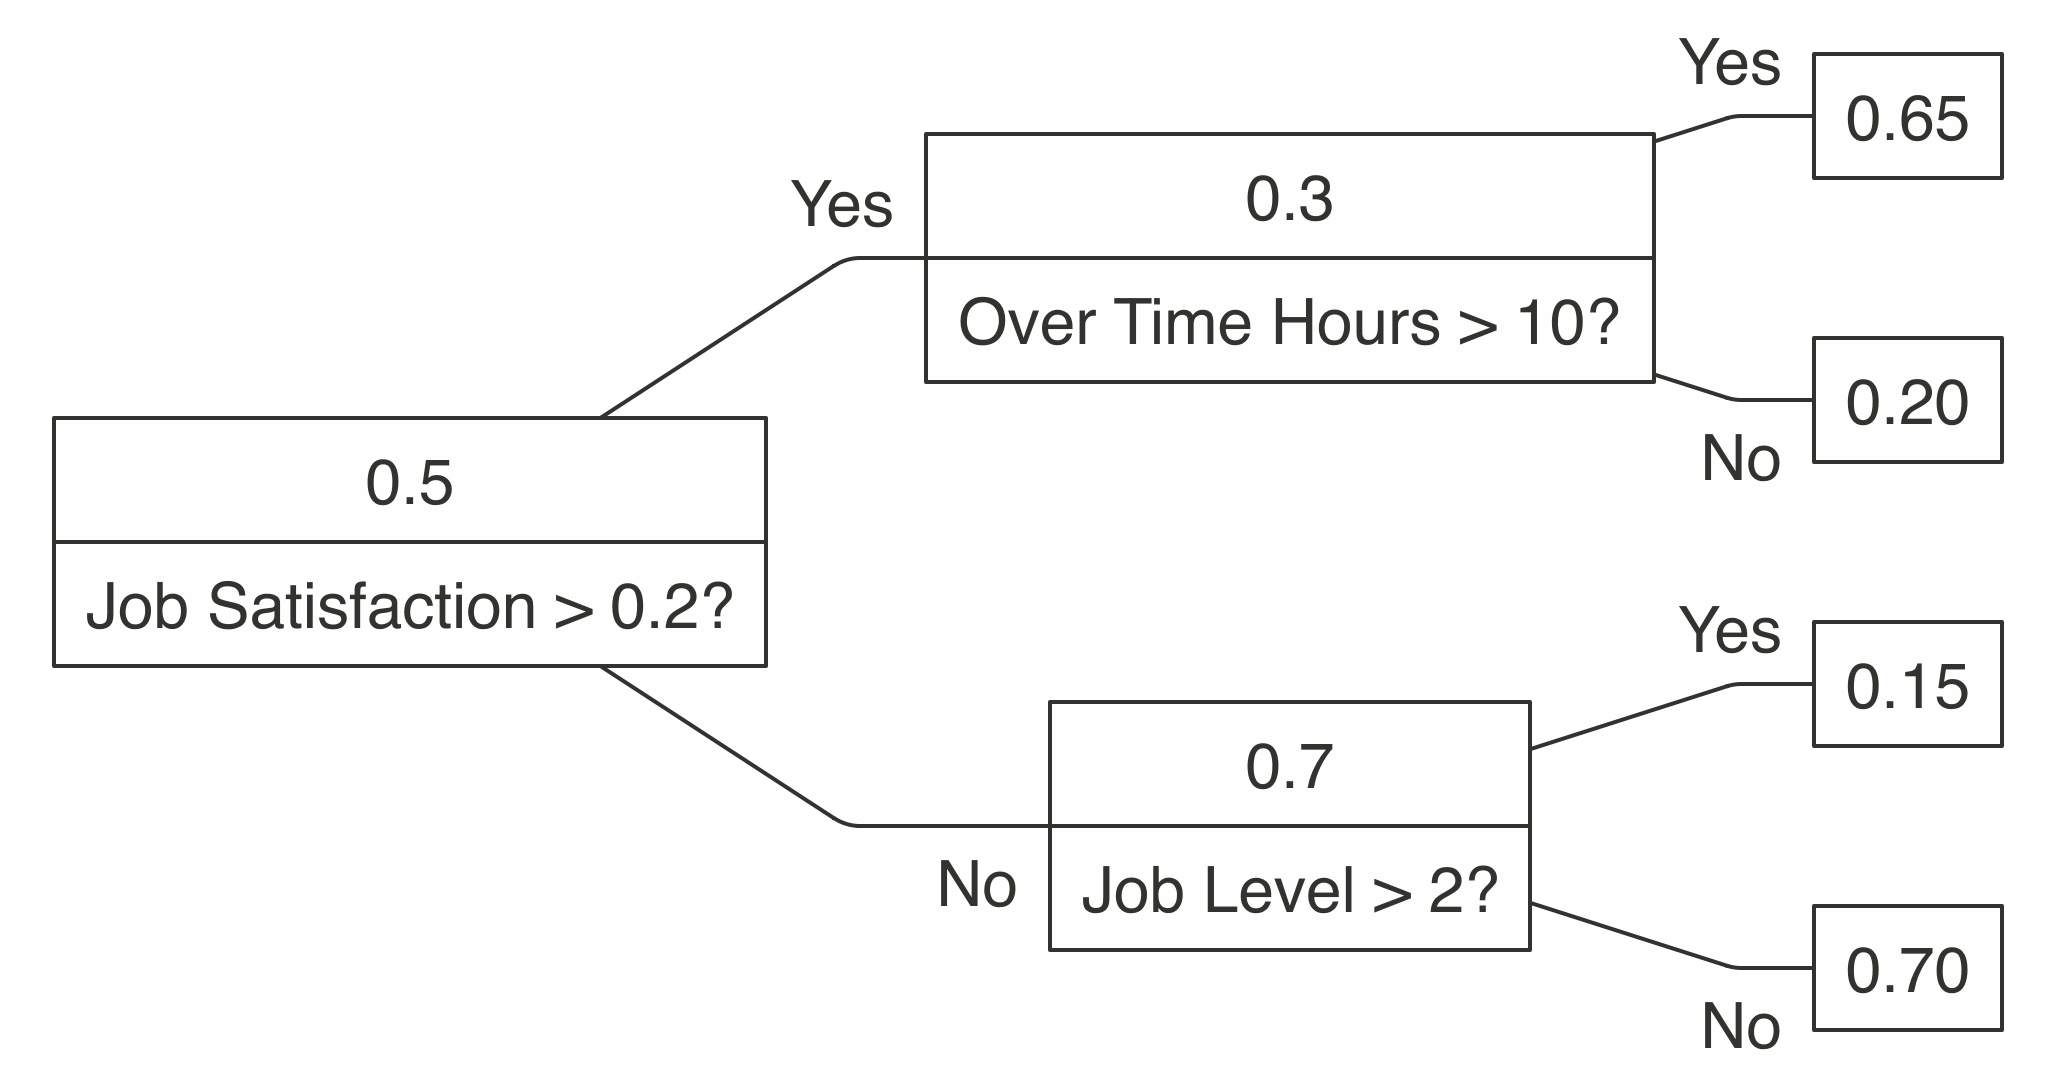
FIGURE 10.5: A decision tree to predict job attrition based on known factors While a decision tree representation is quite easy to understand and to interpret, finding out the decisions in the tree requires mathematical techniques like gradient descent to find a local minimum. Gradient descent takes steps proportional to the negative of the gradient of the function at the current point. The gradient is represented by \(\nabla\), and the learning rate by \(\gamma\). You simply start from a given state \(a_n\) and compute the next iteration \(a_{n+1}\) by following the direction of the gradient:
\(a_{n+1} = a_n - \gamma \nabla F(a_n)\)
XGBoost is an open source software library that provides a gradient-boosting framework. It aims to provide scalable, portable, and distributed gradient boosting for training gradient-boosted decision trees (GBDT) and gradient-boosted regression trees (GBRT). Gradient-boosted means XGBoost uses gradient descent and boosting, which is a technique that chooses each predictor sequentially. sparkxgb is an extension that you can use to train XGBoost models in Spark; however, be aware that currently Windows is unsupported. To use this extension, first install it from CRAN: install.packages("sparkxgb") Then, you need to import the sparkxgb extension followed by your usual Spark connection code, adjusting master as needed: library(sparkxgb) library(sparklyr) library(dplyr) sc <- spark_connect(master = "local", version = "2.3") For this example, we use the attrition dataset from the rsample package, which you would need to install by using install.packages("rsample"). This is a fictional dataset created by IBM data scientists to uncover the factors that lead to employee attrition: attrition <- copy_to(sc, rsample::attrition) attrition # Source: spark<?> [?? x 31] Age Attrition BusinessTravel DailyRate Department DistanceFromHome <int> <chr> <chr> <int> <chr> <int> 1 41 Yes Travel_Rarely 1102 Sales 1 2 49 No Travel_Freque… 279 Research_… 8 3 37 Yes Travel_Rarely 1373 Research_… 2 4 33 No Travel_Freque… 1392 Research_… 3 5 27 No Travel_Rarely 591 Research_… 2 6 32 No Travel_Freque… 1005 Research_… 2 7 59 No Travel_Rarely 1324 Research_… 3 8 30 No Travel_Rarely 1358 Research_… 24 9 38 No Travel_Freque… 216 Research_… 23 10 36 No Travel_Rarely 1299 Research_… 27 # … with more rows, and 25 more variables: Education <chr>, # EducationField <chr>, EnvironmentSatisfaction <chr>, Gender <chr>, # HourlyRate <int>, JobInvolvement <chr>, JobLevel <int>, JobRole <chr>, # JobSatisfaction <chr>, MaritalStatus <chr>, MonthlyIncome <int>, # MonthlyRate <int>, NumCompaniesWorked <int>, OverTime <chr>, # PercentSalaryHike <int>, PerformanceRating <chr>, # RelationshipSatisfaction <chr>, StockOptionLevel <int>, # TotalWorkingYears <int>, TrainingTimesLastYear <int>, # WorkLifeBalance <chr>, YearsAtCompany <int>, YearsInCurrentRole <int>, # YearsSinceLastPromotion <int>, YearsWithCurrManager <int> To build an XGBoost model in Spark, use xgboost_classifier(). We will compute attrition against all other features by using the Attrition ~ . formula and specify 2 for the number of classes since the attrition attribute tracks only whether an employee leaves or stays. Then, you can use ml_predict() to predict over large-scale datasets: xgb_model <- xgboost_classifier(attrition, Attrition ~ ., num_class = 2, num_round = 50, max_depth = 4) xgb_model %>% ml_predict(attrition) %>% select(Attrition, predicted_label, starts_with("probability_")) %>% glimpse() Observations: ?? Variables: 4 Database: spark_connection $ Attrition <chr> "Yes", "No", "Yes", "No", "No", "No", "No", "No", "No", … $ predicted_label <chr> "No", "Yes", "No", "Yes", "Yes", "Yes", "Yes", "Yes", "Y… $ probability_No <dbl> 0.753938094, 0.024780750, 0.915146366, 0.143568754, 0.07… $ probability_Yes <dbl> 0.24606191, 0.97521925, 0.08485363, 0.85643125, 0.927375… XGBoost became well known in the competition circles after its use in the winning solution of the Higgs Machine Learning Challenge, which uses the ATLAS experiment to identify the Higgs boson. Since then, it has become a popular model and used for a large number of Kaggle competitions. However, decision trees could prove limiting especially in datasets with nontabular data like images, audio, and text, which you can better tackle with deep learning models—should we remind you to disconnect and restart?

10.5 Deep Learning

A perceptron is a mathematical model introduced by Frank Rosenblatt, who developed it as a theory for a hypothetical nervous system. The perceptron maps stimuli to numeric inputs that are weighted into a threshold function that activates only when enough stimuli is present, mathematically: \(f(x) = \begin{cases} 1 & \sum_{i=1}^m w_i x_i + b > 0\\ 0 & \text{otherwise} \end{cases}\) Minsky and Papert found out that a single perceptron can classify only datasets that are linearly separable; however, they also revealed in their book Perceptrons that layering perceptrons would bring additional classification capabilities. Figure 10.6 presents the original diagram showcasing a multilayered perceptron. 
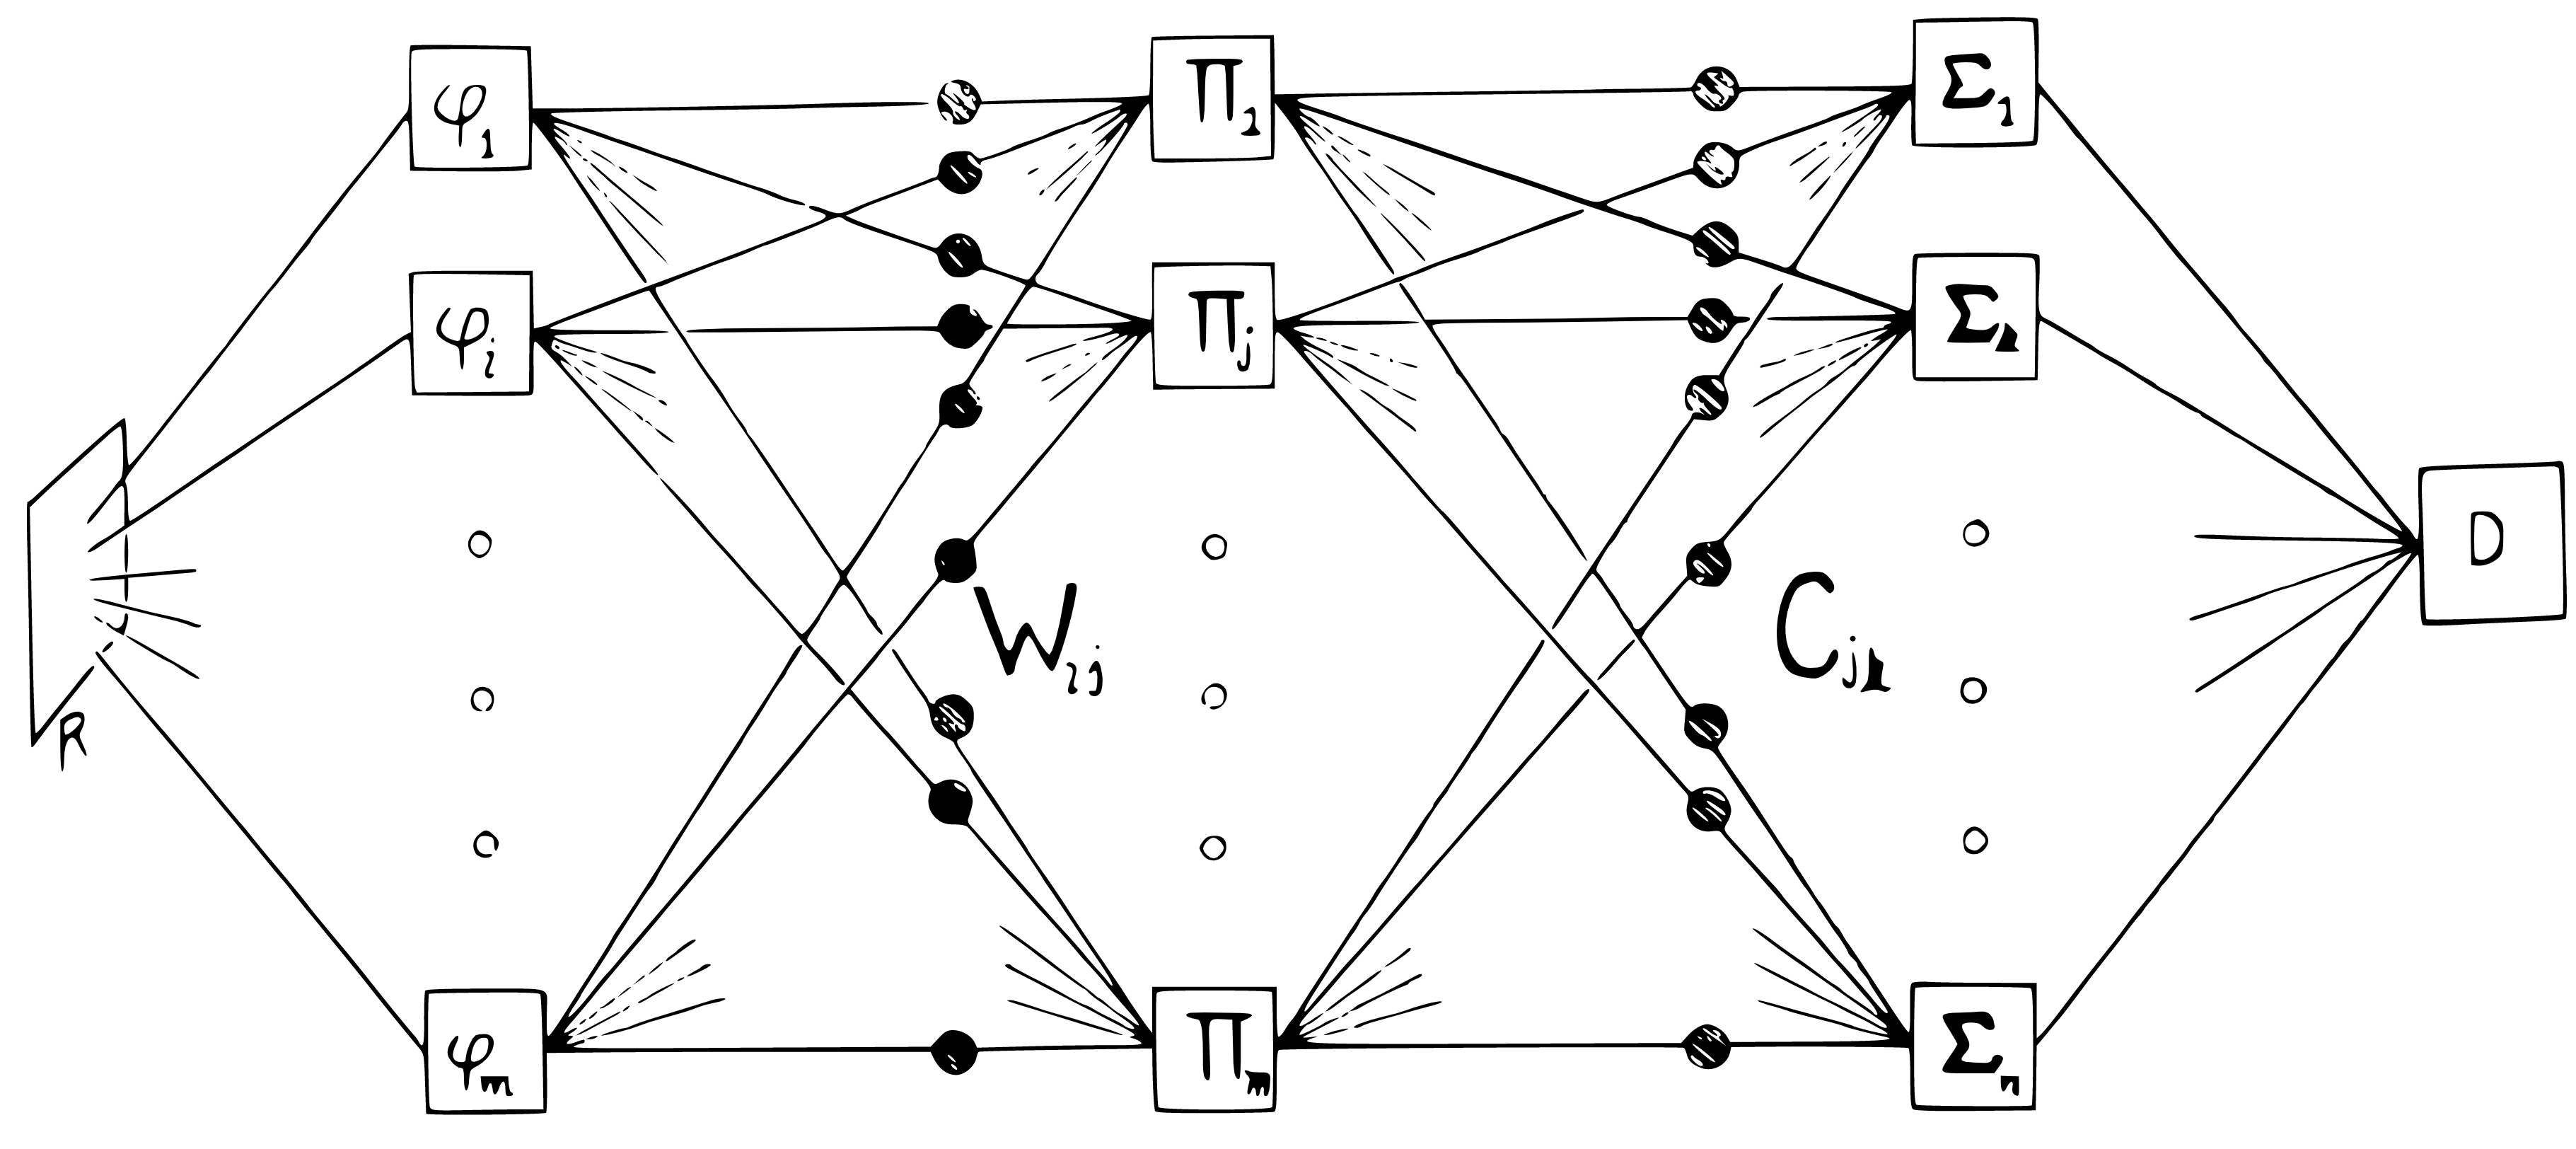
FIGURE 10.6: Layered perceptrons, as illustrated in the book Perceptrons Before we start, let’s first install all the packages that we are about to use: install.packages("sparktf") install.packages("tfdatasets") Using Spark we can create a multilayer perceptron classifier with ml_multilayer_perceptron_classifier() and gradient descent to classify and predict over large datasets. Gradient descent was introduced to layered perceptrons by Geoff Hinton. library(sparktf) library(sparklyr) sc <- spark_connect(master = "local", version = "2.3") attrition <- copy_to(sc, rsample::attrition) nn_model <- ml_multilayer_perceptron_classifier( attrition, Attrition ~ Age + DailyRate + DistanceFromHome + MonthlyIncome, layers = c(4, 3, 2), solver = "gd") nn_model %>% ml_predict(attrition) %>% select(Attrition, predicted_label, starts_with("probability_")) %>% glimpse() Observations: ?? Variables: 4 Database: spark_connection $ Attrition <chr> "Yes", "No", "Yes", "No", "No", "No", "No", "No", "No"… $ predicted_label <chr> "No", "No", "No", "No", "No", "No", "No", "No", "No", … $ probability_No <dbl> 0.8439275, 0.8439275, 0.8439275, 0.8439275, 0.8439275,… $ probability_Yes <dbl> 0.1560725, 0.1560725, 0.1560725, 0.1560725, 0.1560725,… Notice that the columns must be numeric, so you will need to manually convert them with the feature transforming techniques presented in Chapter 4. It is natural to try to add more layers to classify more complex datasets; however, adding too many layers will cause the gradient to vanish, and other techniques will need to use these deep layered networks, also known as deep learning models. Deep learning models solve the vanishing gradient problem by making use of special activation functions, dropout, data augmentation and GPUs. You can use Spark to retrieve and preprocess large datasets into numerical-only datasets that can fit in a GPU for deep learning training. TensorFlow is one of the most popular deep learning frameworks. As mentioned previously, it supports a binary format known as TensorFlow records. You can write TensorFlow records using the sparktf in Spark, which you can prepare to process in GPU instances with libraries like Keras or TensorFlow. You can then preprocess large datasets in Spark and write them as TensorFlow records using spark_write_tf(): copy_to(sc, iris) %>% ft_string_indexer_model( "Species", "label", labels = c("setosa", "versicolor", "virginica") ) %>% spark_write_tfrecord(path = "tfrecord") After you have trained the dataset with Keras or TensorFlow, you can use the tfdatasets package to load it. You will also need to install the TensorFlow runtime by using install_tensorflow() and install Python on your own. To learn more about training deep learning models with Keras, we recommend reading Deep Learning with R. tensorflow::install_tensorflow() tfdatasets::tfrecord_dataset("tfrecord/part-r-00000") <DatasetV1Adapter shapes: (), types: tf.string> Training deep learning models in a single local node with one or more GPUs is often enough for most applications; however, recent state-of-the-art deep learning models train using distributed computing frameworks like Apache Spark. Distributed computing frameworks are used to achieve higher petaflops each day the systems spends training these models. OpenAI analyzed trends in the field of artificial intelligence (AI) and cluster computing (illustrated in Figure 10.7). It should be obvious from the figure that there is a trend in recent years to use distributed computing frameworks. 
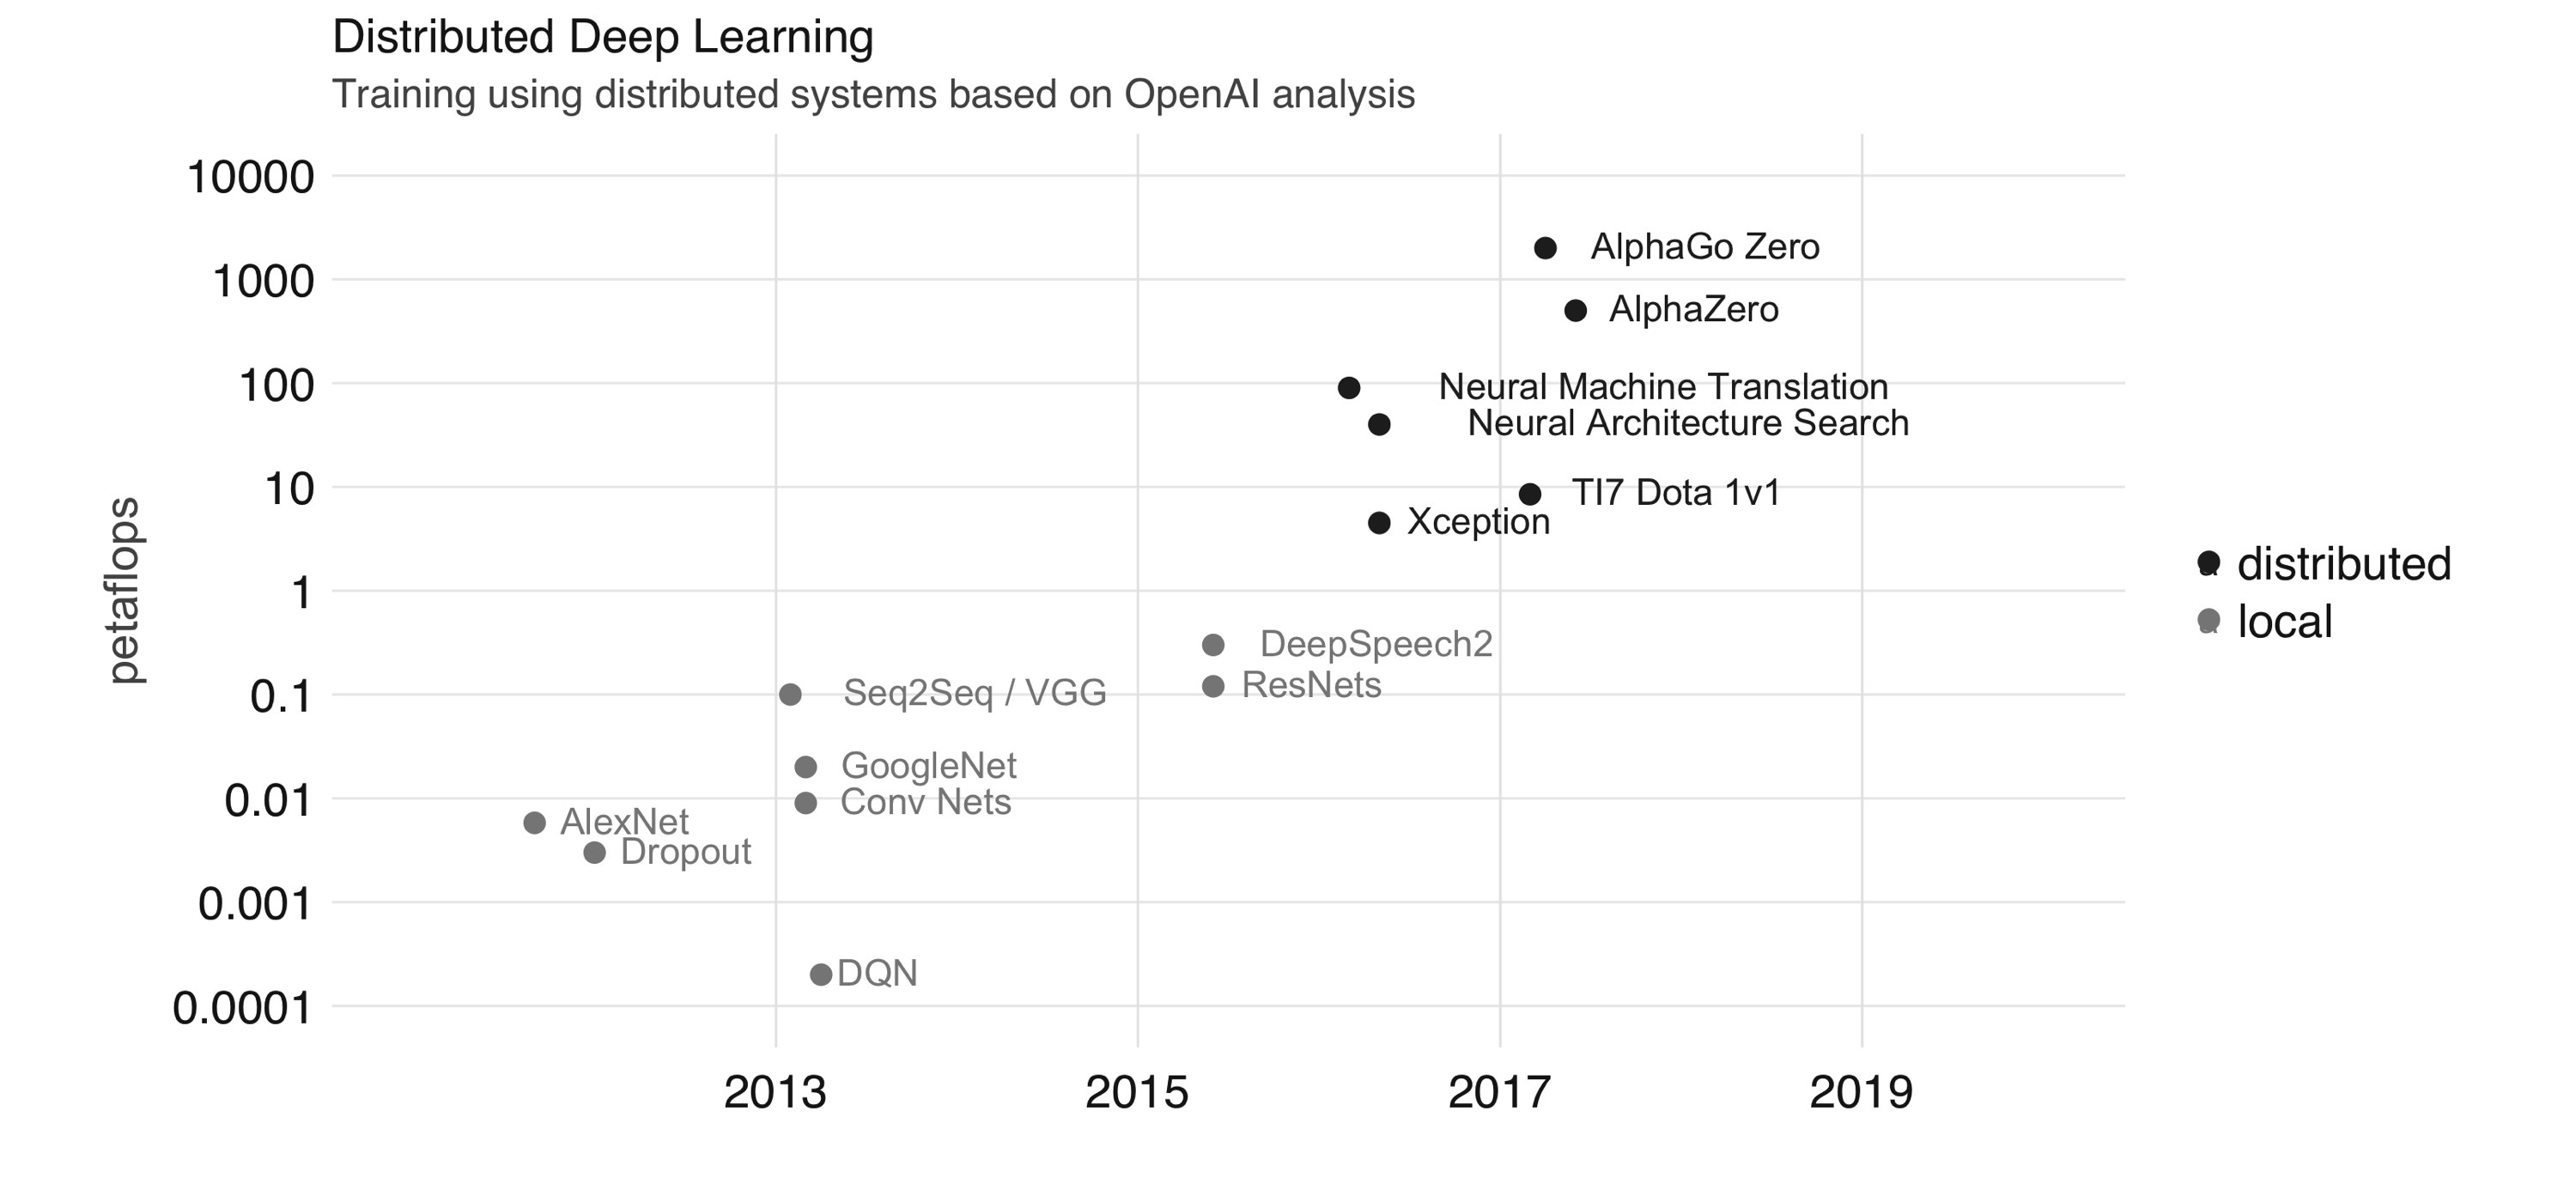
FIGURE 10.7: Training using distributed systems based on OpenAI analysis Training large-scale deep learning models is possible in Spark and TensorFlow through frameworks like Horovod. Today, it’s possible to use Horovod with Spark from R using the reticulate package, since Horovod requires Python and Open MPI, this goes beyond the scope of this book. Next, we will introduce a different Spark extension in the domain of genomics.

10.6 Genomics

The human genome consists of two copies of about 3 billion base pairs of DNA within the 23 chromosome pairs. Figure 10.8 shows the organization of the genome into chromosomes. DNA strands are composed of nucleotides, each composed of one of four nitrogen-containing nucleobases: cytosine (C), guanine (G), adenine (A), or thymine (T). Since the DNA of all humans is nearly identical, we need to store only the differences from the reference genome in the form of a variant call format (VCF) file. 
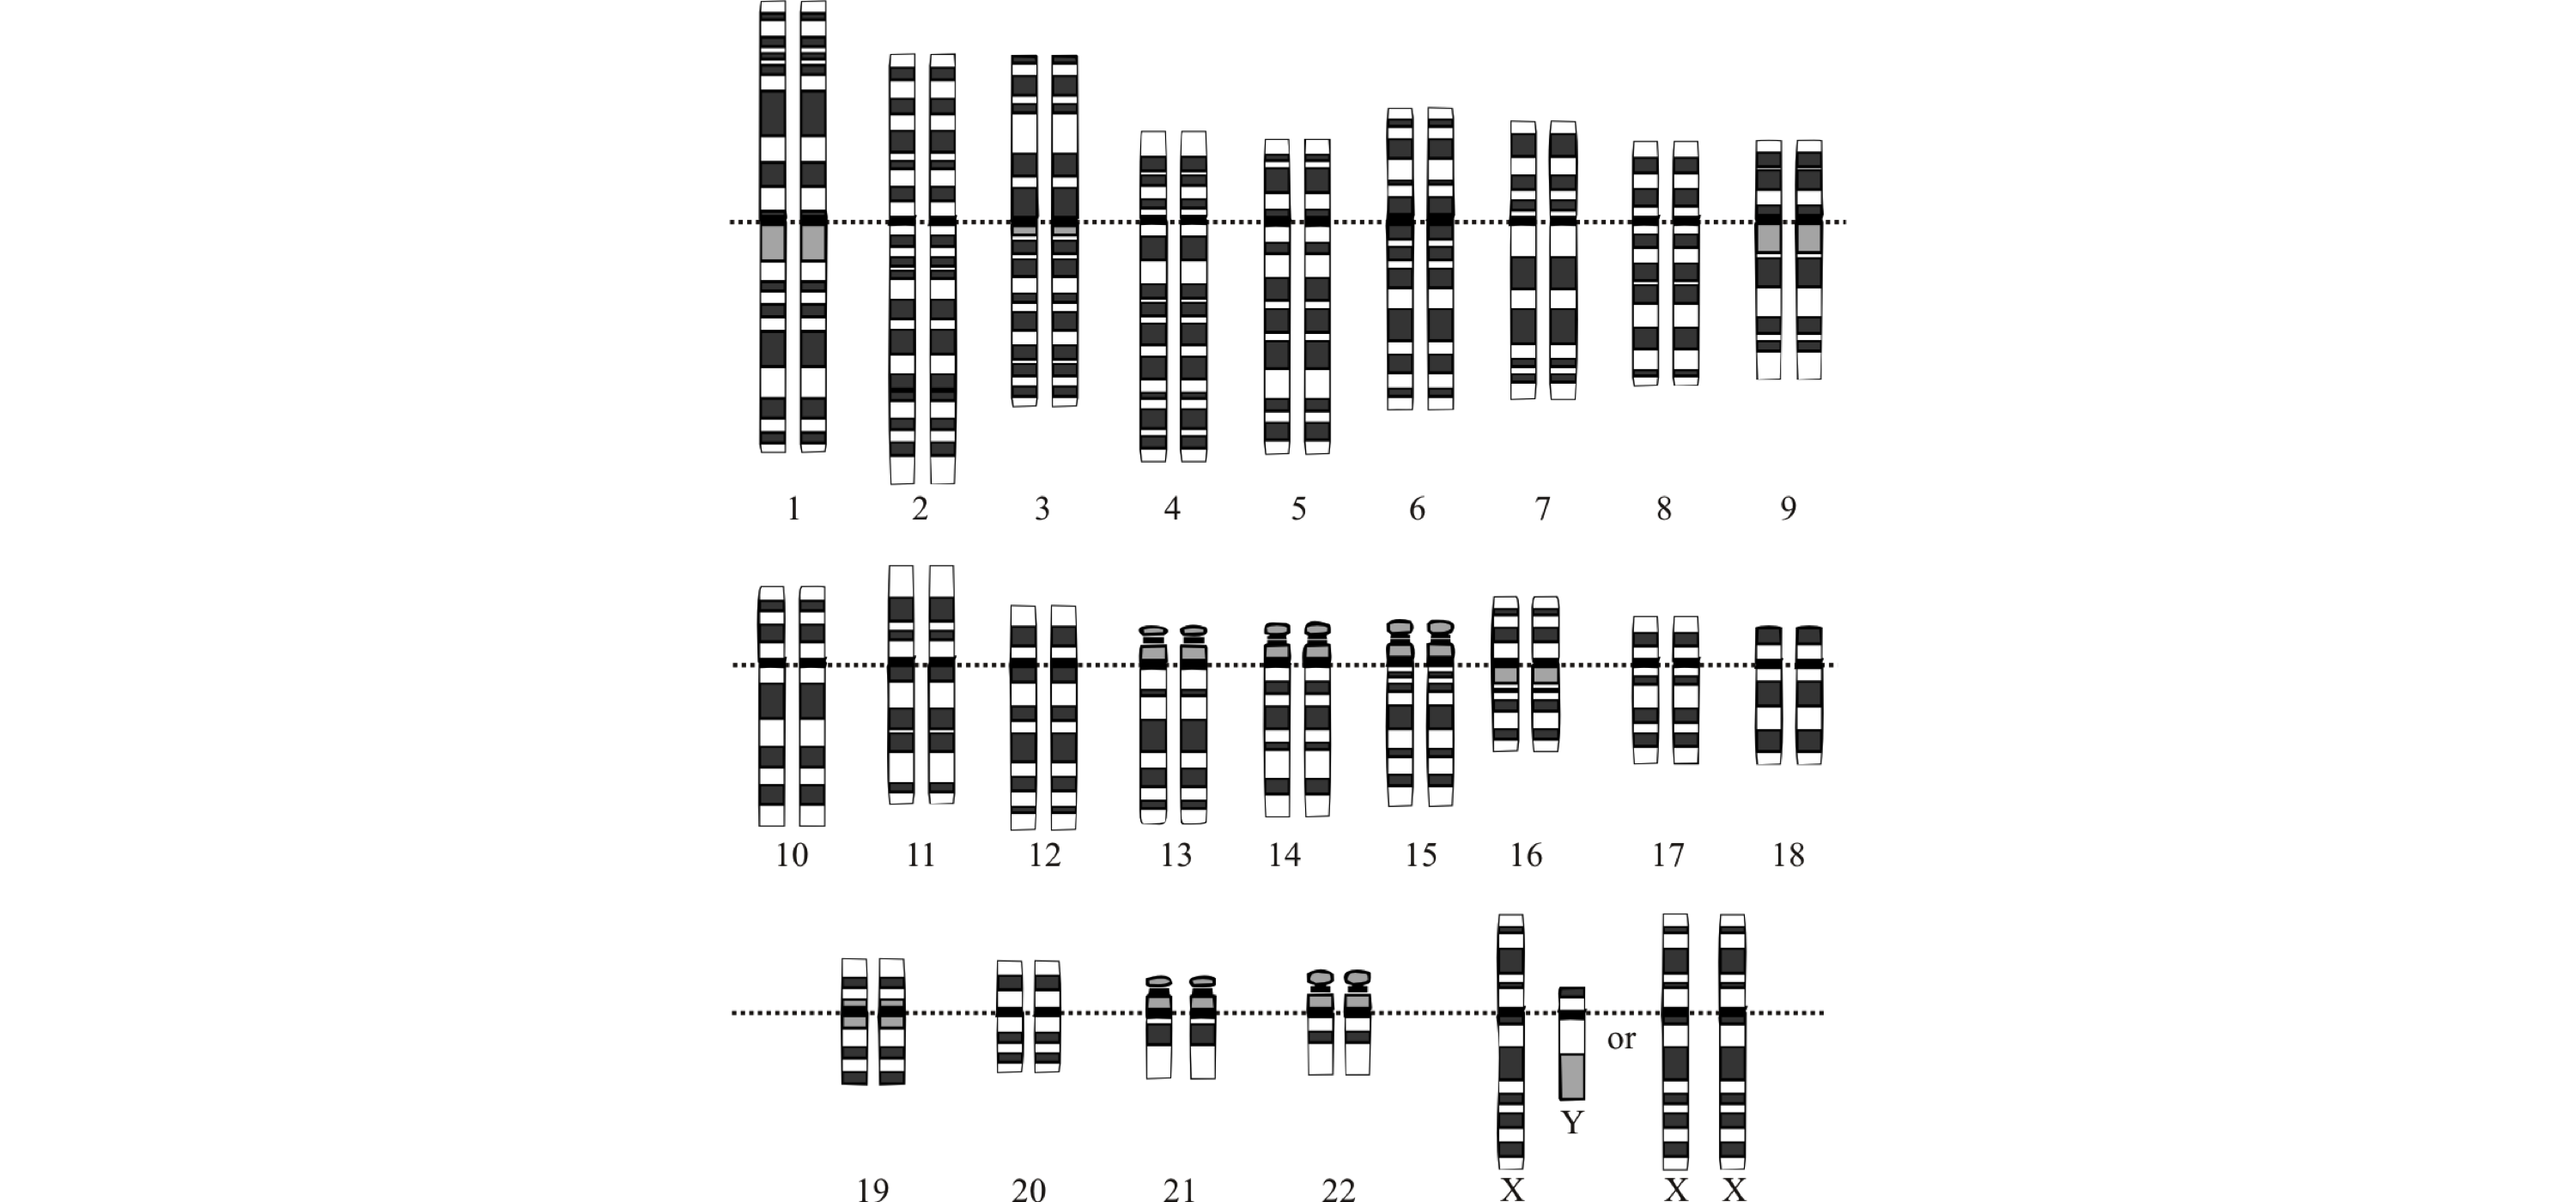
FIGURE 10.8: The idealized human diploid karyotype showing the organization of the genome into chromosomes variantspark is a framework based on Scala and Spark to analyze genome datasets. It is being developed by CSIRO Bioinformatics team in Australia. variantspark was tested on datasets with 3,000 samples, each one containing 80 million features in either unsupervised clustering approaches or supervised applications, like classification and regression. variantspark can read VCF files and run analyses while using familiar Spark DataFrames. To get started, install variantspark from CRAN, connect to Spark, and retrieve a vsc connection to variantspark: library(variantspark) library(sparklyr) sc <- spark_connect(master = "local", version = "2.3", config = list(sparklyr.connect.timeout = 3 * 60)) vsc <- vs_connect(sc) We can start by loading a VCF file: vsc_data <- system.file("extdata/", package = "variantspark") hipster_vcf <- vs_read_vcf(vsc, file.path(vsc_data, "hipster.vcf.bz2")) hipster_labels <- vs_read_csv(vsc, file.path(vsc_data, "hipster_labels.txt")) labels <- vs_read_labels(vsc, file.path(vsc_data, "hipster_labels.txt")) variantspark uses random forest to assign an importance score to each tested variant reflecting its association to the interest phenotype. A variant with higher importance score implies it is more strongly associated with the phenotype of interest. You can compute the importance and transform it into a Spark table, as follows: importance_tbl <- vs_importance_analysis(vsc, hipster_vcf, labels, n_trees = 100) %>% importance_tbl() importance_tbl # Source: spark<?> [?? x 2] variable importance <chr> <dbl> 1 2_109511398 0 2 2_109511454 0 3 2_109511463 0.00000164 4 2_109511467 0.00000309 5 2_109511478 0 6 2_109511497 0 7 2_109511525 0 8 2_109511527 0 9 2_109511532 0 10 2_109511579 0 # … with more rows You then can use dplyr and ggplot2 to transform the output and visualize it (see Figure 10.9): library(dplyr) library(ggplot2) importance_df <- importance_tbl %>% arrange(-importance) %>% head(20) %>% collect() ggplot(importance_df) + aes(x = variable, y = importance) + geom_bar(stat = 'identity') + scale_x_discrete(limits = importance_df[order(importance_df$importance), 1]$variable) + coord_flip() 
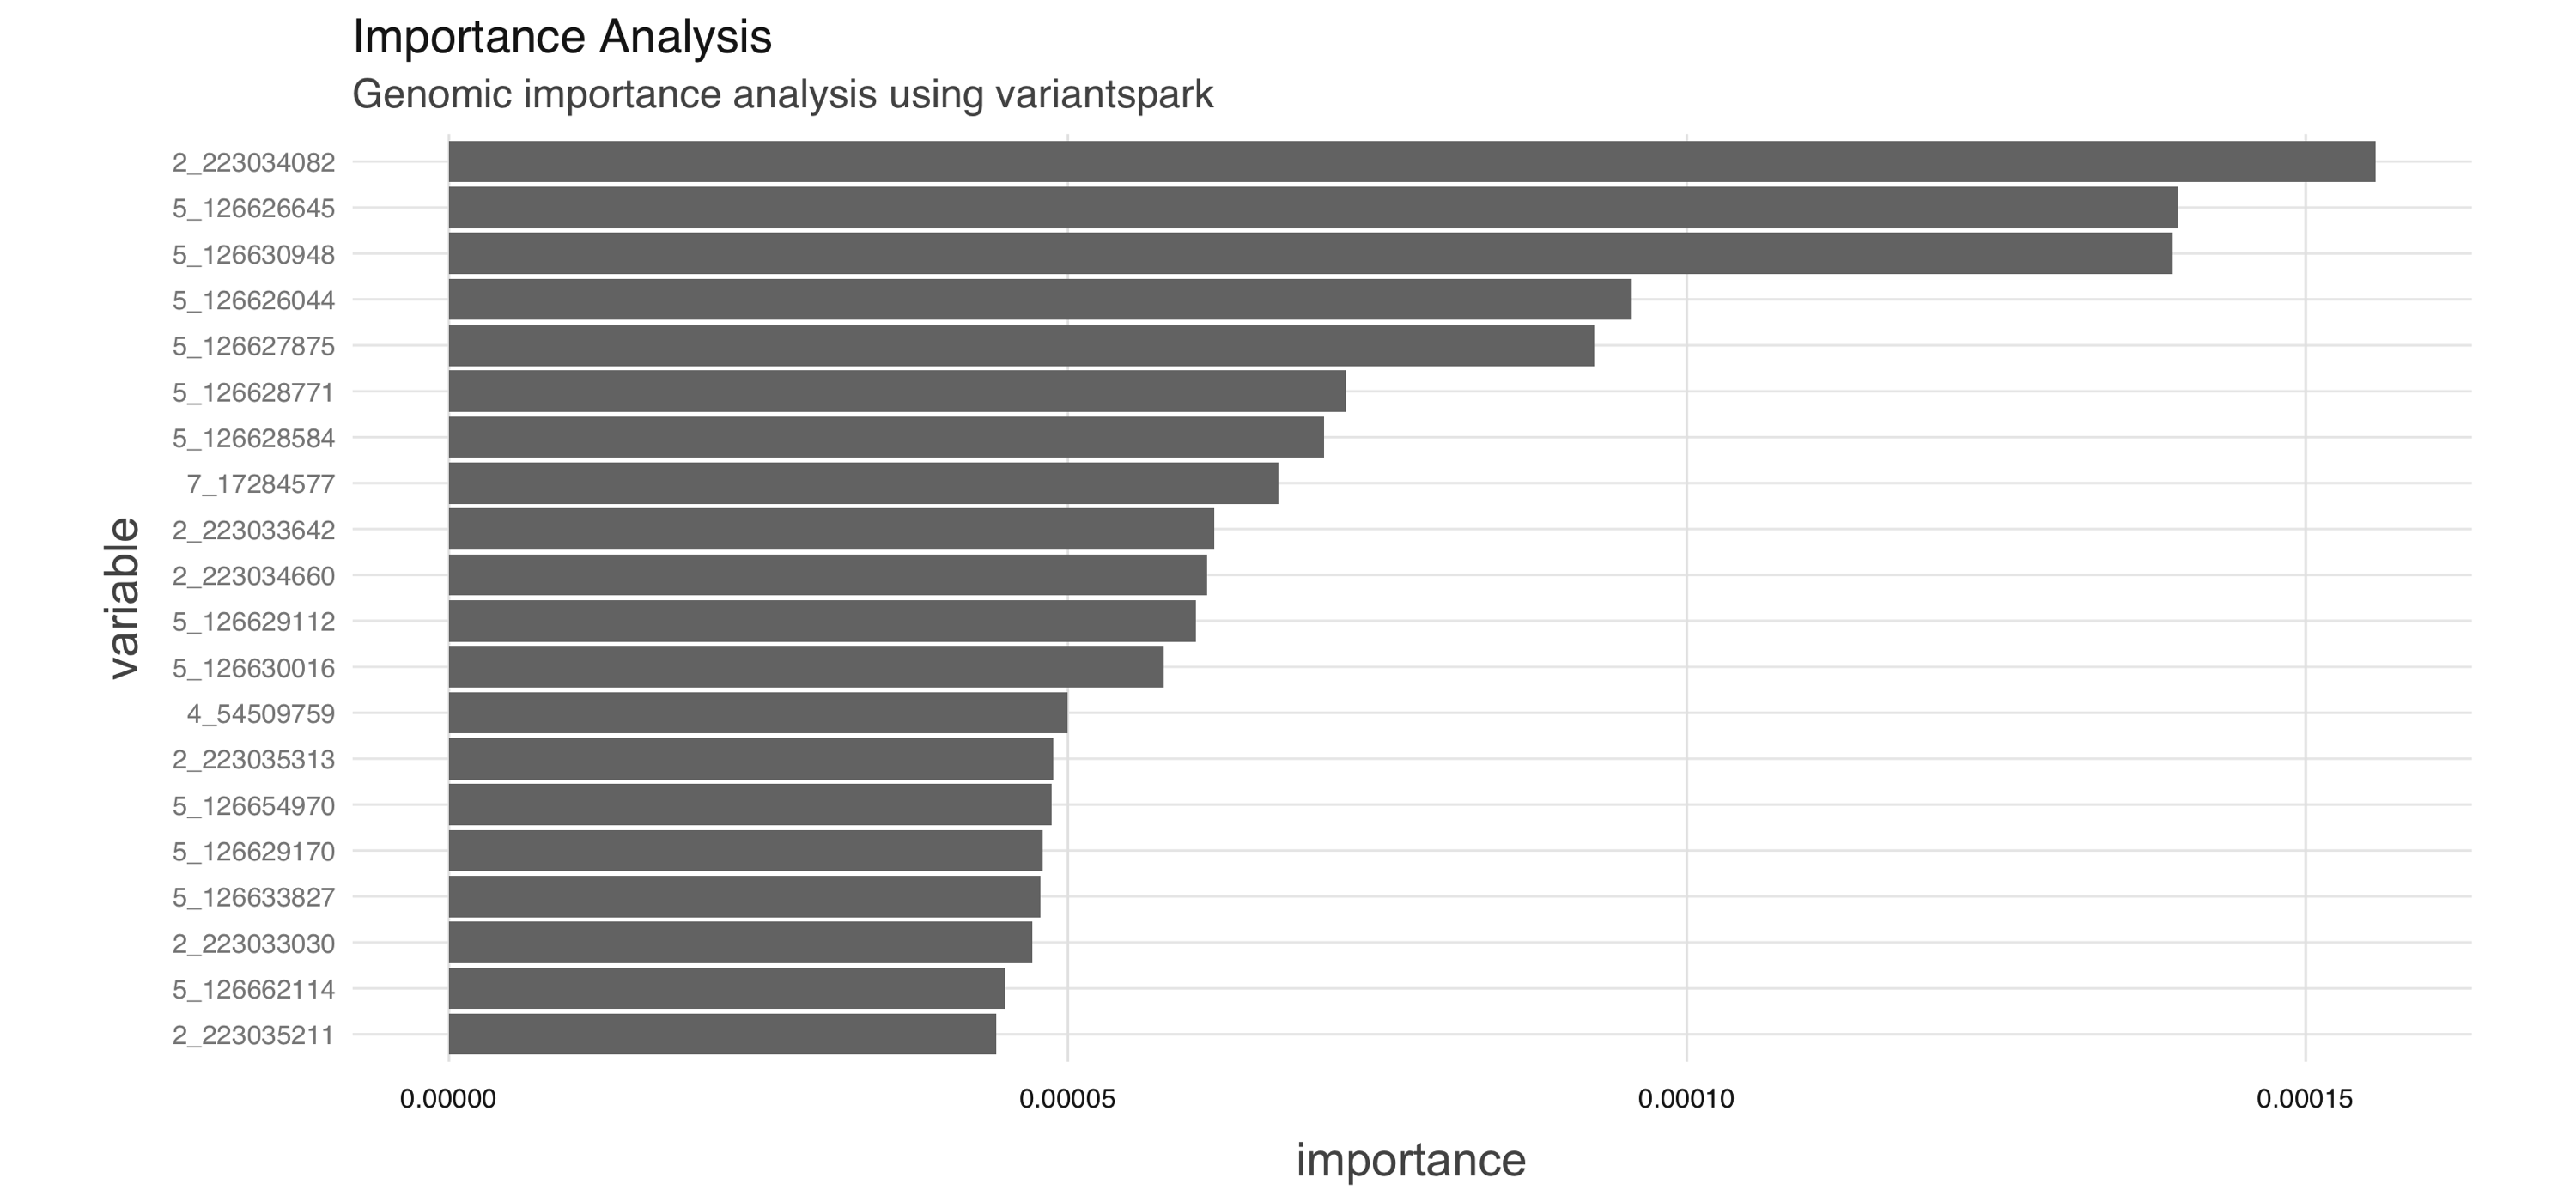
FIGURE 10.9: Genomic importance analysis using variantspark This concludes a brief introduction to genomic analysis in Spark using the variantspark extension. Next, we move away from microscopic genes to macroscopic datasets that contain geographic locations across the world.

10.7 Spatial

geospark enables distributed geospatial computing using a grammar compatible with dplyr and sf, which provides a set of tools for working with geospatial vectors. You can install geospark from CRAN, as follows: install.packages("geospark") Then, initialize the geospark extension and connect to Spark: library(geospark) library(sparklyr) sc <- spark_connect(master = "local", version = "2.3") Next, we load a spatial dataset containing polygons and points: polygons <- system.file("examples/polygons.txt", package="geospark") %>% read.table(sep="|", col.names = c("area", "geom")) points <- system.file("examples/points.txt", package="geospark") %>% read.table(sep = "|", col.names = c("city", "state", "geom")) polygons_wkt <- copy_to(sc, polygons) points_wkt <- copy_to(sc, points) There are various spatial operations defined in geospark, as depicted in Figure 10.10. These operations allow you to control how geospatial data should be queried based on overlap, intersection, disjoint sets, and so on. 
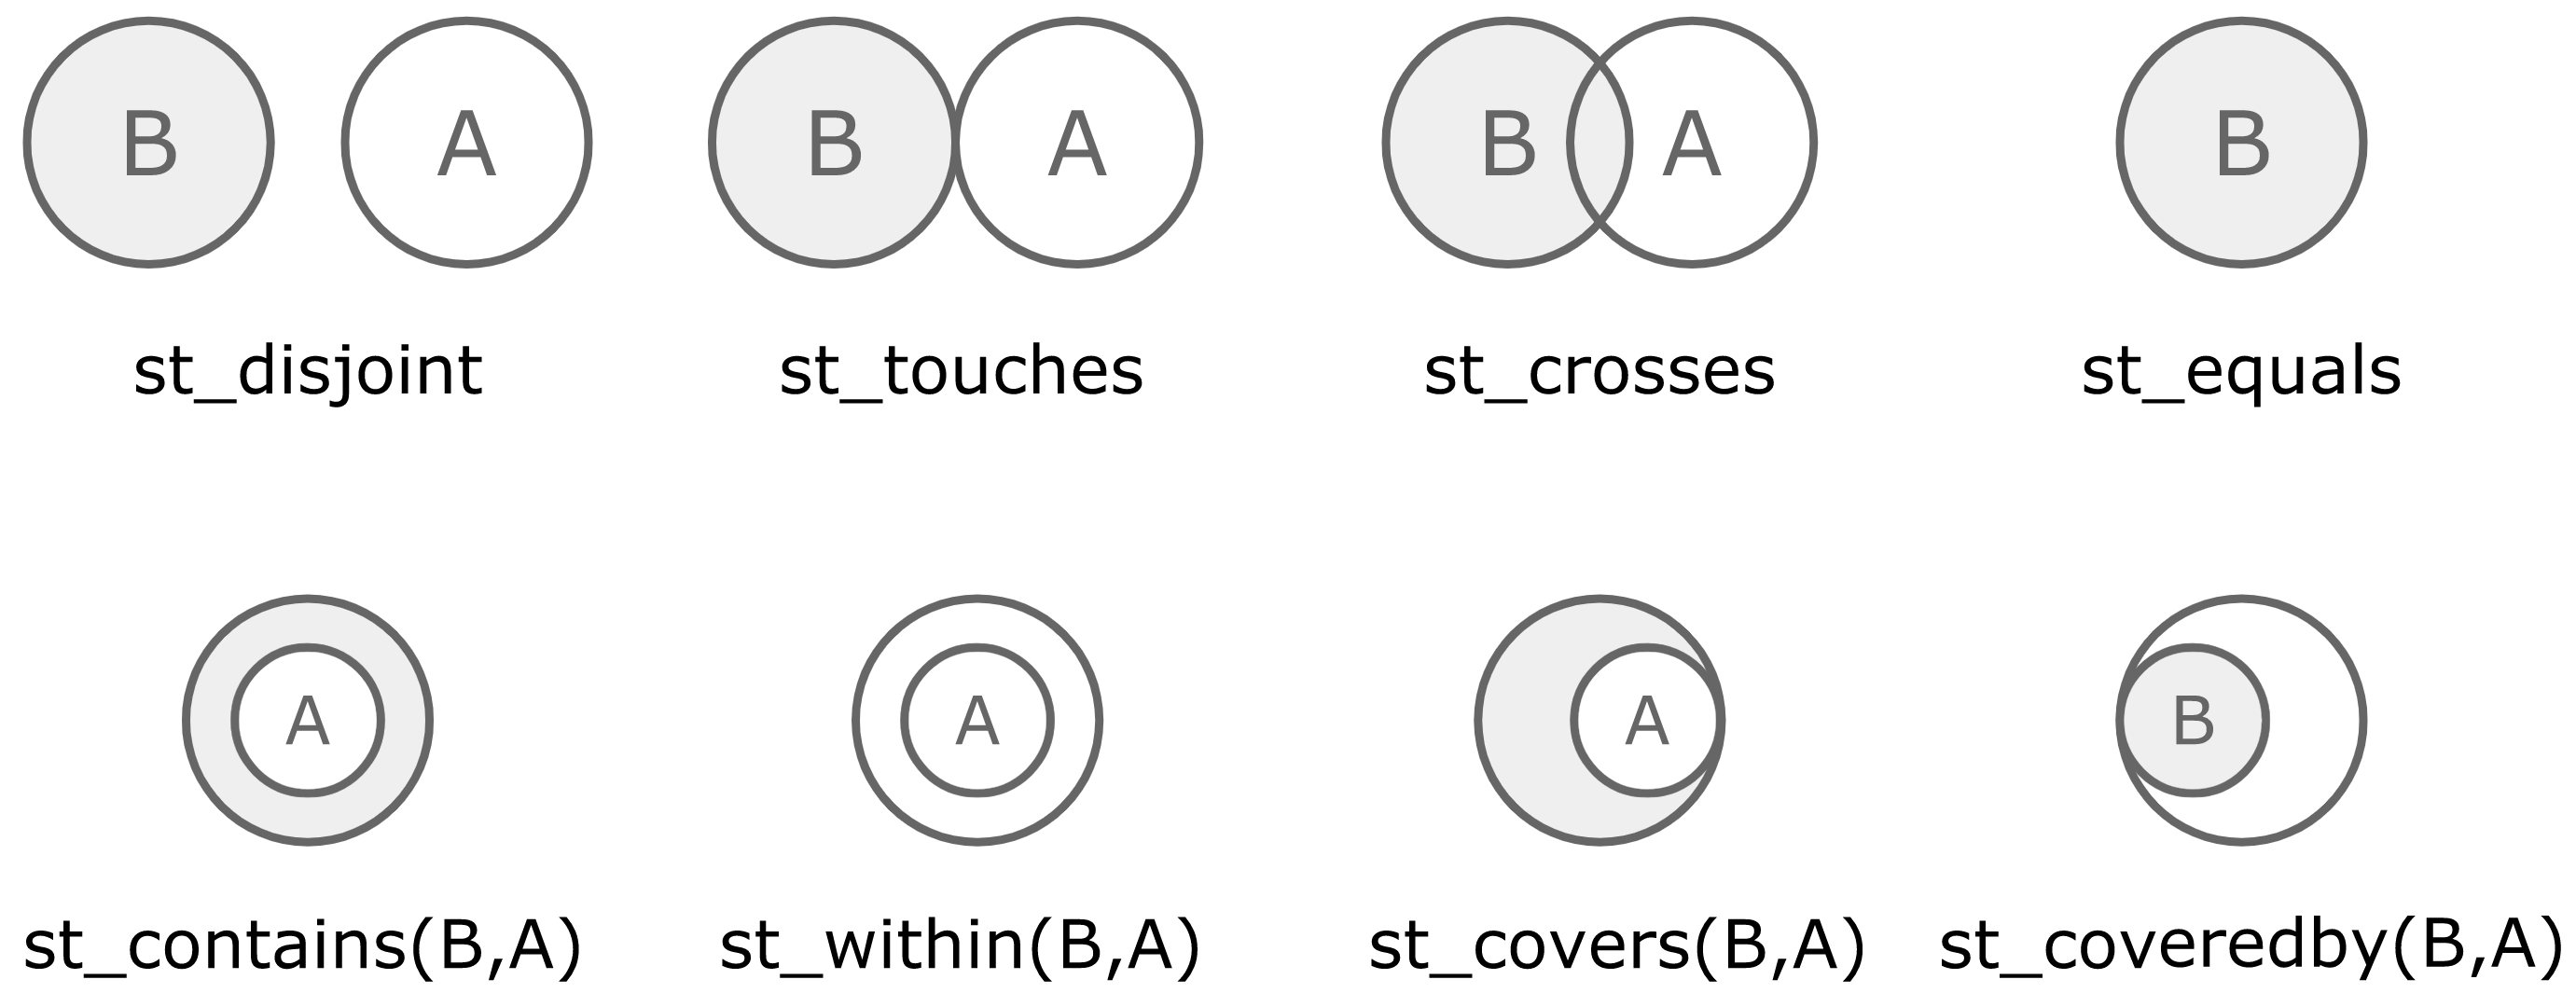
FIGURE 10.10: Spatial operations available in geospark For instance, we can use these operations to find the polygons that contain a given set of points using st_contains(): library(dplyr) polygons_wkt <- mutate(polygons_wkt, y = st_geomfromwkt(geom)) points_wkt <- mutate(points_wkt, x = st_geomfromwkt(geom)) inner_join(polygons_wkt, points_wkt, sql_on = sql("st_contains(y,x)")) %>% group_by(area, state) %>% summarise(cnt = n()) # Source: spark<?> [?? x 3] # Groups: area area state cnt <chr> <chr> <dbl> 1 california area CA 10 2 new york area NY 9 3 dakota area ND 10 4 texas area TX 10 5 dakota area SD 1 You can also plot these datasets by collecting a subset of the entire dataset or aggregating the geometries in Spark before collecting them. One package you should look into is sf. We close this chapter by presenting a couple of troubleshooting techniques applicable to all extensions.

10.8 Troubleshooting

When you are using a new extension for the first time, we recommend increasing the connection timeout (given that Spark will usually need to download extension dependencies) and changing logging to verbose to help you troubleshoot when the download process does not complete: config <- spark_config() config$sparklyr.connect.timeout <- 3 * 60 config$sparklyr.log.console = TRUE sc <- spark_connect(master = "local", config = config) In addition, you should know that Apache IVY is a popular dependency manager focusing on flexibility and simplicity, and is used by Apache Spark for installing extensions. When the connection fails while you are using an extension, consider clearing your IVY cache by running the following: unlink("~/.ivy2", recursive = TRUE) In addition, you can also consider opening GitHub issues from the following extensions repositories to get help from the extension authors:

10.9 Recap

This chapter provided a brief overview on using some of the Spark extensions available in R, which happens to be as easy as installing a package. You then learned how to use the rsparkling extension, which provides access to H2O in Spark, which in turn provides additional modeling functionality like enhanced metrics and the ability to automatically select models. We then jumped to graphframes, an extension to help you process relational datasets that are formally referred to as graphs. You also learned how to compute simple connection metrics or run complex algorithms like PageRank. The XGBoost and deep learning sections provided alternate modeling techniques that use gradient descent: the former over decision trees, and the latter over deep multilayered perceptrons where we can use Spark to preprocess datasets into records that later can be consumed by TensorFlow and Keras using the sparktf extension. The last two sections introduced extensions to process genomic and spatial datasets through the variantspark and geospark extensions. These extensions, and many more, provide a comprehensive library of advanced functionality that, in combination with the analysis and modeling techniques presented, should cover most tasks required to run in computing clusters. However, when functionality is lacking, you can consider writing your own extension, which is what we discuss in Chapter 13, or you can apply custom transformations over each partition using R code, as we describe in Chapter 11.

Chapter 11 Distributed R

In previous chapters, you learned how to perform data analysis and modeling in local Spark instances and proper Spark clusters. In Chapter 10 specifically, we examined how to make use of the additional functionality provided by the Spark and R communities at large. In most cases, the combination of Spark functionality and extensions is more than enough to perform almost any computation. However, for those cases in which functionality is lacking in Spark and their extensions, you could consider distributing R computations to worker nodes yourself. You can run arbitrary R code in each worker node to run any computation—you can run simulations, crawl content from the web, transform data, and so on. In addition, you can also make use of any package available in CRAN and private packages available in your organization, which reduces the amount of code that you need to write to help you remain productive. If you are already familiar with R, you might be tempted to use this approach for all Spark operations; however, this is not the recommended use of spark_apply(). Previous chapters provided more efficient techniques and tools to solve well-known problems; in contrast, spark_apply() introduces additional cognitive overhead, additional troubleshooting steps, performance trade-offs, and, in general, additional complexity you should avoid. Not to say that spark_apply() should never be used; rather, spark_apply() is reserved to support use cases for which previous tools and techniques fell short.

11.1 Overview

Chapter 1 introduced MapReduce as a technique capable of processing large-scale datasets. It also described how Apache Spark provided a superset of operations to perform MapReduce computations easily and more efficiently. Chapter 9 presented insights into how Spark works by applying custom transformations over each partition of the distributed datasets. For instance, if we multiplied each element of a distributed numeric dataset by 10, Spark would apply a mapping operation over each partition through multiple workers. A conceptual view of this process is illustrated in Figure 11.1. 
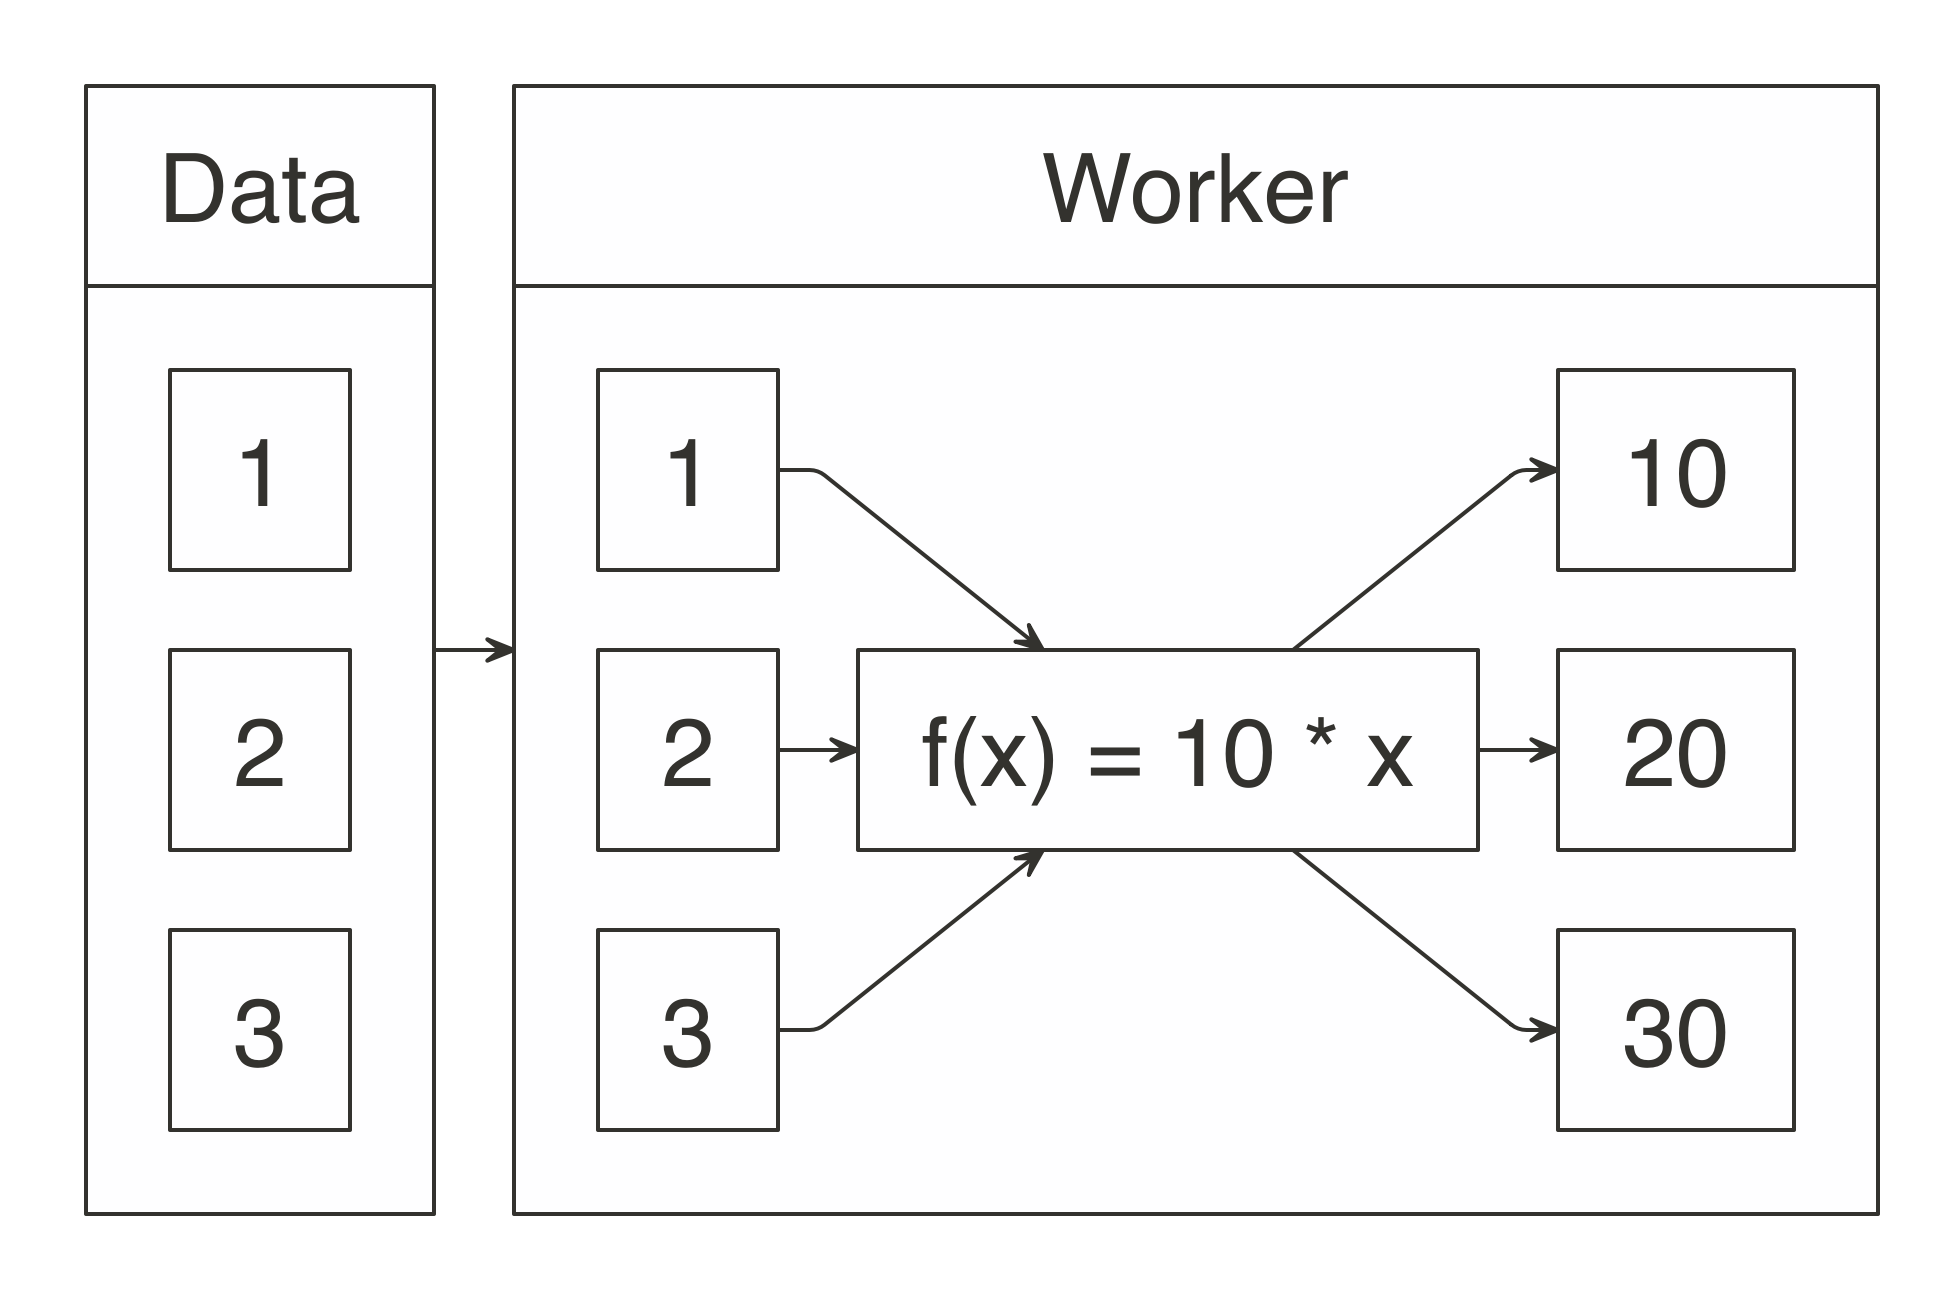
FIGURE 11.1: Map operation when multiplying by 10 This chapter presents how to define a custom f(x) mapping operation using spark_apply(); for the previous example, spark_apply() provides support to define 10 * x, as follows: sdf_len(sc, 3) %>% spark_apply(~ 10 * .x) # Source: spark<?> [?? x 1] id * <dbl> 1 10 2 20 3 30 Notice that ~ 10 * .x is plain R code executed across all worker nodes. The ~ operator is defined in the rlang package and provides a compact definition of a function equivalent to function(.x) 10 * .x; this compact form is also known as an anonymous function, or lambda expression. The f(x) function must take an R DataFrame (or something that can be automatically transformed to one) as input and must also produce an R DataFrame as output, as shown in Figure 11.2. 
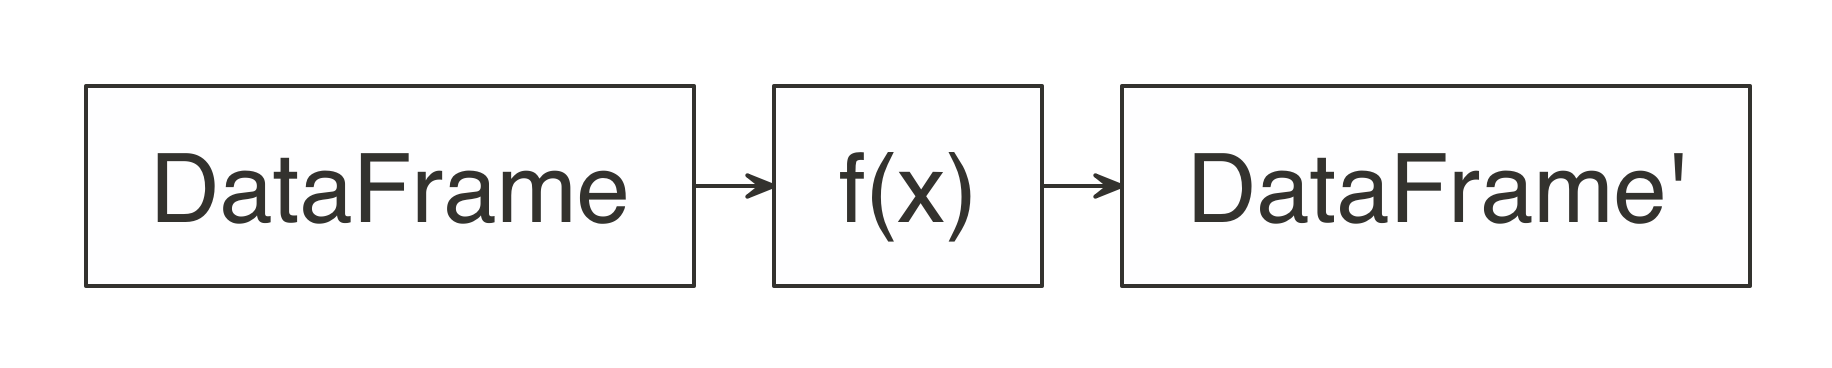
FIGURE 11.2: Expected function signature in spark_apply() mappings We can refer back to the original MapReduce example from Chapter 1, where the map operation was defined to split sentences into words and the total unique words were counted as the reduce operation. In R, we could make use of the unnest_tokens() function from the tidytext R package, which you would need to install from CRAN before connecting to Spark. You can then use tidytext with spark_apply() to tokenize those sentences into a table of words: sentences <- copy_to(sc, data_frame(text = c("I like apples", "I like bananas"))) sentences %>% spark_apply(~tidytext::unnest_tokens(.x, word, text)) # Source: spark<?> [?? x 1] word * <chr> 1 i 2 like 3 apples 4 i 5 like 6 bananas We can complete this MapReduce example by performing the reduce operation with dplyr, as follows: sentences %>% spark_apply(~tidytext::unnest_tokens(., word, text)) %>% group_by(word) %>% summarise(count = count()) # Source: spark<?> [?? x 2] word count * <chr> <dbl> 1 i 2 2 apples 1 3 like 2 4 bananas 1 The rest of this chapter will explain in detail the use cases, features, caveats, considerations, and troubleshooting techniques required when you are defining custom mappings through spark_apply(). Note: The previous sentence tokenizer example can be more efficiently implemented using concepts from previous chapters, specifically through sentences %>% ft_tokenizer("text", "words") %>% transmute(word = explode(words)).

11.2 Use Cases

Now that we’ve presented an example to help you understand how spark_apply() works, we’ll cover a few practical use cases for it:
Import
You can consider using R to import data from external data sources and formats. For example, when a file format is not natively supported in Spark or its extensions, you can consider using R code to implement a distributed custom parser using R packages.
Model
It is natural to use the rich modeling capabilities already available in R with Spark. In most cases, R models can’t be used across large data; however, we will present two particular use cases where R models can be useful at scale. For instance, when data fits into a single machine, you can use grid search to optimize their parameters in parallel. In cases where the data can be partitioned to create several models over subsets of the data, you can use partitioned modeling in R to compute models across partitions.
Transform
You can use R’s rich data transformation capabilities to complement Spark. We’ll present a use case of evaluating data by external systems, and use R to interoperate with them by calling them through(((“web APIs”))) a web API.
Compute
When you need to perform large-scale computation in R, or big compute as described in Chapter 1, Spark is ideal to distribute this computation. We will present simulations as a particular use case for large-scale computing in R. As we now explore each use case in detail, we’ll provide a working example to help you understand how to use spark_apply() effectively.

11.2.1 Custom Parsers

Though Spark and its various extensions provide support for many file formats (CSVs, JSON, Parquet, AVRO, etc.), you might need other formats to use at scale. You can parse these additional formats using spark_apply() and many existing R packages. In this section, we will look at how to parse logfiles, though similar approaches can be followed to parse other file formats. It is common to use Spark to analyze logfiles—for instance, logs that track download data from Amazon S3. The webreadr package can simplify the process of parsing logs by providing support to load logs stored as Amazon S3, Squid, and the Common log format. You should install webreadr from CRAN before connecting to Spark. For example, an Amazon S3 log looks as follows: #Version: 1.0 #Fields: date time x-edge-location sc-bytes c-ip cs-method cs(Host) cs-uri-stem sc-status cs(Referer) cs(User-Agent) cs-uri-query cs(Cookie) x-edge-result-type x-edge-request-id x-host-header cs-protocol cs-bytes time-taken 2014-05-23 01:13:11 FRA2 182 192.0.2.10 GET d111111abcdef8.cloudfront.net /view/my/file.html 200 www.displaymyfiles.com Mozilla/4.0%20 (compatible;%20MSIE%205.0b1;%20Mac_PowerPC) - zip=98101 RefreshHit MRVMF7KydIvxMWfJIglgwHQwZsbG2IhRJ07sn9AkKUFSHS9EXAMPLE== d111111abcdef8.cloudfront.net http - 0.001 This can be parsed easily with read_aws(), as follows: aws_log <- system.file("extdata/log.aws", package = "webreadr") webreadr::read_aws(aws_log) # A tibble: 2 x 18 date edge_location bytes_sent ip_address http_method host path <dttm> <chr> <int> <chr> <chr> <chr> <chr> 1 2014-05-23 01:13:11 FRA2 182 192.0.2.10 GET d111… /vie… 2 2014-05-23 01:13:12 LAX1 2390282 192.0.2.2… GET d111… /sou… # ... with 11 more variables: status_code <int>, referer <chr>, user_agent <chr>, # query <chr>, cookie <chr>, result_type <chr>, request_id <chr>, # host_header <chr>, protocol <chr>, bytes_received <chr>, time_elapsed <dbl> To scale this operation, we can make use of read_aws() using spark_apply(): spark_read_text(sc, "logs", aws_log, overwrite = TRUE, whole = TRUE) %>% spark_apply(~webreadr::read_aws(.x$contents)) # Source: spark<?> [?? x 18] date edge_location bytes_sent ip_address http_method host path * <dttm> <chr> <int> <chr> <chr> <chr> <chr> 1 2014-05-23 01:13:11 FRA2 182 192.0.2.10 GET d111… /vie… 2 2014-05-23 01:13:12 LAX1 2390282 192.0.2.2… GET d111… /sou… # ... with 11 more variables: status_code <int>, referer <chr>, user_agent <chr>, # query <chr>, cookie <chr>, result_type <chr>, request_id <chr>, # host_header <chr>, protocol <chr>, bytes_received <chr>, time_elapsed <dbl> The code used by plain R and spark_apply() is similar; however, with spark_apply(), logs are parsed in parallel across all the worker nodes available in your cluster. This concludes the custom parsers discussion; you can parse many other file formats at scale from R following a similar approach. Next we’ll look at present partitioned modeling as another use case focused on modeling across several datasets in parallel.

11.2.2 Partitioned Modeling

There are many modeling packages available in R that can also be run at scale by partitioning the data into manageable groups that fit in the resources of a single machine. For instance, suppose that you have a 1 TB dataset for sales data across multiple cities and you are tasked with creating sales predictions over each city. For this case, you can consider partitioning the original dataset per city—say, into 10 GB of data per city—which could be managed by a single compute instance. For this kind of partitionable dataset, you can also consider using spark_apply() by training each model over each city. As a simple example of partitioned modeling, we can run a linear regression using the iris dataset partitioned by species: iris <- copy_to(sc, datasets::iris) iris %>% spark_apply(nrow, group_by = "Species") # Source: spark<?> [?? x 2] Species result <chr> <int> 1 versicolor 50 2 virginica 50 3 setosa 50 Then you can run a linear regression over each species using spark_apply(): iris %>% spark_apply( function(e) summary(lm(Petal_Length ~ Petal_Width, e))$r.squared, names = "r.squared", group_by = "Species") # Source: spark<?> [?? x 2] Species r.squared <chr> <dbl> 1 versicolor 0.619 2 virginica 0.104 3 setosa 0.110 As you can see from the r.squared results and intuitively in Figure 11.3, the linear model for versicolor better fits to the regression line: purrr::map(c("versicolor", "virginica", "setosa"), ~dplyr::filter(datasets::iris, Species == !!.x) %>% ggplot2::ggplot(ggplot2::aes(x = Petal.Length, y = Petal.Width)) + ggplot2::geom_point()) 
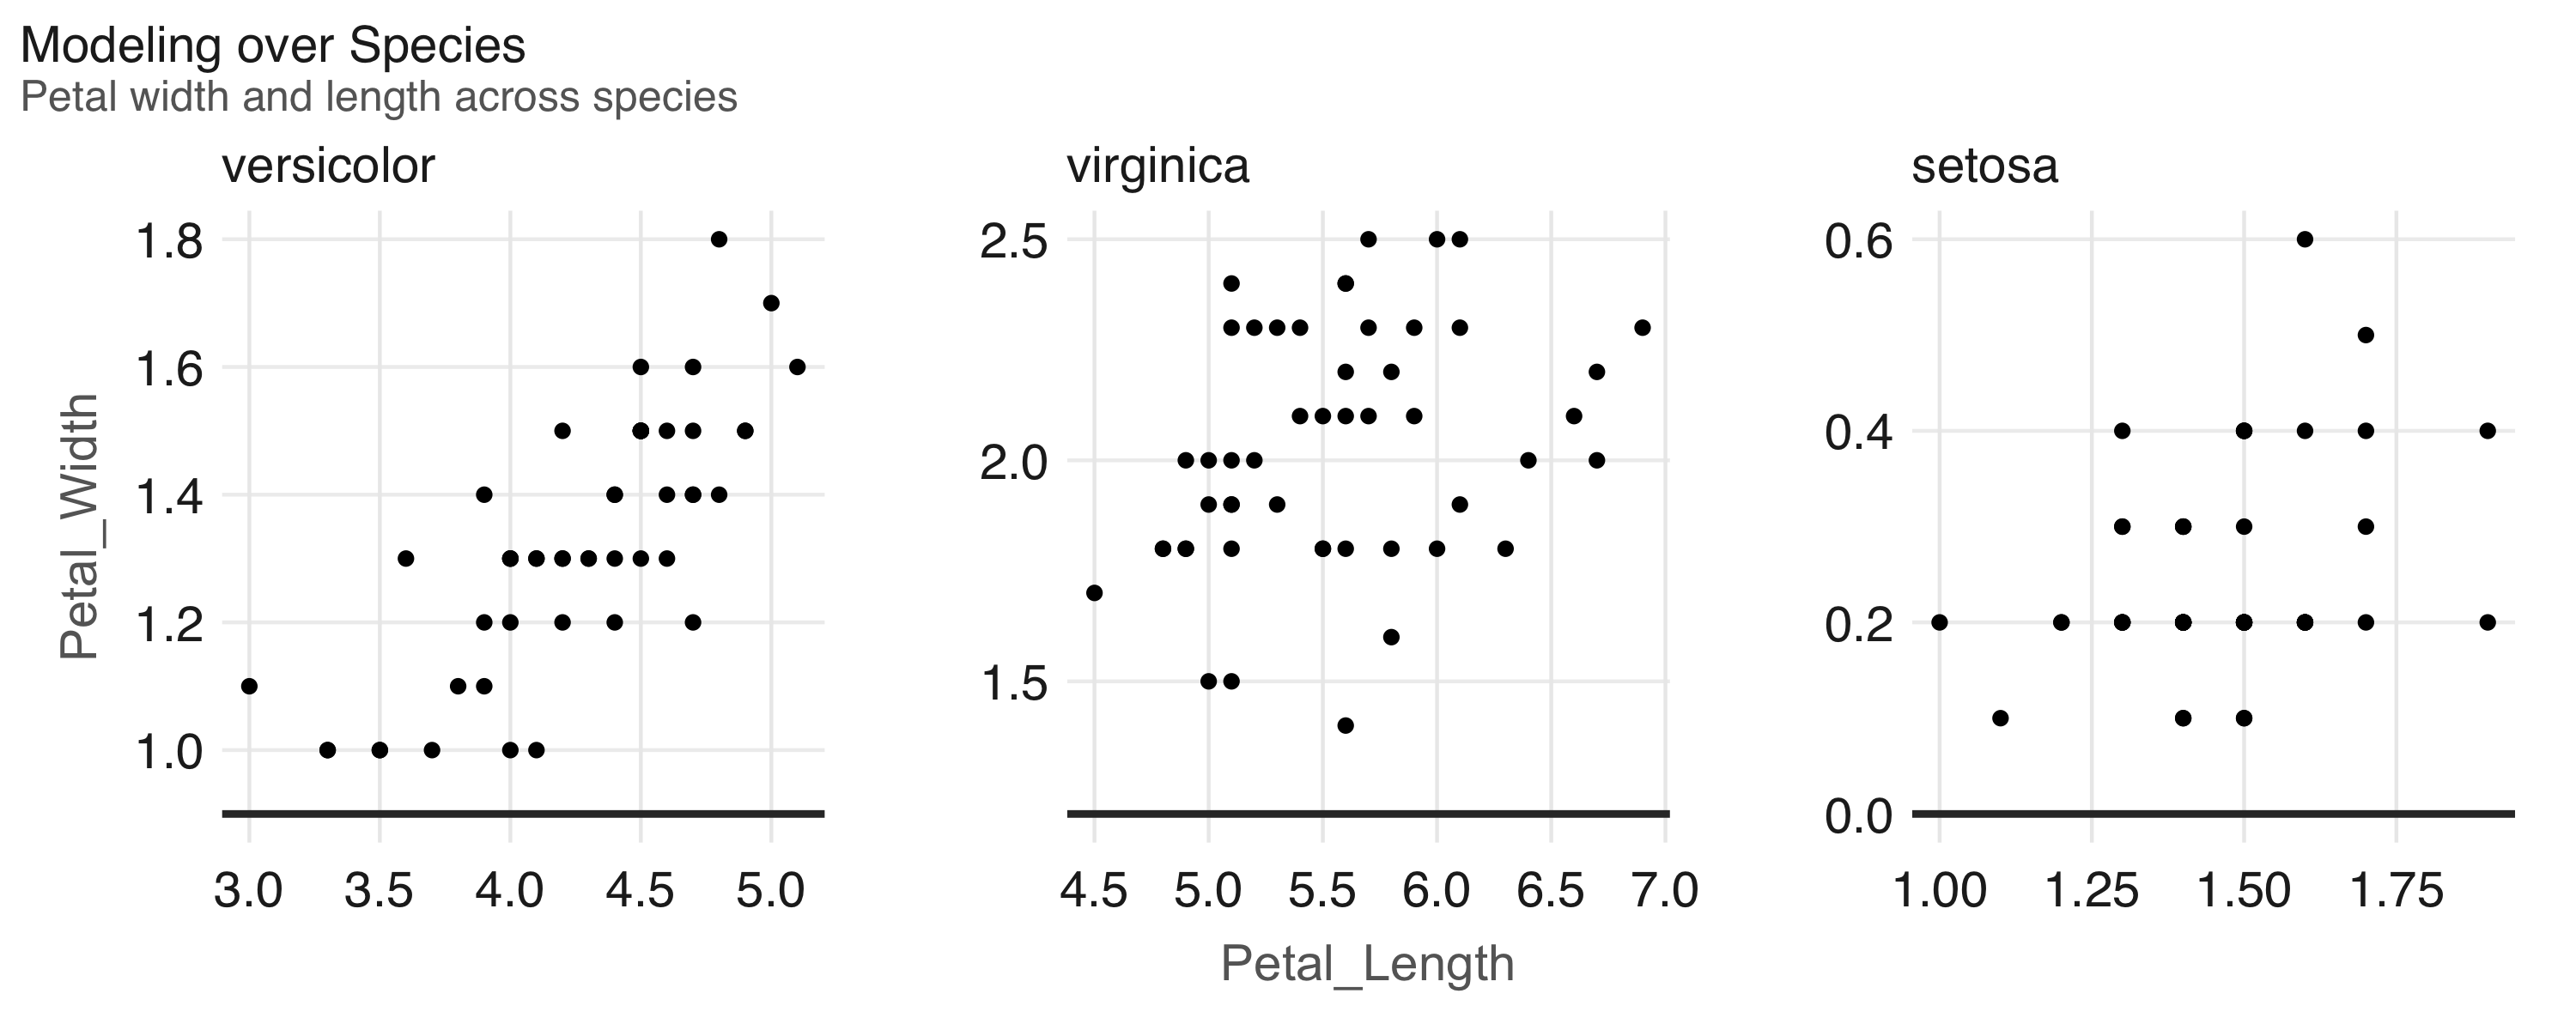
FIGURE 11.3: Modeling over species in the iris dataset This concludes our brief overview on how to perform modeling over several different partitionable datasets. A similar technique can be applied to perform modeling over the same dataset using different modeling parameters, as we cover next.

11.2.3 Grid Search

Many R packages provide models that require defining multiple parameters to configure and optimize. When the value of these parameters is unknown, we can distribute this list of unknown parameters across a cluster of machines to find the optimal parameter combination. If the list contains more than one parameter to optimize, it is common to test against all the combinations between parameter A and parameter B, creating a grid of parameters. The process of searching for the best parameter over this parameter grid is commonly known as grid search. For example, we can define a grid of parameters to optimize decision tree models as follows: grid <- list(minsplit = c(2, 5, 10), maxdepth = c(1, 3, 8)) %>% purrr:::cross_df() %>% copy_to(sc, ., repartition = 9) grid # Source: spark<?> [?? x 2] minsplit maxdepth <dbl> <dbl> 1 2 1 2 5 1 3 10 1 4 2 3 5 5 3 6 10 3 7 2 8 8 5 8 9 10 8 The grid dataset was copied by using repartition = 9 to ensure that each partition is contained in one machine, since the grid also has nine rows. Now, assuming that the original dataset fits in every machine, we can distribute this dataset to many machines and perform parameter search to find the model that best fits this data: spark_apply( grid, function(grid, cars) { model <- rpart::rpart( am ~ hp + mpg, data = cars, control = rpart::rpart.control(minsplit = grid$minsplit, maxdepth = grid$maxdepth) ) dplyr::mutate( grid, accuracy = mean(round(predict(model, dplyr::select(cars, -am))) == cars$am) ) }, context = mtcars) # Source: spark<?> [?? x 3] minsplit maxdepth accuracy <dbl> <dbl> <dbl> 1 2 1 0.812 2 5 1 0.812 3 10 1 0.812 4 2 3 0.938 5 5 3 0.938 6 10 3 0.812 7 2 8 1 8 5 8 0.938 9 10 8 0.812 For this model, minsplit = 2 and maxdepth = 8 produces the most accurate results. You can now use this specific parameter combination to properly train your model.

11.2.4 Web APIs

A web API is a program that can do something useful through a web interface that other programs can reuse. For instance, services like Twitter provide web APIs that allow you to automate reading tweets from a program written in R and other programming languages. You can make use of web APIs using spark_apply() by sending programmatic requests to external services using R code. For example, Google provides a web API to label images using deep learning techniques; you can use this API from R, but for larger datasets, you need to access its APIs from Spark. You can use Spark to prepare data to be consumed by a web API and then use spark_apply() to perform this call and process all the incoming results back in Spark. The next example makes use of the googleAuthR package to authenticate to Google Cloud, the RoogleVision package to perform labeling over the Google Vision API, and spark_apply() to interoperate between Spark and Google’s deep learning service. To run the following example, you’ll first need to disconnect from Spark and download your cloudml.json file from the Google developer portal: sc <- spark_connect( master = "local", config = list(sparklyr.shell.files = "cloudml.json")) images <- copy_to(sc, data.frame( image = "http://pbs.twimg.com/media/DwzcM88XgAINkg-.jpg" )) spark_apply(images, function(df) { googleAuthR::gar_auth_service( scope = "https://www.googleapis.com/auth/cloud-platform", json_file = "cloudml.json") RoogleVision::getGoogleVisionResponse( df$image, download = FALSE) }) # Source: spark<?> [?? x 4] mid description score topicality <chr> <chr> <dbl> <dbl> 1 /m/04rky Mammal 0.973 0.973 2 /m/0bt9lr Dog 0.958 0.958 3 /m/01z5f Canidae 0.956 0.956 4 /m/0kpmf Dog breed 0.909 0.909 5 /m/05mqq3 Snout 0.891 0.891 To successfully run a large distributed computation over a web API, the API needs to be able to scale to support the load from all the Spark executors. We can trust that major service providers are likely to support all the requests incoming from your cluster. But when you’re calling internal web APIs, make sure the API can handle the load. Also, when you’re using third-party services, consider the cost of calling their APIs across all the executors in your cluster to avoid potentially expensive and unexpected charges. Next we’ll describe a use case for big compute where R is used to perform distributed rendering.

11.2.5 Simulations

You can use R combined with Spark to perform large-scale computing. The use case we explore here is rendering computationally expensive images using the rayrender package, which uses ray tracing, a photorealistic technique commonly used in movie production. Let’s use this package to render a simple scene that includes a few spheres (see Figure 11.4) that use a lambertian material, a diffusely reflecting material or “matte”. First, install rayrender using install.packages("rayrender"). Then, be sure you’ve disconnected and reconnected Spark: library(rayrender) scene <- generate_ground(material = lambertian()) %>% add_object(sphere(material = metal(color="orange"), z = -2)) %>% add_object(sphere(material = metal(color="orange"), z = +2)) %>% add_object(sphere(material = metal(color="orange"), x = -2)) render_scene(scene, lookfrom = c(10, 5, 0), parallel = TRUE) FIGURE 11.4: Ray tracing in Spark using R and rayrender In higher resolutions, say 1920 x 1080, the previous example takes several minutes to render the single frame from Figure 11.4; rendering a few seconds at 30 frames per second would take several hours in a single machine. However, we can reduce this time using multiple machines by parallelizing computation across them. For instance, using 10 machines with the same number of CPUs would cut rendering time tenfold: system2("hadoop", args = c("fs", "-mkdir", "/rendering")) sdf_len(sc, 628, repartition = 628) %>% spark_apply(function(idx, scene) { render <- sprintf("%04d.png", idx$id) rayrender::render_scene(scene, width = 1920, height = 1080, lookfrom = c(12 * sin(idx$id/100), 5, 12 * cos(idx$id/100)), filename = render) system2("hadoop", args = c("fs", "-put", render, "/user/hadoop/rendering/")) }, context = scene, columns = list()) %>% collect() After all the images are rendered, the last step is to collect them from HDFS and use tools like ffmpeg to convert individual images into an animation: hadoop fs -get rendering/ ffmpeg -s 1920x1080 -i rendering/%d.png -vcodec libx264 -crf 25 -pix_fmt yuv420p rendering.mp4 Note: This example assumes HDFS is used as the storage technology for Spark and being run under a hadoop user, you will need to adjust this for your particular storage or user. We’ve covered some common use cases for spark_apply(), but you are certainly welcome to find other use cases for your particular needs. The next sections present technical concepts you’ll need to understand to create additional use cases and to use spark_apply() effectively.

11.3 Partitions

Most Spark operations that analyze data with dplyr or model with MLlib don’t require understanding how Spark partitions data; they simply work automatically. However, for distributed R computations, this is not the case. For these you will have to learn and understand how exactly Spark is partitioning your data and provide transformations that are compatible with them. This is required since spark_apply() receives each partition and allows you to perform any transformation, not the entire dataset. You can refresh concepts like partitioning and transformations using the diagrams and examples from Chapter 9. To help you understand how partitions are represented in spark_apply(), consider the following code: sdf_len(sc, 10) %>% spark_apply(~nrow(.x)) # Source: spark<?> [?? x 1] result * <int> 1 5 2 5 Should we expect the output to be the total number of rows? As you can see from the results, in general the answer is no; Spark assumes data will be distributed across multiple machines, so you’ll often find it already partitioned, even for small datasets. Because we should not expect spark_apply() to operate over a single partition, let’s find out how many partitions sdf_len(sc, 10) contains: sdf_len(sc, 10) %>% sdf_num_partitions() [1] 2 This explains why counting rows through nrow() under spark_apply() retrieves two rows since there are two partitions, not one. spark_apply() is retrieving the count of rows over each partition, and each partition contains 5 rows, not 10 rows total, as you might have expected. For this particular example, we could further aggregate these partitions by repartitioning and then adding up—this would resemble a simple MapReduce operation using spark_apply(): sdf_len(sc, 10) %>% spark_apply(~nrow(.x)) %>% sdf_repartition(1) %>% spark_apply(~sum(.x)) # Source: spark<?> [?? x 1] result * <int> 1 10 So now that you know about partitions using spark_apply(), we’ll move on to using group_by to control partitions.

11.4 Grouping

When using spark_apply(), we can request explicit partitions from Spark. For instance, if we had to process numbers less than four in one partition and the remaining ones in a second partition, we could create these groups explicitly and then request spark_apply() to use them: sdf_len(sc, 10) %>% transmute(groups = id < 4) %>% spark_apply(~nrow(.x), group_by = "groups") # Source: spark<?> [?? x 2] groups result * <lgl> <int> 1 TRUE 3 2 FALSE 7 Notice that spark_apply() is still processing two partitions, but in this case we expect these partitions since we explicitly requested them in spark_apply(); therefore, you can safely interpret the results as “there are three integers less than four”. Note: You can only group data by partitions that fit in a single machine; if one of the groups is too large, an exception will be thrown. To perform operations over groups that exceed the resources of a single node, you can consider partitioning to smaller units or use dplyr::do, which is currently optimized for large partitions. The takeaway from this section is to always consider partitions when dealing with spark_apply(). Next, we will zoom in to spark_apply() to understand how columns are interpreted.

11.5 Columns

By default, spark_apply() automatically inspects the DataFrame being produced to learn column names and types. For example: sdf_len(sc, 1) %>% spark_apply(~ data.frame(numbers = 1, names = "abc")) # Source: spark<?> [?? x 2] numbers names * <dbl> <chr> 1 1 abc However, this is inefficient since spark_apply() needs to run twice: first, to find columns by computing spark_apply() against a subset of all the data, and then to compute the actual desired values. To improve performance, you can explicitly specify the columns through the columns parameters. This parameter takes a named list of types expected in the resulting DataFrame. We can then rewrite the previous example to run only once by specifying the correct type for the numbers column: sdf_len(sc, 1) %>% spark_apply( ~ data.frame(numbers = 1, names = "abc"), columns = list(numbers = "double", names = "character")) # Source: spark<?> [?? x 2] numbers names * <dbl> <chr> 1 1 abc Now that we’ve presented how rows and columns interact with spark_apply(), let’s move on to making use of the contextual information sometimes required when processing distributed datasets.

11.6 Context

To process partitions using spark_apply(), you might need to include auxiliary data that is small enough to fit in each node. This was the case in the grid search use case, where the dataset was passed to all partitions and remained unpartitioned itself. We can modify the initial f(x) = 10 * x example in this chapter to customize the multiplier. It was originally set to 10, but we can make it configurable by specifying it as the context parameter: sdf_len(sc, 4) %>% spark_apply( function(data, context) context * data, context = 100 ) # Source: spark<?> [?? x 1] id <dbl> 1 100 2 200 3 300 4 400 Figure 11.5 illustrates this example conceptually. Notice that the data partitions are still variable; however, the contextual parameter is distributed to all the nodes. 
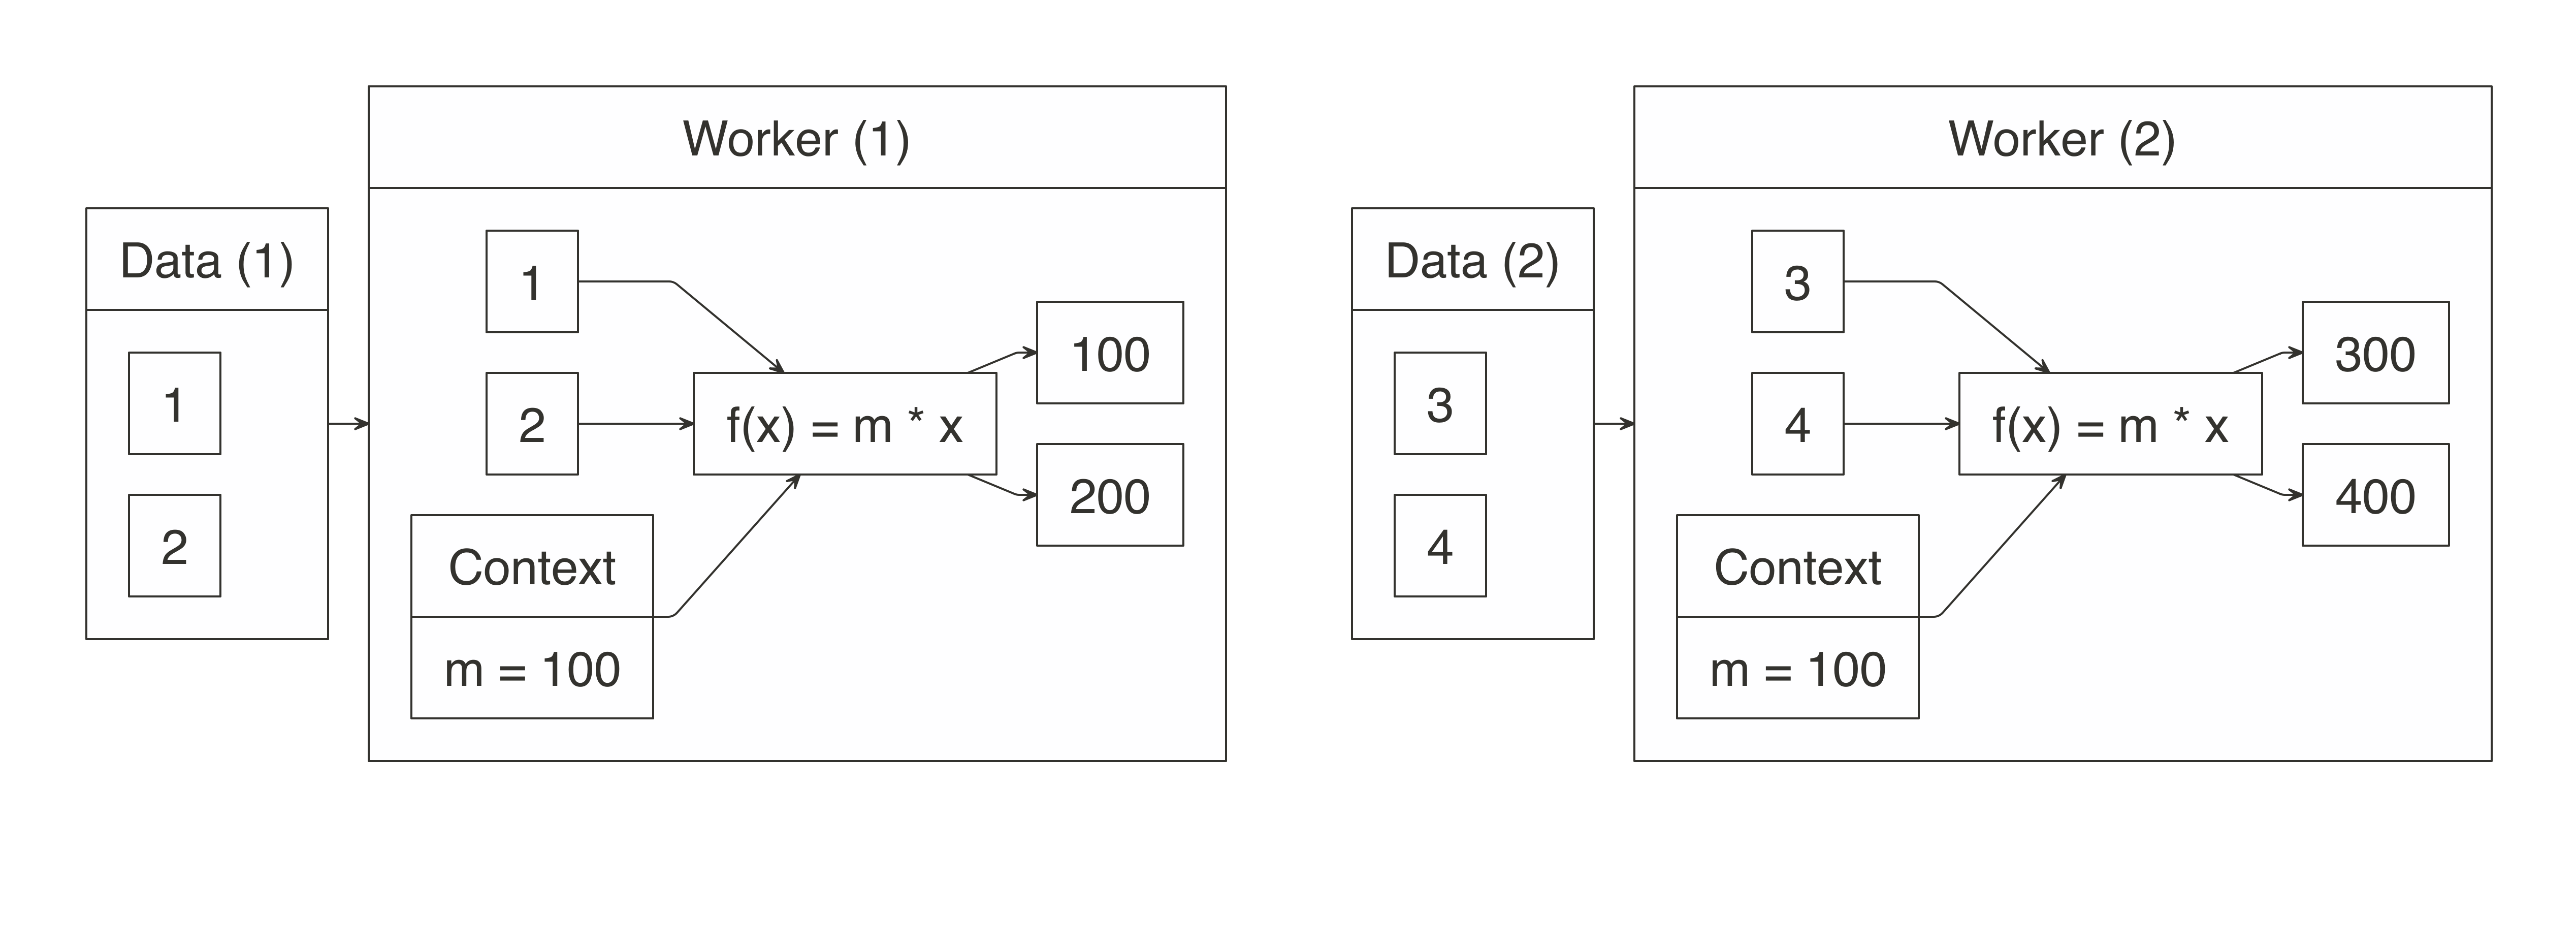
FIGURE 11.5: Map operation when multiplying with context The grid search example used this parameter to pass a DataFrame to each worker node; however, since the context parameter is serialized as an R object, it can contain anything. For instance, if you need to pass multiple values—or even multiple datasets—you can pass a list with values. The following example defines a f(x) = m * x + b function and runs m = 10 and b = 2: sdf_len(sc, 4) %>% spark_apply( ~.y$m * .x + .y$b, context = list(b = 2, m = 10) ) # Source: spark<?> [?? x 1] id <dbl> 1 12 2 22 3 32 4 42 Notice that we’ve renamed context to .y to shorten the variable name. This works because spark_apply() assumes context is the second parameter in functions and expressions. You’ll find the context parameter extremely useful; for instance, the next section presents how to properly construct functions, and context is used in advanced use cases to construct functions dependent on other functions.

11.7 Functions

Earlier we presented spark_apply() as an operation to perform custom transformations using a function or expression. In programming literature, functions with a context are also referred to as a closure. Expressions are useful to define short transformations, like ~ 10 * .x. For an expression, .x contains a partition and .y the context, when available. However, it can be hard to define an expression for complex code that spans multiple lines. For those cases, functions are more appropriate. Functions enable complex and multiline transformations, and are defined as function(data, context) {} where you can provide arbitrary code within the {}. We’ve seen them in previous sections when using Google Cloud to transform images into image captions. The function passed to spark_apply() is serialized using serialize(), which is described as “a simple low-level interface for serializing to connections”. One current limitation of serialize() is that it won’t serialize objects being referenced outside its environment. For instance, the following function errors out since the closure references external_value: external_value <- 1 spark_apply(iris, function(e) e + external_value) As workarounds to this limitation, you can add the functions your closure needs into the context and then assign the functions into the global environment: func_a <- function() 40 func_b <- function() func_a() + 1 func_c <- function() func_b() + 1 sdf_len(sc, 1) %>% spark_apply(function(df, context) { for (name in names(context)) assign(name, context[[name]], envir = .GlobalEnv) func_c() }, context = list( func_a = func_a, func_b = func_b, func_c = func_c )) # Source: spark<?> [?? x 1] result <dbl> 1 42 When this isn’t feasible, you can also create your own R package with the functionality you need and then use your package in spark_apply(). You’ve learned all the functionality available in spark_apply() using plain R code. In the next section we present how to use packages when distributing computations. R packages are essential when you are creating useful transformations.

11.8 Packages

With spark_apply() you can use any R package inside Spark. For instance, you can use the broom package to create a tidy(((“DataFrames”, “from linear regression output”))) DataFrame from linear regression output: spark_apply( iris, function(e) broom::tidy(lm(Petal_Length ~ Petal_Width, e)), names = c("term", "estimate", "std.error", "statistic", "p.value"), group_by = "Species") # Source: spark<?> [?? x 6] Species term estimate std.error statistic p.value <chr> <chr> <dbl> <dbl> <dbl> <dbl> 1 versicolor (Intercept) 1.78 0.284 6.28 9.48e- 8 2 versicolor Petal_Width 1.87 0.212 8.83 1.27e-11 3 virginica (Intercept) 4.24 0.561 7.56 1.04e- 9 4 virginica Petal_Width 0.647 0.275 2.36 2.25e- 2 5 setosa (Intercept) 1.33 0.0600 22.1 7.68e-27 6 setosa Petal_Width 0.546 0.224 2.44 1.86e- 2 The first time you call spark_apply(), all the contents in your local .libPaths() (which contains all R packages) will be copied into each Spark worker node. Packages are only copied once and persist as long as the connection remains open. It’s not uncommon for R libraries to be several gigabytes in size, so be prepared for a one-time tax while the R packages are copied over to your Spark cluster. You can disable package distribution by setting packages = FALSE. Note: Since packages are copied only once for the duration of the spark_connect() connection, installing additional packages is not supported while the connection is active. Therefore, if a new package needs to be installed, spark_disconnect() the connection, modify packages, and then reconnect. In addition, R packages are not copied in local mode, because the packages already exist on the local system. Though this section was brief, using packages with distributed R code opens up an entire new universe of interesting use cases. Some of those use cases were presented in this chapter, but by looking at the rich ecosystem of R packages available today you’ll find many more. This section completes our discussion of the functionality needed to distribute R code with R packages. We’ll now cover some of the requirements your cluster needs to make use of spark_apply().

11.9 Cluster Requirements

The functionality presented in previous chapters did not require special configuration of your Spark cluster—as long as you had a properly configured Spark cluster, you could use R with it. However, for the functionality presented here, your cluster administrator, cloud provider, or you will have to configure your cluster by installing either: Let’s take a look at each requirement to ensure that you properly consider the trade-offs or benefits that they provide.

11.9.1 Installing R

Starting with the first requirement, the R runtime is expected to be preinstalled in every node in the cluster; this is a requirement specific to spark_apply(). Failure to install R in every node will trigger a Cannot run program, no such file or directory error when you attempt to use spark_apply(). Contact your cluster administrator to consider making the R runtime available throughout the entire cluster. If R is already installed, you can specify the installation path to use with the spark.r.command configuration setting, as shown here: config <- spark_config() config["spark.r.command"] <- "<path-to-r-version>" sc <- spark_connect(master = "local", config = config) sdf_len(sc, 10) %>% spark_apply(function(e) e) A homogeneous cluster is required since the driver node distributes, and potentially compiles, packages to the workers. For instance, the driver and workers must have the same processor architecture, system libraries, and so on. This is usually the case for most clusters, but might not be true for yours. Different cluster managers, Spark distributions, and cloud providers support different solutions to install additional software (like R) across every node in the cluster; follow instructions when installing R over each worker node. Here are a few examples:
Spark Standalone
Requires connecting to each machine and installing R; tools like pssh allow you to run a single installation command against multiple machines.
Cloudera
Provides an R parcel (see the Cloudera blog post “How to Distribute Your R code with sparklyr and Cloudera Data Science Workbench”), which enables R over each worker node.
Amazon EMR
R is preinstalled when starting an EMR cluster as mentioned in Clusters - Amazon EMR.
Microsoft HDInsight
R is preinstalled and no additional steps are needed.
Livy
Livy connections do not support distributing packages because the client machine where the libraries are precompiled might not have the same processor architecture or operating systems as the cluster machines. Strictly speaking, this completes the last requirement for your cluster. However, we strongly recommend you use Apache Arrow with spark_apply() to support large-scale computation with minimal overhead.

11.9.2 Apache Arrow

Before introducing Apache Arrow, we’ll discuss how data is stored and transferred between Spark and R. As R was designed from its inception to perform fast numeric computations to accomplish this, it’s important to figure out the best way to store data. Some computing systems store data internally by row; however, most interesting numerical operations require data to be processed by column. For example, calculating the mean of a column requires processing each column on its own, not the entire row. Spark stores data by default by row, since it’s easier to partition; in contrast, R stores data by column. Therefore, something needs to transform both representations when data is transferred between Spark and R, as shown in Figure 11.6. FIGURE 11.6: Data transformation between Spark and R This transformation from rows to columns needs to happen for each partition. In addition, data also must be transformed from Scala’s internal representation to R’s internal representation. Apache Arrow reduces these transformations that waste a lot of CPU cycles. Apache Arrow is a cross-language development platform for in-memory data. In Spark, it speeds up transferring data between Scala and R by defining a common data format compatible with many programming languages. Instead of having to transform between Scala’s internal representation and R’s, you can use the same structure for both languages. In addition, transforming data from row-based storage to columnar storage is performed in parallel in Spark, which can be further optimized by using the columnar storage formats presented in Chapter 8. The improved transformations are shown in Figure 11.6. FIGURE 11.7: Data transformation between Spark and R using Apache Arrow Apache Arrow is not required but is strongly recommended while you are working with spark_apply(). It has been available since Spark 2.3.0; however, it requires system administrators to install the Apache Arrow runtime in every node (see http://arrow.apache.org/install/). In addition, to use Apache Arrow with sparklyr, you also need to install the arrow package: install.packages("arrow") Before we use arrow, let’s take a measurement to validate: system.time( sdf_len(sc, 10^4) %>% spark_apply(nrow) %>% collect() ) user system elapsed 0.240 0.020 7.957 In our particular system, processing 10,000 rows takes about 8 seconds. To enable Arrow, simply include the library and use spark_apply() as usual. Let’s measure how long it takes spark_apply() to process 1 million rows: library(arrow) system.time( sdf_len(sc, 10^6) %>% spark_apply(nrow) %>% collect() ) user system elapsed 0.317 0.021 3.922 In our system, Apache Arrow can process 100 times more data in half the time: just 4 seconds. Most functionality in arrow simply works in the background, improving performance and data serialization; however, there is one setting you should be aware of. The spark.sql.execution.arrow.maxRecordsPerBatch configuration setting specifies the default size of each arrow data transfer. It’s shared with other Spark components and defaults to 10,000 rows: library(arrow) sdf_len(sc, 2 * 10^4) %>% spark_apply(nrow) # Source: spark<?> [?? x 1] result <int> 1 10000 2 10000 You might need to adjust this number based on how much data your system can handle, making it smaller for large datasets or bigger for operations that require records to be processed together. We can change this setting to 5,000 rows and verify the partitions change appropriately: config <- spark_config() config$spark.sql.execution.arrow.maxRecordsPerBatch <- 5 * 10^3 sc <- spark_connect(master = "local", config = config) sdf_len(sc, 2 * 10^4) %>% spark_apply(nrow) # Source: spark<?> [?? x 1] result <int> 1 5000 2 5000 3 5000 4 5000 So far we’ve presented use cases, main operations, and cluster requirements. Now we’ll discuss the troubleshooting techniques useful when distributing R code.

11.10 Troubleshooting

A custom transformation can fail for many reasons. To learn how to troubleshoot errors, let’s simulate a problem by triggering an error ourselves: sdf_len(sc, 1) %>% spark_apply(~stop("force an error")) Error in force(code) : sparklyr worker rscript failure, check worker logs for details Log: wm_bx4cn70s6h0r5vgsldm0000gn/T/Rtmpob83LD/file2aac1a6188_spark.log ---- Output Log ---- 19/03/11 14:12:24 INFO sparklyr: Worker (1) completed wait using lock for RScript Notice that the error message mentions inspecting the logs. When running in local mode, you can simply run the following: spark_log(sc, filter = "terminated unexpectedly") 19/03/11 14:12:24 ERROR sparklyr: RScript (1) terminated unexpectedly: force an error This points to the artificial stop("force an error") error we mentioned. However, if you’re not working in local mode, you will have to retrieve the worker logs from your cluster manager. Since this can be cumbersome, one alternative is to rerun spark_apply() but return the error message yourself: sdf_len(sc, 1) %>% spark_apply(~tryCatch( stop("force an error"), error = function(e) e$message )) # Source: spark<?> [?? x 1] result <chr> 1 force an error Among the other, more advanced troubleshooting techniques applicable to spark_apply(), the following sections present these techniques in order. You should try to troubleshoot by using worker logs first, then identifying partitioning errors, and finally, attempting to debug a worker node.

11.10.1 Worker Logs

Whenever spark_apply() is executed, information regarding execution is written over each worker node. You can use this log to write custom messages to help you diagnose and fine-tune your code. For instance, suppose that we don’t know what the first column name of df is. We can write a custom log message executed from the worker nodes using worker_log() as follows: sdf_len(sc, 1) %>% spark_apply(function(df) { worker_log("the first column in the data frame is named ", names(df)[[1]]) df }) # Source: spark<?> [?? x 1] id * <int> 1 1 When running locally, we can filter the log entries for the worker as follows: spark_log(sc, filter = "sparklyr: RScript") 18/12/18 11:33:47 INFO sparklyr: RScript (3513) the first column in the dataframe is named id 18/12/18 11:33:47 INFO sparklyr: RScript (3513) computed closure 18/12/18 11:33:47 INFO sparklyr: RScript (3513) updating 1 rows 18/12/18 11:33:47 INFO sparklyr: RScript (3513) updated 1 rows 18/12/18 11:33:47 INFO sparklyr: RScript (3513) finished apply 18/12/18 11:33:47 INFO sparklyr: RScript (3513) finished Notice that the logs print our custom log entry, showing that id is the name of the first column in the given DataFrame. This functionality is useful when troubleshooting errors; for instance, if we force an error using the stop() function: sdf_len(sc, 1) %>% spark_apply(function(df) { stop("force an error") }) We will get an error similar to the following: Error in force(code) : sparklyr worker rscript failure, check worker logs for details As suggested by the error, we can look in the worker logs for the specific errors as follows: spark_log(sc) This will show an entry containing the error and the call stack: 18/12/18 11:26:47 INFO sparklyr: RScript (1860) computing closure 18/12/18 11:26:47 ERROR sparklyr: RScript (1860) terminated unexpectedly: force an error 18/12/18 11:26:47 ERROR sparklyr: RScript (1860) collected callstack: 11: stop("force and error") 10: (function (df) { stop("force and error") })(structure(list(id = 1L), class = "data.frame", row.names = c(NA, -1L))) Notice that spark_log(sc) only retrieves the worker logs when you’re using local clusters. When running in proper clusters with multiple machines, you will have to use the tools and user interface provided by the cluster manager to find these log entries.

11.10.2 Resolving Timeouts

When you are running with several hundred executors, it becomes more likely that some tasks will hang indefinitely. In this situation, most of the tasks in your job complete successfully, but a handful of them are still running and do not fail or succeed. Suppose that you need to calculate the size of many web pages. You could use spark_apply() with something similar to: sdf_len(sc, 3, repartition = 3) %>% spark_apply(~ download.file("https://google.com", "index.html") + file.size("index.html")) Some web pages might not exist or take too long to download. In this case, most tasks will succeed, but a few will hang. To prevent these few tasks from blocking all computations, you can use the spark.speculation Spark setting. With this setting enabled, once 75% of all tasks succeed, Spark will look for tasks taking longer than the median task execution time and retry. You can use the spark.speculation.multiplier setting to configure the time multiplier used to determine when a task is running slow. Therefore, for this example, you could configure Spark to retry tasks that take four times longer than the median as follows: config <- spark_config() config["spark.speculation"] <- TRUE config["spark.speculation.multiplier"] <- 4

11.10.3 Inspecting Partitions

If a particular partition fails, you can detect the broken partition by computing a digest and then retrieving that particular partition. As usual, you can install digest from CRAN before connecting to Spark: sdf_len(sc, 3) %>% spark_apply(function(x) { worker_log("processing ", digest::digest(x), " partition") # your code x }) This will add an entry similar to: 18/11/03 14:48:32 INFO sparklyr: RScript (2566) processing f35b1c321df0162e3f914adfb70b5416 partition When executing this in your cluster, look in the logs for the task that is not finishing. Once you have that digest, you can cancel the job. Then you can use that digest to retrieve the specific DataFrame to R with something like this: sdf_len(sc, 3) %>% spark_apply(function(x) { if (identical(digest::digest(x), "f35b1c321df0162e3f914adfb70b5416")) x else x[0,] }) %>% collect() # A tibble: 1 x 1 result <int> 1 1 You can then run this in R to troubleshoot further.

11.10.4 Debugging Workers

A debugger is a tool that lets you execute your code line by line; you can use this to troubleshoot spark_apply() for local connections. You can start spark_apply() in debug mode by using the debug parameter and then following the instructions: sdf_len(sc, 1) %>% spark_apply(function() { stop("Error!") }, debug = TRUE) Debugging spark_apply(), connect to worker debugging session as follows: 1. Find the workers <sessionid> and <port> in the worker logs, from RStudio click 'Log' under the connection, look for the last entry with contents: 'Session (<sessionid>) is waiting for sparklyr client to connect to port <port>' 2. From a new R session run: debugonce(sparklyr:::spark_worker_main) sparklyr:::spark_worker_main(<sessionid>, <port>) As these instructions indicate, you’ll need to connect “as the worker node” from a different R session and then step through the code. This method is less straightforward than previous ones, since you’ll also need to step through some lines of sparklyr code; thus, we only recommend this as a last resort. (You can also try the online resources described in Chapter 2.) Let’s now wrap up this chapter with a brief recap of the functionality we presented.

11.11 Recap

This chapter presented spark_apply() as an advanced technique you can use to fill gaps in functionality in Spark or its many extensions. We presented example use cases for spark_apply() to parse data, model in parallel many small datasets, perform a grid search, and call web APIs. You learned how partitions relate to spark_apply(), and how to create custom groups, distribute contextual information across all nodes, and troubleshoot problems, limitations, and cluster configuration caveats. We also strongly recommended using Apache Arrow as a library when working with Spark with R, and presented installation, use cases, and considerations you should be aware of. Up to this point, we’ve only worked with large datasets of static data, which doesn’t change over time and remains invariant while we analyze, model, and visualize them. In Chapter 12, we will introduce techniques to process datasets that, in addition to being large, are also growing in such a way that they resemble a stream of information.

Chapter 12 Streaming

Looking back at the previous chapters, we’ve covered a good deal, but not everything. We’ve analyzed tabular datasets, performed unsupervised learning over raw text, analyzed graphs and geographic datasets, and even transformed data with custom R code! So now what? Though we weren’t explicit about this, we’ve assumed until this point that your data is static, and didn’t change over time. But suppose for a moment your job is to analyze traffic patterns to give recommendations to the department of transportation. A reasonable approach would be to analyze historical data and then design predictive models that compute forecasts overnight. Overnight? That’s very useful, but traffic patterns change by the hour and even by the minute. You could try to preprocess and predict faster and faster, but eventually this model breaks—you can’t load large-scale datasets, transform them, score them, unload them, and repeat this process by the second. Instead, we need to introduce a different kind of dataset—one that is not static but rather dynamic, one that is like a table but is growing constantly. We will refer to such datasets as streams.

12.1 Overview

We know how to work with large-scale static datasets, but how can we reason about large-scale real-time datasets? Datasets with an infinite amount of entries are known as streams. For static datasets, if we were to do real-time scoring using a pretrained topic model, the entries would be lines of text; for real-time datasets, we would perform the same scoring over an infinite number of lines of text. Now, in practice, you will never process an infinite number of records. You will eventually stop the stream—or this universe might end, whichever comes first. Regardless, thinking of the datasets as infinite makes it much easier to reason about them. Streams are most relevant when processing real-time data—for example, when analyzing a Twitter feed or stock prices. Both examples have well-defined columns, like “tweet” or “price,” but there are always new rows of data to be analyzed. Spark Streaming provides scalable and fault-tolerant data processing over streams of data. That means you can use many machines to process multiple streaming sources, perform joins with other streams or static sources, and recover from failures with at-least-once guarantees (each message is certain to be delivered, but may do so multiple times). In Spark, you create streams by defining a source, a transformation, and a sink; you can think of these steps as reading, transforming, and writing a stream, as shown in Figure 12.1 describes. 
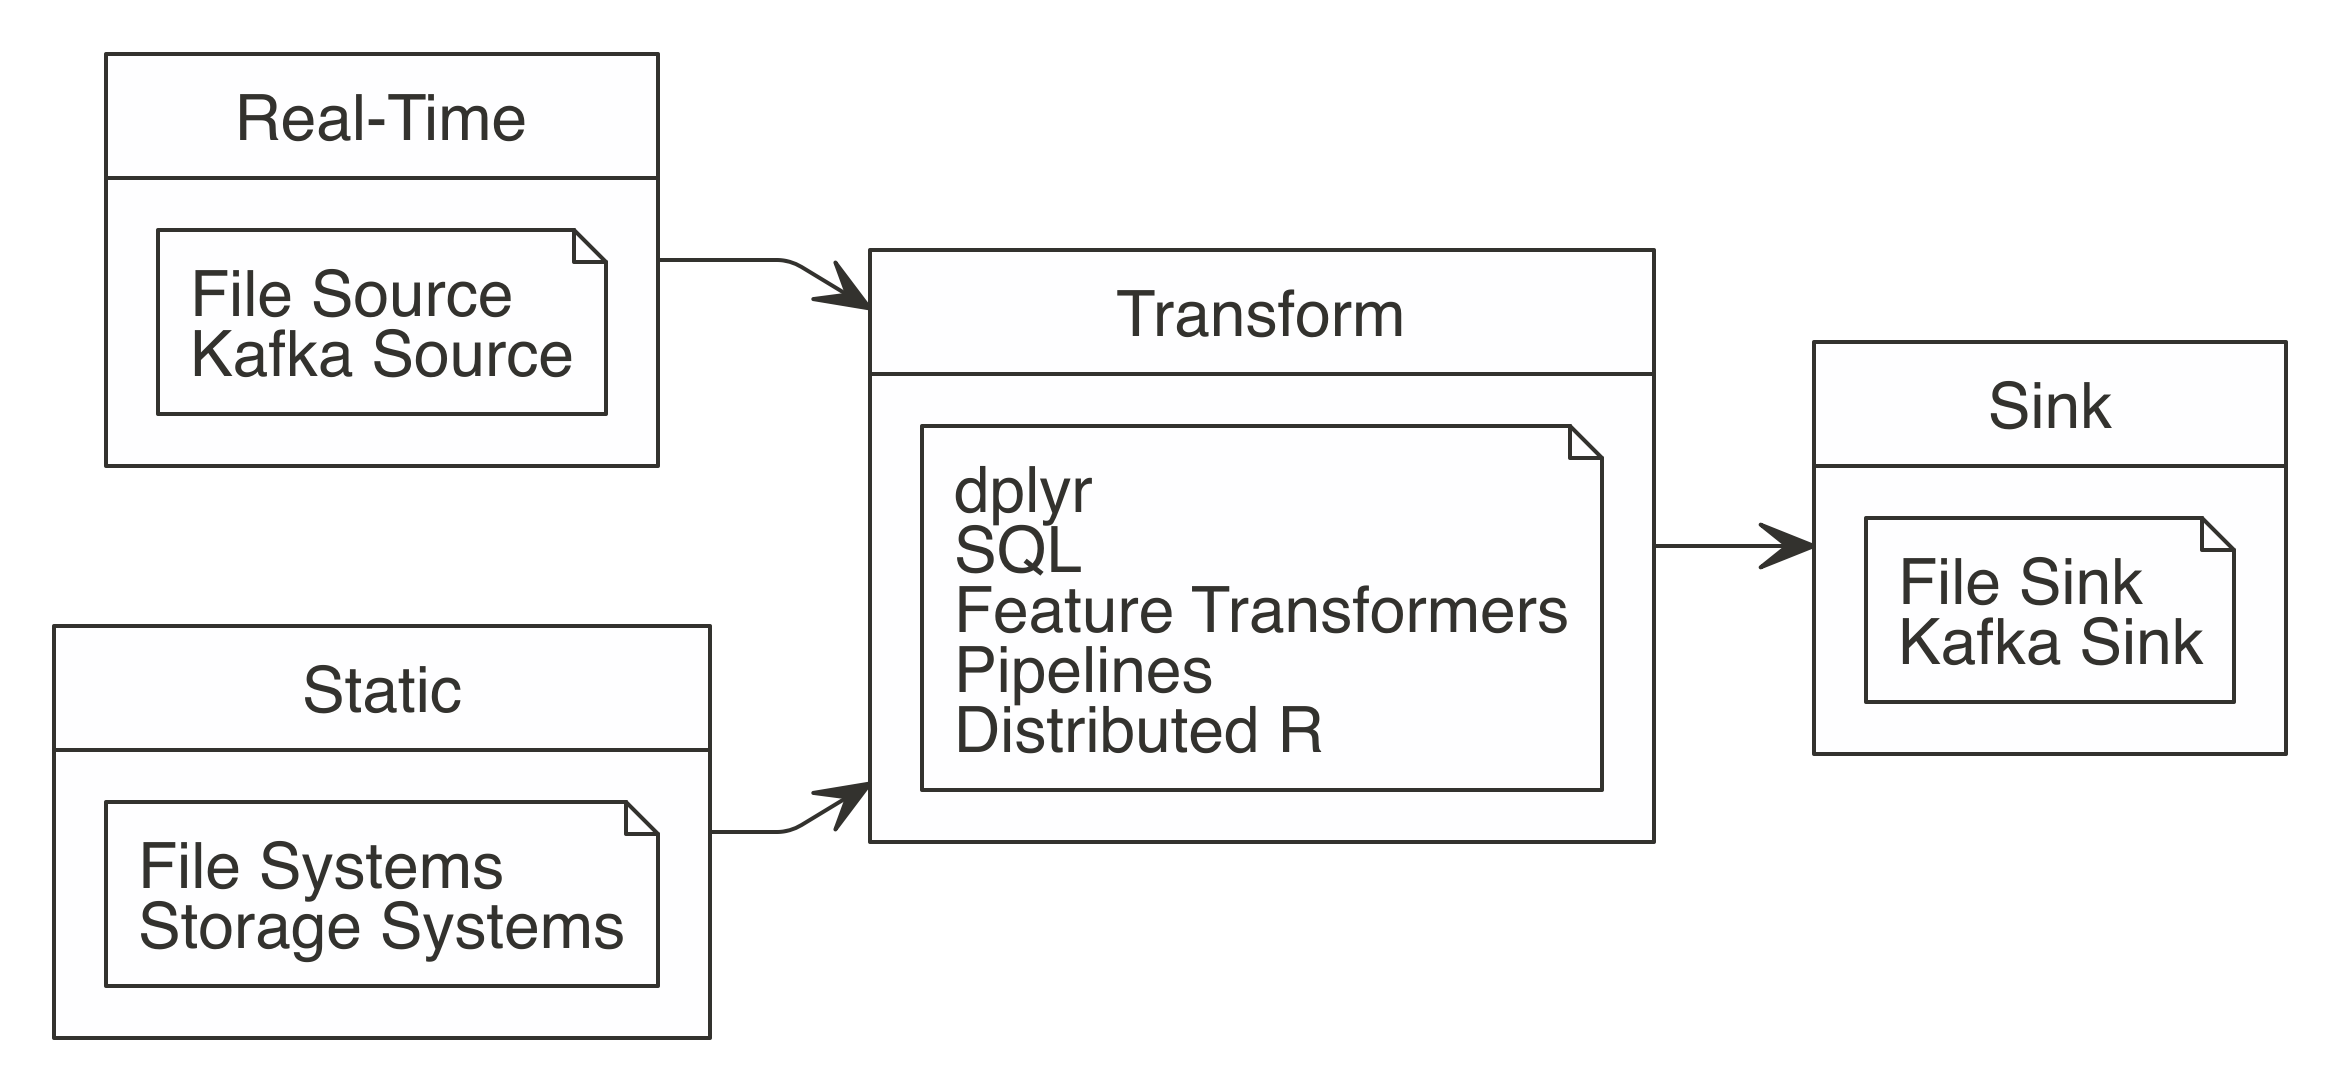
FIGURE 12.1: Working with Spark Streaming Let’s take a look at each of these a little more closely:
Reading
Streams read data using any of the stream_read_*() functions; the read operation defines the source of the stream. You can define one or multiple sources from which to read.
Transforming
A stream can perform one or multiple transformations using dplyr, SQL, feature transformers, scoring pipelines, or distributed R code. Transformations can not only be applied to one or more streams, but can also use a combination of streams and static data sources; for instance, those loaded into Spark with spark_read_() functions—this means that you can combine static data and real-time data sources with ease.
Writing
The write operations are performed with the family of stream_write_*() functions, while the read operation defined the sink of the stream. You can specify a single sink or multiple ones to write data to. You can read and write to streams in several different file formats: CSV, JSON, Parquet, Optimized Row Columnar (ORC), and text (see Table 12.1). You also can read and write from and to Kafka, which we will introduce later on.
TABLE 12.1: Spark functions to read and write streams
FormatReadWrite
CSVstream_read_csvstream_write_csv
JSONstream_read_jsonstream_write_json
Kafkastream_read_kafkastream_write_kafka
ORCstream_read_orcstream_write_orc
Parquetstream_read_parquetstream_write_parquet
Textstream_read_textstream_write_text
Memorystream_write_memory
Since the transformation step is optional, the simplest stream we can define is one that continuously copies text files between source and destination. First, install the future package using install.packages("future") and connect to Spark. Since a stream requires the source to exist, create a source folder: dir.create("source") We are now ready to define our first stream! stream <- stream_read_text(sc, "source/") %>% stream_write_text("destination/") The streams starts running with stream_write_*(); once executed, the stream will monitor the source path and process data into the ++destination /++ path as it arrives. We can use stream_generate_test() to produce a file every second containing lines of text that follow a given distribution; you can read more about this in Appendix. In practice, you would connect to existing sources without having to generate data artificially. We can then use view_stream() to track the rows per second (rps) being processed in the source, and in the destination, and their latest values over time: future::future(stream_generate_test(interval = 0.5)) stream_view(stream) The result is shown in Figure 12.2. 
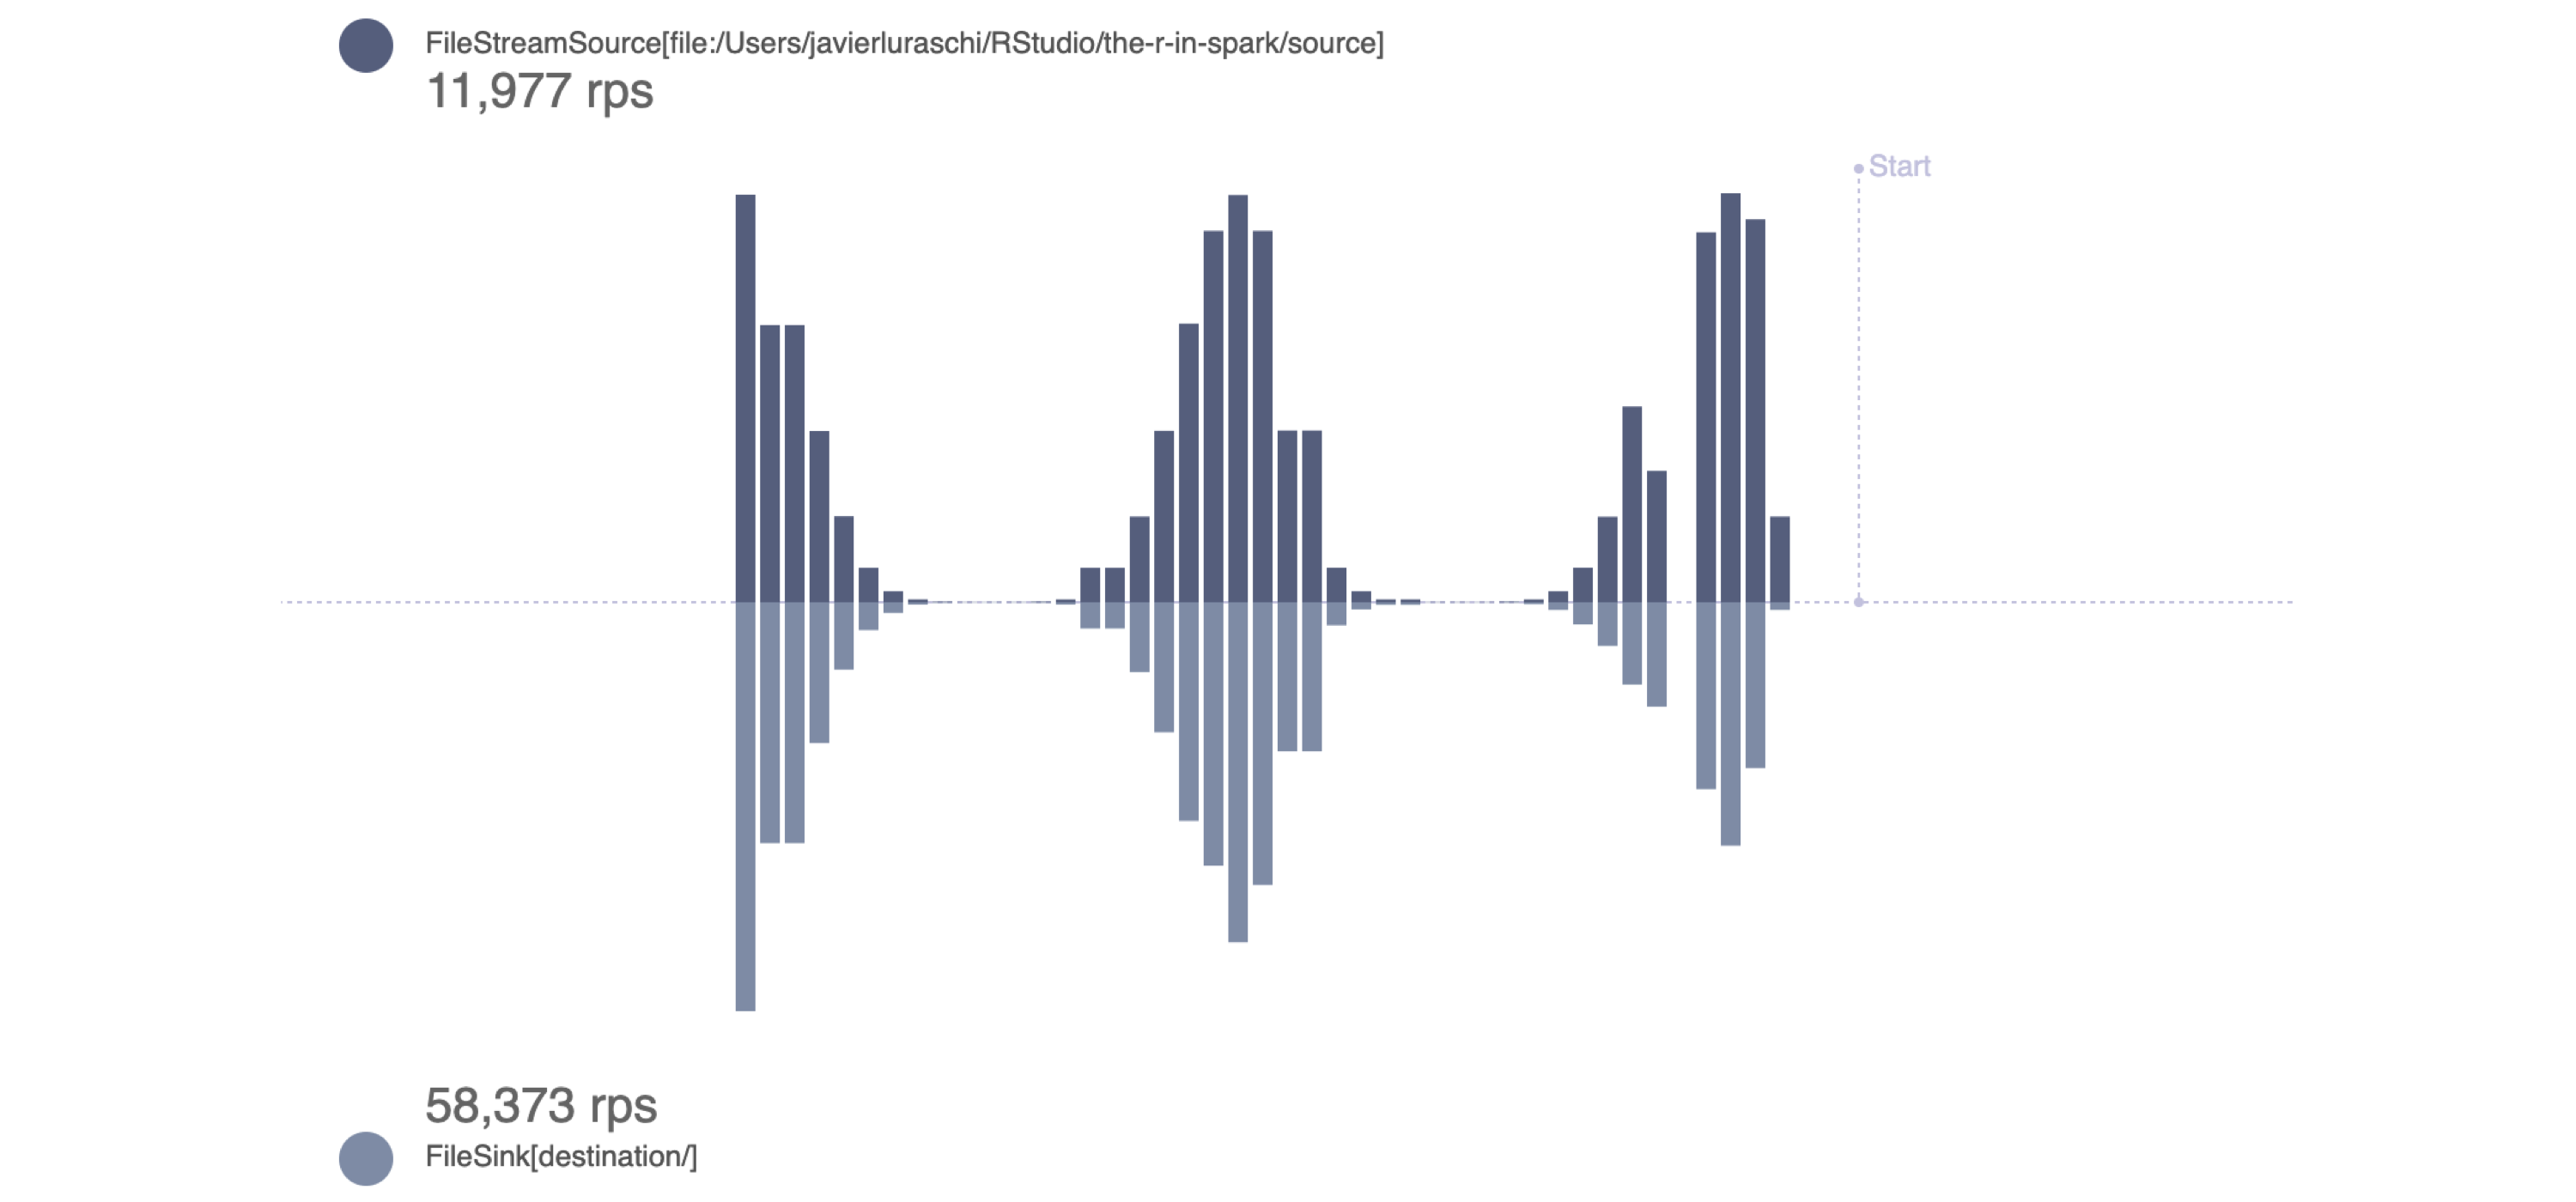
FIGURE 12.2: Monitoring a stream generating rows following a binomial distribution Notice that the rps rate in the destination stream is higher than that in the source stream. This is expected and desirable since Spark measures incoming rates from the source stream, but also actual row-processing times in the destination stream. For example, if 10 rows per second are written to the source/ path, the incoming rate is 10 rps. However, if it takes Spark only 0.01 seconds to write all those 10 rows, the output rate is 100 rps. Use stream_stop() to properly stop processing data from this stream: stream_stop(stream) This exercise introduced how we can easily start a Spark stream that reads and writes data based on a simulated stream. Let’s do something more interesting than just copying data with proper transformations.

12.2 Transformations

In a real-life scenario, the incoming data from a stream would not be written as is to the output. The Spark Streaming job would make transformations to the data, and then write the transformed data. Streams can be transformed using dplyr, SQL queries, ML pipelines, or R code. We can use as many transformations as needed in the same way that Spark DataFrames can be transformed with sparklyr. The source of the transformation can be a stream or DataFrame, but the output is always a stream. If needed, you can always take a snapshot from the destination stream and then save the output as a DataFrame. That is what sparklyr will do for you if a destination stream is not specified. Each of the following subsections covers an option provided by sparklyr to perform transformations on a stream.

12.2.1 Analysis

You can analyze streams with dplyr verbs and SQL using DBI. As a quick example, we will filter rows and add columns over a stream. We won’t explicitly call stream_generate_test(), but you can call it on your own through the later package if you feel the urge to verify that data is being processed continuously: library(dplyr) stream_read_csv(sc, "source") %>% filter(x > 700) %>% mutate(y = round(x / 100)) # Source: spark<?> [inf x 2] x y <int> <dbl> 1 701 7 2 702 7 3 703 7 4 704 7 5 705 7 6 706 7 7 707 7 8 708 7 9 709 7 10 710 7 # … with more rows It’s also possible to perform aggregations over the entire history of the stream. The history could be filtered or not: stream_read_csv(sc, "source") %>% filter(x > 700) %>% mutate(y = round(x / 100)) %>% count(y) # Source: spark<?> [inf x 2] y n <dbl> <dbl> 1 8 25902 2 9 25902 3 10 13210 4 7 12692 Grouped aggregations of the latest data in the stream require a timestamp. The timestamp will note when the reading function (in this case stream_read_csv()) first “saw” that specific record. In Spark Streaming terminology, the timestamp is called a watermark. The spark_watermark() function adds the timestamp. In this example, the watermark will be the same for all records, since the five files were read by the stream after they were created. Note that only Kafka and memory outputs support watermarks: stream_read_csv(sc, "source") %>% stream_watermark() # Source: spark<?> [inf x 2] x timestamp <int> <dttm> 1 276 2019-06-30 07:14:21 2 277 2019-06-30 07:14:21 3 278 2019-06-30 07:14:21 4 279 2019-06-30 07:14:21 5 280 2019-06-30 07:14:21 6 281 2019-06-30 07:14:21 7 282 2019-06-30 07:14:21 8 283 2019-06-30 07:14:21 9 284 2019-06-30 07:14:21 10 285 2019-06-30 07:14:21 # … with more rows After the watermark is created, you can use it in the group_by() verb. You can then pipe it into a summarise() function to get some stats of the stream: stream_read_csv(sc, "source") %>% stream_watermark() %>% group_by(timestamp) %>% summarise( max_x = max(x, na.rm = TRUE), min_x = min(x, na.rm = TRUE), count = n() ) # Source: spark<?> [inf x 4] timestamp max_x min_x count <dttm> <int> <int> <dbl> 1 2019-06-30 07:14:55 1000 1 259332

12.2.2 Modeling

Spark streams currently don’t support training on real-time datasets. Aside from the technical challenges, even if it were possible, it would be quite difficult to train models since the model itself would need to adapt over time. Known as online learning, this is perhaps something that Spark will support in the future. That said, there are other modeling concepts we can use with streams, like feature transformers and scoring. Let’s try out a feature transformer with streams, and leave scoring for the next section, since we will need to train a model. The next example uses the ft_bucketizer() feature transformer to modify the stream followed by regular dplyr functions, which you can use just as you would with static datasets: stream_read_csv(sc, "source") %>% mutate(x = as.numeric(x)) %>% ft_bucketizer("x", "buckets", splits = 0:10 * 100) %>% count(buckets) %>% arrange(buckets) # Source: spark<?> [inf x 2] # Ordered by: buckets buckets n <dbl> <dbl> 1 0 25747 2 1 26008 3 2 25992 4 3 25908 5 4 25905 6 5 25903 7 6 25904 8 7 25901 9 8 25902 10 9 26162

12.2.3 Pipelines

Spark pipelines can be used for scoring streams, but not to train over streaming data. The former is fully supported, while the latter is a feature under active development by the Spark community. To score a stream, it’s necessary to first create our model. So let’s build, fit, and save a simple pipeline: cars <- copy_to(sc, mtcars) model <- ml_pipeline(sc) %>% ft_binarizer("mpg", "over_30", 30) %>% ft_r_formula(over_30 ~ wt) %>% ml_logistic_regression() %>% ml_fit(cars) Tip: If you choose to, you can make use of other concepts presented in Chapter 5, like saving and reloading pipelines through ml_save() and ml_load() before scoring streams. We can then generate a stream based on mtcars using stream_generate_test(), and score the model using ml_transform(): future::future(stream_generate_test(mtcars, "cars-stream", iterations = 5)) ml_transform(model, stream_read_csv(sc, "cars-stream")) # Source: spark<?> [inf x 17] mpg cyl disp hp drat wt qsec vs am gear carb over_30 <dbl> <int> <dbl> <int> <dbl> <dbl> <dbl> <int> <int> <int> <int> <dbl> 1 15.5 8 318 150 2.76 3.52 16.9 0 0 3 2 0 2 15.2 8 304 150 3.15 3.44 17.3 0 0 3 2 0 3 13.3 8 350 245 3.73 3.84 15.4 0 0 3 4 0 4 19.2 8 400 175 3.08 3.84 17.0 0 0 3 2 0 5 27.3 4 79 66 4.08 1.94 18.9 1 1 4 1 0 6 26 4 120. 91 4.43 2.14 16.7 0 1 5 2 0 7 30.4 4 95.1 113 3.77 1.51 16.9 1 1 5 2 1 8 15.8 8 351 264 4.22 3.17 14.5 0 1 5 4 0 9 19.7 6 145 175 3.62 2.77 15.5 0 1 5 6 0 10 15 8 301 335 3.54 3.57 14.6 0 1 5 8 0 # … with more rows, and 5 more variables: features <list>, label <dbl>, # rawPrediction <list>, probability <list>, prediction <dbl> Though this example was put together with a few lines of code, what we just accomplished is actually quite impressive. You copied data into Spark, performed feature engineering, trained a model, and scored the model over a real-time dataset, with just seven lines of code! Let’s try now to use custom transformations, in real time.

12.2.4 Distributed R {streaming-r-code}

Arbitrary R code can also be used to transform a stream with the use of spark_apply(). This approach follows the same principles discussed in Chapter 11, where spark_apply() runs R code over each executor in the cluster where data is available. This enables processing high-throughput streams and fulfills low-latency requirements: stream_read_csv(sc, "cars-stream") %>% select(mpg) %>% spark_apply(~ round(.x), mpg = "integer") %>% stream_write_csv("cars-round") which, as you would expect, processes data from cars-stream into cars-round by running the custom round() R function. Let’s peek into the output sink: spark_read_csv(sc, "cars-round") # Source: spark<carsround> [?? x 1] mpg <dbl> 1 16 2 15 3 13 4 19 5 27 6 26 7 30 8 16 9 20 10 15 # … with more rows Again, make sure you apply the concepts you already know about spark_apply() when using streams; for instance, you should consider using arrow to significantly improve performance. Before we move on, disconnect from Spark: This was our last transformation for streams. We’ll now learn how to use Spark Streaming with Kafka. spark_disconnect(sc)

12.3 Kafka

Apache Kafka is an open source stream-processing software platform developed by LinkedIn and donated to the Apache Software Foundation. It is written in Scala and Java. To describe it using an analogy, Kafka is to real-time storage what Hadoop is to static storage. Kafka stores the stream as records, which consist of a key, a value, and a timestamp. It can handle multiple streams that contain different information, by categorizing them by topic. Kafka is commonly used to connect multiple real-time applications. A producer is an application that streams data into Kafka, while a consumer is the one that reads from Kafka; in Kafka terminology, a consumer application subscribes to topics. Therefore, the most basic workflow we can accomplish with Kafka is one with a single producer and a single consumer; this is illustrated in Figure 12.3. FIGURE 12.3: A basic Kafka workflow If you are new to Kafka, we don’t recommend you run the code from this section. However, if you’re really motivated to follow along, you will first need to install Kafka as explained in Appendix or deploy it in your cluster. Using Kafka also requires you to have the Kafka package when connecting to Spark. Make sure this is specified in your connection config: library(sparklyr) library(dplyr) sc <- spark_connect(master = "local", config = list( sparklyr.shell.packages = "org.apache.spark:spark-sql-kafka-0-10_2.11:2.4.0" )) Once connected, it’s straightforward to read data from a stream: stream_read_kafka( sc, options = list( kafka.bootstrap.server = "host1:9092, host2:9092", subscribe = "<topic-name>" ) ) However, notice that you need to properly configure the options list; kafka.bootstrap.server expects a list of Kafka hosts, while topic and subscribe define which topic should be used when writing or reading from Kafka, respectively. Though we’ve started by presenting a simple single-producer and single-consumer use case, Kafka also allows much more complex interactions. We will next read from one topic, process its data, and then write the results to a different topic. Systems that are producers and consumers from the same topic are referred to as stream processors. In Figure 12.4, the stream processor reads topic A and then writes results to topic B. This allows for a given consumer application to read results instead of “raw” feed data. 
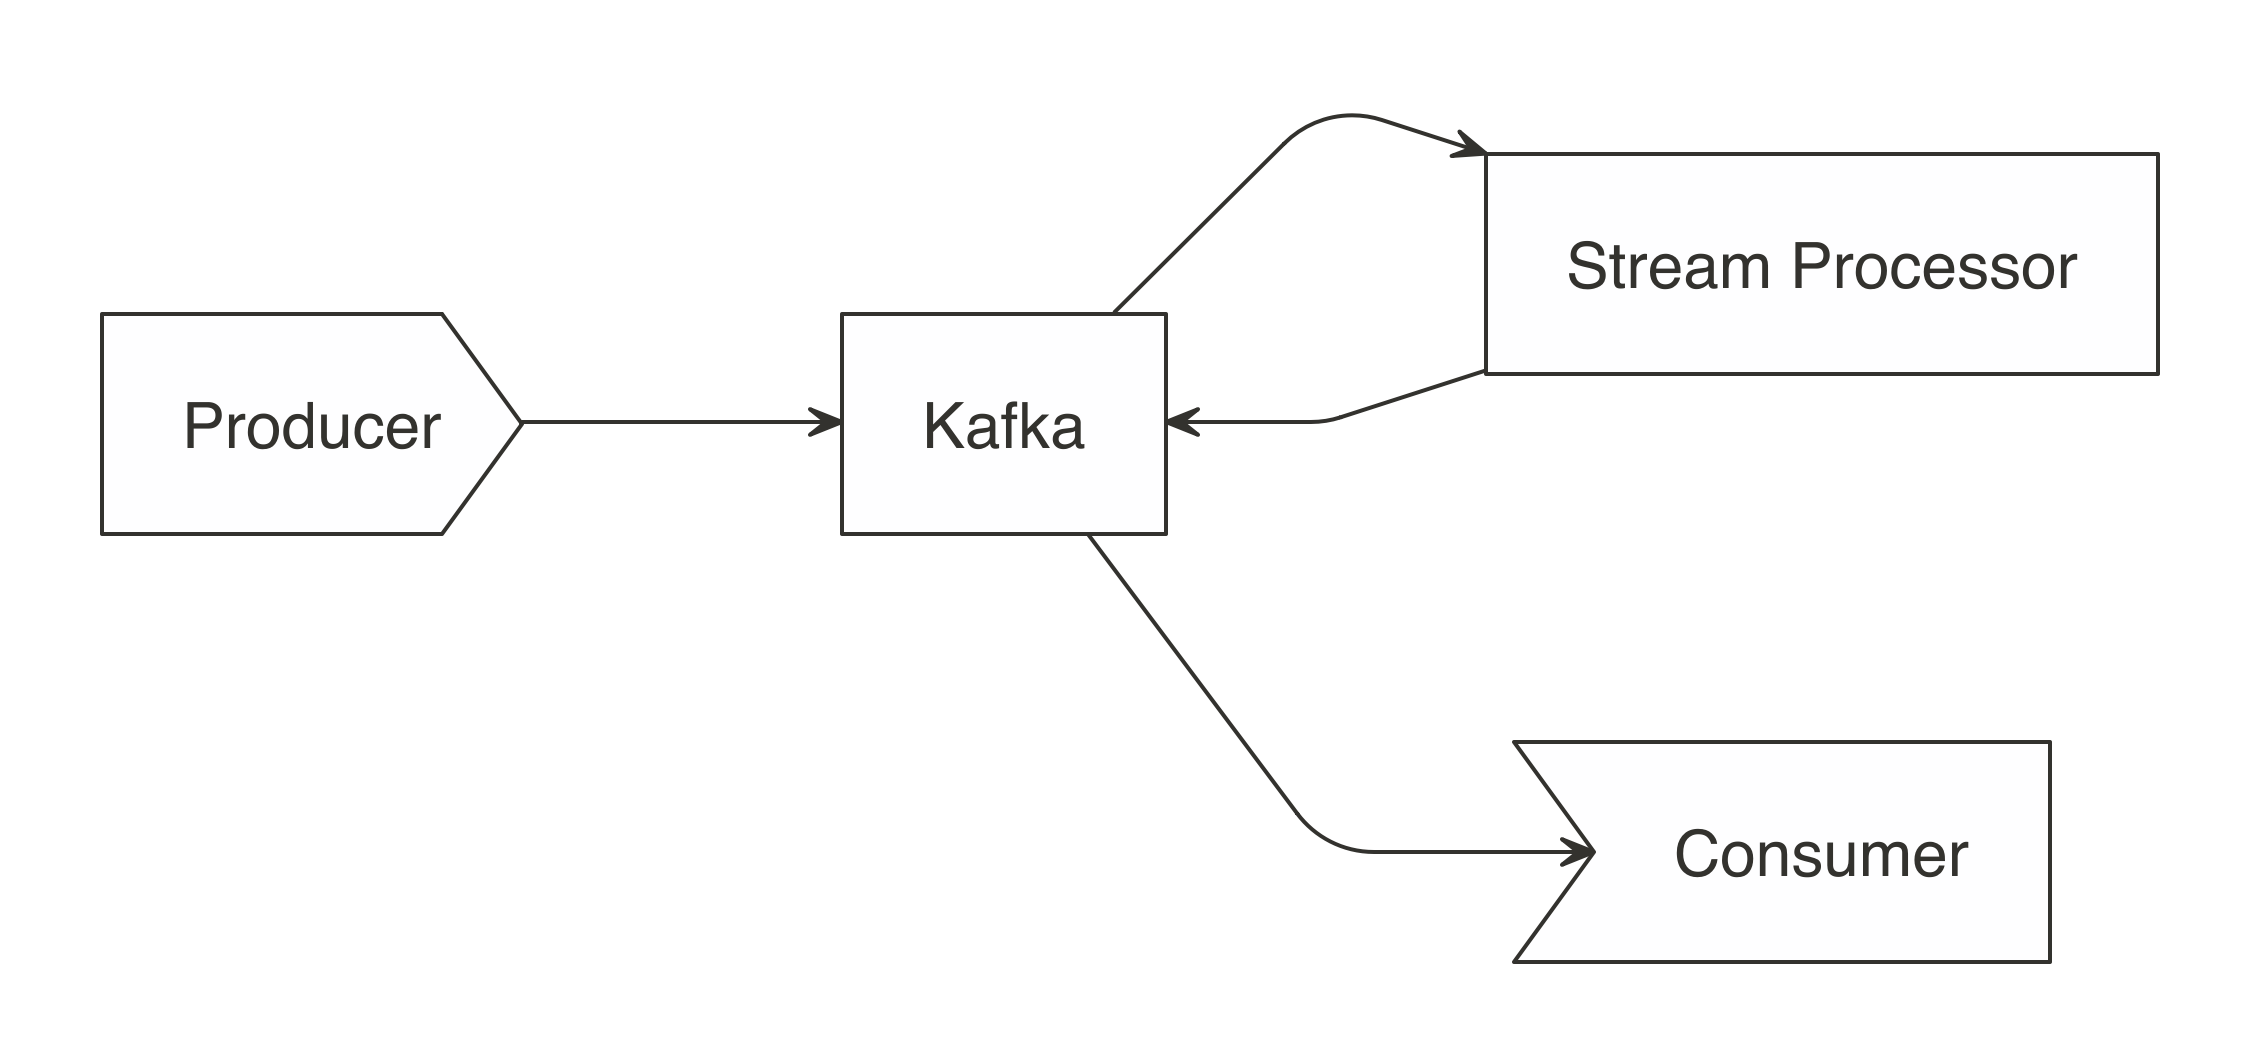
FIGURE 12.4: A Kafka workflow using stream processors Three modes are available when processing Kafka streams in Spark: complete, update, and append. The complete mode provides the totals for every group every time there is a new batch; update provides totals for only the groups that have updates in the latest batch; and append adds raw records to the target topic. The append mode is not meant for aggregates, but works well for passing a filtered subset to the target topic. In our next example, the producer streams random letters into Kafka under a letters topic. Then, Spark will act as the stream processor, reading the letters topic and computing unique letters, which are then written back to Kafka under the totals topic. We’ll use the update mode when writing back into Kafka; that is, only the totals that changed will be sent to Kafka. This change is determined after each batch from the letters topic: hosts <- "localhost:9092" read_options <- list(kafka.bootstrap.servers = hosts, subscribe = "letters") write_options <- list(kafka.bootstrap.servers = hosts, topic = "totals") stream_read_kafka(sc, options = read_options) %>% mutate(value = as.character(value)) %>% # coerce into a character count(value) %>% # group and count letters mutate(value = paste0(value, "=", n)) %>% # kafka expects a value field stream_write_kafka(mode = "update", options = write_options) You can take a quick look at totals by reading from Kafka: stream_read_kafka(sc, options = totals_options) Using a new terminal session, use Kafka’s command-line tool to manually add single letters into the letters topic: kafka-console-producer.sh --broker-list localhost:9092 --topic letters >A >B >C The letters that you input are pushed to Kafka, read by Spark, aggregated within Spark, and pushed back into Kafka, Then, finally, they are consumed by Spark again to give you a glimpse into the totals topic. This was quite a setup, but also a realistic configuration commonly found in real-time processing projects. Next, we will use the Shiny framework to visualize streams, in real time!

12.4 Shiny

Shiny’s reactive framework is well suited to support streaming information, which you can use to display real-time data from Spark using reactiveSpark(). There is far more to learn about Shiny than we could possibly present here. However, if you’re already familiar with Shiny, this example should be quite easy to understand. We have a modified version of the k-means Shiny example that, instead of getting the data from the static iris dataset, is generated with stream_generate_test(), consumed by Spark, retrieved to Shiny through reactiveSpark(), and then displayed as shown in Figure 12.5. To run this example, store the following Shiny app under shiny/shiny-stream.R: library(sparklyr) library(shiny) unlink("shiny-stream", recursive = TRUE) dir.create("shiny-stream", showWarnings = FALSE) sc <- spark_connect( master = "local", version = "2.3", config = list(sparklyr.sanitize.column.names = FALSE)) ui <- pageWithSidebar( headerPanel('Iris k-means clustering from Spark stream'), sidebarPanel( selectInput('xcol', 'X Variable', names(iris)), selectInput('ycol', 'Y Variable', names(iris), selected=names(iris)[[2]]), numericInput('clusters', 'Cluster count', 3, min = 1, max = 9) ), mainPanel(plotOutput('plot1')) ) server <- function(input, output, session) { iris <- stream_read_csv(sc, "shiny-stream", columns = sapply(datasets::iris, class)) %>% reactiveSpark() selectedData <- reactive(iris()[, c(input$xcol, input$ycol)]) clusters <- reactive(kmeans(selectedData(), input$clusters)) output$plot1 <- renderPlot({ par(mar = c(5.1, 4.1, 0, 1)) plot(selectedData(), col = clusters()$cluster, pch = 20, cex = 3) points(clusters()$centers, pch = 4, cex = 4, lwd = 4) }) } shinyApp(ui, server) This Shiny application can then be launched with runApp(), like so: shiny::runApp("shiny/shiny-stream.R") While the Shiny app is running, launch a new R session from the same directory and create a test stream with stream_generate_test(). This will generate a stream of continuous data that Spark can process and Shiny can visualize (as illustrated in Figure 12.5): sparklyr::stream_generate_test(datasets::iris, "shiny/shiny-stream", rep(5, 10^3)) 
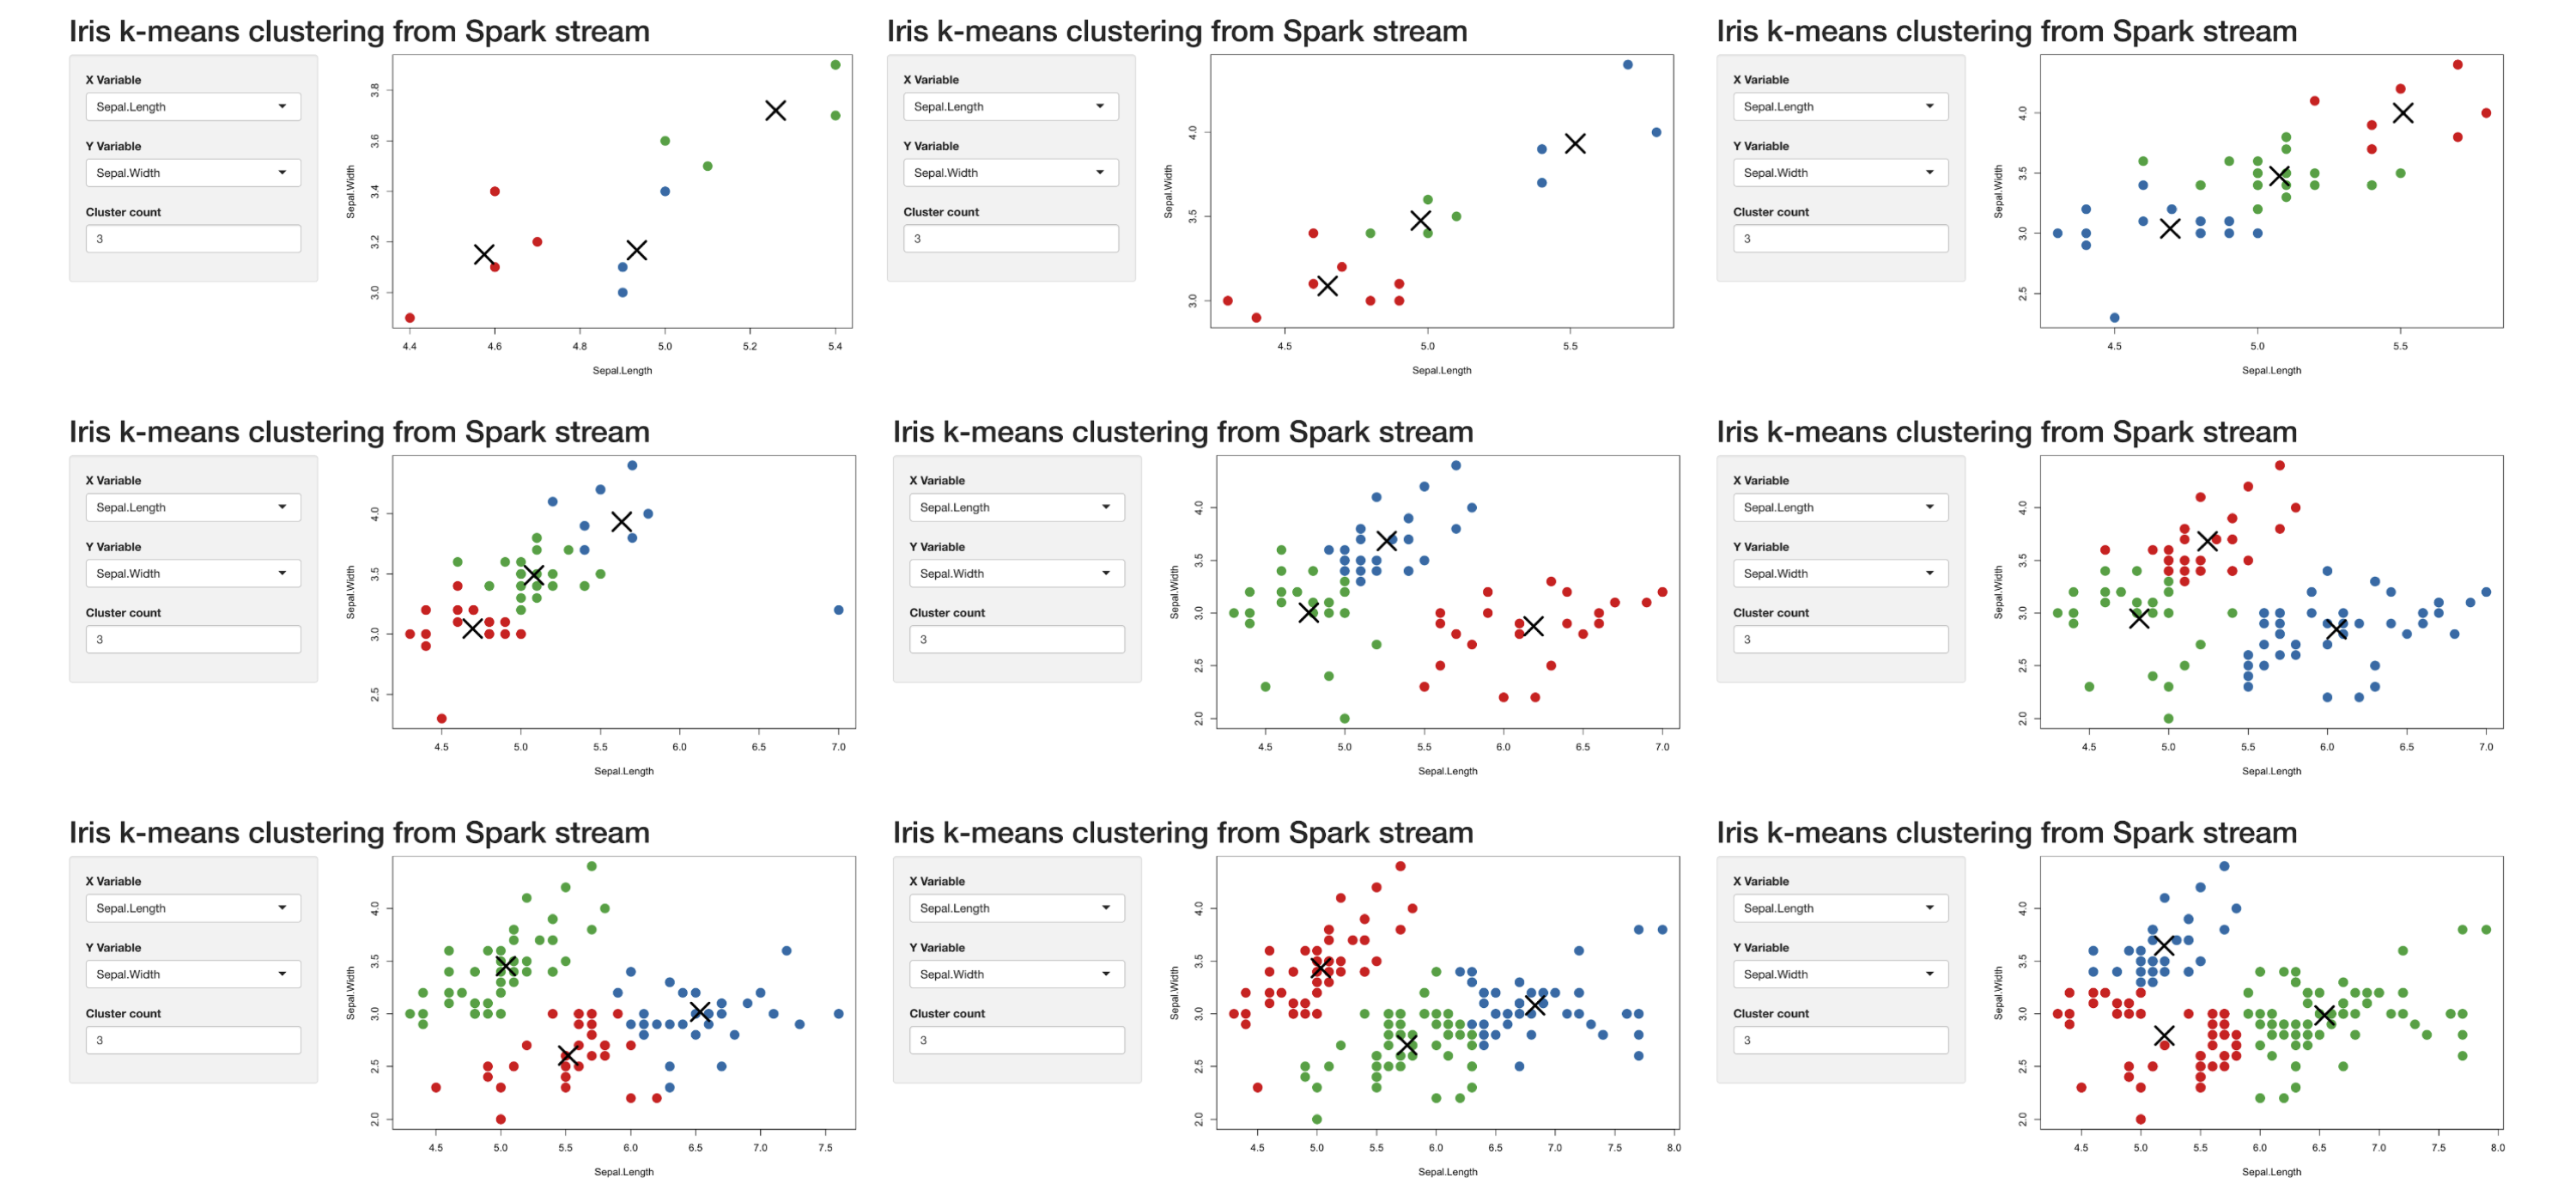
FIGURE 12.5: Progression of Spark reactive loading data into the Shiny app In this section you learned how easy it is to create a Shiny app that can be used for several different purposes, such as monitoring and dashboarding. In a more complex implementation, the source would more likely be a Kafka stream. Before we transition, disconnect from Spark and clear the folders that we used: spark_disconnect(sc) unlink(c("source", "destination", "cars-stream", "car-round", "shiny/shiny-stream"), recursive = TRUE)

12.5 Recap

From static datasets to real-time datasets, you’ve truly mastered many of the large-scale computing techniques. Specifically, in this chapter, you learned how static data can be generalized to real time if we think of it as an infinite table. We were then able to create a simple stream, without any data transformations, that copies data from point A to point B. This humble start became quite useful when you learned about the several different transformations you can apply to streaming data—from data analysis transformations using the dplyr and DBI packages, to feature transformers introduced while modeling, to fully fledged pipelines capable of scoring in real time, to, last but not least, transforming datasets with custom R code. This was a lot to digest, for sure. We then presented Apache Kafka as a reliable and scalable solution for real-time data. We showed you how a real-time system could be structured by introducing you to consumers, producers, and topics. These, when properly combined, create powerful abstractions to process real-time data. Then we closed with “a cherry on top of the sundae”: presenting how to use Spark Streaming in Shiny. Since a stream can be transformed into a reactive (which is the lingua franca of the world of reactivity), the ease of this approach was a nice surprise. It’s time now to move on to our very last (and quite short) chapter, Chapter 13; there we’ll try to persuade you to use your newly acquired knowledge for the benefit of the Spark and R communities at large.

Chapter 13 Contributing

In Chapter 12, we equipped you with the tools to tackle large-scale and real-time data processing in Spark using R. In this final chapter we focus less on learning and more on giving back to the Spark and R communities or colleagues in your professional career. It really takes an entire community to keep this going, so we are counting on you! There are many ways to contribute, from helping community members and opening GitHub issues to providing new functionality for yourself, colleagues, or the R and Spark community. However, we’ll focus here on writing and sharing code that extends Spark, to help others use new functionality you can provide as an author of Spark extensions using R. Specifically, you’ll learn what an extension is, the different types of extensions you can build, what building tools are available, and when and how to build an extension from scratch. You will also learn how to make use of the hundreds of extensions available in Spark and the millions of components available in Java that can easily be used in R. We’ll also cover how to create code natively in Scala that makes use of Spark. As you might know, R is a great language for interfacing with other languages, such as C++, SQL, Python, and many others. It’s no surprise, then, that working with Scala from R will follow similar practices that make R ideal for providing easy-to-use interfaces that make data processing productive and that are loved by many of us.

13.1 Overview

When you think about giving back to your larger coding community, the most important question you can ask about any piece of code you write is: would this code be useful to someone else? Let’s start by considering one of the first and simplest lines of code presented in this book. This code was used to load a simple CSV file: spark_read_csv(sc, "cars.csv") Code this basic is probably not useful to someone else. However, you could tailor that same example to something that generates more interest, perhaps the following: spark_read_csv(sc, "/path/that/is/hard/to/remember/data.csv") This code is quite similar to the first. But if you work with others who are working with this dataset, the answer to the question about usefulness would be yes—this would very likely be useful to someone else! This is surprising since it means that not all useful code needs to be advanced or complicated. However, for it to be useful to others, it does need to be packaged, presented, and shared in a format that is easy to consume. A first attempt would be to save this into a teamdata.R file and write a function wrapping it: load_team_data <- function() { spark_read_text(sc, "/path/that/is/hard/to/remember/data.csv") } This is an improvement, but it would require users to manually share this file again and again. Fortunately, this problem is easily solved in R, through R packages. An R package contains R code in a format that is installable using the function install.packages(). One example is sparklyr. There are many other R packages available; you can also create your own. For those of you new to creating them, we encourage you to read Hadley Wickham’s book, R Packages (O’Reilly). Creating an R package allows you to easily share your functions with others by sharing the package file in your organization. Once you create a package, there are many ways of sharing it with colleagues or the world. For instance, for packages meant to be private, consider using Drat or products like RStudio Package Manager. R packages meant for public consumption are made available to the R community in CRAN (the Comprehensive R Archive Network). These repositories of R packages allow users to install packages through install.packages("teamdata") without having to worry where to download the package from. It also allows other packages to reuse your package. In addition to using R packages like sparklyr, dplyr, broom, and others to create new R packages that extend Spark, you can also use all the functionality available in the Spark API or Spark Extensions or write custom Scala code. For instance, suppose that there is a new file format similar to a CSV but not quite the same. We might want to write a function named spark_read_file() that would take a path to this new file type and read it in Spark. One approach would be to use dplyr to process each line of text or any other R library using spark_apply(). Another would be to use the Spark API to access methods provided by Spark. A third approach would be to check whether someone in the Spark community has already provided a Spark extension that supports this new file format. Last but not least, you could write your own custom Scala code that makes use of any Java library, including Spark and its extensions. This is shown in Figure 13.1. 
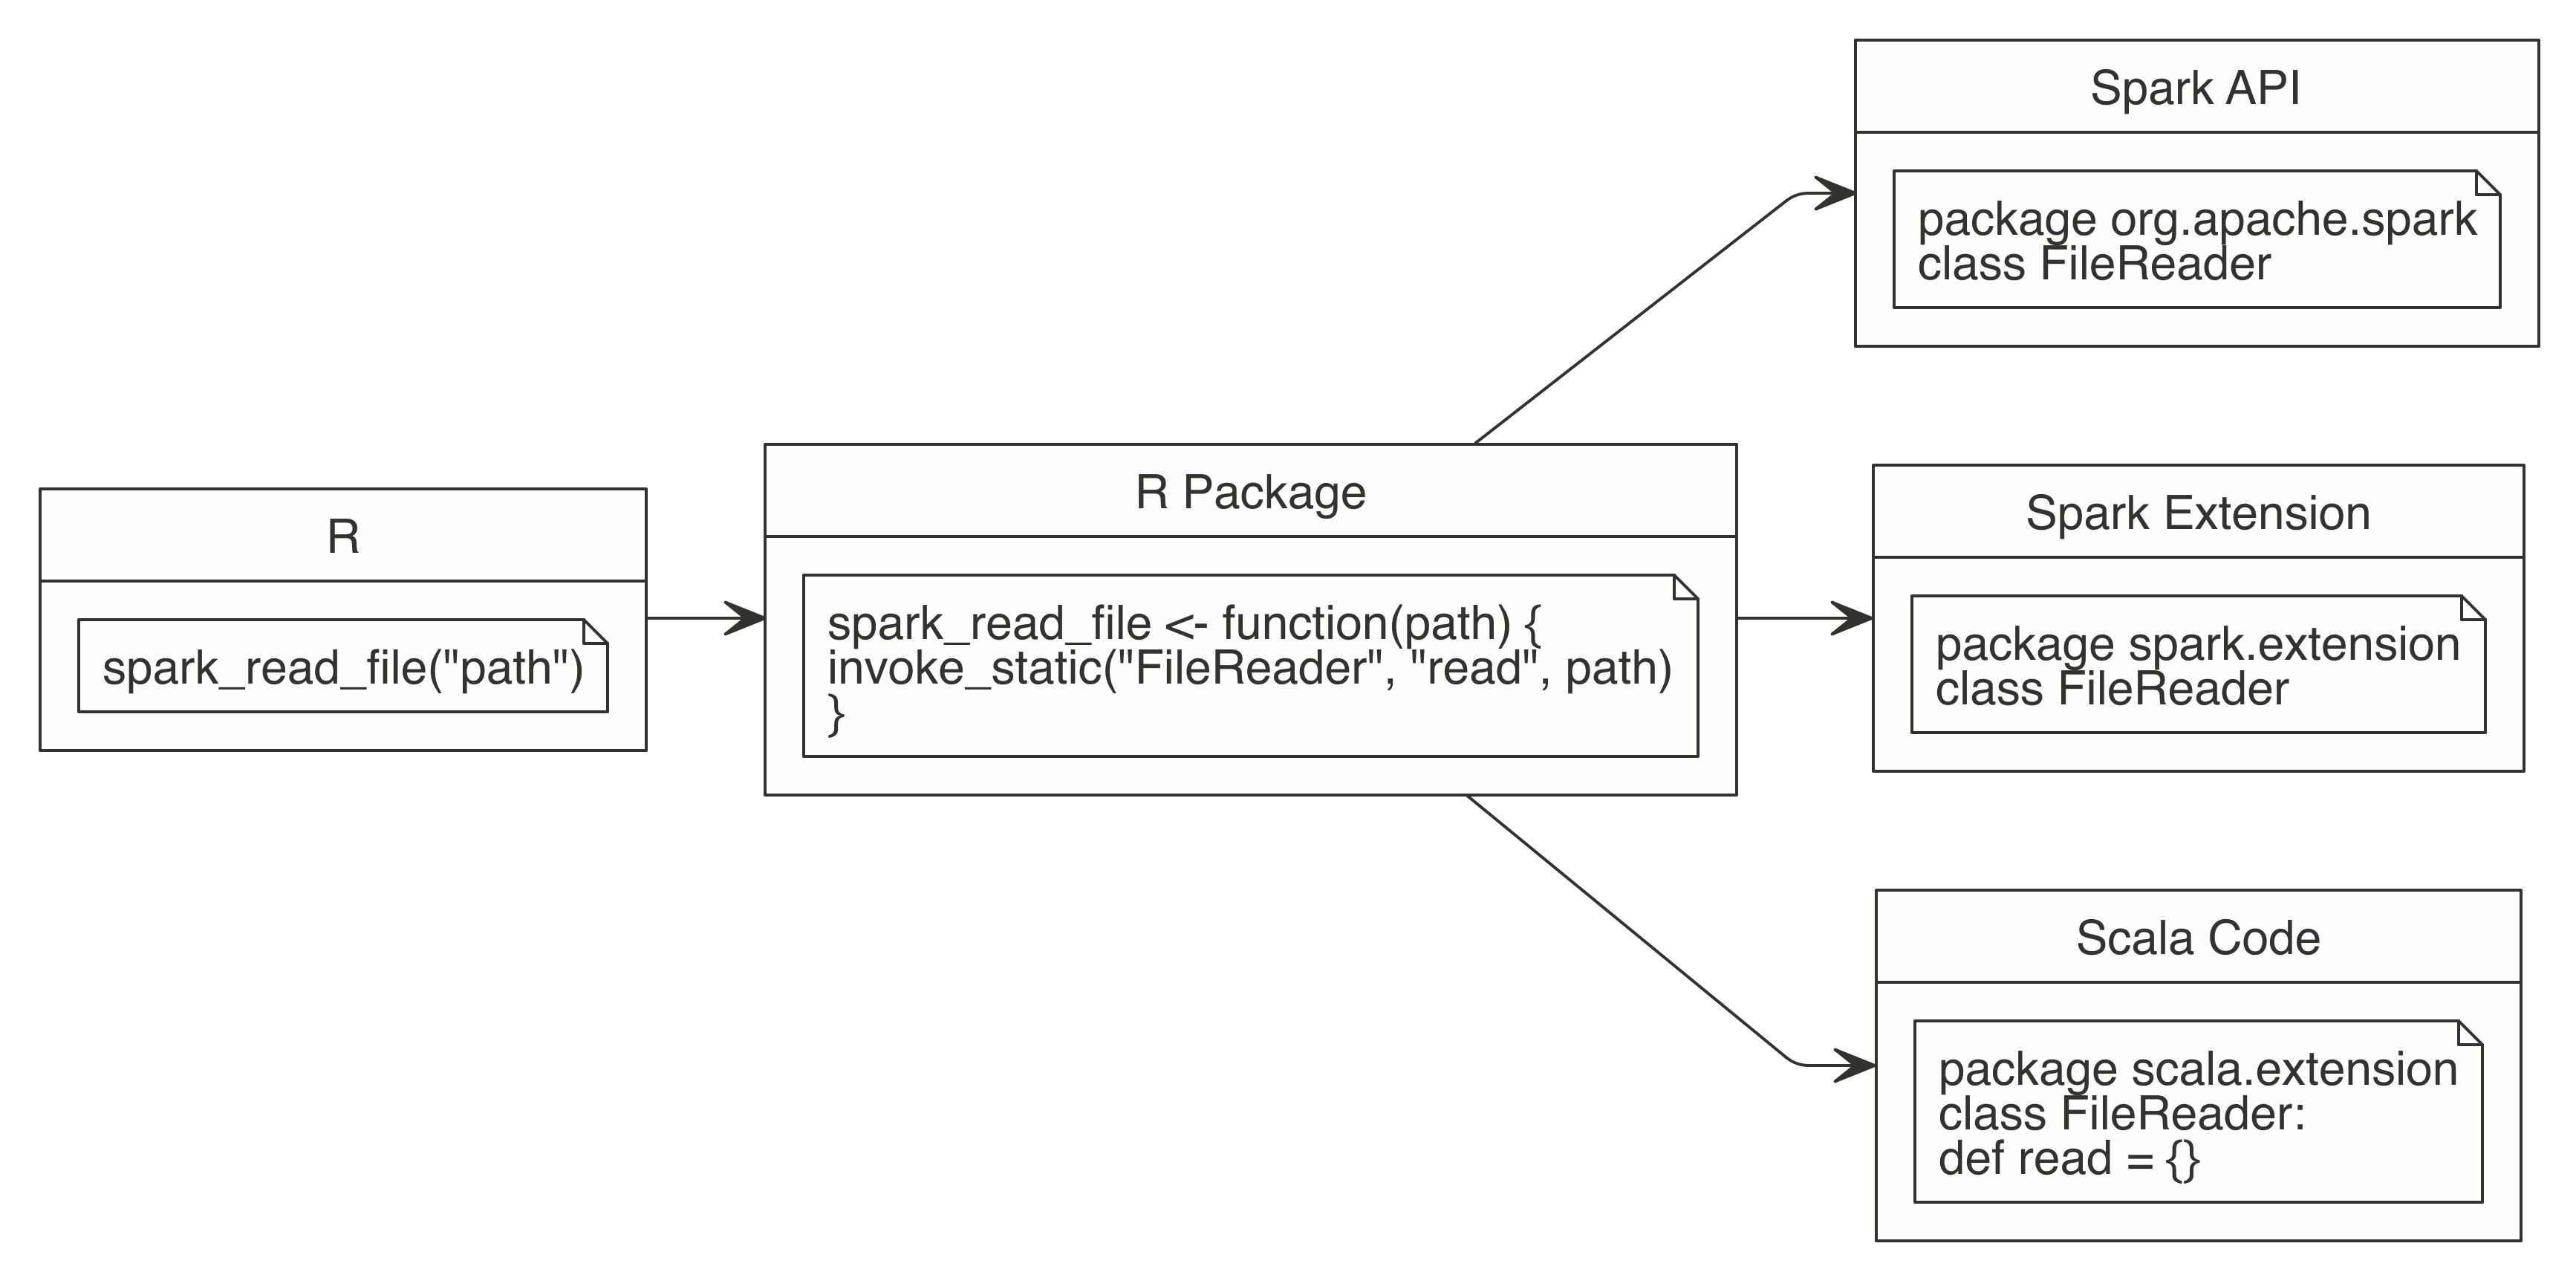
FIGURE 13.1: Extending Spark using the Spark API or Spark extensions, or writing Scala code We will focus first on extending Spark using the Spark API, since the techniques required to call the Spark API are also applicable while calling Spark extensions or custom Scala code.

13.2 Spark API

Before we introduce the Spark API, let’s consider a simple and well-known problem. Suppose we want to count the number of lines in a distributed and potentially large text file—say, cars.csv, which we initialize as follows: library(sparklyr) library(dplyr) sc <- spark_connect(master = "local", version = "2.3") cars <- copy_to(sc, mtcars) spark_write_csv(cars, "cars.csv", mode = "overwrite") Now, to count how many lines are available in this file, we can run the following: spark_read_text(sc, "cars.csv") %>% count() # Source: spark<?> [?? x 1] n <dbl> 1 33 Easy enough: we used spark_read_text() to read the entire text file, followed by counting lines using dplyr’s count(). Now, suppose that neither spark_read_text(), nor dplyr, nor any other Spark functionality, is available to you. How would you ask Spark to count the number of rows in cars.csv? If you do this in Scala, you find in the Spark documentation that by using the Spark API you can count lines in a file as follows: val textFile = spark.read.textFile("cars.csv") textFile.count() So, to use the functionality available in the Spark API from R, like spark.read.textFile, you can use invoke(), invoke_static(), or invoke_new(). (As their names suggest, the first invokes a method from an object, the second invokes a method from a static object, and the third creates a new object.) We then use these functions to call Spark’s API and execute code similar to the one provided in Scala: spark_context(sc) %>% invoke("textFile", "cars.csv", 1L) %>% invoke("count") [1] 33 While the invoke() function was originally designed to call Spark code, it can also call any code available in Java. For instance, we can create a Java BigInteger with the following code: invoke_new(sc, "java.math.BigInteger", "1000000000") <jobj[225]> java.math.BigInteger 1000000000 As you can see, the object created is not an R object but rather a proper Java object. In R, this Java object is represented by the spark_jobj. These objects are meant to be used with the invoke() functions or spark_dataframe() and spark_connection(). spark_dataframe() transforms a spark_jobj into a Spark DataFrame when possible, whereas spark_connect() retrieves the original Spark connection object, which can be useful to avoid passing the sc object across functions. While calling the Spark API can be useful in some cases, most of the functionality available in Spark is already supported in sparklyr. Therefore, a more interesting way to extend Spark is by using one of its many existing extensions.

13.3 Spark Extensions

Before we get started with this section, consider navigating to spark-packages.org, a site that tracks Spark extensions provided by the Spark community. Using the same techniques presented in the previous section, you can use these extensions from R. For instance, there is Apache Solr, a system designed to perform full-text searches over large datasets, something that Apache Spark currently does not support natively. Also, as of this writing, there is no extension for R to support Solr. So, let’s try to solve this by using a Spark extension. First, if you search “spark-packages.org” to find a Solr extension, you should be able to locate spark-solr. The “How to” extension mentions that the com.lucidworks.spark:spark-solr:2.0.1 should be loaded. We can accomplish this in R using the sparklyr.shell.packages configuration option: config <- spark_config() config["sparklyr.shell.packages"] <- "com.lucidworks.spark:spark-solr:3.6.3" config["sparklyr.shell.repositories"] <- "http://repo.spring.io/plugins-release/,http://central.maven.org/maven2/" sc <- spark_connect(master = "local", config = config, version = "2.3") While specifying the sparklyr.shell.packages parameter is usually enough, for this particular extension, dependencies failed to download from the Spark packages repository. You would need to manually find the failed dependencies in the Maven repo and add further repositories under the sparklyr.shell.repositories parameter. Note: When you use an extension, Spark connects to the Maven package repository to retrieve it. This can take significant time depending on the extension and your download speeds. In this case, consider using the sparklyr.connect.timeout configuration parameter to allow Spark to download the required files. From the spark-solr documentation, you would find that this extension can be used with the following Scala code: val options = Map( "collection" -> "{solr_collection_name}", "zkhost" -> "{zk_connect_string}" ) val df = spark.read.format("solr") .options(options) .load() We can translate this to R code: spark_session(sc) %>% invoke("read") %>% invoke("format", "solr") %>% invoke("option", "collection", "<collection>") %>% invoke("option", "zkhost", "<host>") %>% invoke("load") This code will fail, however, since it would require a valid Solr instance and configuring Solr goes beyond the scope of this book. But this example provides insights as to how you can create Spark extensions. It’s also worth mentioning that you can use spark_read_source() to read from generic sources to avoid writing custom invoke() code. As pointed out in Overview, consider sharing code with others using R packages. While you could require users of your package to specify sparklyr.shell.packages, you can avoid this by registering dependencies in your R package. Dependencies are declared under a spark_dependencies() function; thus, for the example in this section: spark_dependencies <- function(spark_version, scala_version, ...) { spark_dependency( packages = "com.lucidworks.spark:spark-solr:3.6.3", repositories = c( "http://repo.spring.io/plugins-release/", "http://central.maven.org/maven2/") ) } .onLoad <- function(libname, pkgname) { sparklyr::register_extension(pkgname) } The onLoad function is automatically called by R when your library loads. It should call register_extension(), which will then call back spark_dependencies(), to allow your extension to provide additional dependencies. This example supports Spark 2.4, but you should also support mapping Spark and Scala versions to the correct Spark extension version. There are about 450 Spark extensions you can use; in addition, you can also use any Java library from a Maven repository, where Maven Central has over 3 million artifacts. While not all Maven Central libraries might be relevant to Spark, the combination of Spark extensions and Maven repositories certainly opens many interesting possibilities for you to consider! However, for those cases where no Spark extension is available, the next section will teach you how to use custom Scala code from your own R package.

13.4 Scala Code

Scala code enables you to use any method in the Spark API, Spark extensions, or Java library. In addition, writing Scala code when running in Spark can provide performance improvements over R code using spark_apply(). In general, the structure of your R package will contain R code and Scala code; however, the Scala code will need to be compiled as JARs (Java ARchive files) and included in your package. Figure 13.2 shows this structure. 
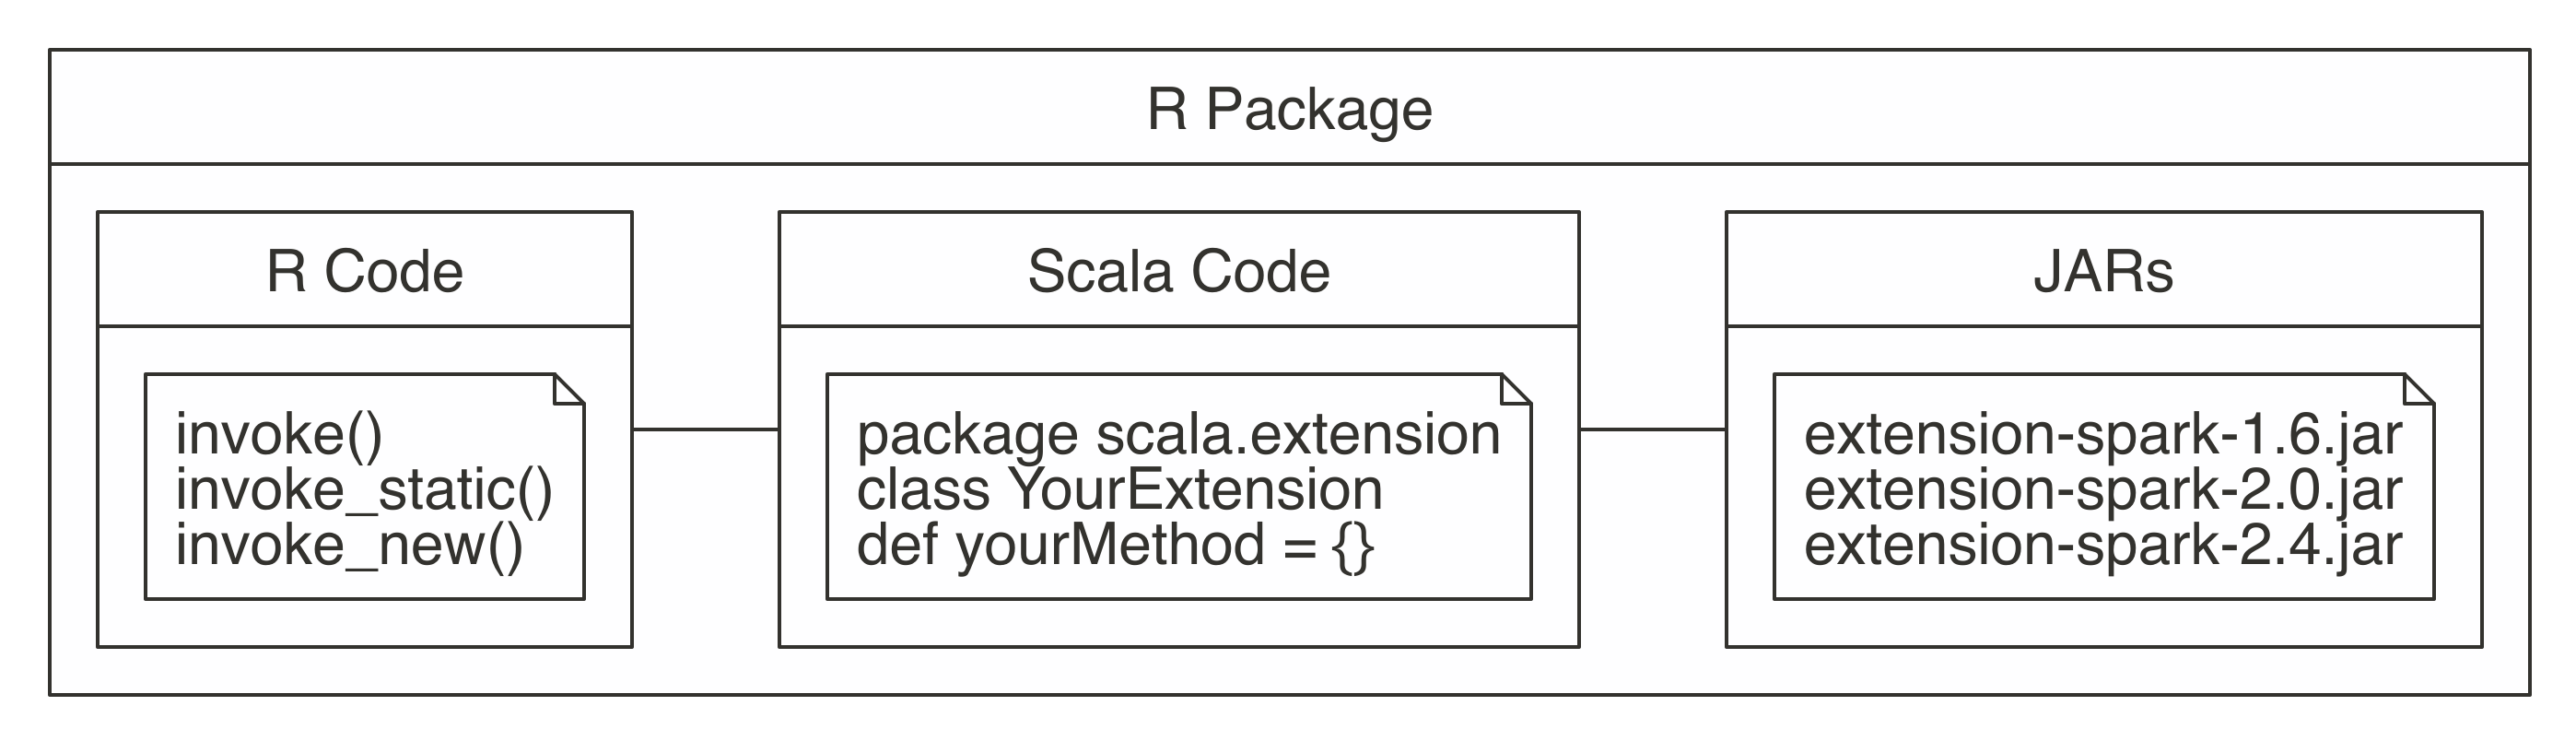
FIGURE 13.2: R package structure when using Scala code As usual, the R code should be placed under a top-level R folder, Scala code under a java folder, and the compiled JARs under an inst/java folder. Though you are certainly welcome to manually compile the Scala code, you can use helper functions to download the required compiler and compile Scala code. To compile Scala code, you’ll need to install the Java Development Kit 8 (JDK8, for short). Download the JDK from Oracle’s Java download page; this will require you to restart your R session. You’ll also need a Scala compiler for Scala 2.11 and 2.12. The Scala compilers can be automatically downloaded and installed using download_scalac(): download_scalac() Next, you’ll need to compile your Scala sources using compile_package_jars(). By default, it uses spark_compilation_spec(), which compiles your sources for the following Spark versions: [1] "1.5.2" "1.6.0" "2.0.0" "2.3.0" "2.4.0" You can also customize this specification by creating custom entries with spark_compilation_spec(). While you could create the project structure for the Scala code from scratch, you can also simply call spark_extension(path) to create an extension in the given path. This extension will be mostly empty but will contain the appropriate project structure to call the Scala code. Since spark_extension() is registered as a custom project extension in RStudio, you can also create an R package that extends Spark using Scala code from the File menu; click New Project and then select “R Package using Spark” as shown in Figure 13.3. 
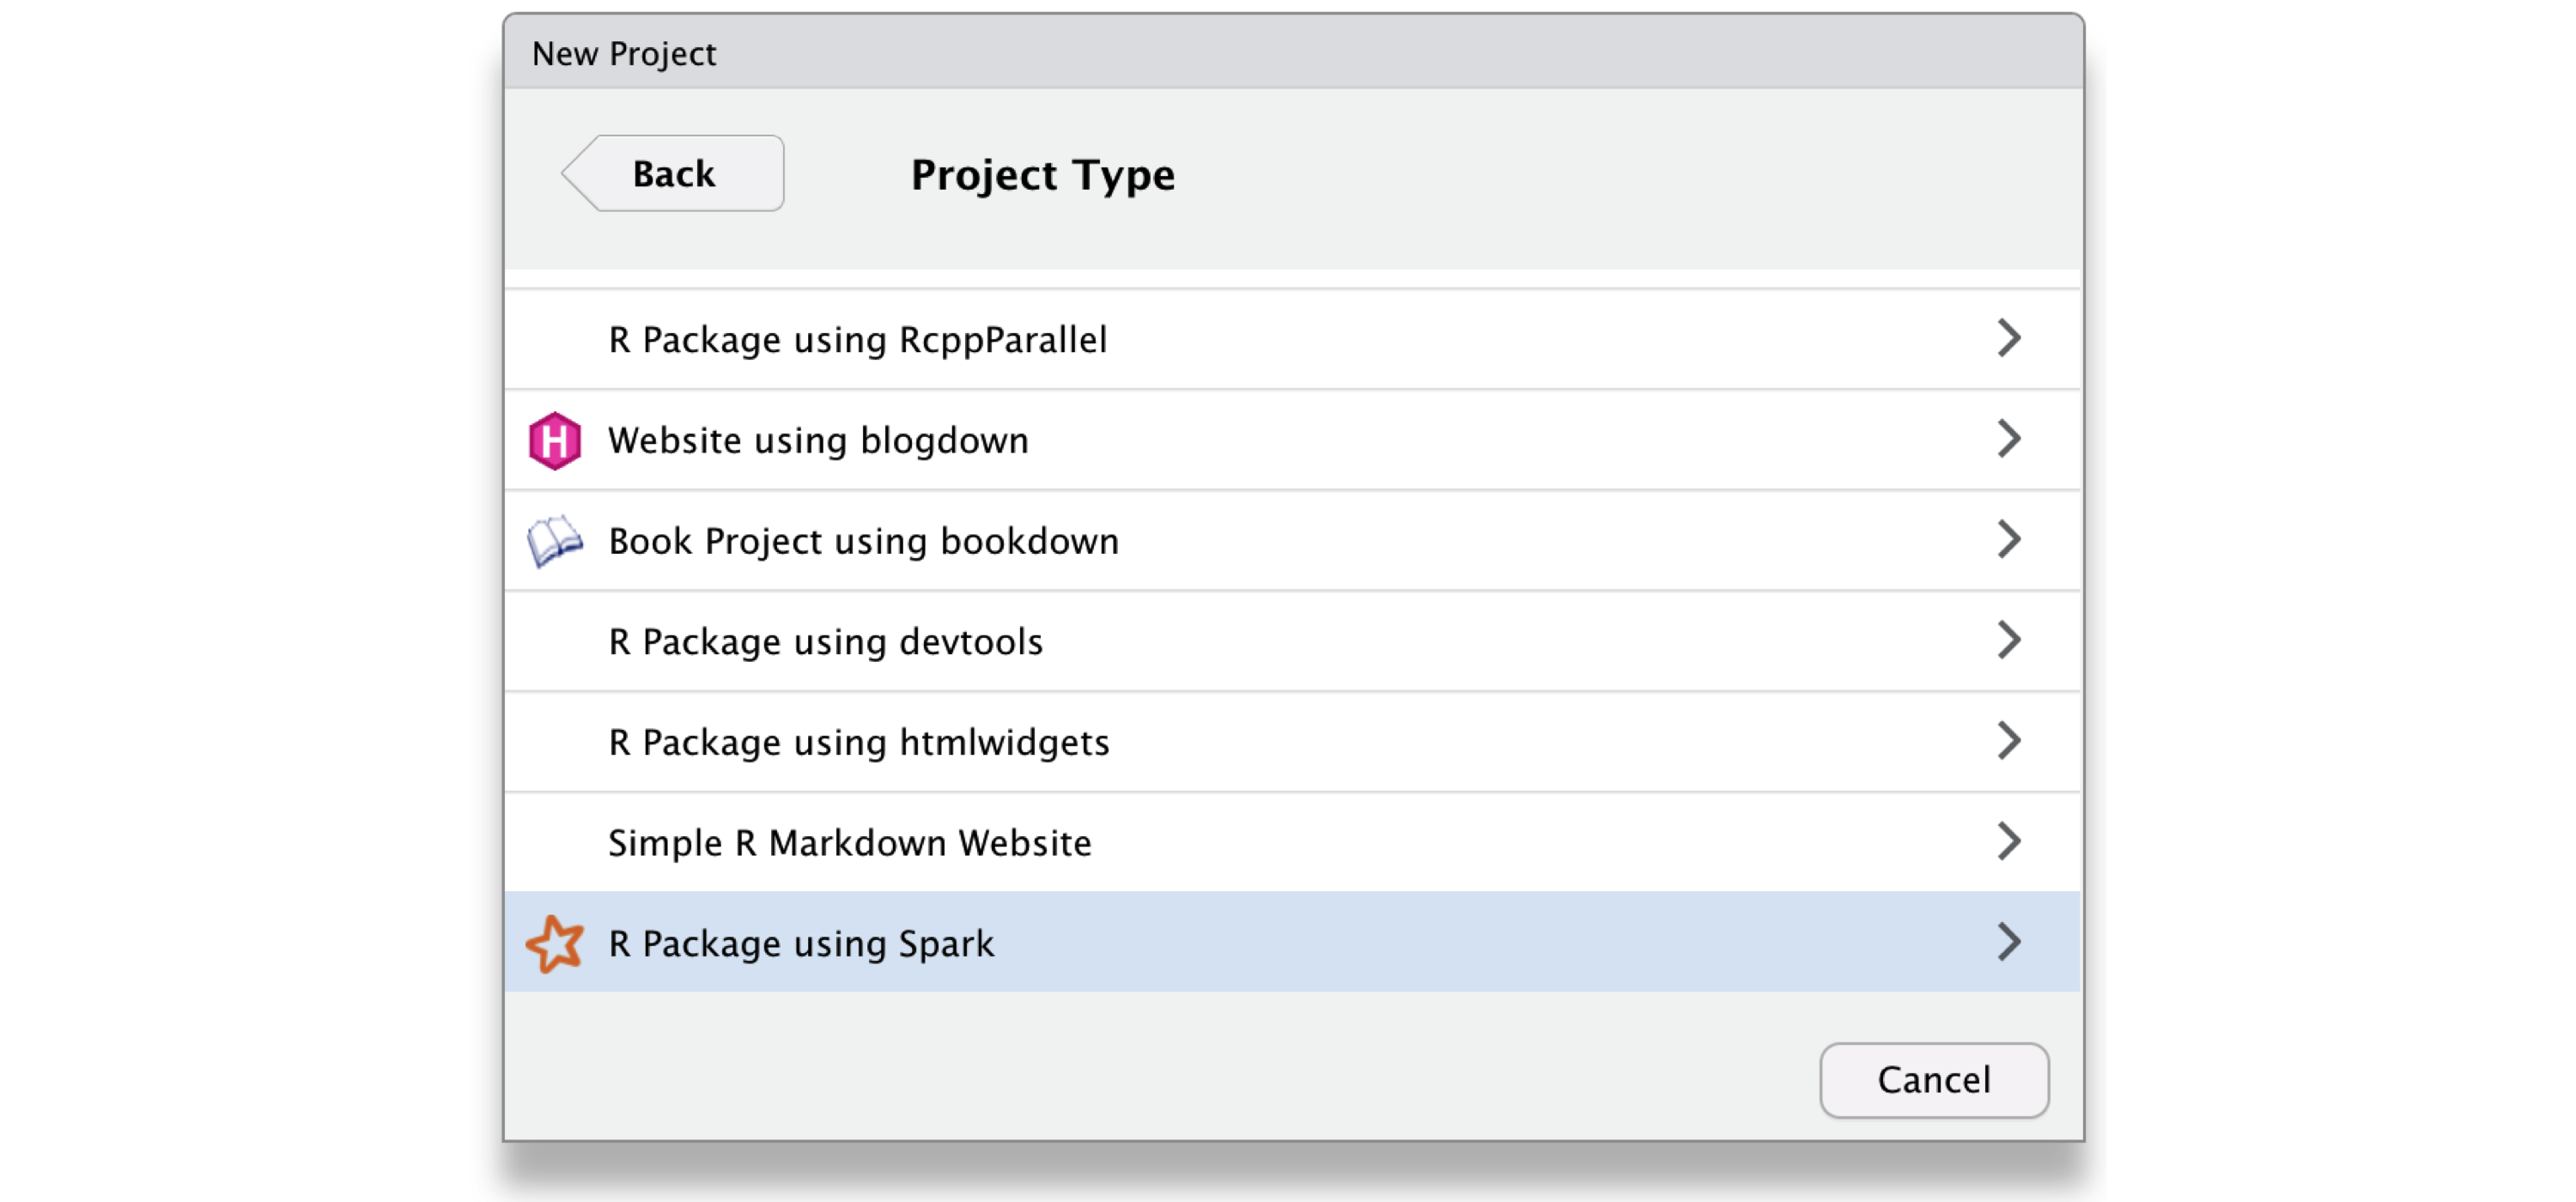
FIGURE 13.3: Creating a Scala extension package from RStudio Once you are ready to compile your package JARs, you can simply run the following: compile_package_jars() Since the JARs are compiled by default into the inst/ package path, when you are building the R package all the JARs will also be included within the package. This means that you can share or publish your R package, and it will be fully functional by R users. For advanced Spark users with most of their expertise in Scala, it’s compelling to consider writing libraries for R users and the R community in Scala and then easily packaging these into R packages that are easy to consume, use, and share among them. If you are interested in developing a Spark extension with R and you get stuck along the way, consider joining the sparklyr Gitter channel, where many of us hang out to help this wonderful community to grow. We hope to hear from you soon!

13.5 Recap

This final chapter introduced you to a new set of tools to use to expand Spark functionality beyond what R and R packages currently support. This vast new space of libraries includes more than 450 Spark extensions and millions of Java artifacts you can use in Spark from R. Beyond these resources, you also learned how to build Java artifacts using Scala code that can be easily embedded and compiled from R. This brings us back to this book’s purpose, presented early on; while we know you’ve learned how to perform large-scale computing using Spark in R, we’re also confident that you have acquired the knowledge required to help other community members through Spark extensions. We can’t wait to see your new creations, which will surely help grow the Spark and R communities at large. To close, we hope the first chapters gave you an easy introduction to Spark and R. Following that, we presented analysis and modeling as foundations for using Spark, with the familiarity of R packages you already know and love. You moved on to learning how to perform large-scale computing in proper Spark clusters. The last third of this book focused on advanced topics: using extensions, distributing R code, processing real-time data, and, finally, giving back by using Spark extensions using R and Scala code. We’ve tried to present the best possible content. However, if you know of any way to improve this book, please open a GitHub issue under the the-r-in-spark repo, and we’ll address your suggestions in upcoming revisions. We hope you enjoyed reading this book, and that you’ve learned as much as we have learned while writing it. We hope it was worthy of your time—it has been an honor having you as our reader.

Chapter 14 Appendix

14.1 Preface

14.1.1 Formatting

The following ggplot2 theme was use to format plots in this book: plot_style <- function() { font <- "Helvetica" ggplot2::theme_classic() + ggplot2::theme( plot.title = ggplot2::element_text( family = font, size=14, color = "#222222"), plot.subtitle = ggplot2::element_text( family=font, size=12, color = "#666666"), legend.position = "right", legend.background = ggplot2::element_blank(), legend.title = ggplot2::element_blank(), legend.key = ggplot2::element_blank(), legend.text = ggplot2::element_text( family=font, size=14, color="#222222"), axis.title.y = ggplot2::element_text( margin = ggplot2::margin(t = 0, r = 8, b = 0, l = 0), size = 14, color="#666666"), axis.title.x = ggplot2::element_text( margin = ggplot2::margin(t = -2, r = 0, b = 0, l = 0), size = 14, color = "#666666"), axis.text = ggplot2::element_text( family=font, size=14, color="#222222"), axis.text.x = ggplot2::element_text( margin = ggplot2::margin(5, b = 10)), axis.ticks = ggplot2::element_blank(), axis.line = ggplot2::element_blank(), panel.grid.minor = ggplot2::element_blank(), panel.grid.major.y = ggplot2::element_line(color = "#eeeeee"), panel.grid.major.x = ggplot2::element_line(color = "#ebebeb"), panel.background = ggplot2::element_blank(), strip.background = ggplot2::element_rect(fill = "white"), strip.text = ggplot2::element_text(size = 20, hjust = 0) ) } Which you can then active with: ggplot2::theme_set(plot_style())

14.2 Introduction

14.2.1 Worlds Store Capacity

The following script was used to generate the worlds store capacity diagram: library(ggplot2) library(dplyr) library(tidyr) read.csv("data/01-worlds-capacity-to-store-information.csv", skip = 8) %>% gather(key = storage, value = capacity, analog, digital) %>% mutate(year = X, terabytes = capacity / 1e+12) %>% ggplot(aes(x = year, y = terabytes, group = storage)) + geom_line(aes(linetype = storage)) + geom_point(aes(shape = storage)) + scale_y_log10( breaks = scales::trans_breaks("log10", function(x) 10^x), labels = scales::trans_format("log10", scales::math_format(10^x)) ) + theme_light() + theme(legend.position = "bottom")

14.2.2 Daily downloads of CRAN packages

The CRAN downloads chart was generated through: downloads_csv <- "data/01-intro-r-cran-downloads.csv" if (!file.exists(downloads_csv)) { downloads <- cranlogs::cran_downloads(from = "2014-01-01", to = "2019-01-01") readr::write_csv(downloads, downloads_csv) } cran_downloads <- readr::read_csv(downloads_csv) ggplot(cran_downloads, aes(date, count)) + labs(title = "CRAN Packages", subtitle = "Total daily downloads over time") + geom_point(colour="black", pch = 21, size = 1) + scale_x_date() + xlab("year") + ylab("downloads") + scale_x_date(date_breaks = "1 year", labels = function(x) substring(x, 1, 4)) + scale_y_continuous( limits = c(0, 3.5 * 10^6), breaks = c(0.5 * 10^6, 10^6, 1.5 * 10^6, 2 * 10^6, 2.5 * 10^6, 3 * 10^6, 3.5 * 10^6), labels = c(", "1M", ", "2M", ", "3M", ") )

14.3 Getting Started

14.3.1 Prerequisites

14.3.1.1 Installing R

From r-project.org, download and launch the R installer for your platform, Windows, Macs or Linux available. FIGURE 14.1: The R Project for Statistical Computing

14.3.1.2 Installing Java

From java.com/download, download and launch the installer for your platform, Windows, Macs or Linux are also available. FIGURE 14.2: Java Download Page Starting with Spark 2.1, Java 8 is required; however, previous versions of Spark support Java 7. Regardless, we recommend installing Java Runtime Engine 8, or JRE 8 for short. Note: For advanced readers that are already using the Java Development Kit, JDK for short. Please notice that JDK 9+ is currently unsupported so you will need to downgrade to JDK 8 by uninstalling JDK 9+ or by setting JAVA_HOME appropiately.

14.3.1.3 Installing RStudio

While installing RStudio is not strictly required to work with Spark with R, it will make you much more productive and therefore, I would recommend you take the time to install RStudio from rstudio.com/download, then download and launch the installer for your platform: Windows, Macs or Linux. 
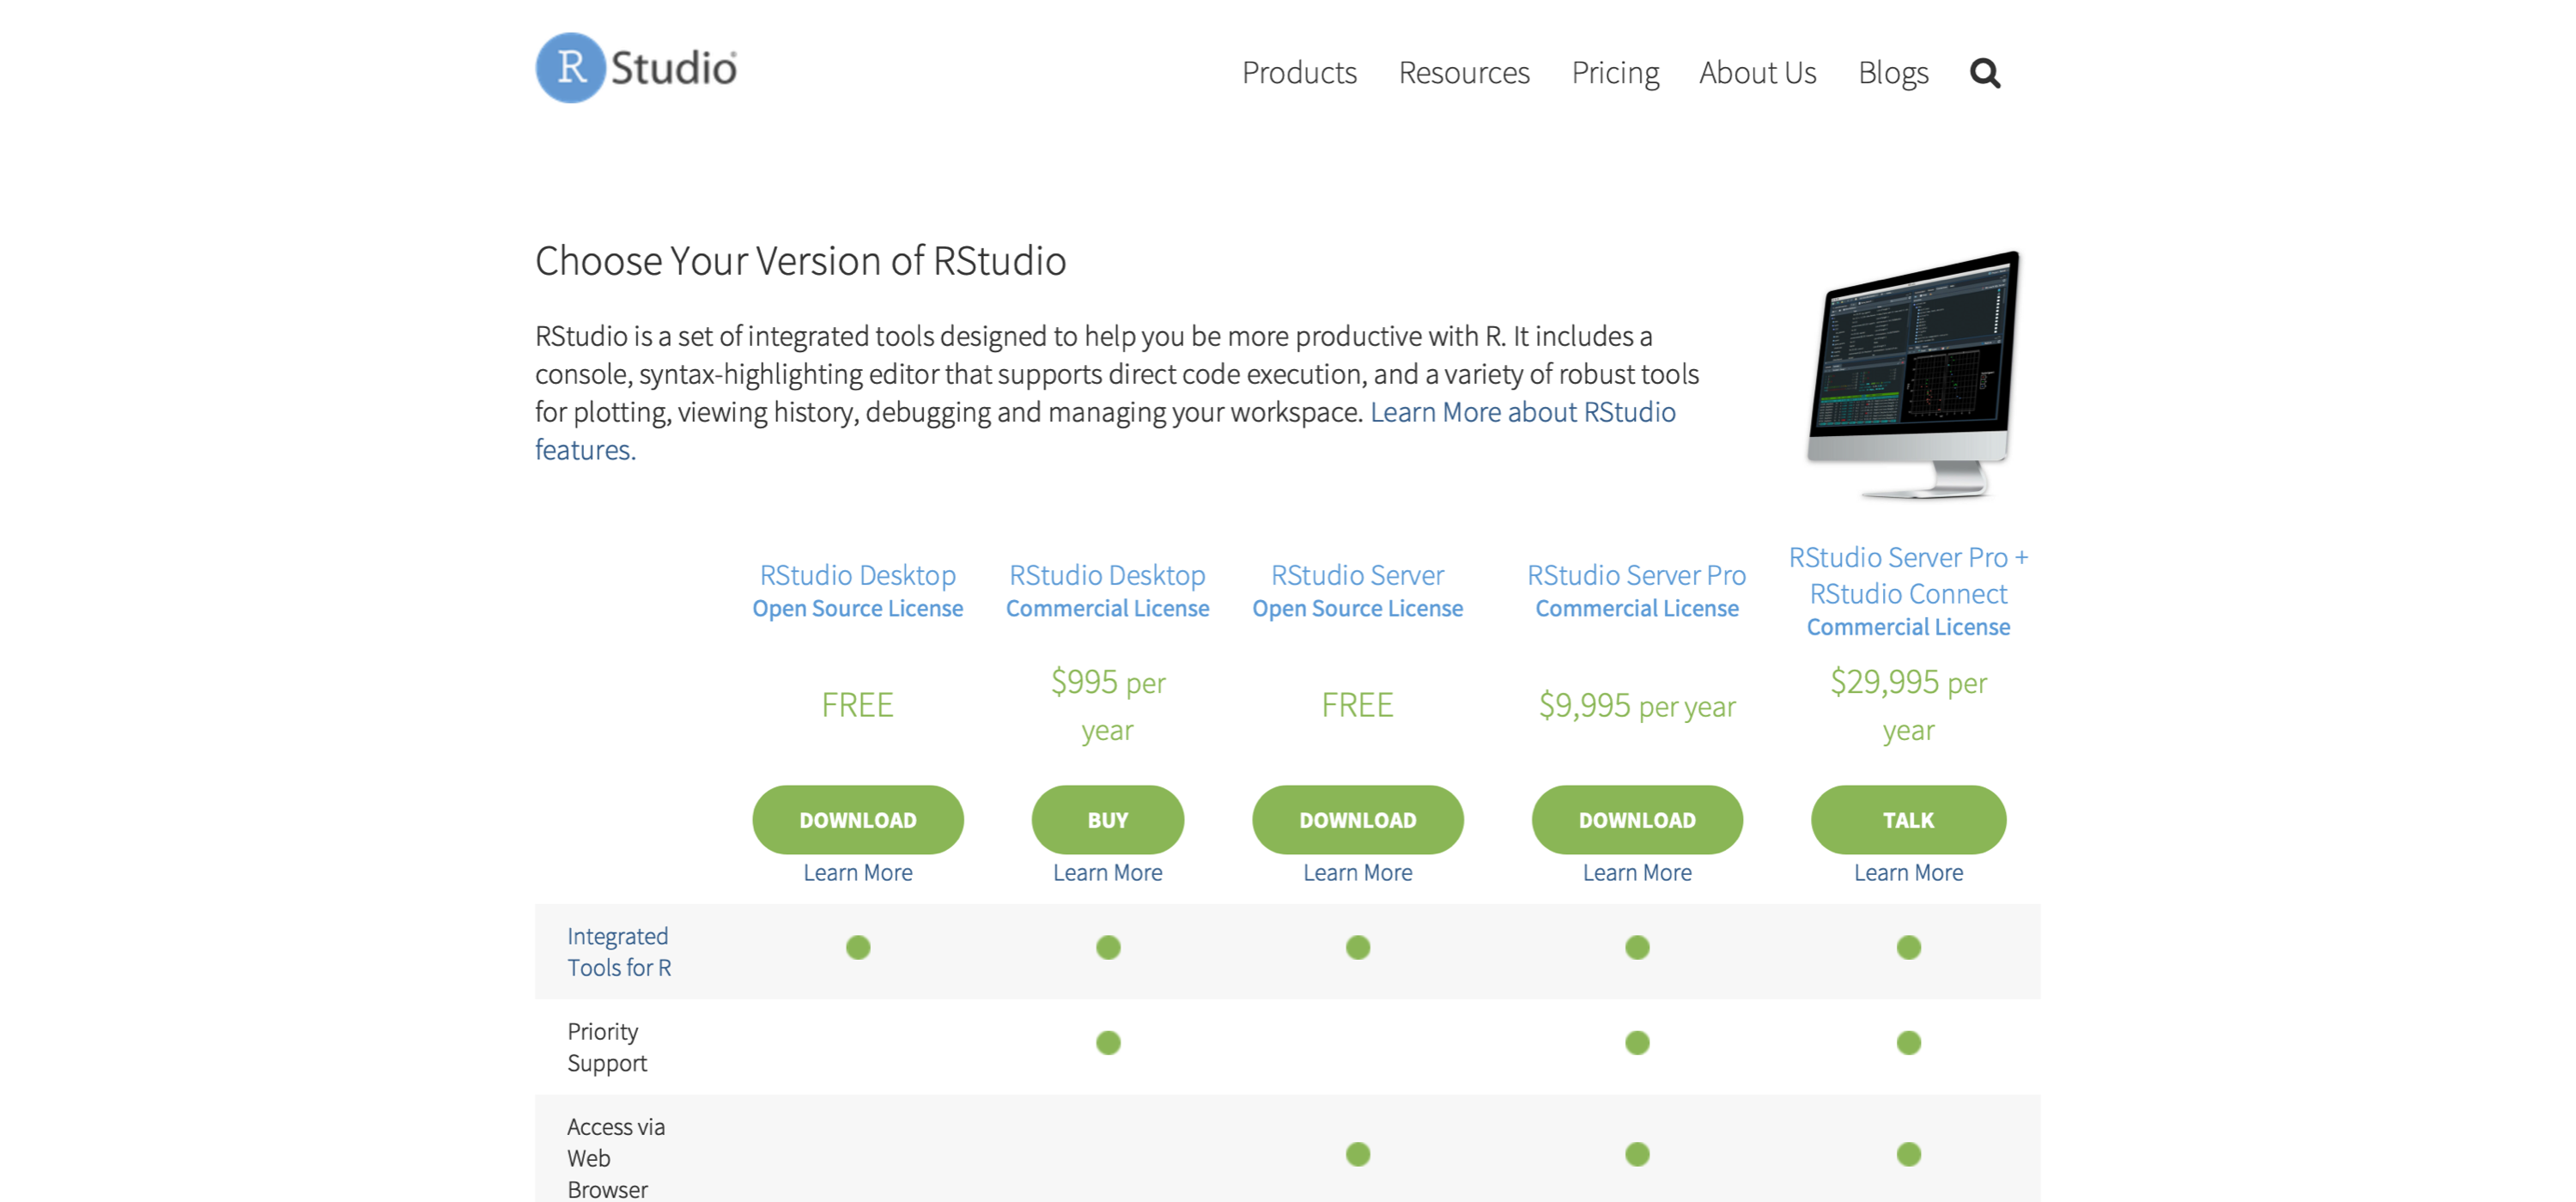
FIGURE 14.3: RStudio Downloads Page After launching RStudio, you can use RStudio’s console panel to execute the code provided in this chapter.

14.3.1.4 Using RStudio

If you are not familiar with RStudio, you should make note of the following panes: 
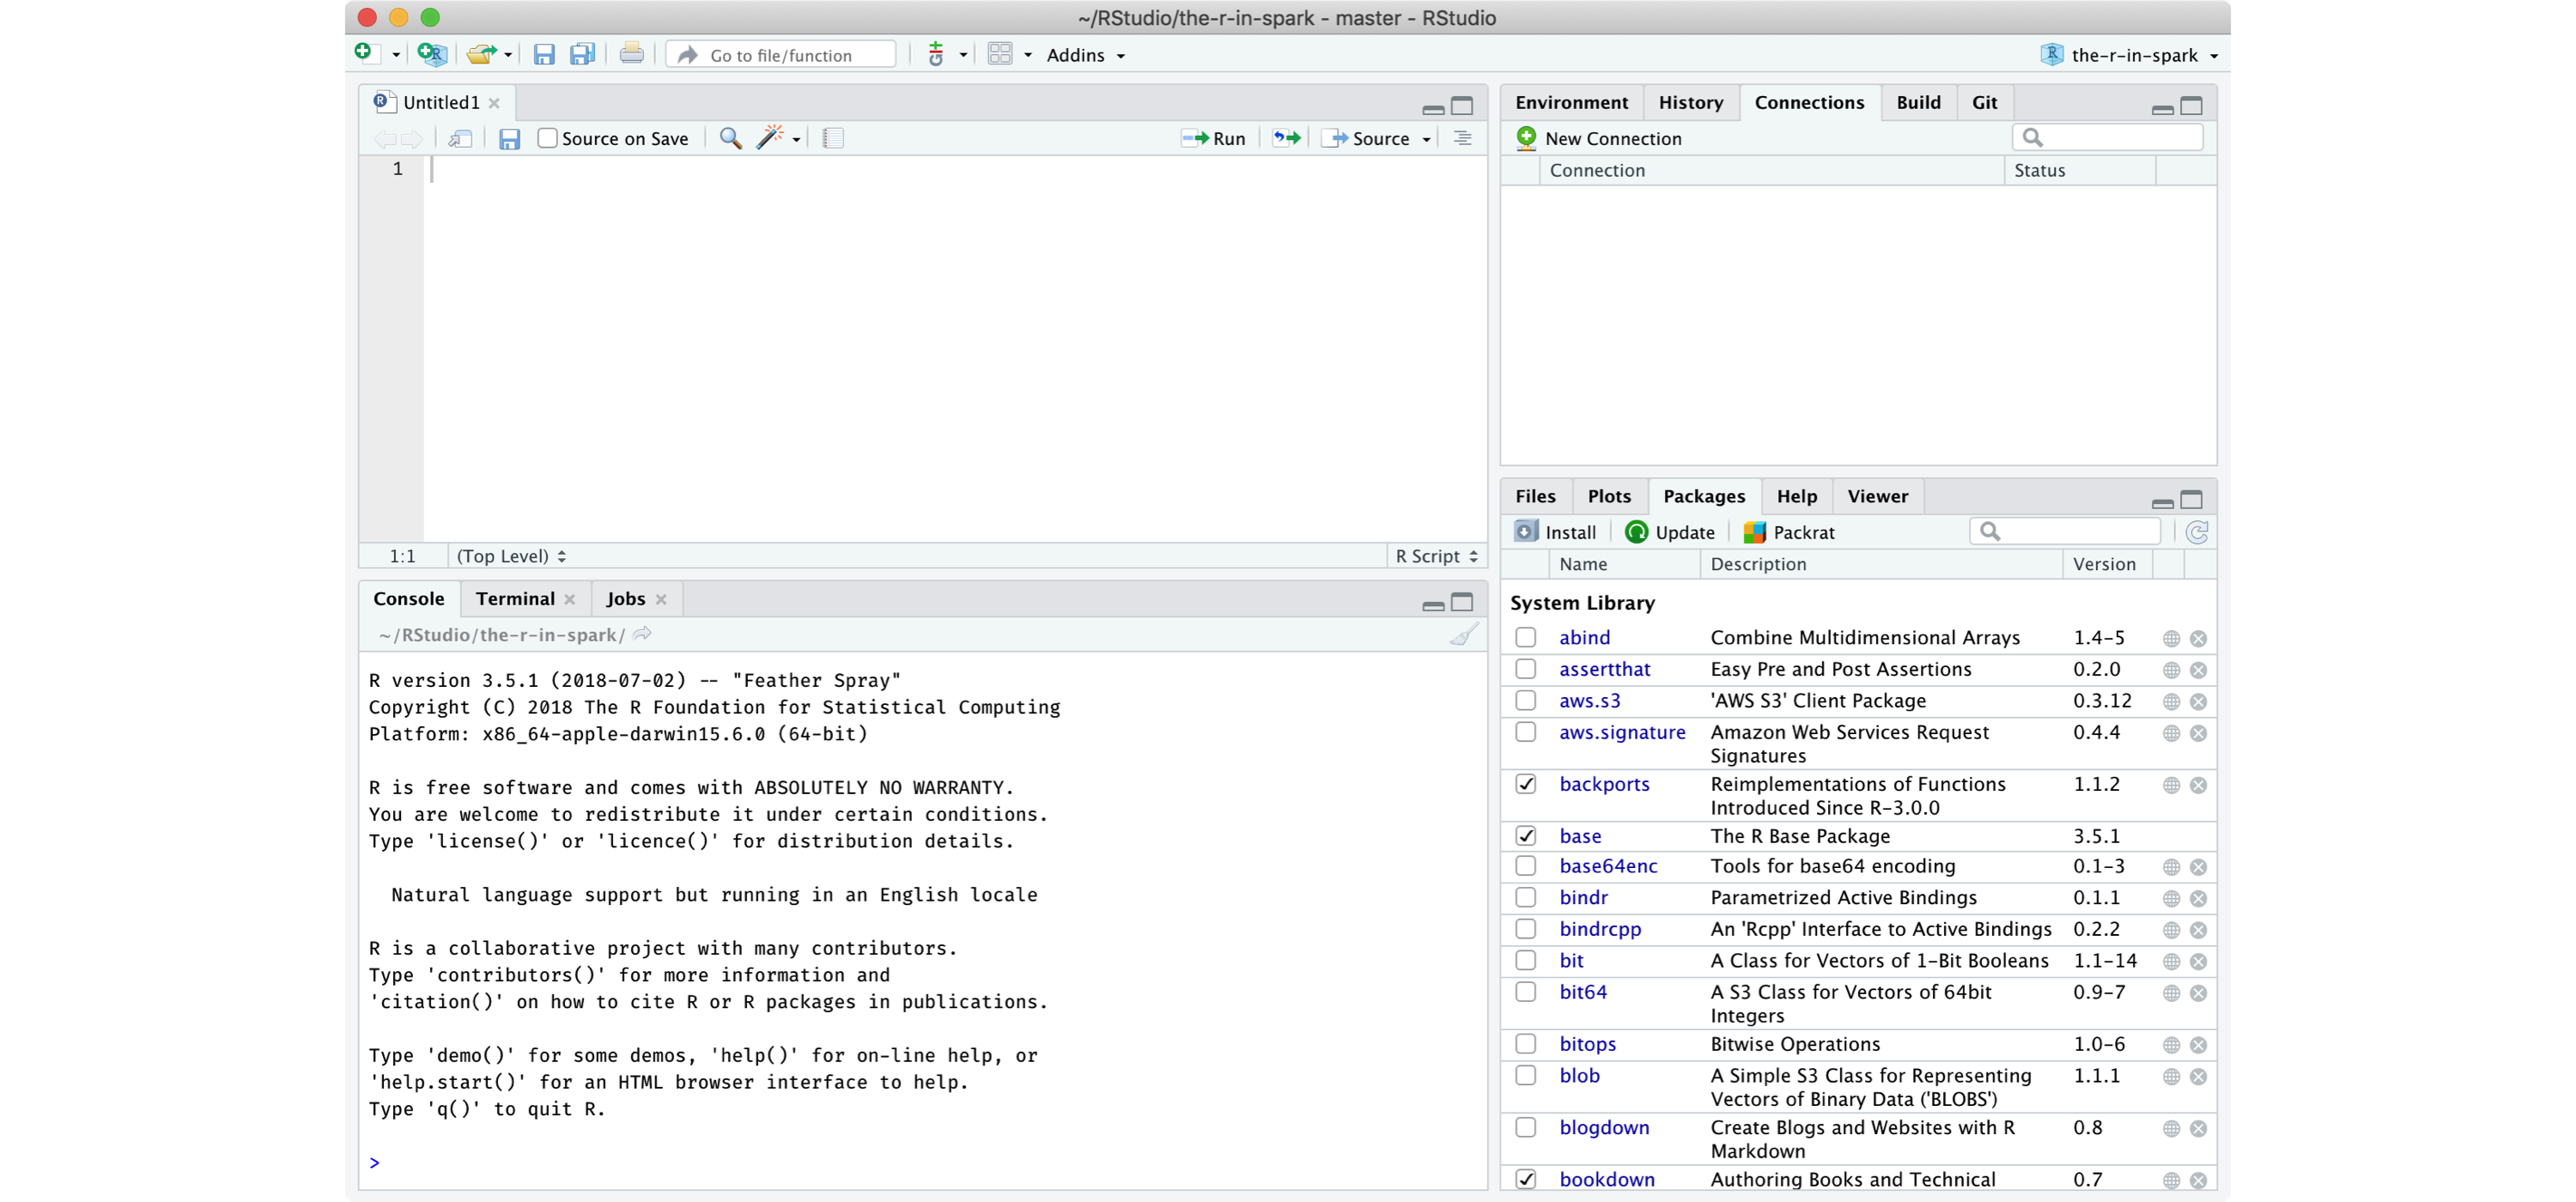
FIGURE 14.4: RStudio Overview

14.4 Analysis

14.4.1 Hive Functions

NameDescription
size(Map<K.V>)Returns the number of elements in the map type.
size(Array<T>)Returns the number of elements in the array type.
map_keys(Map<K.V>)Returns an unordered array containing the keys of the input map.
map_values(Map<K.V>)Returns an unordered array containing the values of the input map.
array_contains(Array<T>, value)Returns TRUE if the array contains value.
sort_array(Array<T>)Sorts the input array in ascending order according to the natural ordering of the array elements and returns it
binary(string or binary)Casts the parameter into a binary.
cast(expr as ‘type’)Converts the results of the expression expr to the given type.
from_unixtime(bigint unixtime[, string format])Converts the number of seconds from unix epoch (1970-01-01 00:00:00 UTC) to a string.
unix_timestamp()Gets current Unix timestamp in seconds.
unix_timestamp(string date)Converts time string in format yyyy-MM-dd HH:mm:ss to Unix timestamp (in seconds).
to_date(string timestamp)Returns the date part of a timestamp string.
year(string date)Returns the year part of a date.
quarter(date/timestamp/string)Returns the quarter of the year for a date.
month(string date)Returns the month part of a date or a timestamp string.
day(string date) dayofmonth(date)Returns the day part of a date or a timestamp string.
hour(string date)Returns the hour of the timestamp.
minute(string date)Returns the minute of the timestamp.
second(string date)Returns the second of the timestamp.
weekofyear(string date)Returns the week number of a timestamp string.
extract(field FROM source)Retrieve fields such as days or hours from source. Source must be a date, timestamp, interval or a string that can be converted into either a date or timestamp.
datediff(string enddate, string startdate)Returns the number of days from startdate to enddate.
date_add(date/timestamp/string startdate, tinyint/smallint/int days)Adds a number of days to startdate.
date_sub(date/timestamp/string startdate, tinyint/smallint/int days)Subtracts a number of days to startdate.
from_utc_timestamp({any primitive type} ts, string timezone)Converts a timestamp in UTC to a given timezone.
to_utc_timestamp({any primitive type} ts, string timezone)Converts a timestamp in a given timezone to UTC.
current_dateReturns the current date.
current_timestampReturns the current timestamp.
add_months(string start_date, int num_months, output_date_format)Returns the date that is num_months after start_date.
last_day(string date)Returns the last day of the month which the date belongs to.
next_day(string start_date, string day_of_week)Returns the first date which is later than start_date and named as day_of_week.
trunc(string date, string format)Returns date truncated to the unit specified by the format.
months_between(date1, date2)Returns number of months between dates date1 and date2.
date_format(date/timestamp/string ts, string fmt)Converts a date/timestamp/string to a value of string in the format specified by the date format fmt.
if(boolean testCondition, T valueTrue, T valueFalseOrNull)Returns valueTrue when testCondition is true, returns valueFalseOrNull otherwise.
isnull( a )Returns true if a is NULL and false otherwise.
isnotnull ( a )Returns true if a is not NULL and false otherwise.
nvl(T value, T default_value)Returns default value if value is null else returns value.
COALESCE(T v1, T v2, …)Returns the first v that is not NULL, or NULL if all v’s are NULL.
CASE a WHEN b THEN c [WHEN d THEN e]* [ELSE f] ENDWhen a = b, returns c; when a = d, returns e; else returns f.
nullif( a, b )Returns NULL if a=b; otherwise returns a.
assert_true(boolean condition)Throw an exception if ‘condition’ is not true, otherwise return null.
ascii(string str)Returns the numeric value of the first character of str.
base64(binary bin)Converts the argument from binary to a base 64 string.
character_length(string str)Returns the number of UTF-8 characters contained in str.
chr(bigintdouble A)
concat(stringbinary A, string
context_ngrams(array<array<string>>, array<string>, int K, int pf)Returns the top-k contextual N-grams from a set of tokenized sentences.
concat_ws(string SEP, string A, string B…)Like concat() above, but with custom separator SEP.
decode(binary bin, string charset)Decodes the first argument into a String using the provided character set (one of ‘US-ASCII’, ‘ISO-8859-1’, ‘UTF-8’, ‘UTF-16BE’, ‘UTF-16LE’, ‘UTF-16’). If either argument is null, the result will also be null.
elt(N int,str1 string,str2 string,str3 string,…)Return string at index number, elt(2,‘hello’,‘world’) returns ‘world’.
encode(string src, string charset)Encodes the first argument into a BINARY using the provided character set (one of ‘US-ASCII’, ‘ISO-8859-1’, ‘UTF-8’, ‘UTF-16BE’, ‘UTF-16LE’, ‘UTF-16’).
field(val T,val1 T,val2 T,val3 T,…)Returns the index of val in the val1,val2,val3,… list or 0 if not found.
find_in_set(string str, string strList)Returns the first occurance of str in strList where strList is a comma-delimited string.
format_number(number x, int d)Formats the number X to a format like '#,###,###.##', rounded to D decimal places, and returns the result as a string. If D is 0, the result has no decimal point or fractional part.
get_json_object(string json_string, string path)Extracts json object from a json string based on json path specified, and returns json string of the extracted json object.
in_file(string str, string filename)Returns true if the string str appears as an entire line in filename.
instr(string str, string substr)Returns the position of the first occurrence of substr in str.
length(string A)Returns the length of the string.
locate(string substr, string str[, int pos])Returns the position of the first occurrence of substr in str after position pos.
lower(string A) lcase(string A)Returns the string resulting from converting all characters of B to lower case.
lpad(string str, int len, string pad)Returns str, left-padded with pad to a length of len. If str is longer than len, the return value is shortened to len characters.
ltrim(string A)Returns the string resulting from trimming spaces from the beginning(left hand side) of A.
ngrams(array<array<string>>, int N, int K, int pf)Returns the top-k N-grams from a set of tokenized sentences, such as those returned by the sentences() UDAF.
octet_length(string str)Returns the number of octets required to hold the string str in UTF-8 encoding.
parse_url(string urlString, string partToExtract [, string keyToExtract])Returns the specified part from the URL. Valid values for partToExtract include HOST, PATH, QUERY, REF, PROTOCOL, AUTHORITY, FILE, and USERINFO.
printf(String format, Obj… args)Returns the input formatted according do printf-style format strings.
regexp_extract(string subject, string pattern, int index)Returns the string extracted using the pattern.
regexp_replace(string INITIAL_STRING, string PATTERN, string REPLACEMENT)Returns the string resulting from replacing all substrings in INITIAL_STRING that match the java regular expression syntax defined in PATTERN with instances of REPLACEMENT.
repeat(string str, int n)Repeats str n times.
replace(string A, string OLD, string NEW)Returns the string A with all non-overlapping occurrences of OLD replaced with NEW.
reverse(string A)Returns the reversed string.
rpad(string str, int len, string pad)Returns str, right-padded with pad to a length of len.
rtrim(string A)Returns the string resulting from trimming spaces from the end(right hand side) of A.
sentences(string str, string lang, string locale)Tokenizes a string of natural language text into words and sentences, where each sentence is broken at the appropriate sentence boundary and returned as an array of words.
space(int n)Returns a string of n spaces.
split(string str, string pat)Splits str around pat (pat is a regular expression).
str_to_map(text[, delimiter1, delimiter2])Splits text into key-value pairs using two delimiters. Delimiter1 separates text into K-V pairs, and Delimiter2 splits each K-V pair. Default delimiters are ‘,’ for delimiter1 and ‘:’ for delimiter2.
substr(stringbinary A, int start)
substring_index(string A, string delim, int count)Returns the substring from string A before count occurrences of the delimiter delim.
translate(stringchar
trim(string A)Returns the string resulting from trimming spaces from both ends of A.
unbase64(string str)Converts the argument from a base 64 string to BINARY.
upper(string A) ucase(string A)Returns the string resulting from converting all characters of A to upper case. For example, upper(‘fOoBaR’) results in ‘FOOBAR’.
initcap(string A)Returns string, with the first letter of each word in uppercase, all other letters in lowercase. Words are delimited by whitespace.
levenshtein(string A, string B)Returns the Levenshtein distance between two strings.
soundex(string A)Returns soundex code of the string.
mask(string str[, string upper[, string lower[, string number]]])Returns a masked version of str.
mask_first_n(string str[, int n])Returns a masked version of str with the first n values masked. mask_first_n(“1234-5678-8765-4321”, 4) results in nnnn-5678-8765-4321.
mask_last_n(string str[, int n])Returns a masked version of str with the last n values masked.
mask_show_first_n(string str[, int n])Returns a masked version of str, showing the first n characters unmasked.
mask_show_last_n(string str[, int n])Returns a masked version of str, showing the last n characters unmasked.
mask_hash(stringchar
java_method(class, method[, arg1[, arg2..]])Synonym for reflect.
reflect(class, method[, arg1[, arg2..]])Calls a Java method by matching the argument signature, using reflection.
hash(a1[, a2…])Returns a hash value of the arguments.
current_user()Returns current user name from the configured authenticator manager.
logged_in_user()Returns current user name from the session state.
current_database()Returns current database name.
md5(string/binary)Calculates an MD5 128-bit checksum for the string or binary.
sha1(string/binary)sha(string/binary)Calculates the SHA-1 digest for string or binary and returns the value as a hex string.
crc32(string/binary)Computes a cyclic redundancy check value for string or binary argument and returns bigint value.
sha2(string/binary, int)Calculates the SHA-2 family of hash functions (SHA-224, SHA-256, SHA-384, and SHA-512).
aes_encrypt(input string/binary, key string/binary)Encrypt input using AES.
aes_decrypt(input binary, key string/binary)Decrypt input using AES.
version()Returns the Hive version.
count(expr)Returns the total number of retrieved rows.
sum(col), sum(DISTINCT col)Returns the sum of the elements in the group or the sum of the distinct values of the column in the group.
avg(col), avg(DISTINCT col)Returns the average of the elements in the group or the average of the distinct values of the column in the group.
min(col)Returns the minimum of the column in the group.
max(col)Returns the maximum value of the column in the group.
variance(col), var_pop(col)Returns the variance of a numeric column in the group.
var_samp(col)Returns the unbiased sample variance of a numeric column in the group.
stddev_pop(col)Returns the standard deviation of a numeric column in the group.
stddev_samp(col)Returns the unbiased sample standard deviation of a numeric column in the group.
covar_pop(col1, col2)Returns the population covariance of a pair of numeric columns in the group.
covar_samp(col1, col2)Returns the sample covariance of a pair of a numeric columns in the group.
corr(col1, col2)Returns the Pearson coefficient of correlation of a pair of a numeric columns in the group.
percentile(BIGINT col, p)Returns the exact pth percentile of a column in the group (does not work with floating point types). p must be between 0 and 1.
percentile(BIGINT col, array(p1 [, p2]…))Returns the exact percentiles p1, p2, … of a column in the group. pi must be between 0 and 1.
percentile_approx(DOUBLE col, p [, B])Returns an approximate pth percentile of a numeric column (including floating point types) in the group. The B parameter controls approximation accuracy at the cost of memory. Higher values yield better approximations, and the default is 10,000. When the number of distinct values in col is smaller than B, this gives an exact percentile value.
percentile_approx(DOUBLE col, array(p1 [, p2]…) [, B])Same as above, but accepts and returns an array of percentile values instead of a single one.
regr_avgx(independent, dependent)Equivalent to avg(dependent).
regr_avgy(independent, dependent)Equivalent to avg(independent).
regr_count(independent, dependent)Returns the number of non-null pairs used to fit the linear regression line.
regr_intercept(independent, dependent)Returns the y-intercept of the linear regression line, i.e. the value of b in the equation dependent = a * independent + b.
regr_r2(independent, dependent)Returns the coefficient of determination for the regression.
regr_slope(independent, dependent)Returns the slope of the linear regression line, i.e. the value of a in the equation dependent = a * independent + b.
regr_sxx(independent, dependent)Equivalent to regr_count(independent, dependent) * var_pop(dependent).
regr_sxy(independent, dependent)Equivalent to regr_count(independent, dependent) * covar_pop(independent, dependent).
regr_syy(independent, dependent)Equivalent to regr_count(independent, dependent) * var_pop(independent).
histogram_numeric(col, b)Computes a histogram of a numeric column in the group using b non-uniformly spaced bins. The output is an array of size b of double-valued (x,y) coordinates that represent the bin centers and heights
collect_set(col)Returns a set of objects with duplicate elements eliminated.
collect_list(col)Returns a list of objects with duplicates.
ntile(INTEGER x)Divides an ordered partition into x groups called buckets and assigns a bucket number to each row in the partition. This allows easy calculation of tertiles, quartiles, deciles, percentiles and other common summary statistics.
explode(ARRAY<T> a)Explodes an array to multiple rows. Returns a row-set with a single column (col), one row for each element from the array.
explode(MAP<Tkey,Tvalue> m)Explodes a map to multiple rows. Returns a row-set with a two columns (key,value) , one row for each key-value pair from the input map.
posexplode(ARRAY<T> a)Explodes an array to multiple rows with additional positional column of int type (position of items in the original array, starting with 0). Returns a row-set with two columns (pos,val), one row for each element from the array.
inline(ARRAY<STRUCT<f1:T1,…,fn:Tn>> a)Explodes an array of structs to multiple rows. Returns a row-set with N columns (N = number of top level elements in the struct), one row per struct from the array.
stack(int r,T1 V1,…,Tn/r Vn)Breaks up n values V1,…,Vn into r rows. Each row will have n/r columns. r must be constant.
json_tuple(string jsonStr,string k1,…,string kn)Takes JSON string and a set of n keys, and returns a tuple of n values.
parse_url_tuple(string urlStr,string p1,…,string pn)Takes URL string and a set of n URL parts, and returns a tuple of n values.

14.5 Modeling

14.5.1 MLlib Functions

The following table exhibits the ML algorithms supported in sparklyr:

14.5.1.1 Classification

AlgorithmFunction
Decision Treesml_decision_tree_classifier()
Gradient-Boosted Treesml_gbt_classifier()
Linear Support Vector Machinesml_linear_svc()
Logistic Regressionml_logistic_regression()
Multilayer Perceptronml_multilayer_perceptron_classifier()
Naive-Bayesml_naive_bayes()
One vs Restml_one_vs_rest()
Random Forestsml_random_forest_classifier()

14.5.1.2 Regression

AlgorithmFunction
Accelerated Failure Time Survival Regressionml_aft_survival_regression()
Decision Treesml_decision_tree_regressor()
Generalized Linear Regressionml_generalized_linear_regression()
Gradient-Boosted Treesml_gbt_regressor()
Isotonic Regressionml_isotonic_regression()
Linear Regressionml_linear_regression()

14.5.1.3 Clustering

AlgorithmFunction
Bisecting K-Means Clusteringml_bisecting_kmeans()
Gaussian Mixture Clusteringml_gaussian_mixture()
K-Means Clusteringml_kmeans()
Latent Dirichlet Allocationml_lda()

14.5.1.4 Recommendation

AlgorithmFunction
Alternating Least Squares Factorizationml_als()

14.5.1.5 Frequent Pattern Mining

AlgorithmFunction
FPGrowthml_fpgrowth()

14.5.1.6 Feature Transformers

TransformerFunction
Binarizerft_binarizer()
Bucketizerft_bucketizer()
Chi-Squared Feature Selectorft_chisq_selector()
Vocabulary from Document Collectionsft_count_vectorizer()
Discrete Cosine Transformft_discrete_cosine_transform()
Transformation using dplyrft_dplyr_transformer()
Hadamard Productft_elementwise_product()
Feature Hasherft_feature_hasher()
Term Frequencies using Hashingexport(ft_hashing_tf)
Inverse Document Frequencyft_idf()
Imputation for Missing Valuesexport(ft_imputer)
Index to Stringft_index_to_string()
Feature Interaction Transformft_interaction()
Rescale to [-1, 1] Rangeft_max_abs_scaler()
Rescale to [min, max] Rangeft_min_max_scaler()
Locality Sensitive Hashingft_minhash_lsh()
Converts to n-gramsft_ngram()
Normalize using the given P-Normft_normalizer()
One-Hot Encodingft_one_hot_encoder()
Feature Expansion in Polynomial Spaceft_polynomial_expansion()
Maps to Binned Categorical Featuresft_quantile_discretizer()
SQL Transformationft_sql_transformer()
Standardizes Features using Corrected STDft_standard_scaler()
Filters out Stop Wordsft_stop_words_remover()
Map to Label Indicesft_string_indexer()
Splits by White Spacesft_tokenizer()
Combine Vectors to Row Vectorft_vector_assembler()
Indexing Categorical Featureft_vector_indexer()
Subarray of the Original Featureft_vector_slicer()
Transform Word into Codeft_word2vec()

14.6 Clusters

14.6.1 Google trends for mainframes, cloud computing and kubernetes

Data downloaded from https://bit.ly/2YnHkNI. library(dplyr) read.csv("data/clusters-trends.csv", skip = 2) %>% mutate(year = as.Date(paste(Month, "-01", sep = "))) %>% mutate(`On-Premise` = `mainframe...Worldwide.`, Cloud = `cloud.computing...Worldwide.`, Kubernetes = `kubernetes...Worldwide.`) %>% tidyr::gather(`On-Premise`, Cloud, Kubernetes, key = "trend", value = "popularity") %>% ggplot(aes(x=year, y=popularity, group=trend)) + geom_line(aes(linetype = trend, color = trend)) + scale_x_date(date_breaks = "2 year", date_labels = "%Y") + labs(title = "Cluster Computing Trends", subtitle = paste("Search popularity for on-premise (mainframe)", "cloud computing and kubernetes ")) + scale_color_grey(start = 0.6, end = 0.2) + geom_hline(yintercept = 0, size = 1, colour = "#333333") + theme(axis.title.x = element_blank())

14.7 Streaming

14.7.1 Stream Generator

The stream_generate_test() function creates a local test stream. This function works independently from a Spark connection. The following example will create five files in sub-folder called “source”. The files will be created one second apart from the previous file’s creation. library(sparklyr) stream_generate_test(iterations = 5, path = "source", interval = 1) After the function completes, all of the files should show up in the “source” folder. Notice that the file size vary. This is so that it simulates what a true stream would do. file.info(file.path("source", list.files("source")))[1] ## size ## source/stream_1.csv 44 ## source/stream_2.csv 121 ## source/stream_3.csv 540 ## source/stream_4.csv 2370 ## source/stream_5.csv 7236 The stream_generate_test() by default will create a single numeric variable data frame. readr::read_csv("source/stream_5.csv") ## # A tibble: 1,489 x 1 ## x ## <dbl> ## 1 630 ## 2 631 ## 3 632 ## 4 633 ## 5 634 ## 6 635 ## 7 636 ## 8 637 ## 9 638 ## 10 639 ## # ... with 1,479 more rows

14.7.2 Installing Kafka

This instructions were put together using information from the official Kafka site. Specifically from the Quickstart page, and at the time of writing this book. Newer versions of Kafka undoubtely will be available when reading this book. The idea is to “timestamp” the versions used in the example in the Streaming chapter.
  1. Download Kafka wget http://apache.claz.org/kafka/2.2.0/kafka_2.12-2.2.0.tgz
  2. Expand the tar file and enter the new folder tar -xzf kafka_2.12-2.2.0.tgz cd kafka_2.12-2.2.0
  3. Start the Zookeeper service that comes with Kafka bin/zookeeper-server-start.sh config/zookeeper.properties
  4. Start the Kafka service bin/kafka-server-start.sh config/server.properties
Make sure to always start Zookeper first, and then Kafka.

Chapter 15 References